Automated configuration verification... and a few words about development standards. Automated verification of configurations... and a few words about 1c development standards automated verification of configurations
29.09.2016
Checking the legality of using installed updates of standard program configurations of the 1C Enterprise 8 system.
Get access to the 1C:Fresh cloud for free for 30 days!Starting with platform version 1C:Enterprise 8.3.7, 1C programs have implemented a mechanism for checking the legality of using 1C application solutions, including 1C configuration updates.
After installing the next update to the standard configuration and the 1C:Enterprise platform, the program may display a message that there are problems with checking the legality of using the installed configuration update in the Update Protection Center.
The purpose of this mechanism is to timely inform the user about the actual use of certain versions or releases of the configuration for which he does not have rights, and the associated potential legal risks.
The check is performed for application solutions deployed in a file version or on a server in the MINI version. Eligibility checks are not performed for application solutions that use a base license. The verification procedure is carried out after completing the update of the 1C:Enterprise system configuration, and the program makes a request to the Update Protection Center (hereinafter referred to as the UOC).
Attention! At the moment there may be technical problems with the availability of the Update Protection Center website https://1cv8update.com
When checking the legality of the installed configuration update, information about the program and account data created when registering the software product and the information technology support agreement on the 1C:ITS Portal are used. If the configuration update was installed illegally, the program periodically generates a dialog containing information about the reasons for the illegal use of the application solution.

If the request is successfully completed, the central processing center returns the status of legality of use. If the central control center does not confirm the legality of using the installed configuration update, the 1C:Enterprise system begins to inform all users of the information base that this application solution is being used unlawfully, and the information received from the central control center is displayed.
Information about the results of the check can also be seen in the “About the program” dialog, which contains information about how the call to the central control center was completed:

In order for the 1C application solution to successfully pass the test at the central control center, the following conditions must be met:
- The program must be licensed.
- The software product must have a valid ITS subscription.
- The software product must be registered in the user's personal account on the 1C Portal
- Internet user support must be enabled in the configuration.
- Reason 1. An unlicensed (pirated, hacked, “warez”, “patched”, etc.) version of 1C software is used.
Solution: We can offer two options for solving the problem: purchase a licensed version of the 1C software product or switch to working in “1C in the cloud”.
Option 1: Purchase a licensed version of the 1C software product.
Please note that you must purchase the exact kit that includes the configuration you are using, i.e. if, for example, you use 1C: Trade Management, then it makes no sense to purchase 1C: Accounting, because This will not solve the problem of checking the legality of using the configuration.
If you are using a single-user version of the program in file mode, then it will be enough to purchase only the main package. If you use the network version on several computers in client-server mode, then you must also purchase additional client licenses and a license for the 1C:Enterprise server.Cost of 1C programs
Name Price
rub.A comment 1C: Accounting 8 PROF. Electronic delivery

The fastest licensing option!
Delivery time 3-4 hours from the moment of payment! *
Basic supply for 1 workplace
with software protection system.1C: Salaries and personnel management 8 PROF. Electronic delivery
The fastest licensing option!
Delivery time 3-4 hours from the moment of payment! *Basic supply for 1 workplace
with software protection system.
The cost of other software products of the 1C:Enterprise system, additional client and server licenses can be viewed in the price list.
If you urgently need to legalize 1C: Accounting or in your region 1C partners do not have this program available, then you can purchase “Electronic Delivery” from our company. Electronic delivery is a “boxless” version of the program, which is 100% licensed, functionally no different from the usual “box”. After payment, in your 1C Portal personal account, you will be able to download program installation distributions, activation codes and documentation in electronic form (in pdf format). If you need the help of our specialists when installing the program, they will help you remotely via the Internet.Option 2: Go to work in "1C in the cloud".
In this case, you upload your database with all accumulated credentials to the 1C Fresh cloud server (https://1cfresh.com/).
You do not need to purchase the 1C program and install the program on your computers. Work in the program is carried out via the Internet using a regular browser or the 1C Thin Client, which can be legally downloaded from the official 1C website completely free of charge.
Access to the 1C cloud server is provided on a rental basis under the SaaS (Software as a Service) business model. The cost of access to the cloud version of 1C is 500-600 rubles per month per user. The exact cost will depend on the number of users, the number of databases used, the chosen tariff and payment method.The cost of renting 1C programsin the cloud using the SaaS model
Name Rate
"PROF" **Rate
"TECHNO"Ownership cost per user per month
when concluding a contract for 12 months.495 rub./month.
525 rub./month.
The exact cost depends on the terms of payment *: - Payment monthly
- Prepayment 3 months
- Prepayment for 6 months
- Prepayment for 12 months
2970 rub.
8031 rub.
15498 rub.
RUB 29,664
1200 rub.
3498 rub.
6546 rub.
12528 rub.Number of concurrent users 5 users. 2 users. Available applications from the list: - 1C: Accounting 8
- 1C: Salaries and personnel management 8
- 1C: Management of a small company 8
- 1C: Accounting of a government agency 8
- 1C: Salaries and personnel of government institutions 8
- 1C: Entrepreneur reporting 8
- 1C-Kamin: Salary
All One from the list to choose from Number of information bases No limits One working database
+ one test/archive/demo*The indicated price is valid subject to the continuity of the contract.
** The cost of connection under the PROF tariff, in addition to access for 5 users to an unlimited number of databases, includes a number of additional services: 1C-Reporting; regulatory framework "1C: Garant"; full access to the 1C:ITS information system; consultations and answers from auditors and experts to user questions on accounting, taxation and personnel issues (in your personal account on the 1C:ITS website); access to updates for boxed versions of the 1C:Enterprise platform and standard 1C configurations, etc. More details.The first 30 days of access are free!
So that you can evaluate the availability, stability, speed and ease of use, we can provide free access to the 1C:Fresh cloud service for 30 days.Information materials:
-
- Instructions for downloading a database from a local computer to the 1C:Fresh cloud service
- Instructions for installing and configuring a 1C thin client for working with the 1C:Fresh cloud service
- Application form for connecting to the 1C:Fresh cloud service
- Application form for self-registration in the 1C:Fresh cloud service - Reason 2. There is no valid agreement for information technology support (ITS).
Solution: conclude an agreement for information technology support. If you urgently need to sign up for an ITS subscription, you can sign up for it in our company even if you are in another region of the Russian Federation and purchased the 1C program itself elsewhere. The only condition is that the program must be licensed.ITS subscription cost
Please note the following points:
- There are two ITS subscription options: ITS Techno and ITS PROF, which differ in information content. ITS Techno includes a minimal support option (access to the 1C technical support site for downloading updates yourself). ITS Prof, in addition to access to updates, includes a number of additional services and services, for example, 1C: Reporting, 1C: Counterparty, 1C: Fresh, 1C: Cloud Archive, legal framework "GARANT" and many others. For a more detailed comparison of ITS Techno and PROF, see.
- The cost of an ITS subscription depends on the contract period. The minimum option is a one-time subscription for 1 month, but given the need to regularly update accounting programs for 1C: Accounting, we recommend subscribing for a longer period.
- The subscription cost for continuous renewal of an ITS subscription is less than for its renewal.
Name Price at
continuous
extension
rub.Price at
resumption
agreement
rub.ITS PROF one-time subscription for 1 month 4818 ITS Techno for 6 months 7854 ITS Techno for 12 months 15036 ITS PROF for 3 months 9636 ITS PROF for 6 months 18600 ITS PROF for 12 months 35592 - Reason 3. The software product is not registered in the user’s personal account on the 1C portal.
Solution: register the software product.
Instructions for registering software products in the personal account of the 1C:ITS Portal (portal.1c.ru)
If the user has not previously registered on the portal, then before registering a software product in his personal account, the user first needs to register independently on the portal and receive a login and password to access his personal account.
Instructions for registering users on the 1C:ITS Portal (portal.1c.ru)
- Reason 4. Internet user support is not configured in the 1C program.
Solution: set up Internet support.
Instructions for connecting Internet support in typical 1C:Enterprise 8 configurations
Technical problems
If you are using a licensed version of the program, the software product is registered in your personal account on the 1C portal, you have a valid ITS subscription and Internet support is configured correctly, but the program still displays the messages “The licensing center is unavailable”, “Configuration registration in the licensing center has not been completed”, “The remote node did not pass the test”, etc., then technical problems are possible:
1. The central control center server https://1cv8update.com is unavailable
In this case, it is necessary to check the functionality of the server and its availability for blocking by antiviruses, firewalls, firewalls or proxy server security settings.
2. The security certificate on the website https://1cv8update.com has been updated, and you are using the old 1C:Enterprise platform (or the compatibility mode is set) below version 8.3.8. In this case, you need to update the platform version, configure the compatibility mode, or manually register the security certificate in the cacert.pem file in the bin directory.
3. Perhaps the Update Protection Center server is simply overloaded, try repeating the scanning procedure several times by clicking on the “Repeat now” button or perform the scan later.
Clarifications on the terms of distribution of 1C Enterprise program updates
When selling 1C software products, non-exclusive (limited) rights to use the programs are transferred from the Copyright Holder (1C Company) to the Licensee (user) in accordance with the terms of the “License Agreement” included in the delivery of the Software Product. At the same time, the Licensee undertakes to strictly adhere to and not violate the rules of licensed use of software products, and violation of the terms of the “License Agreement” is considered a violation of copyright and is prosecuted by law.

According to the “License Agreement,” the cost of “1C” software products currently includes information technology support (ITS) for 3 months, which includes monthly receipt of ITS DVDs; receiving updates to programs, configurations and reporting forms; advice line services; access to the 1C technical support site (from 01/01/2016 you can purchase a “diskless” version of the ITS).
After the expiration of the free support period, servicing of 1C Company programs will be carried out only under an ITS agreement on a paid basis.
In addition, when installing an update, the user confirms his agreement with the terms of distribution and use of updates and accepts responsibility for violations of the terms of use, otherwise the user must refuse to install the update.

Thus, not only the programs themselves, but also UPDATES to programs produced by the 1C company are objects of the exclusive right of the 1C company and are distributed according to the rules established by the 1C company as the copyright holder in accordance with Art. 1225 of the Civil Code, and unauthorized SPREADING And USAGE updates are considered as copyright infringement and are punishable by law:
- Art. 1301 of the Civil Code of the Russian Federation,
- Art. 7.12 of the Code of the Russian Federation on Administrative Offenses of the Russian Federation,
- Art. 146 of the Criminal Code of the Russian Federation.
Updates and information resources must be obtained by the user through legal distribution channels:
- Information technology support disks
- 1C company websites: www.1c.ru, v8.1c.ru, online.1c.ru, its.1c.ru, portal.1c.ru, releases.1c.ru, users.v8.1c.ru
- offices of partners of the company "1C"
Updates received from other sources are ILLEGAL:
- texted from a friend
- the update was installed by “student Vasya” (source unknown)
- downloaded from a site that is not the official 1C site
- bought at a stall
- etc.
Finding out the eligibility for using an update is very simple: the 1C company receives information about all legal ITS subscribers with the registration numbers of installed 1C software products and the subscription period, each update has a unique number and the release date, date and time of installation of the update on the user’s computer are known is fixed in the program itself, i.e. in case of verification, the user must have a subscription to ITS at the time of release and installation of updates.
|
Checking the presence of an ITS subscription In order to avoid claims from law enforcement agencies and clarify the legality of using updates and information resources, we recommend that users check the availability of an ITS subscription for their software product on the 1C company website:
Do not require a subscription to ITS:
|
Tags: Checking the legality of receiving 1c configuration updates, checking the legality of the 1c 8.3 update, checking the legality of the 1c update, 1c download updates, its, 1c its, its disk, checking the legality of 1c 8.3 7, users.1c.ru, its.1c.ru, support 1s 8
The implementation of 1C 8 provides a large number of advantages, but effective operation is only possible if the system is of high quality, both functional and technological.
Functional and technological quality of the system - features and differences The functional quality of an information system is the ability of a certain configuration to solve the company’s business problems, and the technological quality is high performance, absence of failures and stable operation. Quality performance management varies significantly:- the technological quality of the system is checked during the specific implementation of the system. 1C licensed program implemented on the platform 1C:Enterprise 8, must ensure stable operation of several users on certain equipment. It does not matter what capabilities are built into the system;
- functional quality is verified for a specific configuration and its capabilities. The quality of a system is determined by its ability to perform specified tasks, regardless of the conditions of use.
- the 1C licensed program solves all business problems;
- in response to any correct user action, the system behaves adequately and predictably.
Thus, functional quality consists of two directions - subject and technical. A substantive assessment of a system can only be carried out by a professional in a specific field, while a technical assessment can be assessed regardless of the tasks.
Why is high functional quality of the system necessary? Developing a system for implementation requires serious consideration for several reasons. A high-quality system ensures easier implementation of 1C 8, which ultimately saves the company time and money. In addition, supporting a high-quality 1C system is much simpler and requires less attention from specialists.When developing new solutions based on a ready-made system, all processes proceed much faster and easier, and its operation eliminates operational failures.
How to determine functional quality? The absence of errors in the program code does not mean that the functional quality of the system is at a certain level.The overall quality of a configuration can be determined by a number of factors, such as:
- Availability of up-to-date and detailed reference information. By pressing “F1” the user must receive help for each configuration object;
- presence of hints. Brief tooltips on each form control should explain the meaning of those forms;
- the dimensions of screen forms should ensure comfortable work and not exceed standard values;
- the text of system messages and warnings should be concise and understandable, without spelling and grammatical errors;
- before performing any irreversible action, the system must issue a warning with information about the operation and its consequences;
- The program code must have up-to-date and comprehensive comments.
- defining the basic standards that are needed for the configuration;
- checking the current version for compliance with established standards;
- if inconsistencies are detected, notify specialists of the errors found; accumulation of statistical information about errors.
- even a small system requires a lot of time to check, and a complex configuration that includes hundreds of objects makes manual checking simply impossible;
- The person checking the configuration must be highly qualified and have an understanding of the standards. Even if the company has such a specialist, spending his time on routine operations is not the most rational decision.
- check 1C: Enterprise 8 configurations for compliance with development methods. In addition, the program registry can be supplemented with special verification rules that are necessary for a particular case;
- collection of information about found system errors and automatic distribution by severity level;
- distribution of errors among developers responsible for fixing them.
- control over the functional quality of configurations, both mass-produced and individual, developed for a specific organization;
- 1C support includes periodic modifications and changes to standard and industry-specific programs, and the 1C solution: Automated configuration verification allows you to check the quality of these modifications;
- assessment of the quality of the configuration offered to the enterprise. In the process of preparing for implementation, the program allows you to determine not only the technological quality of the configuration, but also the competence of its developers.
Thus, with the help of a convenient 1C program, any company will be able to ensure the implementation of a high-quality system and flawless operation of the configuration.
Sometimes troubles happen in 1C databases - a 1C report that previously worked does not run, a document is not processed due to an incomprehensible error, it is impossible to enter the program... One of the main means of correcting 1C errors is testing and correcting the 1C 8.3 database using the utility built into the platform.
I would like to note that in case of any incorrect operation of 1C Enterprise 8.3, the main methods for restoring the functionality of the program are:
- Clearing cache 1C Enterprise;
- Testing and fixing the 1C 8.3 database.
The method for deleting the 1C cache is described in detail in the article. Let's consider the second service tool for administering the 1C platform.
Testing and fixing the 1C 8.3 database using the built-in utility
To start this operation, you do not need to have any special knowledge, so any user can handle this without contacting 1C specialists. To start testing and correction, you need to log into the 1c configurator and select “Administration” - “Testing and correction...”
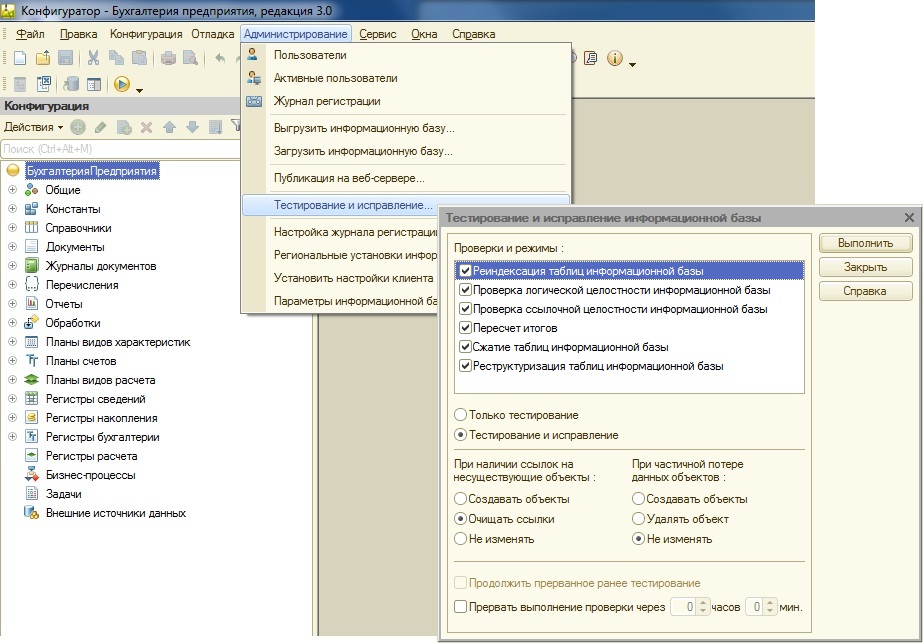
Description of the utility “Testing and correcting the 1c information base”
The form that opens contains a number of items that allow you to correct errors. To use this tool professionally, you need to understand the purpose and operating logic of each item, so let’s look at them in more detail:
Reindexing infobase tables.
To quickly search for information, auxiliary tables are added to the main tables with the main data, in which the data is sorted according to the specified fields of the main table - the indexing table. By using indexing tables, the performance of 1C increases significantly, since there is no need to iterate through the entire main data table for sampling; you can use the index file and select the necessary records from there.
When data is written to the main data tables, the index tables are also filled. But for various technical reasons, indexes can get confused, which can ultimately lead to errors. To correct this class of errors when testing and correcting the 1C 8.3 database, you must check the box next to this menu item.
Checking the logical integrity of the information base
At the moment of creating new objects in the 1C configuration, new tables are created in the database, which indicate connections with other tables in the database. For various reasons, connections may become incorrect (for example, due to an incorrect update or an unexpected power outage at the time of recording). To correct this type of error, select this menu item.
Checking the referential integrity of the infobase
To identify and correct these errors, select this menu item, and the options for processing such errors will be activated below (see the figure above). We can choose how to correct errors when when there are references to non-existent objects: create objects, clear links , do not change ; And in case of partial data loss: create objects, delete object , do not change .
Recalculation of results
To perform quick data selections in the 1C database, there are tables with already calculated data every month. When we access this data, it is not collected from the main tables (this would take a lot of time), but is issued immediately from the data in the summary tables. Accordingly, for this mechanism to work, it is necessary to have correct results for past periods. Therefore, if 1C “deceives” in reports, then such an error is corrected with this menu item.
Compressing infobase tables
Deleting objects in a database is a rather painstaking and time-consuming operation, therefore in 1C configurations the deletion process is divided into 2 stages. When you delete objects in the configuration, the data in the 1c database is nulled and because of this it does not participate in further operations, although it physically remains in place. To clear the tables of these records, they test and correct the 1C 8.3 database with the menu item “Compress infobase tables”.
Restructuring infobase tables
When changing the details of any 1c metadata object, the database needs to add new records to all tables of the changed object. This is done through restructuring the database tables. During the restructuring process, copies of database tables are created with the structure of the current configuration, after which data is transferred to the created tables. If you add an attribute in the 1c metadata, an empty column will be created for it in the new table; if an attribute is deleted, a column for this attribute will not be created in the new table, and, accordingly, it will not be transferred.
During the restructuring process, all database tables will be recreated, so this operation is the longest.
Testing and fixing the 1C 8.3 database in practice
After receiving comprehensive information, I think that you can easily figure out which utility items you need to select to fix any problems.
Testing and fixing the 1C 8.3 database can be done in two modes:
- Testing. In this mode, the database is tested and technical corrections of minor errors are made.
- Testing and fixing. In this mode, the 1C database is tested and tries to correct all detected errors (see figure above).
To perform testing and correction of the 1C 8.3 database, you need to click the “Run” button, after which you can monitor the progress of testing and correction in the information window at the bottom of the configurator. 
Indeed, the complexity of 1C configurations is increasing every year, teams are growing, products are being released containing more than 5,000,000 lines of code. Without ordering code flows, it becomes difficult to work. And we are not just talking about maintaining a minimum order - prefixing new objects, comment conventions, or scattering objects across subsystems. As teams grow and configurations become more complex, the need to adhere to standards in a broader sense becomes clear.
And in order not to remain shoemakers without boots, it is good to have suitable tools for these purposes. Conferences and webinars, including those listed above, offer interesting tools. At the same time, a rather little-known configuration from 1C itself also deserves attention. As you already understood from the title of the publication, this product is called “Automated configuration verification”. It is free, available to every user (formally, access to ITS is required to use it), quite easy to use, but not very widespread yet.
This is partly due to the fact that 1C itself actively promotes the idea of compliance with standards and the use of tools suitable for this only among developers of circulation solutions through the “1C: Compatible” certification. The influence of the idea of compliance with standards and purity of code in relation to the broad masses of developers who are not involved in production solutions is felt much weaker. Even familiarization with basic development standards is conditionally locked - having access to ITS (information is outdated, currently, for 2018-2019, access is open without registration) :
Basic information about the agro-industrial complex
The APK configuration is designed to automatically search for errors and deviations from standards in configurations. Its use has been recommended by 1C since 2009, not only in companies that develop circulation solutions, but also for other companies that refine and adapt standard solutions:
The first impression of the configuration can be given by the page on the 1C website:
It describes the main capabilities of this tool and says that it helps:
Follow standard development standards and perform platform configuration checks
create and follow your own configuration verification rules
Comply with the standards required to obtain 1C: Compatible status
perform scheduled checks
check spelling errors
assign various statuses to identified configuration errors, including marking them as “features” that do not require correction
slightly facilitate the verification process yourself by performing some actions such as updating the demo database configuration from the repository, the possibility of step-by-step verification, etc.
even the possibility of integration with DSS is mentioned
Another source of general information can be a publication in the online magazine PCMagazine:
Apart from these review materials, there is almost no information on the network on the APC and its application. The good news is that the configuration itself includes a user manual in PDF format. Some issues are not covered in the manual as thoroughly as we would like. But still, there is a manual and it allows you to learn how to perform basic techniques when working with the configuration.
In order not to repeat the user manual, here we will consider an example of using the APK to check a standard configuration, and not the demo configuration from the APK delivery. We will also try to look at the details of the work that are not mentioned in the manual.
Let's start from scratch. You can download the latest version of the APK from the following link:
At the time of publication of this article, the latest release is 1.1.12.26 dated 01/30/17, but it was first written for version 1.1.11.16, so some of the screenshots and comments will refer to this version. To work with APK 1.1, you will need a platform version of at least 8.3.6. After installing the configuration delivery, three new items appear in the list of configuration templates:
The first template is a pure APK base. All standard rules are present in it, but there is no loaded data about the demo database for testing, which is present in the second template.
The second template “Automated configuration check (demo)” after deployment contains loaded information about the demo database (located in the third template). You can use it to see how reports and standard checks work. It is best to study working with this database armed with the user manual from the package, since the examples in the manual are designed specifically for this demo database:

The APK works in such a way that when new checks are performed, it loads information from the configuration being checked via a COM connection. To do this, she needs an existing file “experimental” database. Therefore, if there is a desire not only to familiarize yourself with the interface of the demo database, but to carry out a full cycle of working with the database being tested, then it makes sense to also deploy another file database from the third template “Demo configuration for testing”.
In this case, we will get two databases - one demo APK with already loaded information about the Demo database being checked and the Demo database being checked itself, which allows you to quickly become familiar with the process of connecting and conducting new checks.
I note that after experiments with demo databases, a clean APK database does not need to be deployed. Checks of working configurations can be performed on the same configuration as checks of the demo database. You can download information about any number of databases being checked into the APK.
In general, the principle of operation of the APK is similar to the work of “Data Conversion”. No work required in the APK configurator (although, as will become clear later, it is unlikely to be possible to do without it completely). Information about the structure of the configurations being checked is loaded in user mode. It also specifies configuration check algorithms in the form of code in the 1C:Enterprise language, which is then executed by the system itself using the operator “ Execute" In the code, you can and should use methods built into the agro-industrial complex (non-platform) - procedures and functions that work with automatically created objects. Objects necessary for performing configuration checks are created by the system itself and become available in the code of check handlers. A detailed description of these methods, objects and handlers can be obtained from Chapter 6 of the User's Guide.
The configuration of the agro-industrial complex is almost entirely built on directories, information registers and processing. In general, if you are familiar with “Data Conversion”, then the principles of working with the APK will be clear. Moreover, if there is no obvious need for your own check algorithms, then at first you can limit yourself to standard checks and not study the built-in methods and software objects of the system. Then almost all the settings can be done with the mouse and it seems that for many tasks this will be enough.
Configuring connection to the database being checked and default checks
After launching the demo database, we are presented with the following interface:

The purpose of the sections from the point of view of APK developers can be read in the manual. We will go in order and first add a new configuration. Click on the “New configuration” button. The system will prompt you to fill in the connection parameters. In fact, the form of the directory item “Configurations” opens:

Name and full name are arbitrary text fields, only the sense of beauty and the length of the field can limit you in what will be indicated in them. But then the restrictions are more stringent. You need to specify the full path to the 1C platform executable file. In earlier versions of the APK, you additionally need to indicate the version of the platform with which you are working. Let me remind you that APK can only check configurations on platform version 8.3.6 and higher.
Information from the developers:
If the path to the platform is specified below, an error will be thrown during the COM connection.The reason is this. Due to the development of the platform and new APK checks, information (metadata properties) that appeared only in platform 8.3.6 or higher is collected. Thus, when checking on a version, for example, 8.2, an error will naturally be thrown when collecting such information. And since these new checks, as a rule, are priority, a ban is set on running a check lower than 8.3.6. In the opposite case (if the client has a lower fundamental version of the platform), then it is assumed that he can use previous versions of the APK to check his configuration.
Next, you need to specify the path to the demo database and connection parameters to it. Under demo base in this case, it is understood as nothing more than a specially allocated file database that contains the configuration being checked. There are no options for connecting an SQL database to the APK. This can be improved if desired, but there is not much point in this. First, the configuration is simply checked, not unit testing or load testing. In this case, even for large configurations like ERP 2, just an empty file database containing the current configuration is sufficient. Secondly, in accordance with 1C standards, any configuration must be designed to work not only with an SQL database, but also to work in a file version.
If you are developing using a repository, then the APC can automatically update the database configuration from the repository before performing new testing. The lower group of parameters in the screenshot is intended for this.
I also note that the DSS, like the APK, requires a file database to load configuration information. Therefore, if you decide to develop using the technologies offered by 1C, using APK and DSS, then for both of these systems it will be enough to create one file database, if necessary, connecting it to the configuration storage and setting up automatic updating of the configuration from the storage before loading the data.
The choice between the “Configuration” and “Library” modes determines the severity of the checks. For the “Library” mode, the checks are stricter. A library is a configuration built into others, which means it must satisfy certain rules and “think not only about itself.” If you hover your cursor over both switch options, a tooltip will appear describing the differences in the check. In particular, all selected requirements will be checked for the library. The configuration does not check requirements from the "Develop and use libraries" group, regardless of whether they are selected or not. This group of requirements contains very long-term validation rules that are really only intended for libraries.
An important point for version 1.1.11.16 and earlier versions of the APK (this error has been fixed in version 1.1.12.26). After the settings have been set and the “Configurations” directory item has been written down, you can check the connection. But for the first time, the system may display an error about no connection.

This is a misleading message. If the paths and users are set correctly, you just need to first record the element of this directory and only then check the connection. Then the system will report a successful connection. Checking the connection to a large database, for example ERP, can take up to 1-2 minutes:

In fact, we have now created a new directory element "Configurations". Now you can open it in different ways:
- Through the menu “Settings” -> “Configurations”

- In the “Checks” section, click “Select configuration”

- Or simply open the “Configurations” directory through the “Operations” menu

Let's return to the configuration settings window.
On the second tab “Checked Requirements” we can configure what checks we want to perform on our configuration. Two predefined options are available: “Full check” - check for compliance with the system of standards https://its.1c.ru/db/v8std and spelling control, as well as “1C: Compatible” - checking for compliance with 1C: Compatible standards http://1c.ru/rus/products/1c/predpr/compat/soft/requirements.htm

You can also set up an arbitrary set of requirements to be checked, then enter an arbitrary representation of the option into the “Validation option” field and save it under this name using the “Save option” button. Options are saved in relation to configurations, that is, the same setting cannot be automatically applied to other elements of the Configurations directory:

I will make a note for those who plan to use the APK for several configurations and do not want to configure checks for each of them separately. You can transfer check settings between configurations by writing a simple script, if you know that they are stored in the “Configuration Requirements” information register, and the check options themselves are stored in the directory of the same name:

The list of checks is quite extensive. Each requirement is a development standard, adhering to which we can make our products better. But the ability to disable individual requirements or groups of them is also not superfluous. For example, in most enterprises you can limit yourself to the “Full check” option (spelling + system of standards) and not check for “1C: Compatible”. Or at least control spelling, since there is no such thing that development has been carried out for years without a single spelling error.
The list of requirements selected here is the default list for automatically performed checks. If you run the test step by step, you may be able to override the values specified here.
Information from the developers:
It makes sense to tell in more detail what the “System of Standards” group is and how it differs from the other two groups. So, let's start with the "1C: Compatible" group. As previously written, this is a mandatory set of standards to obtain a certain status for your configuration. Roughly speaking, this is the backbone that all configurations without exception must comply with. By the way, this group of standards does not check the configuration for spelling errors...
Next, “Spelling” is a group of standards that checks the configuration only for spelling errors. Every self-respecting developer can check his configuration for spelling. This group contains all the checking rules that track spelling in module texts, metadata (name, synonym, comment), form elements, layouts, in general, everywhere where you can check text. Out of the box, only Russian text is checked, but as correctly noted in the comments, for other languages you can upload your own dictionaries and even replace the one included in the configuration with them.
And now about the “System of Standards” group. It is the most global and contains checks of the other two predefined groups of requirements, as well as additional specialized checks. For clients, errors in this group are rather recommendations, although for typical configurations most errors, of course, must be corrected. That. if any standard is described in the “1C: Compatible” or “Spelling” group, it will no doubt also be described in the “System of Standards” group, however, perhaps in more detail and with deeper checks.
On the "Exclusions from scanning" tab, various filtering is configured. For example, you can configure checks so that only objects you added to the standard configuration with a certain prefix like “ mf_ Super Customs Declaration.”
Or, if you are developing with the addition of all changed or added objects to a specific development subsystem, then it makes sense to perform the check only within this subsystem, and bypass immutable objects of a standard configuration that are “locked”. If you need to temporarily exclude any configured filter during checks, you do not need to delete it. It is enough to remove the use flag (second column):

The filtering function is very useful and it makes sense to experiment with it, which we will do next. I’ll say right away that enabling checks like “Enable subsystem” and “Enable with prefix” work using “OR”. That is, an object will be included in the check if it satisfies one or another condition. This is not always convenient. Fortunately, changing this behavior is very easy. This issue will be discussed in more detail in the section on filtering, as well as the issue of the influence of filters on the time of inspections
In APK version 1.1.11.16 and earlier versions, the filtering settings were divided into two tabs - “Requirements collection filters” and “Data collection exceptions”, but the meaning was the same:

You can also specify the need for scheduled checks in the settings form:

This is the setting not for work through a routine task. To run a scheduled scan, the APK must be launched in user mode and running. When the system starts, the method is called in a regular application module AtSystemStart() where the wait handler is connected Run Scheduled Check(), which performs the scheduled check. If you want to run a routine check, the system will have to be modified. If you look into the APK configuration, you can see that it has only two routine tasks and both of them are not related to scheduled checks:

Information from the developers:
The explanation is very simple. If the APK is deployed in the SQL version, then when specifying the path to the configuration (more precisely, the demo database) on the client, the check simply will not start, because a routine task always runs on the server. In the file version of the APK, of course, a routine task would be more suitable, rather than a wait handler.
The schedule is not the last of the possible tabs. If you enable integration with the “Application Solution Design System” in the system, then another tab “Integration with DSS” will appear, which allows you to configure the automatic registration of errors in the DSS. Setting up integration at the system level is performed in the form of constants (“Operations” - “Constants”).
The functionality of integration with DSS was intended by the developers of the agro-industrial complex for internal use in the 1C company (this is described in the User's Guide, p. 28). However, I am sure that for those companies that already use DSS in their work or plan to use it, this functionality will be interesting. You can take it as a model to implement your own integration mechanism, or you can figure it out and use it out of the box:


In this case, it is possible to connect the APK to the web service raised on the DSS side, and vice versa, you can configure the connection to the web service raised on the APK side in the DSS:


Carrying out inspections
After the connection settings have been made and the tests to be performed have been selected, you can proceed to performing tests.
To conduct a new scan, you must first make the configuration being checked current. All new checks are performed on the “current configuration”. To do this, in the “Checks” section, you must click “Select configuration” and then select a configuration directory element that will be designated “current”.
When you click on the “New check” button, the system will offer two options - to carry out the check again by connecting to the configuration being checked, collecting data again, or to check previously collected data.

The ability to run checks on previously collected data allows you to perform lengthy checks step by step. For example, you can first collect configuration data and perform a filtering test based on subsystems. Then turn on filters for other subsystems and do the second check using previously collected data, which will allow you to complete it much faster.
Information from the developers:
Here it must also be said that now the composition of the collected data directly depends on the selected requirements. For example, one requirement “Spelling in module texts” is selected. If you open the request card itself and go to the “Verification Stages” tab, you can see that only 1 checkbox “Fill in information about modules” is selected:

This means that when checking the configuration for spelling in module texts, only the module texts will be collected (neither the properties of metadata objects, nor form elements, nor layouts will be collected - all types of information collection can be identified by the remaining checkboxes).
This functionality of depending the collected information on the selected requirements appeared relatively recently; previously, during each check with data collection, all information was collected. So previously, this option helped a lot: one requirement was selected, for example, the same modules, all information was collected, errors were corrected for this one requirement, then the next requirement was selected, for example, spelling in form elements, and the check was started according to the collected data, because form elements did not change, etc.
Now you can also use it, but using the collected data you can only check those requirements for which information was collected earlier. Well, one cannot help but say that this verification option is extremely necessary for developers of new checks for debugging, testing, speeding up and identifying inaccuracies in the check rules, because no need to re-collect data every time.
Since we have not yet collected any data, we will select the “Collect and check data...” item. A window will open in which you can choose to either perform an automatic check based on the settings previously made in the new configuration window, or override these settings. Selecting the “Manual” option is especially convenient at the initial stage of familiarization with the system, when you can influence each next step.

By clicking on the “Next” button, you can override all the settings that were described in the previous section of this publication, including the checks performed. However, it should be taken into account that if you do not select a single check at the appropriate step, the system will consider that it is necessary to perform ALL checks, and not just connect and load information about objects from the database being checked:

Therefore, if the purpose of the launch is not a full check, but an update of the configuration structure or a test run of the APK and familiarization with the process, then you should not uncheck all the boxes at this step. For the first time, it is advisable to mark only one element, for example, “Platform configuration check” in the following branch:

In this case, the list of verification steps will be approximately as follows:

and can take as little as 20 minutes even on ERP. But this will be enough to get an idea of how the process actually happens. Although the platform check can present a surprise and take a long time, so you can choose another element that is simpler.
At the last step, you can also set filters on the objects being checked. True, if this is the first configuration check, then the APK will not yet have information about the configuration structure. In this case, the configuration tree at this step will be empty, but it can be loaded with the “Read configuration structure” button directly from the same window:

Now all that remains is to click the “Run check” button. The inspection process will begin. With 1C windows blinking and the process log displayed in the message window. The log output is very awkward. The check window hangs modally, and if you don’t think in advance about making the message window visible, then you won’t be able to find out anything about what’s happening until the process ends:

Therefore, if you have a small screen resolution, then it is better to immediately move the modal window for launching the scan so that the message window is visible.
At one of the verification stages, the system updates the contents of the “Configuration Structure” directory, which contains a tree (hierarchy) of metadata objects as in the configurator. Data about a specific object will be updated if this object has changed or been included in an additional subsystem. A directory element will be marked for deletion if the corresponding configuration object has been deleted. New elements will be created for the new configuration objects:
Also, during each check with data collection, the contents of the “ObjectsPropertiesValues” and “CompositeObjectPropertiesValues” registers are updated, storing properties of objects, modules, layout contents, form elements, etc. When checking against previously collected data, this information remains the same.
If any checks are selected that require not only updating the metadata structure and platform checking, but also something more, then the system will upload the configuration to files for their subsequent analysis:
Uploading occurs without hierarchy - all files into one folder:

Information from the developers:
So what is going on and when ( when checking with data collection):
- The configuration structure is generally always the same, no matter what requirements are selected.
- The collection occurs by running external processing from a shared "MetadataStructureLoader" layout in the enterprise in the thick client. Enterprise processing works with the Metadata platform object and writes data to an external file, which is then transferred and parsed to the APC.
All further steps that trigger external processing in the enterprise operate in a similar way. The remaining information, as mentioned above, is collected depending on the selected requirements:
- Collecting metadata information (again, these are properties of metadata objects, not the structure itself) occurs by launching external processing from the general “MetadataInformationLoader” layout.
- Collecting information about forms (or rather, about form elements) using processing from the "Form Information Loader" layout.
- Collecting form information from XML occurs by parsing the form's XML file from the configuration upload into XML files. All information that could not be obtained from the enterprise at the previous stage is collected.
- Collecting information about modules - by reading module texts from XML download files.
- Collecting information about roles (or rather, collecting the rights of each role for each object) - from XML upload role files.
- Collecting information about layouts - using processing from the layout "Layout Information Loader".
- Collect help information - by reading help files from XML download files.
Platform configuration verification - batch launch of the demo database in configurator mode with platform verification keys. The file with the verification log is also indicated. Then it parses the APK, from which platform verification errors are obtained, which are stored in a separate “Configuration Check Errors” register.
Thus, if at least one requirement with the checkbox for collecting information about forms from XML, roles, modules or help is selected, then the database being checked will be downloaded to XML files. If none of these actions are required, there will be no upload.
Previously, all actions were performed sequentially. First, the collection of the structure was launched, then the upload to XML, then the platform verification, then the collection of properties of metadata, modules, forms, etc., which greatly slowed down the verification (data collection) of large configurations.
APK 1.1.12 added copying of the source database to a temporary directory and identified the longest stages of data collection, which made it possible to parallelize data collection during verification. Thus, at the moment, collecting the configuration structure, platform verification, uploading to XML and clearing registers are performed in parallel. The remaining stages take little time, even for ERP. As a result of introducing parallel information collection, it was possible to speed up the ERP check by at least a couple of hours.
In the temporary files directory, processing files that create instances of metadata objects and create forms and object layouts are generated and opened in the database being checked. This mechanism was originally designed to collect information about forms, layouts, and metadata properties. But also thanks to it, errors are looked for that do not even allow you to create an object or form programmatically. This is of course far from unit testing, but it’s something:


If in an object or form module there is an attempt to access an undeclared variable or an object inaccessible from the context of the module, the system will either stop during the verification process with an error (a window will appear in the opened checked database), or the APK will catch this error and show it in the reports. If the APK stops during the verification process due to such an error, then this is certainly not very convenient. But on the other hand, the presence of module compilation errors is a critical error of programmers and it is better if it is detected using the APK in this way than if it ends up in the product and a message about it comes from users!
During the process of a full check (or its equivalent in terms of the number of rules and objects), the system gets stuck on checking object No. 1 without reporting progress in any way:

This status with the message that object No. 1 out of 77 thousand is being checked hangs for 5-10 hours and it seems that the agro-industrial complex has frozen. In fact, the process is ongoing, you can verify this by looking at the processor load in the task manager or by calling a stop from the configurator (if the APK was launched from it). The reasons for the long check of Object No. 1, namely the configuration itself, are as follows:
1) As part of this step, information is collected and cached, which is used further when conducting checks of individual objects. Thanks to this, scanning of other objects is completed faster.
2) Most checks that affect all configuration objects at once are performed within this step. There are many such checks, about 90. But the longest ones, which take up most of the time, are only a couple. This is for example "Find unused utility export methods". Obviously, you can't tell whether a particular object's method is being used or not by checking just that one object or any particular subsystem. This conclusion can only be drawn by analyzing method calls throughout the entire configuration. And it is obvious that it is optimal to walk through the entire configuration once, when checking “Object No. 1,” and not many times, when checking individual documents and reference books. Another example of a lengthy check is "Control of the presence of a common module, subsystem, method and control of the composition of parameters".
If you disable the two specified checks and the platform configuration check, then checking even such a configuration as ERP can take no more than half an hour. But it’s probably not worth saving time and sacrificing quality. It is better to resolve this issue organizationally and do checks in advance.
I’ll give an example - the beginning and end of the check execution log, which shows that the entire process on ERP 2.1 and APK 1.1.11.16 takes about 15 hours (of course, the figure greatly depends on the performance of the computer, also the verification speed on APK 1.1.12 is significantly higher and under the same conditions takes about 10 hours):
: The connection to the infobase via a COM connection is being checked
: Start collecting configuration metadata structure information
: Start uploading configuration to XML files
: Start clearing metadata information
: Start collecting configuration role information
: Collected and recorded information about configuration roles
: Collected configuration metadata information
: Platform configuration check completed
: Start testing configuration objects
: Start collecting configuration form information from XML files
: Configuration check started
……...HERE THE MESSAGES START TO BE DISPLAYED IN THE STATUS BAR…..
: Configuration check completed
Result of checking
What do we get as a result of the first check? First, the directory of configuration versions is filled in (the “Versions” directory is subordinate to the “Configurations” directory). An element corresponding to the version of the configuration being checked appears in it. The version information is also updated in the form of the "Configurations" directory item:

Secondly, a document of the “Configuration check” type is created, which indicates this element of the “Versions” directory and other check parameters - the composition of the requirements being checked, the composition of the objects being checked and the “Check Log” in which the log previously displayed in the message window is duplicated:

Third, the configuration structure data is updated:

The configuration structure is a hierarchical directory with a hierarchy of elements, subordinate to the “Versions” directory, that is, when checking the configuration of a new version, a new element of the “Versions” directory will be created and a new metadata structure will be loaded in connection with this version.
And fourthly, the “Errors Found” register is filled in, which actually contains information about what errors were discovered during the verification process and is the basis for AIC reports:

There is no list form created for this register. The dump in this common cauldron of the register can be put in order in just a few minutes. For example, add a managed form, in user mode or directly in the configurator, display the owner of the objects (elements of the "Configuration Structure" directory) to which errors are associated. These owners will be the configuration versions.

If we display the owners and from them, we will get in the form of a list the ability to filter errors both by configurations and by their versions. You can make groupings based on them. In this case, you can work with errors not only using reports, but also directly through the register, which is sometimes much more convenient:

Each entry in this register is a found non-compliance with standards, a spelling or other error. Having opened any of them, you can see that even such reliable and proven systems as ERP 2.1 ;)) contain typos and errors. And quite a large number of them:


I would like us to perceive the fact of the presence of such errors in ERP not as an indulgence for their presence in our developments, but as additional evidence that they can and should be identified and eliminated. Especially if you have the right tools. Because they look ugly and that’s exactly what our users see. The 1C blog on Habré notes that ERP 2 developers use the APC to check the configuration, but apparently limit the list of checks to the rules that are most important from their point of view, ensuring an acceptable ratio of development speed and product quality. When developing our products, we can raise the quality bar and capture this area as well.
It will also be useful to know that the collected data about module texts, module blocks and other properties of configuration objects is placed in the “Values of composite object properties” and “Values of object properties” registers. Records are stored in relation to the same objects, subordinate versions and configurations:

It is not possible to see module texts directly from the register forms; they are all packaged in value stores.
But for viewing the texts of modules already broken into their component parts, and other properties of configuration objects, the APK has a wonderful tool! This is the "View properties of configuration objects" processing, opened through the "Settings" menu:

AIC reports
Information about errors found in the form of reports can be obtained from two sections of the system at once. "Errors" section:

It is based on the Errors Found report:

And the “Reports” section

It is built on the basis of the “Work Results” report:

In fact, in the APK configuration there are only two main objects “Report”. But they have quite a lot of different ACS layouts:

All of them are based on analysis of the "Errors Found" information register. The “Reports” section is intended to obtain summary information on errors; it has a statistical focus, while the “Errors” section is intended to obtain detailed information on errors and manage them. In the “Errors” section, control is possible both using a special command panel and through the context menu:


There is a problem when using the APK file database and the 32-bit 1C platform. If you do not install a sufficient number of filters, you may receive an out-of-memory message when analyzing errors in a large configuration. In the case of ERP 2.x, this message will appear constantly. This error usually occurs already at the stage of outputting data into a spreadsheet document. In general, it is worth installing filters. Only a few of them were included in the quick selections. The rest can be installed using the “Report Settings” command.
What gets in the way here is that reports begin to be generated immediately after selecting an option. This greatly interferes with work and suggests the need to refine the configuration of the agro-industrial complex, even to the point of writing your own reports: you want to apply selections before they are generated, and so that the report settings are saved, and so that they are in a manageable form. Fortunately, this is not difficult to do based on just one register of information.
I note that When using the 64-bit version of 1C or the SQL database of the APK, the error with lack of memory is not observed.
After first glance at the reports, it seems that the APK is too picky about the configuration being tested. For example, it requires setting the correct synonyms even for layouts of printed forms; it perceives the words “logistics”, “additional delivery”, “accountables”, etc. as an error. But firstly, most of the errors found really require correction! Secondly, the choice of rules to be checked is left to the user; this can be done both when setting up the configuration to be checked and when performing the check. Thirdly, each of the rules can be modified, if desired, replaced with your own, or you can configure filtering in the reports so that you see only the information of interest.
Finally, the system has other customization options. For example, the information register “True Words” (initially empty). It is involved in spell checking, in particular the Check.CheckSpelling() method. The words that we consider correct can be entered into it manually or loaded from a text file in which each word is on a separate line. A sample of such a txt file can be downloaded from the general layout “Dictionary of True Words”. But there is no need to load this file into the registry. By default, the system takes the correct words from this layout and supplements it with data from the register. The system also has processing " Updating the dictionary". Its use is described in very detail and clearly in the user manual (see chapter 4.6).


In general, if it seems that the system is too strict with our configurations, then we can tweak it in the right places and “appease it”))
The most interesting reports are “Errors by requirements” in the “Errors” section, which displays data in a grouping corresponding to the structure of the “Requirements” directory:

and “Error Analysis” in the “Reports” section, which displays summary data based on the classification “1C: Compatible”, “Mandatory” and “Recommendation”:

Rules for checking configurations
Creating your own rules using specific examples will not be discussed here. First you need to better understand this issue yourself. In the user manual from the APK delivery, a rather voluminous Chapter 5 is devoted to the creation of new rules - this is a cross-cutting example in the form of as many as 30 pages of fascinating text and illustrations))
Let's take a quick look at the rules. They are located in the system directory of the same name:

Navigation along the left tree is inconvenient - selecting an element to display its composition on the right side is done by double-clicking. Therefore, the selected element does not always coincide with the one whose composition is displayed on the right.
Each rule can be opened. The reference element form gives access to a list of object types that must be checked by this rule, algorithm parameters (a numbered list of errors that can be referenced from the algorithm), the algorithm itself and its description, description of the requirement, as well as usage settings:

There are three useful buttons at the top. “Show standards” leads to the corresponding section of the 1C website with a description of the standard, the link opens in the browser. “Open Requirements” opens the “Requirements” directory element corresponding to the rule, and the “Open Debugging” command starts processing the “Check Rule Debugger”. How it works is silent in the user manual, but it is obvious that debugging tools are either available or there are developments for them that can be developed.
The rule algorithm can be changed, as well as new rules and rule groups can be created. If you need to write your own algorithms, you will have to study the built-in methods and software objects. The corresponding section “Syntax of validation rules” in Chapter 6 of the PDF user manual is devoted to this. You can also use algorithms of existing rules as examples and samples for copying.
The built-in help for the program is catastrophically poor. Or rather, it is missing, so a description of the built-in methods cannot be obtained from it.

Filtering objects during inspections
In conclusion, let's see how APK 1.1 behaves when performing a scan with filters applied. Do they really help reduce verification time and reduce the amount of information in reports? Let's check both filtering by prefix and by subsystem.
In this section there will be more “burrowing into the code” than a story about the capabilities of the agro-industrial complex. If this is not your goal at this stage, you can skip this section.
Let's take the same experimental configuration, create a new element for it in the configuration directory (only you need to create an element not by copying, since when copying configurations, their versions and data structure are also copied, this is a long process and violates the purity of the experiment). Let's assign documents to two new subsystems:
apk_Document_1_1,apk_Document_1_2 And new_Document_1_3 refer to the subsystem apk_Subsystem_1
apk_Document_2_1, apk_Document_2_2 And new_Document_2_3 refer to the subsystem apk_Subsystem_2

We will allow spelling errors in the documents and add an unused export method to the manager module. We will create documents by copying.
Let's add two information collection filters - for the prefix apk_ and to the subsystem apk_Subsystem_2 (screenshot taken on APK version 1.1.11.16):

As a result of the check, we expect to see the appearance of errors and error reports relating only to documents that match the filters (as will be shown below, filters are applied using "OR"). I would also like to speed up the verification process, with the discount that some operations and checks are performed regardless of the number of objects being checked.
Let's start the check. After a couple of hours of basic checks (including platform checks), we will see that the number of objects for further checks is no longer the frightening 77,736, but only 65:

As a result of the checks, the reports actually stop providing information about “extra” objects and report only about objects that match the filters. At the same time, both intentional errors were found and other comments were made:

However, we get almost no gain in checking time from filters. In this example, a full scan took 10 instead of 15 hours, that is, it was accelerated by only 30%. The reasons for this behavior have already been explained in the “Conducting checks” section. Now let’s figure out why this happens at the code level and at the same time we’ll better understand how filtering and bypassing algorithms for configuration structure elements during checks work.
The reports show that in addition to information about documents, information about the root configuration element is also collected as part of general checks. And when carrying out checks, it’s hard not to notice that it is the message about checking this object No. 1 that hangs in the status bar for almost all 10 hours (on version 1.1.11.16). At the same time, the system reports the upcoming inspection of 65 objects, although we need a maximum of 6-8 of them. Let’s stop the process in the debugger while the status bar displays the message “Object No. 1 is being checked” and see which modules are being checked. You can see that at the first stage of verification, the system still analyzes all objects, including, for example, general salary modules, which are definitely not included in our new subsystem:

But we did not require the system to collect data about common modules. What are those 65 objects that the system will check?
You can get a list of them by going up the call stack to the CheckObjects() method in the document object module “CheckVersion”. From it you can also get information that ALL objects from the Configuration Structure directory for which data were collected are selected for verification, or the system considers that the data was collected:

These are the objects:

There are less than 65 objects themselves; the system simply counted not only our documents, but also their details. But you can notice that the root element of the hierarchy of the Configuration Structure directory was the very first in this list. And we have seen that it is the process of verifying it that takes so much time.
Having a list of these objects, you can draw conclusions about how the filtering mechanism works and how filter-based checks work:
Filtering only works at the data collection stage. During the verification process, filters no longer play any role. And this is logical, because the algorithms are specified in user mode. The APK only transfers the elements of the Configuration Structure directory to them for verification if it believes that data has been collected on them.
Despite the filters we have applied for checks, the APK collects information about the modules of ALL configuration objects. Data about the modules is used by the APK when conducting checks common to the entire configuration. Below we will demonstrate what happens if you disable such checks.
Some common objects will be present in the list for scanning in any case, regardless of our filters. Including the top root object - the configuration itself. Again, this is necessary to carry out "general" checks. Since the configuration included in the list is still checked according to the same rules as before, and common modules, their texts and some other data were not filtered when collecting data, the longest multi-hour check of object No. 1 will still be performed. It will not be possible to radically speed up the process by using filters.
The system decided to check not only documents that satisfy both of our filters, but those that satisfy any of them. Those objects that begin with the prefix will also be sent for scanning apk_ and those objects that are included in the subsystem apk_Subsystem2, including document new_Document_2_3. Only the document is missing from the list of objects being checked new_Document_1_3, not suitable for any filter. The result will become clear if you look into the filtering function. Resolution filters work using “OR” rather than “AND”. If this needs to be changed, then again you will have to make small changes to this method:

Now let’s try to “play” with the code and see what would happen if filtering worked not only at the data collection stage, but also at the verification stage. To do this, let's create another element of the Configuration directory with the same filters:

Artificially, in the code of the CheckObjects() method of the CheckVersion document, we will skip the first element of the selection when traversing the query result. That is, let’s skip the root element of the Configuration Structure directory:

Let's run the same check and look at the time it takes for the entire process and whether the reporting results will differ from those obtained without skipping the configuration root.
In this case, from the start of the process to its completion, only 50 minutes pass instead of 10 hours:
: Document created Check version 8 from 01/11/2017 20:51:37
………………..
: Start uploading configuration to XML files
: Configuration upload to XML files completed
………………..
: Configuration check started
: Configuration check completed
Now the report:

It can be seen that the root element is no longer displayed. But in addition, the report displays 9 lines instead of 10 relating to each document. Lines reporting unused export methods in document manager modules are missing. That is, some errors are actually detected only if the root element of the Configuration Structure directory is involved in the verification process. Otherwise, the corresponding verification rules simply do not work. These are errors, when detected, logically the relationship of the object with all other objects of the configuration should be checked.
Thus, if we want to radically speed up checks when applying filters, then this must be done either by disabling the most time-consuming general checks that require bypassing all modules (this can be done in the settings), or by developing our own alternative checking rules.
Result:
- The configuration includes tools for debugging new and existing rules. To work with them, you need to understand the APK configuration code, see how objects are created and in what context the algorithms specified in user mode are executed. But if desired, this seems quite possible; the approaches should be similar to those we use in “Data Conversion”.
The “Automatic Configuration Testing” tool really allows, once configured, to find errors in configurations automatically. APK makes it possible to find gross errors in the configuration, correct spelling, and bring it into compliance with quite reasonable and justified development standards from the 1C company.
APC cannot be a complete replacement for other tools for improving code quality, such as code reviews. It does not allow you to track the presence of excessive copy-paste (code duplication), multiple server calls where they could be packed into one, or check for the simplest signs of a non-optimal request. But it can significantly reduce the need for visual inspection and provide a good starting point for other tools and practices. And if necessary, write your own checks that solve more problems than those that are “out of the box”.
Despite the lack of information on it, mastering this tool to start using it in practice is not difficult. Having a user manual, and now this article, can give a good start for step-by-step mastery. The APK configuration itself is quite simple and can be easily modified, at least in terms of the interface. There really is a lot to improve. For comfortable and efficient use, our “tanks” always need a file))
Developing your own verification rules requires mastering the “built-in language” of the agro-industrial complex, more precisely the built-in procedures and functions; this can be done using the user manual and existing rules.
Even the simplest operations that require collecting data from configurations such as ERP take more than 20 minutes from the APC. Therefore, to develop and debug your own verification rules, you should either create your own small demo configurations and demo databases, in which some modules will violate this rule, or conduct checks using previously collected data. Both techniques will help speed up the process of debugging new rules.
Testing and correction of the 1C 8.3 infobase must be performed if you encounter errors in the operation of the infobase and before updating the database configuration. In most cases, if your information base is damaged, it helps.
Before performing testing and correction, you must make a backup copy of the database. If you cannot enter the configurator, then in the folder with the installed 1C program there is a testing and correction utility that does not require running the program in configurator mode. We'll talk about all this below.
Let's look at this tool and how to work with it. We will analyze in particular detail which flags should be set in the interface.
Let's launch the program in configurator mode:
Select “Testing and Correction” from the Administration menu:

What checkboxes should I tick?
There are various options for setting up testing, consider these daws:
- Reindexing infobase tables- This is a complete rebuild of indexes for database tables. Reindexing increases the speed of the information base. The procedure is lengthy, but it will never be unnecessary.
- Checking the logical integrity of the information base- check the logical and structural integrity of the database, correct errors in the data;
- Checking the referential integrity of the infobase- checking for “broken links” in the database. Such errors can occur due to direct deletion of system objects or failures. There are 3 options for correcting such errors:
- Create objects- the system creates placeholder elements that can then be filled with the necessary information,
- Clear links- “broken” links will be cleared,
- Do not change- the system will only show you errors.
- Recalculation of results. Totals - a table of pre-calculated results in the accumulation, calculation and accounting registers. Recalculation of totals, as well as reindexing, will never be harmful and will give an advantage in the speed of the program;
- Compressing infobase tables- when deleting data, 1C does not delete table rows, but only “marks” them for deletion. They are not visible to the user, but will continue to be in the database. Compacting the database permanently deletes this data. The same effect can also be achieved by uploading and downloading an infobase file (*.dt);
- Restructuring infobase tables- a long process by which the system recreates database tables. This procedure also occurs when changes are made to the configuration structure.
In our example, check all the boxes as shown in the figure and click “Run”:

We can observe the stage of the operation in the lower left corner of the 1C configurator window. Detected errors are shown in the service message window.

After testing is completed, click “Close”:

We can see the result of the operations in the service messages window.

Testing and fixing completed.
If the configurator does not open: chdbfl.exe utility
If the database is so damaged that you cannot enter the configurator, you can use . The utility is installed along with the 1C platform and can be found in the Bin folder of the installation directory:

Before you start testing, you definitely need to make a copy of your database, since using this utility can lead to irreversible consequences. Since you cannot enter the configurator, a backup copy must be made by simply copying the directory of your infobase.

After clicking copy, right-click on an empty space in the folder window and click “Paste.” The copy is made, run the utility:

The main window of the utility appears. We need to specify the name of the database file. Click on the three dots. The database file selection window opens. We look for the directory of your database and point to the file 1Cv8.1CD in it. Click “Open”.

Check the box “Correct detected errors” and click “Run”.

We are waiting for the operation to complete. It may take a long time, depending on the size of the database.

After execution, if errors have been corrected, they will be displayed in the utility window. In my case, no errors were found. Click “Close” and try to enter the program. If you still can’t log in, you need to contact a specialist.


