Log into your personal account on the tp link router. Log in to your personal account tp link. How to log into a TP-Link router? Connecting and setting up a TP-Link router
TPLINKLOGIN.NET- this is the standard address at which the entrance to the TP-LINK router is located. To enter the control panel settings, use the login and password “admin-admin”. You can also log into your TP-Link router’s personal account using its IP - 192.168.0.1 or in some models 192.168.1.1. But what if you open http://tplinklogin.net, an error occurs - how to solve it? Let's figure out together how to log into a TP-LINK router.
tplinklogin.net - login to the personal account of the TP-Link router at 192.168.0.1
These connection instructions are universal and suitable for setting up any TP-Link routers - TL-WR740N, TL-WR840N, TL-WR841N, etc.
Friends!
Read this important information - today login to your TP-Link router personal account at " tplinklogin.net» is no longer available due to simple carelessness - the company forgot to pay for the domain, and it went into other hands. The router's web interface is now located either at the address " " or at the IP "192.168.0.1". Login and password for connection remain the same - admin-admin
Let's start, as they say, “from the stove,” and one of the most affordable routers TP-LINK TL-WR741N will help us with this today.

After this, most users open a browser and enter the address http://tplinklogin.net and in 50% of cases they receive an error that it is impossible to log in.

How to configure a computer to log into the TP-Link router using the TPLINKLOGIN.NET administrator address?
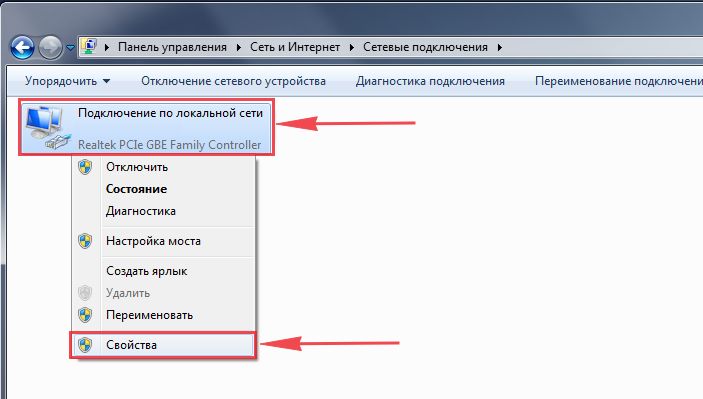
The whole point is that the parameters for connecting the PC’s network card to the router are incorrectly set in Windows. Therefore, we go to the computer’s network connection settings using the following chain: Start - Control Panel - Network and Internet - Network and Sharing Center - Change adapter settings.

Right-click on “Local Area Connection” and open the “Properties - Internet Protocol Version 4” section

Here you need to check the “Automatic acquisition” checkboxes on the IP address and DNS servers - the router will give them to us automatically. Pay attention to the last point - if certain public servers are registered as DNS, for example or 4.4.4.4, then you will not be able to access the address “tplinklogin.net” or “tplinkmodem.net”. Another possible option is to write here, by default it looks like “192.168.0.1”

If you need, then the path to selecting a network adapter is slightly different - you need to right-click on “Start”, select “Network Connections” and then open the “Adapter Settings” section.

Save the parameters with the “OK” button.
TP-Link login error - 192.168.o.1/192.168.0.l/192.168.1.1
- Another very popular mistake lies in the user’s carelessness, when instead of the purely digital value “192.168.O.1”, the letter “o” is entered into the address bar instead of “zero”. Of course, you won’t be able to access the control panel using an incorrect address.
- The same applies when the letter “L” is written at the end instead of the number “1”
- Finally, it is possible that the IP was simply chosen incorrectly - instead of 192.168.0.1 they indicate 192.168.1.1 and vice versa
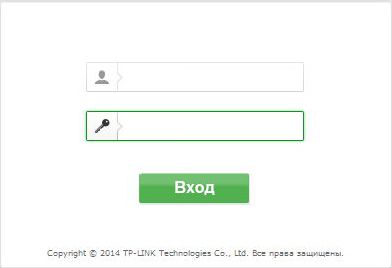
How to log into the personal account of a TP-Link TPLINKLOGIN.NET router via admin-admin?

We get to the admin panel - there are many menu items for configuring the TP-LINK router, but the easiest way to start is with “Quick setup”.

First you need to select the type of your Internet connection. You should not rely on the automatic mode - it is better to find a paper contract for the provision of Internet access services and see there all the data necessary for connection. My Internet works in PPPoE mode - that’s what I’ll choose.


Next, set the TP-Link settings for wireless connections. At the initial stage, all you need to do is come up with the name of your WiFi network (SSID) and an 8-character password. Select “WPA2-Personal” as the encryption type. The rest can be left as default.

In the last step, reboot the router.

These steps are enough to log into your TP-Link router’s personal account via the web interface at tplinklogin.net or 192.168.0.1 and configure it to work with the Internet. By the way, you can also use a mobile application - a separate article is devoted to this. Start using it, and you can master the rest of the settings by reading other articles on our blog.
Good luck!
Anyone who sets up a Wi-Fi router for the first time comes across the term Router Personal Account, which is often used by beginners who are just trying to understand the operation of this class of network devices. Let's figure out together what a router LAN is and why it is needed.
A modern wireless router is no longer just a dumb piece of plastic into which the provider's cable is plugged. Now this is already a whole computer, comparable in power to a home computer from 7-8 years ago, which has quite a lot of specific functions, features and corresponding settings.
Twenty years ago, in order to configure such a router, it was necessary to connect to it through a special console - a command shell. Then enter a special set of commands. Agree - it’s terribly inconvenient, and besides, it’s also completely incomprehensible for people prepared for this. Therefore, in those days, only system administrators were involved in setting up modems and routers.
It is clear that for the mass consumer this is terribly inconvenient and therefore manufacturers went to meet consumers by creating a web interface. This is the so-called router website, which you get to when you enter the device’s IP address in the browser - 192.168.1.1 or 192.168.0.1. This is what users call “Personal Router Account”. But this is not entirely false! I’ll tell you why later.
Personal account, web interface or configurator?!
So what should be the correct name for the configuration interface of a network gadget - the router’s personal account, the web interface or the web configurator?!

Let's look at each option in detail to figure out what is right and what is wrong.
Router personal account— the phrase itself already implies the presence of some personal information. In the Sberbank personal account - this is the account number, card number, availability of money or credit, etc. The taxpayer’s personal account on the tax office’s website contains data about a specific person, his tax base and information on his taxes. I think from this you understand that “personal” implies the presence of some personal information. But the router settings do not have any such information. This means that calling the interface the Personal Account of the router is fundamentally incorrect and this term cannot be used in this case. And those who call it “Router’s personal account” or “Router’s website” are completely wrong!
Router web configurator- this is already a more or less correct name for the user interface of a network device. You go to the device page and make changes to its configuration by changing the values of certain parameters - that is, you configure. So this name is quite correct and even some manufacturers use it. An example is Zyxel.

Router web interface- this is perhaps the most correct name for the user shell of router parameters. In other words, this is the device interface that is accessible to the user through a web browser. This term is also used by network equipment developers. Therefore, this is the most correct option!
192.168.1.1 to log into the router’s personal account
Another question that also comes up quite often is how to use IP 192.168.0.1 or 192.168.1.1 to log into the router’s personal account.

The user sees the router’s address on the sticker, but does not know what to do with it and, accordingly, how to log into the router for further configuration. Everything is just outrageous. Open your favorite web browser - no matter Chrome, Opera or Firefox. Each browser has an address bar where you enter the name of the site you need (it is usually also a search bar). Enter the IP address in this line to log into your router’s personal account. Like this:

If everything is completed without errors, then you will see a window for entering your login and password to enter the web interface. If any difficulties arise, then study and you will succeed! We wish you good luck and patience!
Not all owners of modern TP-Link WiFi routers know that you can access the settings of their network device not only through the IP address 192.168.1.1 or 192.168.0.1, but also through the hostname tplinklogin.net, simply by entering it in the address bar of your web browser, as is the case with regular sites. On some models of TP-Link modems and routers, this address is even written on the sticker instead of IP, like on all others.
The main condition for operation is that the network card must receive IP addresses automatically or the router address must be registered as the preferred DNS server.
This is how it looks in Windows 8, Windows 10 and other versions of the operating system from Microsoft.

How it works? Very simple. TP-Link modems or routers do not have their own DNS server and simply transparently transmit requests to provider servers. Despite this, the operating system of the router has a strict binding of the tplinklogin.net domain name to the internal IP, which “looks” towards the local network, that is, 192.168.0.1 or 192.168.1.1.

Accordingly, if it receives a request from a computer what IP is the hostname “tplinklogin.net”, it does not broadcast it further, but immediately issues the local address of the router.
If a different DNS server is registered on the network card of a PC or laptop, other than 192.168.1.1 or 192.168.0.1, then it, of course, will not be able to give the correct answer and the result will be a “Page not found” error.
What to do if you can’t log in to tplinklogin.net?!
In this case, try logging into the TP-Link settings not by hostname but by IP address. That is, open a new browser page and enter the address http://192.168.1.1.

If it doesn’t work, your router model may have a default IP address of 192.168.0.1. Then try entering it in the address bar.
Separately, I would like to tell you about another hostname that is used on TP-Link network bridges and repeaters - this is tplinkextender.net(Login for authorization is admin, password is admin). It may also be inaccessible and not open if there are problems with the network setup.

The solution to the problem is exactly the same as with “tplinklogin.net” - you must first try to log in via IP by entering it in the Chrome, Opera or Firefox web browser.
If this does not help, try to register addresses on the network card statically. Like this:

This doesn’t help either - then “seven troubles - one reset”. As a rule, after a hardware reset of the configuration, logging in via tplinklogin.net or tplinkextender.net to the TP-Link router returns again.
Before we start setting up the router, let's check the local network connection settings. For this:
Windows 7
Click on " Start", "Control Panel".
Then click on " View network status and tasks".


LAN connectionProperty".
Then select from the list " Internet Protocol Version 4 (TCP/IPv4)" and press " Property".

" and "", then press the " button Ok".

Windows 10
Click on " Start", "Options".

Then click on " Network and Internet".


In the window that opens we see " Ethernet". Right-click on it and select " Property".

Then select from the list " IP version 4 (TCP/IPv4)" and press " Property".

In the window that opens, you need to check the box " Obtain an IP address automatically" And " Obtain DNS server address automatically", then press the button " Ok".

Connecting the TP-Link TL-WR841N router to a computer
The next step is to connect the router TP-Link TL-WR841N to your Laptop or Personal Computer (PC). To do this, you need to connect the cable that your provider provided to you to the blue port of the router (that is, this is the cable that goes to your apartment, house, office, etc. from outside), and the cable that came with router, one end into one of the four ports, which are marked in yellow on the router, and connect the other end to your laptop or PC. And yes, don't forget to connect the power cable.

Authorization of the TP-Link TL-WR841N router
So, we have connected the router, now you need to access its web interface through any browser (be it Google Chrome, Mozilla Firefox, Internet Explorer, etc.). To do this, open the browser and enter the router address in the address bar: 192.168.0.1 and press the button " Enter" on your keyboard (in older models of this router this address may be: 192.168.1.1 ).
- Username - admin
- Password - admin
So, enter the data and press " Entrance"

Setting up the Tp-Link TL-WR841N router
And finally we got to the router’s Web interface and now you need to configure the equipment. First of all, let's secure the wireless network by setting a password for wi-fi. Then you will need to find out what type of connection is used to access the Internet, is it PPTP, L2TP or PPPOE. You can find out by calling your provider (this is the organization with which you entered into an agreement to provide Internet services). So, let's start setting up the router.
Setting a password for wi-fi
I bring to your attention Video instructions for setting a password for wi-fi on a router Tp-Link TL-WR841N
Let's also take a written and illustrative look at setting up a Wi-Fi password on a router Tp-Link TL-WR841N.
On the Web interface, select the "tab" in the menu Wireless mode"and we get into" Wireless Settings". Here it is necessary in the column " Wireless Network Name:"Come up with and indicate a name for your wireless network; this name will then light up when you connect to the network. Then select " Region:" - Russia. After that, click " Save".

Next, go to the menu in the "tab" Wireless Security". Here we will set up a password for the wireless network invented above, for this we select the encryption type " WPA/WPA2-Personal(Recommended)" and then below in the field " PSK Password"we come up with and enter a password. Then click " Save".

After we pressed " Save"a message will appear above this button indicating that the settings have been saved and now we need to reboot the router. This is what we do by clicking on the button" click here"by sending the router to reboot. After the reboot, the name of your wireless network will appear in the network settings of your computer.
Setting up PPTP
PPTP on the router Tp-Link TL-WR841N using the Tp-Link TL-WR1043ND router as an example.
Let's also write and illustrate PPTP on the router Tp-Link TL-WR841N.
Net", then " WAN".
IN " WAN connection type:"choose" PPTP/PPTP RussiaUsername:") and password (in the line " Password:IP Address/Server Name:
Connect automatically NOT Connect on demand
Save".

Setting up PPTP with a static IP address
Let's look at setting up the connection PPTP with static IP address on the router Tp-Link TL-WR841N.
So go to the menu in the tab " Net", then " WAN".
IN " WAN connection type:"choose" PPTP/PPTP Russia", below you will be asked to indicate your username (in the line " Username:") and password (in the line " Password:").
Static IP addressIP Address/Server Name:"), IP address (in the line " IP address:"), subnet mask (in line " Subnet mask:"), default gateway (in line " Main gate:") and DNS (in the line " DNS:"). All of the above data is provided to you by the provider (the organization that provided you with the Internet).
All this data is usually specified in the contract with the provider. If for some reason you could not find them, you need to call your provider's hotline and find out how you can get them.
After you have entered all the necessary data, check the box next to " Connect automatically" (This setting will keep your Internet connection permanently, so if you have NOT For an unlimited tariff, I recommend checking the box next to " Connect on demand", that is, the Internet is connected only when you start using it).
After all manipulations with the settings, press the button " Save".

L2TP setup
Let's look at setting up the connection L2TP on the router Tp-Link TL-WR841N.
So go to the menu in the tab " Net", then " WAN".
IN " WAN connection type:"choose" L2T/L2T Russia", below you will be asked to indicate your username (in the line " Username:") and password (in the line " Password:"). You will also need to specify the server IP address (in the line " IP Address/Server Name:"). All of the above data is provided to you by the provider (the organization that provided you with the Internet).
All this data is usually specified in the contract with the provider. If for some reason you could not find them, you need to call your provider's hotline and find out how you can get them.
After you have entered all the necessary data, check the box next to " Connect automatically" (This setting will keep your Internet connection permanently, so if you have NOT For an unlimited tariff, I recommend checking the box next to " Connect on demand", that is, the Internet is connected only when you start using it).
After all manipulations with the settings, press the button " Save".

Setting up L2TP with a static IP address
Let's look at setting up the connection L2TP with static IP address on the router Tp-Link TL-WR841N.
Typically, a static IP address is provided to legal entities, or as an additional service to the basic tariff to individuals.
So go to the menu in the tab " Net", then " WAN".
IN " WAN connection type:"choose" L2T/L2T Russia", below you will be asked to indicate your username (in the line " Username:") and password (in the line " Password:").
Since the connection uses a static IP address, you check the box next to " Static IP address", then indicate the server IP address (in the line " IP Address/Server Name:"), IP address (in the line " IP address:"), subnet mask (in line " Subnet mask:"), default gateway (in line " Main gate:") and DNS (in the line " DNS:"). All of the above data is provided to you by the provider (the organization that provided you with the Internet).
All this data is usually specified in the contract with the provider. If for some reason you could not find them, you need to call your provider's hotline and find out how you can get them.
After you have entered all the necessary data, check the box next to " Connect automatically" (This setting will keep your Internet connection permanently, so if you have NOT For an unlimited tariff, I recommend checking the box next to " Connect on demand", that is, the Internet is connected only when you start using it).
After all manipulations with the settings, press the button " Save".

Setting up PPPOE
I bring to your attention Video instructions for setting up the connection type PPPOE on the router Tp-Link TL-WR841N using the Tp-Link TL-WR1043ND router as an example.
PPPOE on the router Tp-Link TL-WR841N.
So go to the menu in the tab " Net", then " WAN".
IN " WAN connection type:"choose" PPPoE/PPPoE Russia", below you will be asked to indicate your username (in the line " Username:"), password (in line " Password:Confirm the password:"). All of the above data is provided to you by the provider (the organization that provided you with the Internet).
All this data is usually specified in the contract with the provider. If for some reason you could not find them, you need to call your provider's hotline and find out how you can get them.
After you have entered all the necessary data, check the box next to " Dynamic IP address" And " Connect automatically" (This setting will keep your Internet connection permanently, so if you have NOT For an unlimited tariff, I recommend checking the box next to " Connect on demandConnect according to schedule
After all manipulations with the settings, press the button " Save".

Setting up PPPOE with a static IP address
Let's look at setting up the connection PPPOE with static IP address on the router Tp-Link TL-WR841N.
Typically, a static IP address is provided to legal entities, or as an additional service to the basic tariff to individuals.
So go to the menu in the tab " Net", then " WAN".
IN " WAN connection type:"choose" PPPoE/PPPoE Russia", below you will be asked to indicate your username (in the line " Username:"), password (in line " Password:") and password confirmation (in the line " Confirm the password:"). Since the connection uses a static IP address, you check the box next to " Static IP address", then indicate the IP address (in the line " IP address:"), subnet mask (in line " Subnet mask:").
All of the above data is provided to you by the provider (the organization that provided you with the Internet).
All this data is usually specified in the contract with the provider. If for some reason you could not find them, you need to call your provider's hotline and find out how you can get them.
After you have entered all the necessary data, check the box next to " Connect automatically" (This setting will keep your Internet connection permanently, so if you have NOT For an unlimited tariff, I recommend checking the box next to " Connect on demand", that is, the Internet is connected only when you start using it, or " Connect according to schedule", that is, the Internet works at a certain time specified by you).
After all manipulations with the settings, press the button " Save".

Changing the web interface password
I bring to your attention Video instructions for changing the password on the router web interface Tp-Link TL-WR841N using the Tp-Link TL-WR1043ND router as an example.
Resetting the web interface password
If you set a password for the web interface of the router and forgot it, I suggest you watch the Video instructions for resetting the web interface password on the router Tp-Link TL-WR841N using the Tp-Link TL-WR1043ND router as an example.
Firmware update
I bring to your attention Video instructions for updating the firmware on the router Tp-Link TL-WR841N using the Tp-Link TL-WR1043ND router as an example.
Connecting a computer to wi-fi
After connecting and setting up the router, you need to connect the computer to a wireless network (wi-fi), let's consider connecting to wi-fi in two operating systems, these are Windows 7 and Windows 10:
Windows 7
Video instruction

Sultan

Connect automatically" and press
"Connection".


Windows 10
Video instruction
In the lower right corner of the desktop, find the wireless network (wi-fi) icon and click on it with the left mouse button.

A window pops up with a list of available wireless networks. Select a wireless network, in my case it is the network " Sultanova"(You select the network whose name was given at ).

After selecting the network, check the box next to " Connect automatically" and press " Connect".


We wait perhaps a couple of seconds and you are connected to your wireless network.

If you don't know how to go into the settings of your router or you can't do it, you've come to the right address. So, 192.168.0.1 is a unique electronic IP address of your device (router or modem) on the Internet between it and the PC. The subnet used here is indicated as 192.168.0.X, when X will be a number from 1 to 254. Your PC also has its own network address. For the router to be accessible, the computer’s IP address must also be located on the 192.168.0.X network and in the range - 2-254. Please note that there cannot be several devices on the network that have the same IP address - this would lead to a conflict between them.
Go to 192.168.0.1 admin/admin
The router serves as an independent network equipment that has its own operating system. You can configure it using the telnet interface or the Internet interface. In the first case, we are talking about the command console of the device - the router settings interface is more complex. If you are not a very experienced user, use the second option. His address - enter it in your browser.
If you are denied entry, make sure that you have registered an IP address.
Features of registering an IP address to log in to 192.168.0.1
Go to the “Network and Sharing Center”, then click on the “Network Connections” icon. For quick access, you can press simultaneously “ Win+R" In the pop-up Run window, enter the command control netconnections
Click the Enter key or click OK. Click on the connection through which the router is connected and right-click on it:

In Properties, in the Select connection components menu, double-click on “ Internet Protocol Version 4 (TCP/IPv4)»

Typically the default is the following:

Couldn't log into 192.168.0.1? In most cases, this indicates that it is disabled on the router DHCP server. This means you will need to manually register the IP address. Follow the picture:

The address must be between 192.168.0.2 and 192.168.0.254. Do not forget about the requirement to specify the IP address as the “Default Gateway”. Besides, 192.168.0.1 must be specified as the “Preferred DNS Server”. Click the “OK” button.
If you cannot log into TP-Link or D-Link equipment via http://192.168.0.1 from any LAN port, you need to check access from other ports. Connect the patch cord to each of them one by one. Sometimes it turns out that a certain Ethernet connector is configured in bridge mode for a set-top box.
Among network equipment manufacturers, the specified IP addresses for their equipment are usually chosen only by D-Link and sometimes Netgear.
Problems logging into your router personal account
Have you completed all the steps correctly? However, you can’t log in to 192.168.0.1 using the admin login and admin password? You will find the advice "" useful. The list of steps is similar, but you need to use the 192.168.0.0/24 subnet.Brief list of actions:

If nothing helps?
In this case, we can only recommend one thing to you. Note that this method is the most extreme. We are now talking about a hardware reset of all settings and characteristics of the equipment. You can perform the necessary actions by clicking on the small button Reset. It is a hole and is located on the back panel of the device.
Use a toothpick or a paperclip, and with the router running, hold it for 15 seconds. As soon as you start performing these steps, the device should wink at you with indicators on the front and go into reboot mode.
After you follow this advice, any device settings will be reset and the router will return to its factory specifications.


