We follow the white rabbit: how to replace the matrix on a laptop with your own hands. Cleaning the laptop matrix from traces of liquid
June 24, 2009 at 2:49 pmCleaning the laptop matrix from traces of liquid
- Computer hardware
I received a MacBook Black with a full range of small defects. It came down to a matrix filled with alcohol.
I wanted to take a picture of what it looked like before the operation, but I forgot. During the cleaning process, the full scale of the tragedy will be visible, I will only say that approximately 20% of the screen (lower central part) glowed with cheerful white spots and at different angles they had different shapes (different layers of films stuck together in different ways).
This is just an example, I had one and a half times less and in different layers and directions.
I searched on Youtube and found a couple of videos that were enough for me to make a decisive start, here they are:
Here I only needed to see a few seconds (3:15) to confirm my theoretical knowledge about the screen structure :)
And just look here:
iFixit will tell us how to disassemble the cover and remove the matrix. I’ll just add that it’s not necessary to disassemble everything else (superdrive, speakers, cables) after removing the top cover of the laptop itself (the one with the keyboard). It is enough just to unscrew the fastening of the hinges to freely open the compartment with the inverter (this is the protruding lower part of the screen cover).
There are two cables glued to the back of the screen, a wide one to the matrix, a narrow one to the camera. We disconnect them and peel off the tape. Both cables are disconnected without any secrets; we simply use a screwdriver at the edges to help pull the plug out of the socket. 

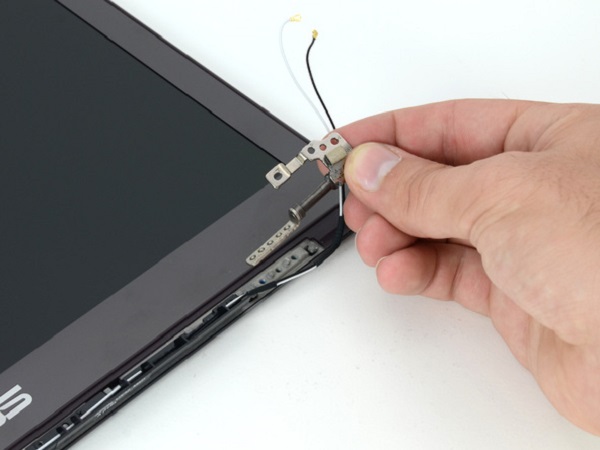
Unscrew the screen mounting frame (on which the antennas are located): 
We leave the cables, we take the screen: 
Next, I advise you to go to the bathroom :) By first turning on the shower there for a few minutes, we will get rid of most of the dust in this way. Here's everything that could be useful to me: 
Knife - if you have a screen with a glued frame.
There were only 2 bolts on my screen: 
The rest of the fasteners are on latches and tape. Peel off the tape and snap off the latches: 

After the frame is disconnected, you need to remove the matrix itself (dark, quite strong, with a wide printed circuit board connected). Carefully! A board with a controller is connected to it; in fact, there is nothing fragile there, but any damage to the wide buses will lead to the appearance of horizontal or vertical “broken” stripes on the screen.
Now the first traces of the liquid became noticeable, I tried to choose the angle at which it was most noticeable: 

These are traces on glued films that scatter light, and this is on the matrix itself (inner side): 
It's easiest to clean, it's glass :) Xxxxxxxx, and we wipe it, and here's the main tip, MICROFIBER. The coolest way to clean everything is MICROFIBER. Costs pennies at any hardware store. 
Let's move on. There are usually 3 films, folded into a sandwich. They usually have key valves for unambiguous orientation during installation; all that remains is to remember the order of the films :) Just try.
The valves are secured with stickers: 
And here are the films: 
Here you can see how these two are glued together by the remaining liquid: 
You shouldn’t peel it off, you can damage it even more, just take it and put it all in water. Let it soak :)
Let me remind you, there are 3 films! 
While they are soaking, I will tell you how these 3 films differ. Two of them are very similar and have a fine “notch” at an angle; the films differ precisely in the different angles of inclination of this notch. These films need to be rubbed only in the direction of this notch, otherwise they will get scratched. The direction is easy to determine the first time you touch it with microfiber, it moves towards the notch well :) On the other hand, both films are glossy.
The third film is matte, let's call it that; in fact, all three films have a special notch shape in the form of prisms, like in a reflector, for better light dispersion.
It is matte on both sides. It is easier to wash than others.
Here's my option: 
You can clearly see where the liquid used to be; water lingers in this place.
Mine! I washed with soap, after which the water flowed evenly from the entire surface of the film. 
After the films got wet, most of what was on them came off. Cleaning to perfection is not at all necessary; the entire joint was in the glued layers, which is why in the places of gluing the light passed through without scattering and was brighter than the rest of the screen area. Simply rinse and dry the films.
Dried between two A4 sheets. (13.3" matrix).
The usual use of water leaves stains and stains of varying sizes on all films. Here is my recipe for how to quickly and easily get rid of them. With matte film, everything is simple, take a napkin (I have one made of non-woven material) and wipe exactly the entire film with it (with a damp cloth). Then use fiber in the same direction and you're done.
With films with an angular notch - wipe with a napkin in these directions and then with fiber. The water dries on them quite slowly, so that after wiping the entire film with a napkin, the moisture does not even begin to evaporate and it can be easily washed with fiber.
Using light and glare, I checked the cleanliness of the wipe: 
Now let's put it back together. blow off the dust particles and lay the films, glue the fasteners back: 
We install the frame, latches, tape, etc. We connect the inverter and cables: 
At this angle and lighting, traces of active use of the laptop and abrasions on the outer, glossy surface of the matrix are visible.
Test run (you can just short-circuit the first pair of contacts in the keyboard connector, you don’t have to be afraid to short-circuit the rest - that’s okay): 
Under the fan cable
In this article, we’ll look at how to replace a laptop screen matrix with your own hands, using the example of disassembling and removing it from an Acer screen.
Everything is not as complicated as it might seem at first; there are much more demanding tasks for the professionalism of the engineer conducting them. Sometimes it's more difficult, or. First, I’ll make a reservation that complete dismantling and replacement of the screen matrix, cable, and curtains of the laptop screen is only part of the total disassembly of the laptop, which is described in the example at the link.
You can replace the matrix without completely disassembling the laptop, but this option is not available in all cases.
So, the algorithm for completely disassembling the screen and Replacing the laptop matrix yourself in pictures.
It is understood that we have carried out partial disassembly; all that remains is to remove the matrix. How to disassemble a laptop - see the link above in the text.
- We remove the laptop screen and find the plugs. We carefully remove them.
- We unscrew the exposed bolts. Carefully remove the rim. Prying your fingers from the side of the laptop matrix until you hear a characteristic click. This allows you to remove the frame without damaging the latches in the absence of a special tool.
- We take out the external cables. Unscrew the internal fastener.
- We carefully remove the matrix for replacement, remove the remaining fasteners and cables.
- Next, we pry up and remove the signal cable from the connector, remove the wi-fi antenna wiring, and the web camera.


That's all compressed Algorithm for replacing a laptop matrix with your own hands. I hope this guide will be useful. If it seems too complicated, overly responsible and unclear, please contact our service center. We will be happy to provide high-quality and professional services in the field of laptop repair in Minsk.
Well, admit it, what do you want to do when you see on your laptop screen the impudent face of an opponent who shamelessly and unfairly took away your victory in the game? Well, of course, hit it with your fist! For those who are not very restrained in their emotions, it is still better to keep a punching bag at hand, because it is not your virtual enemy that will suffer from the blow, but the innocent matrix.
Continuing the topic of self-upgrade/repair of our electronic assistants, let's talk about restoration. Today's story is about how to replace the matrix on a laptop.
How to find out which matrix is installed on your laptop
And laptop and laptop, as we have already found out, are different. Very similar, even completely externally identical devices can be completely different inside. Yes, they are similar... even the same model sometimes comes off the assembly line with different types of matrices, which cannot simply be taken and swapped. In a word, in order to choose a new “face” for your laptop to replace the broken one, you need to know its parameters.To make sure you don’t make a mistake in your choice, because modern LED matrices are not particularly cheap, you can buy exactly the same one as you disassemble. However, the exact same one may not be available for sale. In this case, it is permissible to select an interchangeable analogue. Fortunately, the vast majority of inexpensive and mid-budget laptops released in recent years are equipped with standard displays, for which there are no problems finding parts today.
How to determine the type of matrix installed on a laptop? There is only one way to do this correctly: by the factory part number indicated on the label of the matrix itself, which is located on its back surface. To get to it, you will have to disassemble the screen.
Perhaps, when looking for a new “face” for your electronic friend, you will come across web services that automatically select compatible spare parts based on your computer model. Should you trust them? As I already said, the same model can be equipped with different screens, and if such a service gives you several options, you will become even more confused. On the other hand, if the service belongs to a serious specialized store (Aliexpress is not one of them), you can contact its consultants for clarification.
Let's go back to the part number on the label. In the picture below it is underlined with a green line.

Knowing this code, it is enough to feed it to Google or Yandex along with the word “buy”, and, if the part is not rare or very outdated, dozens of offers from online stores will open to you.

Some parameters of the matrices are encrypted in the part numbers, in particular the diagonal and manufacturer. In my example - LTN156 AT37, the screen has a diagonal of 15.6” (number 156) and it was produced by Samsung, as indicated by the LTN factory code.
What parameters are important for selecting a compatible matrix
Both the old and the new parts must match:
- Diagonal, otherwise the new one simply won’t fit in size.
- Permission. This parameter is sometimes specified only in pixels, for example, 1280x800. Sometimes - along with letter designations, like WSVGA, WXGA, etc. The latter, in addition to resolution, take into account the aspect ratio of the screen. You can get more detailed information about what this means from.
- Backlight type– LED (light-emitting diode, most often found on modern laptops) or CCFL (lamp-based – relatively outdated).
- Form factor: thickness, location and type of fastenings to the cover body, location of the video cable connection, number of connector pins. Modern LED matrices are equipped with 40-pin connectors; more often, lamp ones are equipped with 30-pin connectors, but not always. 20-pin (rare) ones are found with both types of backlighting. If only the pinout of the connector does not match, the new screen can be connected via a special adapter.
Let's try, as an example, to select an analogue of the already mentioned “muzzle” - LTN156AT37 (found on some Acer models).
Let's go to the website of any online store where there is a description of it.

It turns out that any matrix that has:
- Diagonal – 15.6”.
- Resolution – 1366×768 WXGA.
- Backlight – LED.
- Connector – 30 pin.
- Fastenings (ears for screws) - at the top and bottom, connector for the cable - bottom right, thickness - slim (thin).
Now let's turn to the catalogs and select from them products with similar characteristics. However, you don’t have to do this, since stores often provide lists of analogues in the description of each matrix. But since the information there is not always reliable, it is better to double-check.
Users often wonder if it is possible to install a 30 or 40-pin LED matrix instead of a 30-pin CCFL, if other parameters are the same? My answer is: since there are fewer and fewer new CCFL matrices left (they are no longer produced), cable adapters have been developed that allow such replacement. The latter are usually sold in the same place as the matrices.
The rule is the rule, but there are exceptions
There are laptops whose matrices are firmly glued to the lid, that is, they are non-removable. If they are damaged, the entire display module must be replaced. An example of such devices is the MacBook Air 11 and 13. Due to the abandonment of mechanical fasteners, the MacBook Air covers are so thin.In the photo below you can clearly see that the lid of the MacBook Air is about half as thin as the lid of the MacBook Pro. The second has a removable matrix.

By the way, in an effort to make something similar to MacBooks (in appearance, but not in quality), similar “lifehacks” with glue are used by manufacturers from the Middle Kingdom.
The non-removability of Apple glued matrices is, of course, conditional. Experienced repairmen have long learned to remove and replace them, but for those who have never done this before, it is better not to try to imitate them, because the probability of damaging expensive parts is close to 99%.
Repairing a broken screen with a glued matrix on cheap Chinese laptops is usually impossible due to the lack of spare parts on sale. It is also not cost effective.
And now - “dismemberment”. Everything described below is done at your own risk.
To dismantle a damaged matrix, you will need a Phillips screwdriver (preferably a magnetic one), a utility knife, a plastic card (can be replaced with a thin ruler or a mediator), as well as a plastic or metal spudger to unclip the latches and disconnect the contacts.
Before you start disassembling the screen, do not forget to completely turn off the power to the laptop - disconnect the external power supply and the battery, even if the latter, in your opinion, is discharged.
Next, let's proceed to dismantling the display frame - the part that surrounds the screen. There are usually small rubber pads on the front of the frames that prevent the screen from touching the keyboard when closing the lid. Underneath some of these covers are screws that hold the frame in place.
Using a knife blade, carefully separate the trim from the frame. Try not to touch their bottom surface, which is covered with a sticky mass, with your fingers, otherwise they will not stick well in the future.

Next, unscrew all the screws. If they are not there, then the frame is held in place only by latches.

Pry the frame with your hands and try to separate it from the screen. If it does not give in, insert a plastic card or pick into the gap between it and the main part of the lid and carefully move them along the perimeter, unlatching the latches.
Some frames are additionally secured with double-sided tape. To remove them you have to put in a little more effort.

After detaching the frame, set it aside. Now in front of you is the matrix itself. Most often, they are also attached to the laptop cover with screws, but there are models that are inserted into grooves.
Unscrew the screws holding the matrix, then grab it by the edges and place it face down on the keyboard.

The next step is to disconnect the video cable and the inverter cable - the backlight control device, which on CCFL matrices has a separate connector. First of all, disconnect the cable: carefully peel off the tape with which it is attached to the back wall of the matrix and, using a spudger, remove it from the connector. Then turn off the inverter. If the webcam cable is adjacent to the matrix, also disconnect it.
By the way, at this stage you will find out what kind of screen is installed on your computer. The part number by which its model is determined, as you remember, is indicated on the label.

Installing a new matrix and assembling the display is done in the reverse order.
A little about connecting LED matrices instead of CCFL via an adapter cable
Cable adapters are devices in the form of a tape, at one end of which there is a connector for connecting an LED, at the other - a CCFL. A small scarf is connected to the middle part of this tape - an inverter for controlling the LED backlight. It also has from 2 to 8 connectors, next to which the brands or model lines of laptops are indicated - Asus, Dell, HP, Toshiba, Lenovo, etc.
I think it’s clear what to connect the main connectors of the adapter cable to. LED – to the LED matrix port. CCFL – to the laptop video cable. Of the inverter ports, you will only need one - the one to which the cable of your CCFL inverter will fit.
After connecting, secure the adapter cable on the rear panel of the matrix with adhesive tape, and you can assemble the laptop. If everything is done correctly, the machine will not notice the substitution.
Also on the site:
Following the white rabbit: how to replace the matrix on a laptop with your own hands updated: April 12, 2017 by: Johnny Mnemonic
Owners of TVs with LCD and plasma screens often face the question of whether it is advisable to replace a broken matrix. The high cost of work at a service center pushes you to look for alternative options - replacing it yourself or buying a new TV. It's worth figuring out which is better.
Signs of a broken matrix on a TV
A common sign that the matrix in a TV has become unusable is a disruption in the normal transmission of images to the screen. It may appear as follows:
- Spots of round or oval shape are black.
- Burnout of individual pixels, which appears as light or dark spots on the TV screen.
- Vertically located stripes of different colors.
- Horizontal gray stains and stripes.
Signs such as: darkening along the edges of the screen (or a separate part of it), complete absence of an image (black screen), blinking, white noise, may indicate the failure of not the entire matrix, but only a separate part of it, for example, the backlight. That is why it is important to make replacements and repairs at a service center - only there they can determine the cause of defects with 100% accuracy. The cost of work depends on the TV model, the availability of ready-made spare parts, and whether they are produced by the manufacturer itself.

When the outer glass of a plasma screen cracks as a result of physical impact, the matrix itself is damaged. The gas mixture contained in it comes out, and numerous noises appear on the screen. In this case, only replacing the matrix can solve the problem, since its repair is impossible.
The only advantage of replacing the matrix on your TV yourself is saving money. Since repairs at a service center cost 75-85% of the cost of the equipment itself. Self-searching for a screen on the Internet helps you find the most profitable option, and you don’t have to pay yourself for the work.
Preparing to replace the matrix on the TV
Before replacing the matrix on the TV, you need to perform a number of preparatory measures:
- Buy a new matrix. You can choose the appropriate option on specialized Internet sites or at a service center that repairs this type of equipment. You need to start from the data that is indicated in the technical documentation for the TV.
- Buy a protective screen. To prevent possible breakdowns in the future, it is better to buy a protective acrylic screen for a new plasma TV matrix.
- Prepare your workplace. To avoid accidentally damaging the LCD screen further, the work area must be covered with something soft, for example, thick cardboard or a blanket.
- Collect the necessary set of tools and materials. This includes a set of screwdrivers with different types of profiles, tweezers for getting into hard-to-reach places and a thin metal plate.

Instructions for replacing the matrix on a TV
Step 1. Disconnect the wires and cable from the TV. Accordingly, if the TV is mounted on a bracket, then remove it from it. Move equipment to the workplace.
Step 2: Separate the front of the TV from the back. Using screwdrivers, unscrew the screws holding the housing together. Place the matrix face down on a soft surface (thick cardboard), use a plate prepared in advance (or any convenient device (not a knife!)) to unlock the latches.
Some TV models may use screw connections instead of plastic fasteners. Use the appropriate tool to work with them.

Step 3. Remove the old matrix. Having first disconnected the power supply wire and the signal cable from it. This must be done very carefully, preferably study in detail the mechanism of fastening the cable in advance. During assembly, the junction of the cable and the matrix is additionally taped with tape; it must be removed in such a way as not to damage fragile elements of the equipment.
Step 4. Prepare the new matrix for installation. Wipe its edges with a damp alcohol wipe and install metal fasteners.
Step 5. Install a new matrix. Connect the signal cable and power cable to it. Check functionality.
Step 6. Reassemble the TV case in reverse order. Install a protective acrylic screen.
Step 7. Coordinate the new matrix with the TV control module. Sometimes, after replacing the matrix, the image is still not transmitted to the screen; this may be due to inconsistency between the new screen and the control module. The necessary changes are made through the TV menu; more details about this can be found in the documentation accompanying the equipment.
Video instructions for replacing the matrix
Replacing the matrix on a TV in a service center is carried out in a short time and using all the necessary tools. If it is not possible to contact specialists, then, following the step-by-step instructions, you can carry out this work yourself. In general, it takes 0.5-1.5 hours.
In contact with
Replacing a laptop matrix is a relatively difficult job. It happens that the user has to carry out such work independently, and it is necessary to treat it very responsibly. Our step-by-step instructions will allow you to easily remove the matrix and install a new one to replace it.
1. You can start by preparing the workplace. You will need a large and fairly level work surface. Even before replacing the matrix, you must turn off the computer, remove its battery, and unplug its power cord from the electrical outlet. Before you start removing the display from your laptop, you need to make sure that the screen is not glued. Otherwise, you will need to contact specialists.
2. In advance, even before starting work on replacing the laptop matrix, you will need to purchase a new case for it. Please note that special plugs are provided on the mounting components of the matrix housing. They must be carefully removed and set aside. The same must be done with all small elements of the laptop.
3. Next, you should remove the fastening elements of the lid of your laptop. You will need to carefully disconnect the cables of the devices that are located inside. You need to unfasten the keyboard latches and remove it. In this case, you should very carefully separate the cable from the motherboard. Then you can remove its top panel. Please note - this element is very fragile, you must work with it carefully so as not to inadvertently damage it. When separating the matrix, you also need to be careful not to break the edges of the computer. Then you can separate all the cables connecting the display to the motherboard.
4. The bolts must be removed from the screen shell. Then you need to remove the housing parts. To do this, you can use a flathead screwdriver to easily pry off the parts.
5. It must be remembered that some laptop models are glued at the edges. If your device is also glued, under no circumstances should you try to tear off the matrix on your own - it is better to use the services of a specialist. Otherwise, you can damage both the old panel and individual parts. Be sure to disconnect the connection cable from the screen - it must be disconnected from the base. After this, you need to find the inverter - this is the green chip. It is placed between the screen and the backlight. You need to disconnect the wires coming from the converter.
6. Next, when installing a new matrix, all this work will need to be done in reverse order. When installing, you can wear thin medical gloves to avoid leaving fingerprints on the body. When installing the matrix, you also need to be careful. Do not press or pull the body - otherwise you can break the parts of the device without really using it. After connecting the cables, you need to check the functionality of the new display. You need to plug in the power cord and turn on the laptop. If everything is in order, you can turn off the laptop again and continue the assembly.

Finally, it is worth noting that it is necessary to change the matrix only if the matrix is completely out of order. If you see stripes in the image, it goes out periodically or changes brightness, then the problem lies elsewhere. Then it’s better to just take the device to a specialist for diagnostics.
Alexander Savchkov


