Straight crimp twisted. Video: how to crimp a twisted pair cable with a screwdriver - visual instructions. Crimping a twisted pair cable into a connector
After becoming familiar with the circuits and standards for crimping twisted pair cables, as well as the network builder’s tools, it’s time to move on to practice.
Today we'll talk about how to crimp a twisted pair cable using special crimpers to get a patch cord for connecting a computer with network equipment (router, switch) or two PCs with each other. But first, let's remember what is needed for this. So…
UTP cable with shielded RJ45
Materials and tools
Before you begin the operation, prepare the following:
- Wire pieces, taking into account the length limitation. In Ethernet networks of 10Base-T, 100Base-T, 100Base-TX, 1000Base-T, 1000Base-TX standards, the maximum segment length is 100 m.

UTP cable 4 pairs
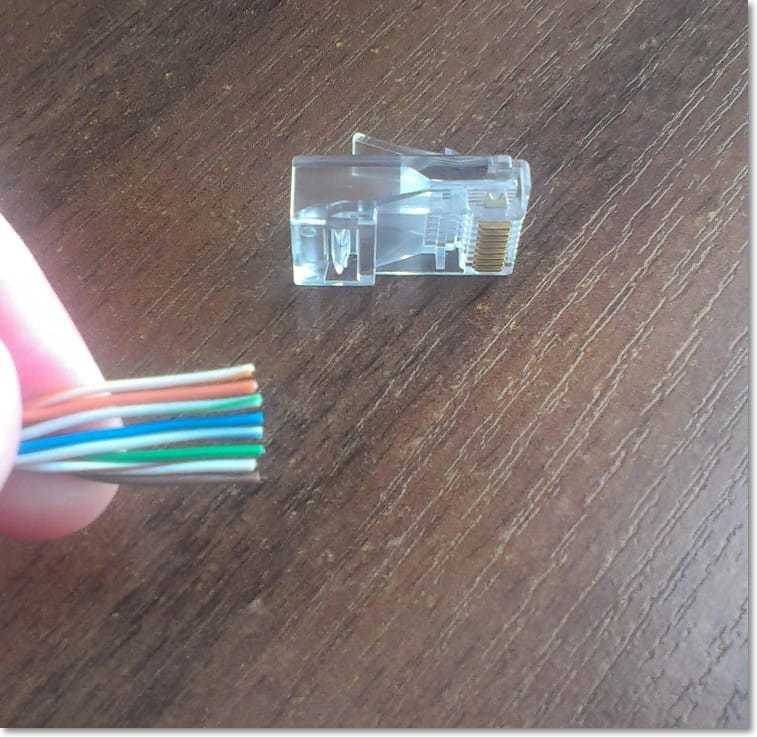
- RJ45 connectors (8Р8С) – at least two per postal cord. These are small “parts” made of transparent plastic with a number of metal contacts. Inside their cases are gold-plated “knives” that cut through the conductors, forming a strong connection with the contacts. On the outside, each connector is equipped with a “tab” - a clamp for holding the cable inside the device socket. Connectors are available in several types: for single-core, multi-core cables, and also universal. For shielded twisted pair cables, shielded connectors are used - covered with a layer of metal, which is connected inside to the wire shield.

- (we will tell you how to crimp a twisted pair without it in another material). We wrote earlier about how to choose a crimper for home or work, so we hope you have already held this tool in your hands and have an idea of how to use it.

- Stripper is a knife for carefully removing insulation from a wire. Instead, you can use a sharp stationery knife, a cutter built into a crimper, or nail scissors.

- Cable tester. With its help, we will check how well the crimping is done - whether all conductors are connected to their contacts, and whether there are any crossovers or short circuits inside the patch cord.

Network cable tester
Crimping schemes
Now let's remember a little. Since we also talked about it, we will give only diagrams of the arrangement of conductors for direct and crossover (crossover) crimping. Direct, as you remember, is used in connections like a computer-network device, and cross-connection is used between two switches or two PCs.

Direct crimp

Since our country is more accustomed to the layout of conductors according to type B (T568B), we present it. Type A differs from it only in the location of the green and orange twists - they change places. According to the standard, both crimping options are equivalent and interchangeable.
Crimping procedure
Finally, let's move on to the main thing - how to properly crimp a twisted pair cable. Let's tell you step by step:
- Cut part of the wire from the coil. For cutting, use special crimper blades, a knife or side cutters. It is not necessary to try to make the cut even and neat at this stage - you will straighten it later;
- Step back 3-5 cm from the cut. Using a stripper or other tool, make a circular cut of the outer insulation without damaging the conductors and the screen (if the wire is shielded). Remove the cut piece of insulation;

Removing the insulation
- Unravel the twists and arrange the wires in the desired order according to one of the above diagrams. Pull the nylon thread, which gives the cable strength, back;

We measure the stripped conductors
- Step back 12-14 mm from the cut of the external insulation. Strictly perpendicular to the cable axis, cut off the ends of the conductors so that they are all the same length;

Cutting off the excess
- Align the conductors and insert the end of the cable into the RJ45 connector until it stops. So that when viewed from the side of the row of contacts, the orange-white (green-white) core is located at the top;

We put on the connector
- Next, the twisted pair cable is directly crimped: insert the connector into the socket of the “8P” crimper and squeeze the tool until it clicks;

Crimp the connector
- Check that the fastening is secure: pull the cable and connector in different directions with your hands. A correctly connected connector cannot be pulled out even by force. Develop the habit of always doing this so as not to create an unnecessary problem for yourself or other people: a loose connector may come off the cable when it is inserted into the device socket. And it is very difficult to get him out of there;
- The next stage is testing the patch cord. Connect the connectors to the tester (which module does not matter). Turn on the device and observe the behavior of the LEDs. If the crimping is done efficiently, green lights will turn on alternately on both modules. The absence of any indicator light indicates a broken conductor, and a red light indicates that the conductor is crossed or short-circuited;

Checking the correctness and reliability of the connection
If a defect is detected, the cable will have to be crimped again. If everything is fine, it is ready for use.
Conclusion
Now you have learned how to properly crimp a twisted pair cable. Don’t be discouraged if something doesn’t work out – not everyone succeeds the first time. For some, two or three attempts are enough, while others have to “suffer” a dozen times and ruin a bunch of RJ45 connectors, fortunately they are inexpensive.
As a result, everyone can master this craft, which means everything will work out for you too.
Read about that in our next materials.
The laying of no local network takes place without a wired segment, due to which the computer is connected to the network. The cables used for this process may differ in type, appearance and even color, but in order to crimp twisted pair cables at home, you will need to familiarize yourself with all the points and features of the procedure. In a local wired network, in order to transmit a signal to access the Internet, a special cable is used, which is called twisted pair and must be crimped. The name twisted pair cables are due to the fact that they consist of four cores, which reduces the likelihood of interference from various sources.
Twisted pair crimping circuit
The computer is connected to the Internet via wires, and twisted pair differs from other cables due to the external dense insulation of polyvinyl chloride film, which prevents the penetration of electromagnetic interference. Unshielded versions of cables are available for sale, as well as shielded ones, which additionally have a foil screen intended for all pairs at the same time. To connect an Internet cable to a computer with your own hands, you will need to follow a sequence of work.

This will eliminate:
- Health problems due to electric shock;
- Incorrect connection of the LAN wire and the computer device;
- Breakdowns in the signal supply and the formation of interference.
If you crimp the cables correctly, you can lay a local area network or a simple network based on Ethernet and Token Ring technologies. The first type of network is most often used to form a physical medium through which data is transmitted via a cable of a predominantly shielded pair. In other words, STP (Shielded Twisted Pair), UTP (Unshielded Twisted Pair) wires are used, which correspond in type and category.
RJ 45 crimp
Today, connecting a router is carried out mainly thanks to such technology as Fast Ethernet, since simply Ethernet no longer satisfies the majority of network users. There is a third type of Gigabit Ethernet technology, but it is too expensive to achieve a wide range of applications, but is gradually pushing out its two predecessors.
In this case, we will consider building a network using Fast Ethernet, for which two pairs of twisted wires called: UTP and Cat.5 will be used.
These types of wires can also be used with simple Ethernet technology, and therefore if there are older devices, then it is possible to use them for them, if necessary.
Once the medium through which the Internet signal will be supplied has been selected, you need to more carefully study its topology, or in other words, how exactly the wires will be connected to each other. If an Ethernet network is selected, then its typical topology is a star, due to which equipment is connected, provided that all other network devices are not connected to it, since they are connected to one device called a hub, which connects them between yourself. To build a large Internet network, they use a hierarchical star, which contains many star-type connections or, more simply, a hierarchical star consists of many star-shaped ports.
RJ 45 pinout by color
The color palette of wires is needed in order to comply with the rules of connection, and each cord is intended for a specific activity. It is worth noting that if wiring of one color is connected to another shade, there is generally nothing dangerous in this, since operation will continue in exactly the same mode.

As an example, it can be noted that if you install white-orange in place of orange and vice versa, the signal will not change and will be carried out in standard mode.
In this case, the question may arise: why observe the colors when connecting and how might this affect the cord or the operating principle of the device? The whole point is that if you change the wires yourself, this can lead to the search for a malfunction when it occurs, and will also significantly interfere with the technician during repairs. When it comes to connecting a computer device and other network products, in particular through the MDI port and the hub (a port called MDI-X), you need to use wires that are crimped using the same standard on both ends.
That is, one crimper must be selected:
- 568A;
- 568B:
- Another variant.
Using such standards, color crimping will not be required. If you are connecting two PCs using an MDI port, you will need to repaint the crimper on each pair in order to use two different standards and not get confused between them.
RJ 45: how to crimp
Pinout by color is not just a connection diagram, but an order that will allow you to connect and disconnect contacts in the correct sequence. To start assembling a network, you need to figure out what type of wire should fit a certain contact in the RJ 45 connector. In this case, the 100Base-TX specification is taken as a basis, or in other words, the application of the standard by using two pairs out of 4 proposed.
There are two standards in the world, as already mentioned, and these are EIA/TIA-568A and EIA/TIA-568B, using each of which you can determine the location of any wire in the connector.
To better perceive colors and their purpose, you should pay attention to the rules for connecting cords with specific shades or, more simply, how exactly a twisted pair should be connected. In the information presented below, the first wire is the EIA/TIA-568A crimp standard, and the second wire is EIA/TIA-568B, respectively.
As a result, we get the diagram:
- Green-white and orange-white;
- Green and orange;
- Orange-white and green-white;
- Blue and blue;
- Blue-white and blue-white;
- Orange and green;
- Brown-white and brown-white;
- Brown and brown.

This is also a kind of cable layout table, in which each wire corresponds to a specific pin number.
How to crimp an Internet cable
When working with cables, especially if they are energized, which is completely prohibited, you must carefully follow the rules, and in case of electric shock, first aid must be quickly provided, and a rapid response medical team must be called, since the current can be dangerous to health. As for the cables through which various ports are connected, there are special instructions here too. In the data presented below, the first is the port on the hub, then what will be connected, then through which connector and, accordingly, what straight cable is required for this.
Intelligence:
- Using a regular port, the hub is connected to a regular port using a crossover cable.
- Using a regular port, a hub is connected via an Uplink connector and a straight cable.
- Using a regular port, the network card is connected directly.
- Using the Uplink port, the hub is connected to a regular connector using a straight wire.
- Using the Uplink port, a hub is connected to the Uplink connector with a crossover cable.
- The Uplink port connects a network card and a crossover cable.
Following these rules is a must. The crossover cable can be crimped with pliers or using pliers. Different types require a separate cross.
Basic circuit for crimping an RJ 45 twisted pair cable
To crimp the wires and connect the device correctly, you will need to follow not only the rules, but you can use any methods, only they must be tested and in compliance with safety measures.
There are some tricks that allow you to crimp wires without problems:
- There should be long wires left on the left side of the connector.
- These wires must be bare or, in other words, unprotected.

This allows further connections to be made quickly and easily, but the cables may lose their strength. If you make a mistake in the form of a strong cut of the contacts, then the braid will fit into the cavity of the connector and the length at the ends will not allow further connection. It is not difficult to determine which types of sockets to repair using crimping and which paired telephone cable to choose.
Proper crimping of a twisted pair cable onto 4 cores: diagram
Crimping or unsoldering cables requires the use of a special tool. To crimp the cable, use a crimper. You can use pliers. A crimper is a crimping device that can be used to cut the cable, remove the outer sheath, and crimp the RJ 45 plug.
A device such as a crimper can replace 3 devices at once, as it allows you to strip, cut and clamp.
This device is very easy to use and can be used to accurately position connectors and crimp heads. The crimping tool has an 8-position crimp head that allows you to connect any 4 pairs of keyed and non-keyed modular connectors.
An equally popular professional tool is the HT-500+HT-308, which is used to connect RJ 45, RJ-12/11 connectors and strip Hanlong twisted pair cables. In order to insert wires into network sockets, you must also comply with a certain standard, based on the markings present. To separate the wires in the cavity of a socket or patch panel, you need a device such as a 110 or Kron knife.
Methods: how to crimp an Internet cable at home
To connect the power cable, you can also use a screwdriver, but the tools are used strictly according to the rules so that pre-medical care is not required. Emergency care (EMP) may simply not be effective if the electric shock is too strong, which can even cause death. Honey. Measures must be followed.
Connection rules are very simple:
- To strip cables or unravel twisted pairs, you must not exceed a stripping length of 12.5 mm.
- When stripping and branching, you need to use pliers, thanks to which the layout will be carried out more quickly and competently.
- The insulation should not be stripped from all cables at once.
- When laying twisted pair cables, you need to maintain a given curvature in each bend.
- If the curvature is exceeded, then it is quite possible that the pickup resistance will decrease and the wire will break.
- When laying a shielded pair, you should carefully monitor the integrity of the screen along the entire length of the wire.

A drain wire must be present to connect to the connector shield.
If we briefly consider the algorithm of actions when connecting cables, you should: follow the rules, do not exclude any stage, follow safety rules. It is important to remember that when connecting even two types of equipment, a network already appears, and therefore, even in this case, you can consider different options for how the twisted pairs will be cut and connected.
The standard connector looks like a hole, inside of which there is a groove, which is used to fix the RJ 45 port and 8 contacts that resemble metal strips in appearance.
Their parameters exactly match the strip contacts at the input. Each of the contacts has its own numbers 1-8 and they have their own pairs.
Namely:
The ports themselves are: MDI (Medium Dependent Interface); MDI-X (Medium Dependent Interface crossover). Each of them has pairs of contacts that have different purposes, and they are swapped. In other words, if in the MDI connector pair 1-2 is responsible for transmitting the signal, and pair 3-6 is the signal receiver, then in the MDI-X port everything will be the other way around.
To connect devices, you need to connect a transmitter (Tx) and a receiver (Rx). As a rule, most adapters for transmitting Internet signals are equipped with MDI connectors. The MDI-X port can be found in a switch, which is required specifically for connecting a device to it and crimping a twisted pair on both sides, carried out according to the same standard without additional crossing.
There are hubs that have auto-detection of contacts, which allows the device to automatically determine what kind of MDI-X or MDI port it is. There are types of switches that can be connected using a regular simple cable without crossing, or through a special port called UpLink. There is another way to connect a port that can function as both MDI-X and MDI, depending on the position of the switch or buttons.
Crimping twisted pair (video)
In general, connecting the Internet to a computer or laptop is not too difficult; you just need to follow all the rules and safety precautions, which will help make installation without problems and avoid harm to health.
Good day, dear visitors! I then remembered that I have not yet written about how to crimp a network cable and how to crimp it. I think you know what a network cable is. This is the cable through which you most likely receive the Internet, connect a computer to a router, or two computers directly, simply by connecting the network cable to the network cards of two computers.
And you probably know that the network cable is sold without connectors. Connectors are a thing at the end of a network cable that connects to a network card, router, etc. Why is this? Can you imagine what holes would have to be drilled in order to push the connector through :). And so, a network cable is laid and after that RJ-45 connectors are crimped onto it, everything is very convenient and thought out. Well, now we have come to the point that the network cable needs to be crimped, this means that you need to put a connector on the cable and fix it.
I just have a network cable, several RJ-45 connectors, a special tool and a phone with which I will photograph all this, so that my instructions are clear and you quickly learn how to crimp a twisted pair cable.
To crimp the network cable we need:
- Myself network cable, measure immediately required amount cable.
- Connectors. In theory, you only need two, but I advise you to buy more, just in case :). They are not expensive, and you can buy them at any computer store, just like a cable.
- Crimping tool. There are several options, ideally you need to buy a special tool, crimper. Like the one I have in the photo above. I bought mine for 75 UAH. (300 rubles). If you don’t have such a thing, you can use a screwdriver, but I don’t recommend it.
- If you crimp with a screwdriver, you will also need a regular knife to strip the cable.
Well, let's get started.
Crimping the network cable
There is one more nuance; we need to decide which of the two options we will use to crimp the cable.
Straight– such a cable is suitable for connecting a computer to a router, for a regular Internet cable, etc. We can say that this is a standard.


Get to the point.
Take the cable and remove the top insulation. Simply stepping back about two centimeters from the beginning of the cable, we make an incision in the top insulation; in a tool like mine, there is a special hole into which we insert the cable and simply twist the crimper around the cable. Then remove the white insulation by simply pulling it off the cable.


Now we unwind all the wiring so that they are one at a time. We pinch them with our fingers and arrange them in the order we need, depending on which cable you are crimping. See diagrams above.
When all the wires are aligned correctly, you can still trim them a little if they turn out to be very long, and it won’t hurt to align them. This means that when everything is ready, we very carefully and slowly begin to insert these wires into the connector. Make sure that the wires fit into the connector correctly, each into its own hole. Once the cable is inserted into the connector, double-check that the cores are positioned correctly, then insert the connector into the crimper and squeeze the handles.


