Welcome sound. Windows greeting sound. Welcome sounds in Windows XP
It's nice to deal with a self-oriented, loved one (user-oriented) Windows operating system. It not only does everything the user needs, but also accompanies it with various sound effects - short and figurative melodies that reflect the essence of what is happening.http://www.compgramotnost.ru/window...tstviya-windowsSome people like it, some don't. Therefore, you can customize the Windows greeting sounds to suit your own preferences.
Windows greeting sounds indicate the sound of various events:
- login to Windows
- exit Windows
- completion of printing,
- shutting down Windows
- notification of receipt of mail, etc.
In Windows, these sounds can be changed - let's look at how to do this first for Windows 7, and then for Windows XP.
Welcome sounds in Windows 7
You can choose the Windows 7 greeting sound if you select Hardware and Sound in Control Panel, then Sound:
Or the second option is how you can find the “Sound” window: in the Control Panel, select “Appearance and Personalization” - “Personalization”, at the bottom “Sounds”.
In the “Sound” window, go to the “Sounds” tab:
Welcome sounds in Windows 7
If in the “Sound Scheme” window (number 1 in the screenshot) you select “No Sound” and then click on the “Apply” button, then the entire sound setup is completed. The reason for this is that from now on, all Windows work on your computer will take place in complete silence. I don’t know who it is, but I like this particular option - there are no Windows welcome sounds.
If you need sounds, then in the “Sound” window select any “Sound scheme” except “No sound”, for example, in the screenshot (number 1) the “default” sound scheme is selected. In the “Program events” list (number 2), select the desired event, for example, “Login to Windows”.
We select any sound from among those proposed (number 3 in the screenshot). If desired, click the “Check” button, after which you can hear the selected soundtrack. After the selection is made, all that remains is to click on “Apply”.
Pay attention to the checkbox next to “Play Windows startup ringtone” (number 5 in the screenshot). If you uncheck this box, this melody will not be played when Windows starts.
From the text description of how to change the Windows 7 greeting sounds, let's move on to the video format:
Welcome sounds in Windows XP
For Windows XP, Windows welcome sounds are configured in the same way. To do this, go to Start – Settings – Control Panel – Sounds and Audio Devices – Sounds tab:
Sound greeting in Windows XP
- Select a sound scheme, for example, “Standard Windows” (number 1 in the screenshot)
- We find the desired “Program event”, for example, “Start Windows” (number 2 in the screenshot)
- We select the appropriate sound (number 3) for the program event selected in the 2nd step
- Click the “Apply” button (number 4).
If the Windows XP greeting sounds are not needed, that is, you need silence, then just select the “No sounds” option in the “Sound scheme” drop-down window (number 1 in the screenshot).
Original post and comments at
It's nice to deal with a self-oriented, loved one (user-oriented) Windows operating system. It not only does everything the user needs, but also accompanies it with various sound effects - short and figurative melodies that reflect the essence of what is happening.
Some people like it, some don't. Therefore, you can customize the Windows greeting sounds to suit your own preferences.
Windows greeting sounds indicate the sound of various events:
- login to Windows
- exit Windows
- completion of printing,
- shutting down Windows
- notification of receipt of mail, etc.
In Windows, these sounds can be changed - let's look at how to do this first for Windows 7, and then for Windows XP.
Welcome sounds in Windows 7
You can choose the Windows 7 greeting sound by selecting Hardware and Sound in Control Panel, then Sound (Figure 1 below):
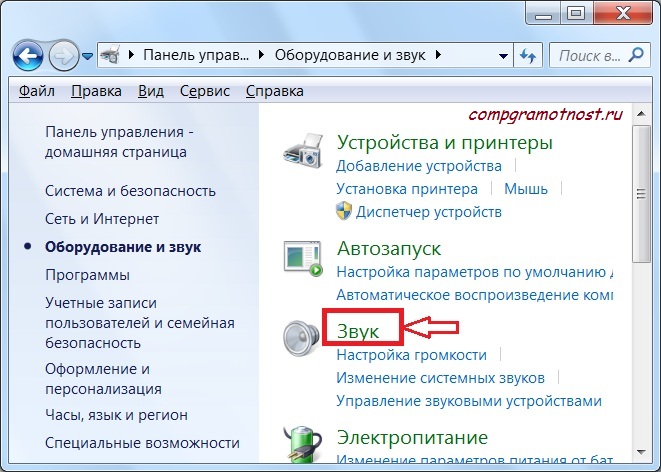
Rice. 1 We are looking for a window where you can configure the system sounds of Windows 7
Or the second option is how you can find the “Sound” window: in the Control Panel, select “Appearance and Personalization” - “Personalization”, at the bottom “Sounds”.
In the “Sound” window, go to the “Sounds” tab (Fig. 2 below):

Rice. 2 Welcome sounds in Windows 7
If in the “Sound Scheme” window (number 1 in Fig. 2) select “No sound” and then click on the “Apply” button, then the entire sound setup is completed. The reason for this is that from now on, all Windows work on your computer will take place in complete silence. I don’t know who it is, but I like this particular option - there are no Windows welcome sounds.
If you need sounds, then in the “Sound” window select any “Sound Scheme” except “No Sound”, for example, in the screenshot (number 1 in Fig. 2) the “default” sound scheme is selected. In the “Program events” list (number 2 in Fig. 2), select the desired event, for example, “Login to Windows”.
We select any sound from among those proposed (number 3 in Fig. 2). If desired, click the “Check” button, after which you can hear the selected soundtrack. After the selection is made, all that remains is to click on “Apply”.
Pay attention to the checkbox next to “Play Windows startup ringtone” (number 5 in Fig. 2). If you uncheck this box, this melody will not be played when Windows starts.
From the text description of how to change the Windows 7 greeting sounds, let's move on to the video format:
Welcome sounds in Windows XP
Windows greeting sounds are configured in the same way. To do this, go to Start – Settings – Control Panel – Sounds and Audio Devices – Sounds tab:

Rice. 3 Sound greeting in Windows XP
- Select a sound scheme, for example, “Standard Windows” (number 1 in Fig. 3).
- We find the desired “Program event”, for example, “Start Windows” (number 2 in Fig. 3).
- We select the appropriate sound (number 3 in Fig. 3) for the program event selected in the 2nd step.
- Click the “Apply” button (number 4 in Fig. 3).
If the Windows XP greeting sounds are not needed, that is, you need silence, then just select the “No sounds” option in the “Sound scheme” drop-down window (number 1 in Fig. 3).
Which do you prefer – when Windows welcome sounds are turned on or when they are turned off?
With respect and faith in benefit, Nadezhda
When you start your computer, you usually hear a Windows welcome sound. This greeting music can be changed or turned off altogether.
How to remove Windows greeting
Open Control Panel and go to the “Hardware and Sound” category.
Control Panel opens category Hardware and Sound  Default voice greeting music is disabled
In this window you need to go to the “Sounds” tab. To disable the standard Windows welcome sounds, you need to uncheck the “Play Windows startup ringtone” checkbox on this tab and click the “OK” button.
How to change Windows 7 greeting
You can change the greeting sound in Windows 7 to some non-standard greeting, for example, a greeting in verse or a voice greeting in English or Russian, and you can also make a musical greeting from your favorite music track. To do this, in the “Sound” window, on the “Sounds” tab, find the “Login to Windows” program event and click on it.
 Window called Sound
 After this, the “Browse” button is activated. Click on it and a window will open in which you need to find the file you need.
 This folder contains the standard Windows 7 welcome ringtone
 This file must have a .WAV extension. You can make a file with the .WAV extension into a sound file. After you find the file you need, you need to click on it and click the “Open” button, and in the “Sound” window you need to click the “OK” button. Your greeting will now be played when Windows starts.
How to change your greeting in Windows 8
The Windows 8 greeting can be changed in exactly the same way as the Windows 7 greeting is changed. The only difference is that by default in Windows 8 in the “Sound” window on the “Sounds” tab there are no program events “Login to Windows”, “Exit Windows” " and "Shut down Windows." Therefore, you must first enable the Windows Logon software event for it to appear. You can enable it in the Registry Editor. We launch the Run command by simultaneously pressing the WIN + R keys on the keyboard. The Run window opens.
 Run regedit command
 In this window you need to enter the command “regedit” without quotes and click the “OK” button. The Registry Editor will open.
 Find the WindowsLogon branch in the Registry Editor
 In this registry editor, you need to follow the path HKEY_CURRENT_USER - AppEvents - EventLabels - WindowsLogon.
 Find the ExcludeFromCPL parameter and change it
 By clicking on WindowsLogon in the right window, you need to right-click on the ExcludeFromCPL item and select “Change” from the menu that appears. A small window will open in which you need to set the value to 0 and click “OK”.
 Change the value of the ExcludeFromCPL parameter to 0
 After this, you can close the registry editor and the “Login to Windows” program event will appear in the “Sound” window on the “Sounds” tab. Now you can safely change your greeting.
It is probably not an exaggeration that every personal computer user sooner or later begins to customize the installed operating system for himself. Either I don’t like the standard loading window or the color scheme. Sometimes you want to change the appearance of folders. You never know.
Windows sounds are also annoying. While various system events are reproduced, as a rule, without causing irritation, the welcome and shutdown sounds leave much to be desired. If you decide to change something in your operating system, then perhaps the most interesting thing will be to change the standard Windows greeting and shutdown to a pleasant female voice: “Hello”, which you will hear when you turn on the computer and “Bye” during it shutdown
Replacing system sounds in Windows XP is not difficult. It is enough to place them in the “Windows > Media” folder. Then, through “Control Panel > Sounds and Audio Devices > Sounds,” change to your own sounds, which should be in WAV format (Windows PCM). Download free sounds “Hello”, “Bye, bye...” forWindows XP is possible .
Windows startup and shutdown tones
It's a little different in Windows 7. Not all system sounds are located in the Windows > Media folder. For such an upgrade of Windows 7, you will need two files. One of them is called "imageres.dll", which contains a greeting, and an audio file in WAV format (Windows PCM), the name of which can be anything.
To get started, download for free “imageres.dll” with the greeting sound “Hello”, a WAV file with the sound “Bye, bye...”.
However, the “imageres.dll” library is protected by Windows 7 and the operating system cannot replace the file using standard deletion, copying, etc. operations. To replace the "imageres.dll" library, you must first become the owner of this file, then change the system folder permissions settings for the "imageres.dll" file.
Stage No. 1. Become the owner of the "imageres.dll" file.
To take ownership of the “imageres.dll” file, go to C:\Windows\System32.

Right-click the imageres.dll file and select Properties.

The "imageres.dll Properties" tab will open.

From the properties menu, select Security.

In the new window, click "Advanced".

In the “Advanced Security Settings for imageres.dll” tab, click “Owner”.

Click "Edit".

Left-click “Administrators (X\Administrators)” and click “Apply”. You will see that you have just taken ownership of this object. And to change permissions, you need to close and reopen the properties window of this object, that is, the “imageres.dll” file.

Click OK.
Stage No. 2. Changing permissions.
To change permissions on the imageres.dll file, go to C:\Windows\System32 again. Select a file "imagers.dll" right-click and select Properties. In the properties of "imageres.dll" click "Security".

Select with the left mouse button « Administrators (X\Administrators) » and click "Advanced".

Select "Permissions... Administrators (X\Administrator...)" and click "Change Permissions".

Again, highlight “Allow... Administrators (X\Administrator...) and click “Change”.

In the “Permission element for “imageres.dll” tab, check the boxes next to all permissions and click “OK”.

When Windows Security warns you that you are about to change the permissions settings for system folders and that this may cause unexpected problems and compromise security, click YES.

Select the “imageres.dll” file with the right mouse button and select “Rename”. As an example, you can change the file extension to, for example, “imageres.dllll”. And click "OK". Copy the new “imageres.dll” file to the C:\Windows\System32 folder.

Restart your computer. You will hear a "Hello" greeting as your computer boots. After the reboot, the renamed “imageres.dllll” file from the “System32” folder can be deleted.
As for the Windows shutdown sound, go to C:\Windows\Media, create in the folder « Media » folder with any name and place audio file with the sound "Bye, bye" to the created folder.

Then go to Control Panel > Hardware and Sound > Change system sounds. From the list of events, select “Windows Shutdown”. Using the "Browse" button, specify the path to the file. Click "Check". If you hear "Bye, bye" sounds, click Apply and OK.
Note.
To play a welcome melody when Windows boots, in the system sound settings, opposite "Play startup melody" Windows" should be checked.
When you change the sound scheme or theme, the greeting sound remains unchanged. But the Windows shutdown sound will have to be turned on again.
You can download the "Hello" audio greeting for Windows 10 for free. The archive contains instructions in video format. As for the sound of Windows shutting down, this is a system event in the new operating system Windows 10 not provided.
Keep in mind that working with system files always involves risk. If you use programs to back up your hard drive data, create a backup copy of your operating system and bootable media with the offline version of the program! If you are using Acronis products, make the change first by enabling Try&Decide mode, which allows you to create a virtual disk with your operating system. Using this temporary virtual disk, completely isolated from the installed system, you can make any changes to the system without worrying that they may damage the system installed on your computer! Or use the built-in Windows Backup and Restore feature to create a system backup (system image). Create a system repair disc that can help you fix a problem with your computer if it won't start. To access Backup and Restore component Right-click the Start button and select Control Panel > Backup and Restore (Windows 7).


