Rambler incoming mail server port on iPhone. How to Set Up Email Accounts on iPhone or iPad
Adding an account and setting up mail on iPhone is done in two ways - automatically and manually. Which method is more convenient is up to the user to decide.
For users of popular email services, the Apple device can independently carry out the setup in automatic mode. You just need to enter your email address and password. This is done in the following sequence:
- In the “Settings” of the iPhone, a submenu of accounts opens, where the “Add account” option is selected. In earlier versions of the operating system, this button is located in the “Mail” section.
- In the list that opens, click the service whose account the user is going to add. If its name is not in the list, select the “Other” line, where the service is entered manually.
- Enter the postal address and enter the password for it. Clicking the corresponding button starts checking the added information.
- Email account details can optionally be displayed on the phone. After setting the display parameters, the procedure is completed by clicking the “Save” button.
Russian sector
If the owner of an iPhone prefers Russian space services, the standard application makes it possible to do this as well. In the already mentioned Mail settings section on iPhone – “Other”, the following steps are taken:
- In the “New account” item, fill in the information lines. The “name” can be anything, it will be seen by email recipients as the author of the message. The “E-mail” field is filled in with the address of an existing mailbox. Enter the “Password” to access this mailbox and enter the corresponding domain in the “Description” section - Yandex.ru, Mail.ru or the domain of any other Russian service.
- Identification starts. When it passes, click “Save” and use of the service becomes available. If you still cannot receive and send letters, you will need to go through a few more steps.
- In the menu of the created account, select “Outgoing Mail Server”. To specify the primary server, sequentially press SMTP – “Not configured” – “Host name”. The last item is filled in in the form “smtp.example.ru”, where “example” is the name of the service being configured. By selecting “Save”, the primary server is stmp.example.ru.
- By clicking it, you should enable “Use SSL” in the options. The port value is set to 465.
- After saving the changes and returning to the account menu, you need to go to the “Advanced” section. SSL is also enabled here. The port value is set to 993.
Thus, you can add an account for the Russian sector, regardless of affiliation.
Selection of options
Almost always, the user does not need to manually enter parameters. If automatic regulation does not work, you may need to request the necessary information from the mail service.
The user will need to enter:
- protocol (IMAP, POP);
- port number of the incoming server (IMAP standard – 143 and 993, POP – 110 and 995);
- encryption option (SSL, TLS);
- outgoing port number (standard: 25, 587, 465).
This information will need to be obtained from the email service that the user plans to add to his iPhone. Other data required for manual entry should already be familiar and no special handling is required.
When accessing mail from multiple devices, it is preferable to choose IMAP. In this case, the data is stored by the mail server, so regardless of the access method, the user sees the full contents of the mailbox. If POP is used, messages received on one device will no longer be visible on the other.
Other additions to settings
According to the preference of the iPhone owner, it is possible to select the mailbox checking mode.
In the “Downloading data” section of the account, you can choose the items “Manual”, “Push”, “Sampling”.
The first option assigns the function of downloading mail to the user himself. Every time you need to read a letter on your iPhone, you will have to activate message updating directly in the application.
“Push” notifies you of the receipt of new messages in real time, which is essential when waiting for important letters. In this case, increased energy consumption reduces the battery life of the smartphone. Also, “Push” does not synchronize with all servers.
“Sampling” combines the advantages of the two previous behavior models. There is automatic downloading - it turns on only when the device is charging and a Wi-Fi connection is established. There is a manual download that is activated immediately when you enter the application, without the need to access it directly. And there is an interval mode in which mail is downloaded from the server at specified intervals. The shorter these intervals, the faster the battery charge is consumed.
Box liquidation
Removing any of the email accounts added there from your phone is even easier than adding it. It should be taken into account that all data associated with the deleted account will be lost.
- In “Settings”, select the “Mail, Addresses, Calendars” submenu, just like before binding an email address. In the list that opens, click the address intended for deletion.
- At the bottom of the screen, the user sees the “Delete account” option. But even by clicking on it, you still have the opportunity to change your mind - the system will ask for confirmation “Delete from iPhone.” If the decision is irrevocable, it is confirmed and all information associated with the box disappears.
The iPhone's focus on maximum convenience allows you to freely add and delete email accounts. But the user needs to be careful not to lose useful information when eliminating an extra box. Once deleted, this information can no longer be restored.
Setting up email on Apple devices is a very simple procedure that even a novice user can do. Moreover, all i-mans have at their disposal our detailed instructions, which describe all the necessary steps step by step. Let's get started?
To configure email settings on your iPhone/iPad/iPod Touch, you can just open this service and select the email service that you want to use in the future. But if after this the mail does not work, then you need more detailed settings.
Go to the settings menu, select Mail, Contacts, Calendars, and then Add an account. Now fill in all the available fields one by one. The first columns in line are POP and IMAP. How they should be filled out is described on the official website of the relevant postal service. Visit the web resource and transfer the sample data from there. Immediately after this, open the Settings menu again and click on the bottommost Advanced button. Here you must provide information about your email account, that is, enter your email address and password.
For a more clear explanation, below we provide you with examples of filling out settings for the most common email services. Provided that your name is Boris Kanarin, the settings for yandex.ru will look like this:
Bookmark: POR
- Address: [email protected](Your current email address)
- Description: [email protected](this address will take place in the “name of postal service” paragraph)
Incoming mail server
- Host name: pop.yandex.ru
- Login: Kanarin_Bor (without the @yandex.ru part)
Outgoing mail server
- Host name: smtp.yandex.ru
- Login: Kanarin_Bor (without ending @yandex.ru)
- Password: *********** (password for personal mailbox)
Additional Inbox
- Use SSL: disabled
- Server port: 110
Additional Outbox
- Use SSL: disabled
- Identification: enter your password
If you are still the same Boris Kanarin, but want to use the rambler.ru service, then here are the settings you need:
Bookmark: POR
- Name: Kanarin Boris (this is the name that will appear in the “from” line for all recipients of your letters)
Incoming mail server
- Node name: mail.rambler.ru
- Login: [email protected]
Outgoing mail server
- Node name: mail.rambler.ru
- Login: [email protected]
- Password: ************ (password for personal mailbox)
Additional Inbox
- Use SSL: enabled
- Identification: enter your password
- Server port: 110 or 995
Additional Outbox
- Use SSL: enabled
- Identification: enter your password
- Server port: 25 or 587
Bookmark: IMAP
- Name: Kanarin Boris (this is the name that will appear in the “from” line for all recipients of your letters)
- Address: [email protected](your current email address)
- Description: [email protected](this address will take place in the “name of postal service” paragraph)
Incoming mail server
- Node name: mail.rambler.ru
- Login: [email protected]
- Password:************ (password for personal mailbox)
Outgoing mail server
- Node name: mail.rambler.ru
- Login: [email protected]
- Password: ************ (password for personal mailbox)
Additional Inbox
- Use SSL: enabled
- Identification: enter your password
- Server port: 993
Additional Outbox
- Use SSL: enabled
- Identification: enter your password
- Server port: 25 or 587 (optional)
If you, Boris Kanarin, intend to use the services of a Mail.ru agent, then in your mail application the picture will be as follows:
Bookmark: POR
- Name: Kanarin Boris (this is the name that will appear in the “from” line for all recipients of your letters)
- Address: [email protected](Your current email address)
- Description: [email protected](this address will take place in the “name of postal service” paragraph)
Incoming mail server
- Host name: pop.mail.ru
- Login: Kanarin_Bor (without the @mail.ru part)
- Password: *********** (password for personal mailbox)
Outgoing mail server
- Host name: smtp.mail.ru
- Login: Kanarin_Bor (without ending @mail.ru)
- Password: *********** (password for personal mailbox)
Additional Inbox
- Use SSL: disabled
- Server port: 110
Additional Outbox
- Use SSL: disabled
- Identification: enter your password
- Server port: 25 or 2525 or 587 (optional)
For the future client of the gmail.ru mail service Boris Kanarin, the following parameters are relevant:
Bookmark: POR
- Name: Kanarin Boris (this is the name that will appear in the “from” line for all recipients of your letters)
- Address: [email protected](Your current email address)
- Description: [email protected](this address will take place in the “name of postal service” paragraph)
Incoming mail server
- Host name: mail.gmail.ru
- Login: [email protected]
Outgoing mail server
- Host name: mail.gmail.ru
- Login: [email protected]
- Password: ********** (password for personal mailbox)
Additional Inbox
- Use SSL: disabled
- Identification: enter your password
- Server port: 110
Additional Outbox
- Use SSL: disabled
- Identification: enter your password
- Server port: 25 or 2525
For mail services bk.ru, list.ru and inbox.ru, the settings must be set similarly to the given parameters of the Yandex or mail client. Please pay special attention to the fact that the data in some fields is not repeated, but is filled in according to the same principle. That is, if in Yandex in the “Node name” item we see “pop.yandex.ru”, then for, for example, list it will be pop.list.ru, for bk pop.bk.ru and so on. In fact, only this node name, which we have already paid attention to, and the “tail” of the email after the @ icon change. The rest of the settings are unchanged, you can simply rewrite them.
When all fields of the new account are filled out correctly, click “Save”. That's all, now you can send and receive electronic messages using your i-player, smartphone or tablet. As you can see, creating an account for the postal service yourself is not difficult at all.
Now you can move on to working directly with mail, for example, select the optimal operating mode (black list or white list). You can activate the desired option through the main mail menu.
Adding a mailbox registered with Google (Gmail), AOL or Yahoo to your Apple gadget is not a difficult task. However, when the need arises to add an account for a Russian-language mail service - for example, Rambler– the user of a mobile device has to rack his brain. The difficulty lies in the fact that when setting up mail on an iPhone, it is not enough to enter your login and password - the application “ Mail"requires you to provide information that is usually unknown to the average user. You will learn where to get such information and how to set up mail on iPhone successfully from this article.
If you are the owner of the now popular " googlemail", you can consider yourself lucky - in iPhone, the settings of this email client are set by default, so you can do without “dancing with a tambourine.”
Adding a Google mailbox goes like this:
Step 1. Go to the program " Mail"on the gadget.
Step 2. From the options, select " Google».

Step 3. Fill in the fields " Name», « Email», « Password" In field " Description» the note “ will appear Gmail" You can change the text in this field yourself.

Step 4. After entering all the data, click " Further" - this will start the information verification procedure.
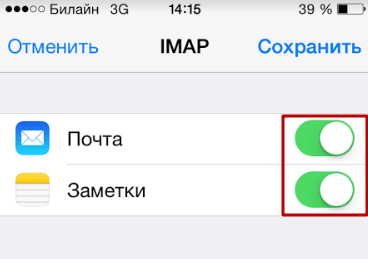
Step 5. At the next stage, the system will offer to synchronize contacts, calendars and notes between the mobile device and the email client. Move all sliders to the active position and click " Save».

After this, Google mailbox will be added to iPhone. Application " Mail" will immediately notify you of an incoming letter, which indicates that Google Mail was accessed from an iOS device.

How to set up Yandex.Mail or another Russian-language email service?
Adding Yandex.Mail is easier than other Russian-language service. The setup is performed as follows:
Step 1. Go to " Mail" and click on the option " Other».

Step 2. Proceed to the section " New account».
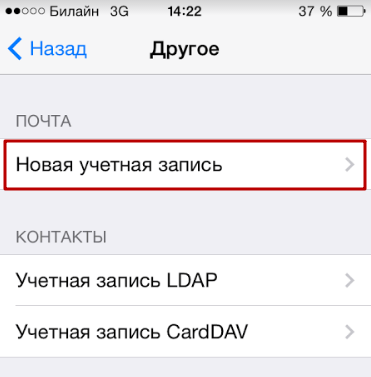
Step 3. Fill in the same fields as during installation Gmail.

Step 4. Set up synchronization of mail and notes - activate two toggle switches. Then click " Save».
There is no need to specify anything else - the Yandex mailbox will be added.
With clients Rambler And Mail.ru everything is more complicated: after filling out the required fields, the application “ Mail» asks you to provide mail server details.

Where can you get such information?
How to find out your mail settings through the Apple website?
Get data about servers to clients Mail.ru You can use the service on the official Apple website. The service is called " Finding Mail settings"and is located at the link https://www.apple.com/ru/support/mail-settings-lookup/.
All that is required from the user is to “drive” the email address into the (only) field and press the blue arrow button.

Please note the note in small print below. According to this note, Apple may use the data users provide to it to improve the experience. This essentially means that the email address you enter will be saved in the company's database.
After a second of waiting, the service will display all the client data.

Which data is actually useful?
- In the block " Incoming mail server" in field " Node name"You need to transfer the server hostname ( imap.mail.ru). In field " Username» you should specify your email address – again. The password must be re-entered - this is an important point.
- In the block " Outgoing mail server"You can only fill in one field - " Node name" You should copy the server hostname here ( smtp.mail.ru). The remaining fields do not need to be filled in.
When you have completed the server settings, click " Further" At the final stage, you need to switch the toggle switches to synchronize notes and mail and click on “ Save».

The described method will give results if you are setting up a Mail.ru mailbox - but with Rambler it is more difficult. Service " Finding Mail settings"on the Apple website will not show information about Rambler Mail servers.

When setting up mail Rambler you need to do this:
- In the block " Incoming mail server" in field " Node name» should be entered pop.rambler.ru, in the fields " Username" And " Password“—respectively, the email address and password for it.
- In the block " Outgoing mail server" in field " Node name» needs to be registered smtp.rambler.ru. Other fields in this block can be left blank.
How to adjust email on iPhone?
The Apple device leaves the opportunity to customize email to suit the user's needs. It’s easy to find out what options are available to the owner of an iPhone by following the path “ Settings» — « Mail, addresses, calendars» and clicking on the name of the mailbox.

At the very bottom of the section " Account" there will be a subsection " Additionally“—you need to go exactly there.

In the subsection " Additionally"There are the following mail settings blocks:
Box behavior. Through the block " Box behavior"The correspondence between mailboxes on the iPhone and on the server is configured. For example, with the configuration shown in the figure below, emails sent to " Cart"from iPhone will be saved in the folder " Outgoing" on server.

Where to move unwanted messages. If you set in this block " Archival box", but not " Deleted", emails erased via iPhone will be archived on the server - just in case.
Deleted messages. In this block you can set after what period of time letters from the mailbox will be deleted irrevocably. There is an option " Never"—for the most cautious users.

Setting up inbox. This block contains several parameters:

- Use SSL. If the slider is activated, emails are sent over a secure channel - as a result, you don’t have to worry about confidentiality.
- Authentication. You can configure the iPhone so that the user is authorized by mail not by entering a username and password, but in other ways - say, through MD5 Challenge response. It’s better not to mess with the authentication settings: entering a password is the easiest way to access your email.
- S/Mime. Option S/Mime allows you to send encrypted messages. Let us immediately note: in order to use S/Mime, you need to have a digital certificate.
There is no need to change anything in the “IMAP Path Prefix” and “Server Port” fields. The first field does not need to be filled in at all; the second field is filled in automatically when the user adds a mailbox.
How to sign out of mail on iPhone?
You need to delete your account from iPhone as follows:
Step 1. Go to " Settings" and look for the section " Mail, addresses, calendars».

Step 2. In the block " Accounts» Find the box you want to erase and click on it.

Step 3. On the next screen, click the button Delete your account».

Step 4. Confirm your intention to delete your account - click on “ Delete from iPhone».

When you delete your account from your mobile device, all information that was synchronized with your account will also be lost. Therefore, before deleting your account, make sure to transfer valuable information to a reliable medium.
Conclusion
Application " Mail» on iPhone allows add existing mailbox - here it is register a new one Using the built-in program will not work. However, this does not mean that creating an account on an Apple mobile device is impossible. Any of the popular email clients has its own application in the AppStore. By downloading and installing a third-party program, you can manage your email accounts without any hassle and create new accounts directly on your iPhone. Problems arise, as usual, only with Rambler / By mail: This client’s application places high demands on the operating system of the mobile device - the iPhone must have iOS version no lower than 9.0.
For owners of mobile devices on iOS, it is possible to synchronize their device with a Yandex mail account. About,
how to do this will be discussed in this article.
Yandex.Mail, like most email services, requires certain permissions for use in third-party client applications (both desktop and mobile). To provide them, do the following:

Setting up Yandex.Mail on iPhone
There are several options for connecting to this email service, after which you will be able to work with letters on your mobile device.
Method 1: System Application
For this procedure you will only need the device itself and account information:

- Incoming mail server: Host name - imap.yandex.ru
- Outgoing mail server: Host name - smtp.yandex.ru


After completing the steps described above, Yandex.Mail on iPhone will be synchronized, configured and ready to work. But sometimes these manipulations are not enough - the mail does not work or gives an error. In this case, you must do the following:
- Open "Settings" devices and go to the item "Accounts and Passwords"(on older versions of iOS it is called "Mail, addresses, calendars").
- Select Yandex there, and then the account you are setting up.
- In chapter "Outgoing mail server" select the corresponding custom box SMTP(there should be only one).
- Mailbox yandex.ru We have already been linked, but it is not working yet. To “start” it, in the section "Primary server" click on the item smtp.yandex.com, if she is there.

In cases where there are no mailboxes yet, select "Not configured". In field "Node name" write down the address smtp.yandex.com.
- Save the information you entered and click on again smtp.yandex.com.
- Make sure the item "Use SSL" activated, and in the field "Server port" value is written 465
.

But it happens that mail does not work with this port number. If you have a similar problem, try entering the following value - 587 , everything works well on it.
- Now click “Done” - “Back” and go to the tab "Additionally", located at the very bottom.
- In chapter "Inbox Settings" item must be activated "Use SSL" and the following server port is specified - 993 .


Note: The Username field is marked as optional. This is partly true, but sometimes it is the lack of information specified in it that causes problems with sending/receiving letters. In such cases, you must enter the mailbox name there, but without part“@yandex.ru”, that is, if, for example, our email [email protected], you only need to enter lumpics.


Now Yandex.Mail will definitely work normally. We will consider another option for setting it up on the iPhone.

Method 2: Official app
The mail service provides a special program for iPhone users. You can find it on the website. After downloading and installing, run the program and follow the installer's instructions. To add an existing email, you only need to enter its address and password in the application.

This completes the Yandex mail setup. All letters will be displayed in the application itself.
In this manual you will find the answer to the question “How to set up mail on an iPhone (iPhone)” of any model. Follow the steps and everything will work out.
All you need for this is Internet access. Owners of Iphone mobile phones often wonder: how to set up mail on their gadget? In this article we will try to give step-by-step instructions for setting up mail on an iPhone.
If you have difficulties setting up mail on your iPhone and you are a resident of St. Petersburg, you can contact our service center staff for help. We work daily and without breaks. We can also perform iPhone repairs using original spare parts.
To become a mobile mail user, you need to do the following:
- Open the “Settings” section (for English versions - “Settings”);
- Select the item “Mail, addresses, calendars”;
- In the “Accounts” item, select “Add...” (AddAcount);
- From the list of suggested email sites, select the one you need, or click “Other”;
- In the window that appears, select “New Account” and then enter your name. The entered name will be displayed to those to whom you will send letters;
- In the next “Email” field, enter your email address. This could be a mailbox opened on Mail.ru, Yandex.ru, Rambler.ru, and so on. Be extremely careful when entering your address. It must be written in the same format as on the website;
- In the “Password” field, enter the password for your email;
- In the “Description” column (“Decription”), enter a name for the configured mail to easily distinguish one configured mailbox from another;
- And finally, click “Save”;
- After completing the operations, exit the settings menu and click on Pop on the screen.
Video instructions on how to set up mail on iPhone.
In this section you need to configure the incoming mail server (for English-language Iphone phones - Incoming mail server):
- In the “Node name” column, enter pop.rambler.ru or pop.mail.ru, or another site on which the email box was created;
- In the “Username” column, again enter the postal address very carefully, without errors;
- There is no need to enter the password, because you have already written it down.
- In the “Node name” column, enter smtp.yandex.ru or smtp.rambler.ru;
- In the “Username” column, again very carefully enter the entire email address, for example [email protected];
- Enter the mailbox password.
- We save the changes, and your mail is ready to use!


