Connect to a virtual server via SSH and SFTP. Standard SSH port. Basic hotkeys
In this article we will look at modern and convenient ways to work with a server via SSH with VPS from Infobox and the cloud.
We will tell you not only about the usual connection method, but also about organizing a stable connection over an unstable Internet (for example, 3G modems), as well as additional utilities that help you work via SSH.
If you are a Windows user and you need to quickly and easily connect to a Linux server, go to the “Putty or how to quickly connect to SSH from Windows” section.
What you need to know to connect via SSH
To connect you need:- Server IP address
- login
- password
Where to get data to connect to the VPS NG server from Infobox
After ordering the service, log in to the control panel https://panel.infobox.ru.Select the “VPS NG” service in the upper right corner of the control panel from the drop-down list.
Then go to the “VPS” tab.
In this section you will see server ip address and you can install password to access the server.

Use your username to connect root, ip address from this page and installed password.
If you have forgotten your password, click on the “Edit access settings” item shown in the screenshot above.
Where to get data to connect to a VPS server from Infobox
Log in to the control panel https://panel.infobox.ru.Select the VPS service in the upper right corner of the control panel in the drop-down list (the service name contains the name of the ordered OS and the location region).
Then go to the “VPS Management” tab.

Use username root, password and server IP address from this page.
Where to get data to connect to the InfoboxCloud server
After creating the server, the connection data will be sent to you by email. This is enough to connect.
If you have lost the email with your access data and want to access the server
By default, the server administrator login is: rootLog in to the control panel at: https://panel.infobox.ru.
Select the “Cloud Servers” service in the upper right corner of the control panel from the drop-down list.
The dedicated IP address for the server can be viewed in the “Cloud Infrastructure” tab of the control panel.

If the field " Dedicated IP address" empty, it means when creating the server you did not add at least 1 dedicated IP address to the server (and therefore there is no access to the server via the Internet, only from the local network).
To add a dedicated IP address, click on the server name.
In the Network settings group, click Configure.

Make sure your network bandwidth (speed) is sufficient (or add more if necessary).
Then click “Add IPv4 Address” and click “Save Changes”.

Now the server has a dedicated IP address.

To change the server access password, click “Change”, as shown in the screenshot above. This way you can set a password to access the server.
Now you know server ip address, login ( root) And password.
Setting up SSH clients
For Windows
To connect to the server you will need an SSH client. If you need to connect quickly, Putty is recommended. If you need to work with unix utilities such as scp, rsync and ssh-copy-id, use Cygwin.Putty or how to quickly connect to SSH from Windows
Download the Putty installer for Windows from The latest release version section and install Putty with default settings.
Launch Putty (Start -> All Applications -> PuTTY -> PuTTY).
Enter the server IP address. Make sure port 22 is selected and the connection type is SSH and click Open.

You will be asked if you trust the server you are connecting to. You need to answer “Yes.”

The connection window will open. Use root as your login and your server password as your password. The password can be pasted from the clipboard with the right mouse button. It is not displayed when you type and paste for security reasons.

The connection was successfully established.
Cygwin or Unix environment on your Windows computer
When working with Linux servers, you may need a similar environment on your computer. It is very convenient to use a single set of utilities on the server and work computer, so be sure to try Cygwin. Linux seems complicated at first glance. As you gradually master this OS, you will increasingly need Cygwin. Good things are addictive.Unstable Internet connection when connecting via SSH - what to do?
Often, when working through an unstable network (for example, via 3G/4G mobile Internet or various WiFi access points), the connection to SSH is lost. Let's look at what can be done at the client level to prevent the need for reconnection. These tools are not suitable for performing critical operations on the server (for example, OS upgrade). To perform critical operations, you must additionally use the utilities described in the next section of the article. The purpose of the utilities in this section is to make work via SSH more convenient for the user.AutoSSH
AutoSSH starts a copy of the ssh client and monitors the connection, restarting the ssh client if necessary.Autossh uses ssh to build a ssh redirect loop (connection from the local computer to the remote computer and vice versa) and forwards test data, expecting it to come back. It also supports using a remote echo service to send back test data.
AutoSSH only supports 3 options:
- -M<порт>[: echo port]- used to specify the monitoring port or monitoring port and echo service port. If the echo service port is not specified, the next numbered port is used. For example, if the -M 20000 flag is set, test data will be sent on port 20000 and received on port 20001. If you specify -M 0, connection monitoring will be disabled and autossh will restart ssh only when ssh exits (you can use this with the ServerAliveInterval options and ServerAliveCountMax in OpenSSH if monitoring cannot be used in your situation);
- -f- sends autossh to the background even before ssh is launched (you will not be able to enter the password in this mode);
- -V- displays the autossh version.
To ensure that when the connection is restored you do not have to re-enter the password, allow this user to log in to the server using the key, as shown in the section above.
Installing AutoSSH in Cygwin on Windows
If using Cygwin on Windows, enter:apt-cyg update
apt-cyg install autossh

Now you can connect to the server:
autossh -M 20000 root@server_ip_address 
The connection has been successfully established.
In general, autossh is a fairly convenient tool for working over unstable Internet connections and for organizing SSH tunnels on a server (we will consider this scenario in a separate article). The disadvantage of autossh is that this utility does not solve the problem if there are significant delays on the network when entering commands (which happens on a 3G network). In this case, you will wait for a response from the server for each character you enter, which slows things down somewhat. However, under normal operating conditions, autossh is very helpful in maintaining an SSH connection.
The ability to enter commands without waiting for a server response is solved by Mosh, but the compatibility of this utility is still very limited and reliability is low, so it is not recommended to use it for now.
How to Perform Critical and Time-consuming Operations on a Server: Terminal Multiplexers
If you are updating the OS, installing some software, or simply editing a file on the server, do not work directly after connecting via ssh or autossh. If the SSH connection is closed, you will lose the session that was started when connecting via SSH. To prevent this from happening and when reconnecting via SSH you will definitely end up in an ongoing operation on the server or in an open file editing window from the same moment, use terminal multiplexers on the server: GNU Screen or tmux.GNU Screen
The screen program was originally created to run multiple terminal sessions within a single terminal. However, screen also has another useful property: the ability to disconnect virtual sessions from a physical terminal and connect to another. This, in particular, allows you to run long-running processes on remote machines, without the need to be constantly logged in to them.1. Log into the remote server via SSH.
2. Run screen there
3. You will see a welcome message, press Enter.
4. Now you can do anything as if you were just connected to the server via SSH (for example, run any long-running process).
5. You can detach a session by pressing CTRL + a then d. You can even complete the SSH connection to the server.
6. To return to the session, reconnect via SSH (or autossh will do it) and enter screen -r
You will return to the running session, and in it the process you started earlier continues. We will look at terminal multiplexers in more detail in subsequent articles.
Conclusion
In this article, we tried to cover the basics necessary for convenient work via SSH from various operating systems. Of course, this is not everything that is possible, but it is a good base to start with. If you find an error in the article, think something important needs to be added, or just have a question -SSH (Secure Shell) is a network protocol designed for remote server management and data transfer over TCP encrypted connections. Most hosting services, even virtual ones, today provide access via both FTP and SSH. In my opinion, this is great, SSH is much more convenient and safer to use.
Setting up SSH
The setup will take place for a dedicated server, VDS, VPS on Debian, Ubuntu. The configuration file is located here: /etc/ssh/sshd_config.
If you have regular hosting, everything should be configured as it should, go to the section.
By default, the SSHD daemon (which is what we are making changes to) does not need any settings and works fine. We will only make a couple of small changes in order to limit the access of unwanted persons to the server.
As a result of making incorrect changes to the configuration file, you may lose access to the server via ssh, so make sure you have alternative options to access it, for example using the ISPManager control panel.
How to restrict SSH access
All changes are made to /etc/ssh/sshd_config
For the changes to take effect, you must
Change port
Port 9724Now, when authorizing, you need to specify 9724 instead of the standard 22 port.
The method is very simple and effective against most simple hacker bots that knock on standard ports. The main thing here is not to create a conflict with other services and choose a number that is obviously unused.
Disable communication using the old protocol
Here we define that communication is only possible using the v2 protocol
If you are not logged in root, before all console commands you need to add sudo - it stands for Substitute User and DO- replace the user and do (under him). For example, it allows you to execute commands as a superuser root.
Reduce the number of authorization attempts
MaxAuthTries 2Number of password attempts. Default is 6. If the search fails, the communication session is terminated.
Reduce authorization waiting time
LoginGraceTime 30sBy default, an authorization session can last 120 seconds. After this time it ends. 2 minutes for authorization is overkill; all this time the server keeps the connection open, which is very irrational. Half a minute is enough.
Close IP access
If only you need access, the simplest and most reliable way is to block access from everywhere except your IP or, if it is dynamic, then the IP range.
- Open /etc/hosts.allow and add SSHD there: 192.168.1.1
where 192.168.1.1 is your IP. If you have a dynamic IP, define an IP with a subnet mask and write down your subnet instead of the IP, for example:
SSHD: 192.168.0.0/16
- Open /etc/hosts.deny and add there: SSHD: ALL
Another way to restrict access via IP
You can use the following directive:
AllowUsers = *@1.2.3.4
Here we only allow access for IP 1.2.3.4
SSH authorization using keys
It will be much safer, more convenient and correct to set up ssh authorization without a password. For this purpose, key authorization will be used.
So here are the instructions:
The connection is configured. If you did something wrong, the error Server refused our key will appear during authorization, that is The server did not accept our key. In this case, go through all the points sequentially and look for the error
This article is devoted to setting up remote access to Ubuntu Server. The connection principle is very simple: on the client side we use a program for remote access (for example, Putty), on the server side we install and configure the OpenSSH package. When connecting, the client undergoes an authorization procedure with the server and an encrypted connection is established between them. The principle of operation of the SSH protocol was discussed in more detail in the article on.
The network diagram is shown below. Remote connection to the server will be made from the client computer.
We installed Ubuntu Server on a blank hard drive. After installation, you need to configure the server's network interface to access the network. Namely, set the IP address, network mask, default gateway. If your interface is already configured, you can skip this step. Network interface settings are specified in the file /etc/network/interfaces. To edit we will use a text editor nano.
We get into the editing mode of the interfaces file. We are interested in everything below # The primary network interface. At the moment, the server obtains an IP address via DHCP, which is not entirely correct. The server must have a static IP so that all nodes on the network know exactly its address. Let's configure the network settings manually.

My server is on the local subnet 192.168.1.0/24. The server is assigned IP 192.168.1.2, mask 255.255.255.0, default gateway 192.168.1.1, DNS server address 192.168.0.1

To save the file, press Ctrl + X -> Y -> Enter. To apply the settings you need to restart the network process. You can also simply reboot the server with the sudo reboot command.
Check (command ifconfig -a) - settings are applied

Everything is ready for OpesnSS, which can be installed from the terminal using the commands
$ sudo apt-get install openssh-client
$ sudo apt-get install openssh-server
You can control starting, stopping and restarting the SSH server using the commands
$sudo service ssh stop | start | restart
In fact, you already have SSH access to the server. But for more fine-tuning there is a configuration file at /etc/ssh/sshd_config. Access to configs is carried out only from root.
On the client side, download any program to connect via SSH, I recommend Putty. In the program, all you have to do is enter the server’s IP address and connect to it. When connecting, enter the user name and password.

___________________________
1. General information
SSH (Secure SHell) is a network protocol that allows you to connect to a remote server and execute commands on it, download files and create tunneling TCP connections. A key feature is the encryption of transmitted information. By default, the hosting uses the bash command interpreter.
2. Connection information
You can get information for connecting to the server via SSH and SFTP in the section " Web server" — « Access Control" — « SSH" control panel (https://www.r01.ru, section “For clients”).
- Server address (host): ssh.identifier.r01host.ru— indicated in the “Domain names” block.
- "Identifier"— a unique name for the hosting service, indicated at the top of the control panel next to the contract number.
- SSH username (login): identifier.
- To obtain the SSH user password, click the button "Change password". The new password will be displayed on the screen. To have the password sent to your contact email address, check the box “Specify the password in the letter”.
To connect via SSH to the hosting server, install an ssh client on your computer.
- Setting up the PuTTY ssh client
To upload files to your hosting, use an SFTP client.
- Access to the virtual server via SFTP
3. Working with hosting using Midnight Commander.
Midnight Commander is a two-panel file manager. Has a built-in text editor.

To launch Midnight Commander, connect to your hosting via SSH and enter the command
Basic hotkeys:
- F1: Help;
- F3: Built-in file viewer;
- F4: Built-in text editor;
- F5: Copy file;
- F6: Move (rename) file;
- F8: Delete file;
- F9: Display drop-down menu;
- F10: Exit the program;
- Tab: Transition between panels;
- Insert: Mark a file for multi-file operations, such as copying.
4. Working with hosting from the command line
4.1. Getting help information
To obtain background information on the command you are interested in command type on the command line:
To complete the help, press “q”.
You can usually get quick help for a command by running it with the --help or -h option:
4.2. Navigating the file system
Print current directory:
Go to the user's home directory:
Go to the tmp directory located in the current directory:
Go to the directory using the full path /home/login/sitename.ru/docs (root directory of the sitename.ru site):
cd /home/login/sitename.ru/docs
Go to the parent directory (one level higher):
Go to previous directory:
4.3. View directory contents
Print the contents of the current directory (except hidden files):
Print all contents of the current directory with detailed information:
Print the entire contents of the tmp directory with detailed information:
Display the size of the tmp directory:
4.4. Creating and deleting files and directories
Create a new directory foo in the current directory:
Create a directory structure foo/bar/baz in the current directory:
mkdir -p foo/bar/baz
Remove the foo directory in the current directory. The directory must be empty:
Delete directory foo with all files and subdirectories:
Create an empty file foo:
Delete file foo:
4.5. Viewing and editing file contents
View the contents of a text file (site log file) (Press “q” to exit):
less sitename.ru/logs/access_log
Open file foo in a text editor:
4.6. Copying and moving files
Copy file foo to file bar:
Copy the contents of the old directory to the new directory:
Rename file foo to file bar:
Move the file foo to the existing bar directory named baz:
4.7. Changing access rights
Make foo executable:
Make file foo read-only:
Changing the permissions for all directories nested under directory foo to 755:
find foo -type d -exec chmod 755 () \;
Changing the permissions for all files nested in the foo directory to 644:
find foo -type f -exec chmod 644 () \;
4.8. Process management
Show information about real-time processes (Press “q” to exit):
Show detailed information about all running processes:
Terminate a process based on its process ID (PID) 1234:
Terminate a process by its name:
Restart Apache web server:
~/etc/rc.d/httpd restart
Restart Nginx web server:
~/etc/rc.d/nginx restart
4.9. Working with archives
Create an archive of the docs directory:
tar -czf archive.tar.gz docs
Unpack the archive.tar.gz archive:
tar -xzf archive.tgz
Unpack the archive.zip archive:
unzip archive.zip
Unpack the archive.rar archive:
unrar x archive.rar
Unpack the archive.gz archive:
gunzip archive.gz
4.10. Search files
Find among the site files containing the text “login.mysql” (server address for accessing the database):
grep -R "login.mysql" sitename.ru/docs
Find files named index.php in the current directory and subdirectories.
We present to your attention a new course from the team The Codeby- "Penetration testing of Web Applications from scratch." General theory, working environment preparation, passive fuzzing and fingerprinting, Active fuzzing, Vulnerabilities, Post-exploitation, Tools, Social Engeneering and much more.
What is SSH and why do you need it?
Secure Shell (SSH) is a network protocol that provides shell functions to a remote machine through a secure channel. SSH comes with various security enhancements, including user/host authentication, data encryption, and data integrity, making popular attacks like eavesdropping, DNS/IP spoofing, data forgery, and connection hijacking impossible. etc. Ftp, telnet or rlogin users who use a protocol that transfers data in clear text are highly recommended to switch to SSH.
OpenSSH is an open-source implementation of the SSH protocol that allows you to encrypt your network connection through a set of programs. If you want to have SSH on Linux, you can install OpenSSH, which consists of an OpenSSH server and client packages.
OpenSSH server/client packages come with the following utilities:
- OpenSSH server: sshd (SSH daemon)
- OpenSSH client: scp (secure remote copy), sftp (secure file transfer), slogin/ssh (secure remote login), ssh-add (private key completion), ssh-agent (authentication agent), ssh-keygen (authentication key management ).
Installing OpenSSH server and client on Linux
If you want to install the OpenSSH server/client and configure the OpenSSH server to start automatically, follow the following instructions, which vary depending on the distribution.
Debian, Ubuntu or Linux Mint
$ sudo apt-get install openssh-server openssh-client
On Debian based systems, once installed, OpenSSH will start automatically on boot. If for some reason the OpenSSH server does not start automatically at system startup, you can run the following command to explicitly add ssh to the boot at system startup.
$ sudo update-rc.d ssh defaults
Fedora or CentOS/RHEL 7
$ sudo yum -y install openssh-server openssh-clients $ sudo systemctl start sshd service $ sudo systemctl enable sshd.service
CentOS/RHEL 6
$ sudo yum -y install openssh-server openssh-clients $ sudo service sshd start $ sudo chkconfig sshd on
Arch Linux
$ sudo pacman -Sy openssh $ sudo systemctl start sshd service $ sudo systemctl enable sshd.service
Setting up an OpenSSH server
If you want to configure the OpenSSH server, you can edit the system-wide configuration file located in /etc/ssh/sshd_config.
There are a couple of OpenSSH options that may be of interest:
By default, sshd listens on port 22 and listens for incoming ssh connections. By changing the default port for ssh, you can prevent various automated hacker attacks.
ListenAddress 192.168.1.1
If your machine has more than one physical network interface, you may want to check which one is associated with sshd, for this you can use the ListenAddress option. This option helps improve security by limiting incoming SSH to only a specific interface.
HostKey /etc/ssh/ssh_host_key
The HostKey option determines where the personal host key is located.
PermitRootLogin no
PermitRootLogin option – whether root can log into the system via ssh.
AllowUsers alice bob
Using the AllowUsers option you can selectively disable the ssh service for certain Linux users. You can specify multiple users, separated by spaces.
After /etc/ssh/sshd_config has been changed, make sure to restart the ssh service.
To restart OpenSSH on Debian, Ubuntu or Linux Mint:
$ sudo /etc/init.d/ssh restart
To restart OpenSSH on Fedora, CentOS/RHEL 7 or Arch Linux:
$ sudo systemctl restart sshd.service
To restart OpenSSH on CentOS/RHEL 6:
$ sudo service sshd restart
How to connect to SSH
Connecting to SSH from Linux
Linux users do not need to install additional programs.
Connecting to SSH from Windows
For Windows, many people recommend and successfully use PuTTY. I have nothing against this program, but I myself prefer and recommend Cygwin.
Cygwin is not just an SSH client. It is a powerful combiner that supports many Linux commands. For example, Cygwin makes it very easy to create SSL certificates (just like Linux). In Windows, to create self-signed certificates you need to dance with a tambourine. Cygwin is very convenient to use cURL (no need to install anything separately), etc. Those who lack the command line and Linux programs on Windows will find an outlet in Cygwin.
Installing Cygwin is easy. Go to the official website and download the 32-bit or 64-bit version.
A tiny file will download - this is the installer. Graphical installer. Although it contains a large number of options, they are all quite simple and many are familiar from other graphical installers. If something is not clear, just click “Next”. Perhaps only the following window can lead to confusion:
All elements available for installation are presented here. We don't need to understand them right now. Because the most popular ones are already marked for installation. And if something is missing in the future, you can easily install what you need.
SSH connection (common to Linux and Windows)
Linux users open the console, Windows users type in Cygwin.
SSH needs the following information to connect:
- IP or hostname
- port number
- Username
- user password
Two of these parameters SSH can assume are username and port number. If a port is not specified, the default port is assumed. If a user is not specified, then the same name is used as on the system from which the connection is made. For example, the host address for the connection is 192.168.1.36. If I dial
Ssh 192.168.1.36
I see the following
Alex@mial-PC ~ $ ssh 192.168.1.36 The authenticity of Host "192.168.1.36 (192.168.1.36)" Can "t be estable. Ecdsa key finterprint is SHA256: Sixzesusuiivoeqaqh XYLXUEA8SC5R/YPHL8WFP8S. yes/no)?
Since I am connecting to the host for the first time, it is an unfamiliar host. They ask me if I want to continue. I'm dialing yes:
Warning: Permanently added "192.168.1.36" (ECDSA) to the list of known hosts. [email protected]"s password:
Okay, host 192.168.1.36 has been added to the list of familiar hosts. I am being asked for a password for user Alex. Since there is no such user on the server with SSH, but I click Ctrl+C(to break) and enter the command along with the username of the remote system. The user is entered before the address of the remote machine and is separated from the address by the @ symbol. The @ symbol in English is read as at and can be translated as “in”. Those. record [email protected] can be interpreted as "mial user on machine 192.168.1.36".

The Alex@MiAl-PC invitation was replaced by the mial@mint invitation. This means that we are already on the remote machine, i.e. we have already made a connection. If you need to specify a port (if it differs from the standard one), then the port must be specified after the -p switch. For example like this:
Ssh [email protected]-p 10456
After connecting, we are greeted with something like this:
Linux mint 3.16.0-4-amd64 #1 SMP Debian 3.16.7-ckt11-1 (2015-05-24) x86_64 The programs included with the Debian GNU/Linux system are free software; the exact distribution terms for each program are described in the individual files in /usr/share/doc/*/copyright. Debian GNU/Linux comes with ABSOLUTELY NO WARRANTY, to the extent permitted by applicable law. Last login: Tue Jun 16 15:32:25 2015 from 192.168.1.35
It follows that the remote machine is Linux Mint, with kernel 3.16, 64-bit version. Also important information is the time of the last login and the IP address from which the connection originated. If the time and IP are unfamiliar to you and you are the only user, then your system is compromised and you need to take appropriate action.
Let's type a few commands to make sure where we are and who we are: pwd, uname -a etc.:

To end the session (log out), dial
Or click Ctrl+D.
Login to SSH without entering a password
Firstly, it's just more convenient. Secondly, it's safer.
First, we need to create rsa keys. If you are a Linux user, then you are fine. If you are a Windows user, but you did not listen to my advice and chose PuTTY, then you have a problem and think for yourself how to solve it. If you have Cygwin, then everything is also in order.
If you managed to log in to the remote system, log out. After that, dial
Ssh-keygen -t rsa
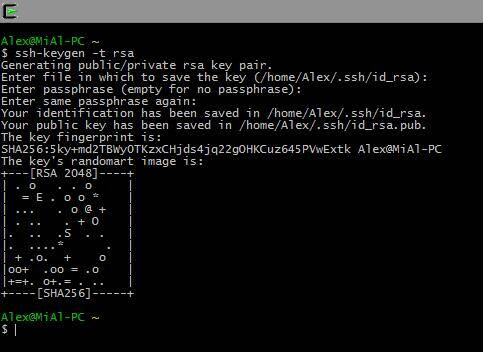
We are asked for a file name, we do not need to enter anything, the default name will be used. It also asks for a password. I don't enter the password.
Now on the remote machine we need to create a .ssh directory. Executing the command on a remote machine will be discussed below. For now, just copy the command, not forgetting to change the IP address and username to your own:
Ssh [email protected] mkdir.ssh
Now we need to copy the contents of the id_rsa.pub file to the remote machine. This is very easy to do (don’t forget to change the data to your own):
Cat .ssh/id_rsa.pub | ssh [email protected]"cat >> .ssh/authorized_keys"

Now we just log in and they don’t ask us for any password anymore. And it will always be like this now.
Executing commands on a remote server without creating a shell session
In addition to opening a shell session on a remote system, ssh also allows you to execute individual commands on the remote system. For example, to run the tree command on a remote host named remote-sys and display the results on the local system, you would do this:
ssh remote-sys tree
My real example:
Ssh [email protected] tree

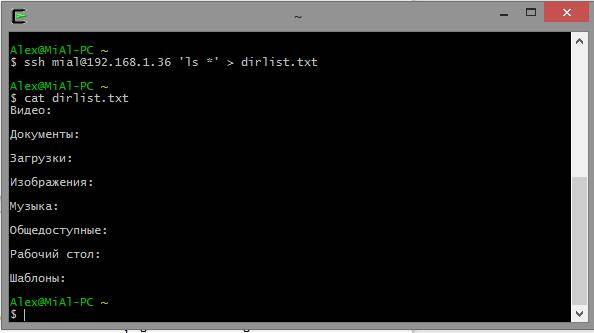
Using this technique you can do interesting things, like running an ls command on a remote system and redirecting the output to a file on the local system:
ssh remote-sys "ls *" > dirlist.txt
Real example:
Ssh [email protected]"ls *" > dirlist.txt cat dirlist.txt
Note the single quotes in the above command. This is because we don't want path expansion to be done on the local machine; because we need this execution on a remote system. Also, if we want to redirect standard output to a file on the remote machine, we can put the redirection statement and the file name inside single quotes:
ssh remote-sys "ls * > dirlist.txt"
Transferring standard output from local machine to remote machine via ssh
An equally interesting option for executing commands is given a little higher:
Cat .ssh/id_rsa.pub | ssh [email protected]"cat >> .ssh/authorized_keys"
- The cat command reads line by line and displays the contents of the .ssh/id_rsa.pub file located on the local machine.
- | (pipe) passes what would appear on standard output to another command.
- Instead of a command that would process the strings passed to it, a connection is made to the remote system (ssh [email protected]).
- The remote system receives lines for which the cat >> .ssh/authorized_keys command is provided. Those. the contents of the standard output are written line by line to the file .ssh/authorized_keys located on the remote machine.
Opening a graphics program located on a remote computer
The next trick requires two Linux computers. Unfortunately, even Cygwin can't handle this trick. Moreover, both Linux systems must have a graphical user interface.
Tunneling with SSH
Among other things that happens when a connection is established with a remote host via SSH is the creation of an encrypted tunnel that is formed between the local and remote systems. Typically, this tunnel is used to ensure that commands typed on the local machine are securely transmitted to a remote machine, and the result is also securely sent back.
In addition to this basic functionality, the SSH protocol allows most types of traffic to be sent over an encrypted tunnel, creating a kind of VPN (virtual private network) between the local and remote systems.
Perhaps the most commonly used of these features is the ability to broadcast X Window systems traffic. On a system running an X server (these are machines that have a graphical user interface), it is possible to run an X client program (a graphical application) on a remote system and see the results of its operation on the local system. It's easy to do. For example, I want to connect to the remote host remote-sys and on it I want to run the xload program. At the same time, I will be able to see the graphical output of this program on the local computer. This is done like this:
ssh -X remote-sys
Real example:
Ssh -X [email protected] gedit
Those. SSH starts with the -X switch. And then the program simply starts. Look at the screenshot.

I'm on Kali Linux. I successfully log in to a remote computer via SSH. After that I ran the gedit program. This program may not even be on Kali Linux, but it definitely is on Linux Mint, which is what I connected to. I can see the result of this program on the screen as if the program were running locally. But again, I want you to understand this, there is no gedit program running on the local computer. If I want to save the result of gedit (or any other program opened in this way), it turns out that it works in the environment of the remote computer, sees its file system, etc. This is convenient when you want to configure the remote computer using a graphical interface .
You will learn how to transfer an image from the entire desktop in the same article later, in the section “How to configure VNC via SSH”.
On some systems, this trick requires using the -Y option instead of the -X option.
Copying from/to a remote computer (scp and sftp)
scp
The OpenSSH package also includes two programs that use an encrypted SSH tunnel to copy files over the network. First program - scp(“secure copy”) - used more often, like the similar cp program for copying files. The most noticeable difference is that the source of the file can be the remote host followed by a colon and the location of the file. For example, if we wanted to copy a document called document.txt from our home directory to remote-sys in the current working directory on our local system, we could do this:
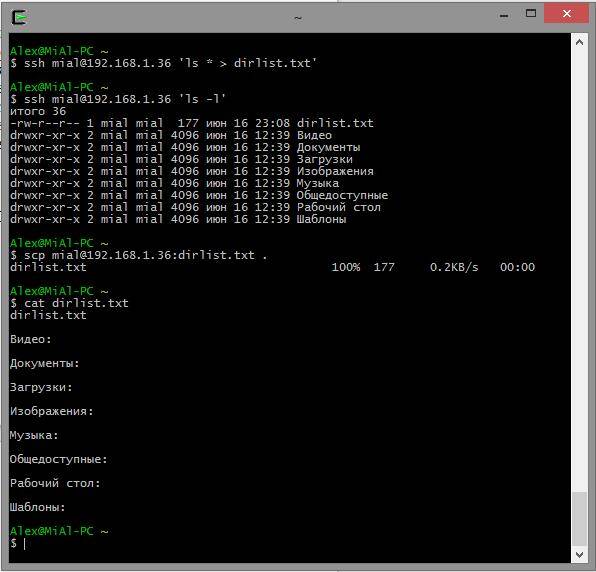
Scp remote-sys:document.txt . document.txt 100% 177 0.2KB/s 00:00
Real example:
# delete the file on the local machine if it exists rm dirlist.txt # create a file on the remote machine ssh [email protected]"ls * > dirlist.txt" # check for its presence ssh [email protected]"ls -l" # copy it to the local machine scp [email protected]:dirlist.txt. # check its contents cat dirlist.txt
To copy a file from a local machine to a remote one:
scp local_file remote-sys:.
Real example
# create a new file touch nfile.txt # send the scp file nfile.txt [email protected]:. nfile.txt 100% 0 0.0KB/s 00:00 # check the presence of the file on the remote machine ssh [email protected]"ls -l"
In the send command:
- nfile.txt - file name,
- [email protected]— username and remote host,
- . (dot) means that the file needs to be copied to the current working directory on the remote server, but the file name will remain the same, i.e. nfile.txt
Memo:
To copy a file from B to A when logged in to B:
scp /path/to/file username@a:/path/to/destination
Copying a file from B to A when logged in to A:
scp username@b:/path/to/file /path/to/destination
sftp
The second program for file copying via SSH is sftp. As its name suggests, it is a secure ftp program replacement. sftp works like the original ftp program. However, instead of sending in plain text, it uses an encrypted SSH tunnel. An important advantage of sftp over ftp is that it does not require an FTP server running on a remote host. It only requires an SSH server. This means that any remote machine that is connected via an SSH client can also be used as an FTP-like server. Here's an example session:
Alex@MiAl-PC ~ $ sftp [email protected] Connected to 192.168.1.36. sftp> ls dirlist.txt newfile.txt nfile.txt temp Videos Documents Downloads Images Music Public Desktop Templates sftp> lls dirlist.txt nfile.txt sftp> ls temp temp/TakeMeHome sftp> cd temp/ sftp> get TakeMeHome Fetching /home /mial/temp/TakeMeHome to TakeMeHome sftp> bye
The SFTP protocol is supported by many graphical file managers that can be found in Linux distributions. Using both Nautilus (GNOME) and Konqueror (KDE), we can enter URIs (links) starting with sftp:// in the jump bar and work with files located on a remote system running an SSH server.
The Guarantor is a trusted intermediary between the Participants during the transaction.


