Sierra won't install. How to install macOS Sierra on a regular Windows computer (Hackintosh). Instructions for installing macOS Sierra on unsupported versions of Mac
On your Windows PC, then in this material we will tell you what is needed to install a foreign OS on a PC, how to prepare it step by step bootable USB flash drive and roll up a hackintosh.
In contact with
The Hackintosh installation process is still far from perfect due to the fact that you need to gain access to the Mac. It is possible that in the near future there will be specialized utilities for Windows that will allow you to avoid this point. In the meantime, as it is, so it is.
What will you need?
- any Mac to download the installation file from Mac App Store and install it correctly on a bootable USB flash drive;
- USB flash drive With minimum volume in 16 GB. Do not forget to move all important data from the flash drive, because it will undergo a full formatting process;
- PC with processor on Intel based and a whole bunch of macOS-compatible hardware that won’t conflict with the Apple desktop system. This is perhaps the most important and difficult point that requires a foray into technical forums. If you treat this point irresponsibly, then there is a possibility of getting non-functioning Wi-Fi, Bluetooth, sound and network card or any other system components;
- do backups important data on the disk, no matter what happened and you didn’t have to hold your head shouting “Everything is lost!”
Preparing a bootable flash drive

You can also download the installer from third-party file hosting services.
2 . Download the latest versions of utilities MultiBeast And UniBeast with which you can create a bootable USB flash drive. To download you will have to go through a free registration process.
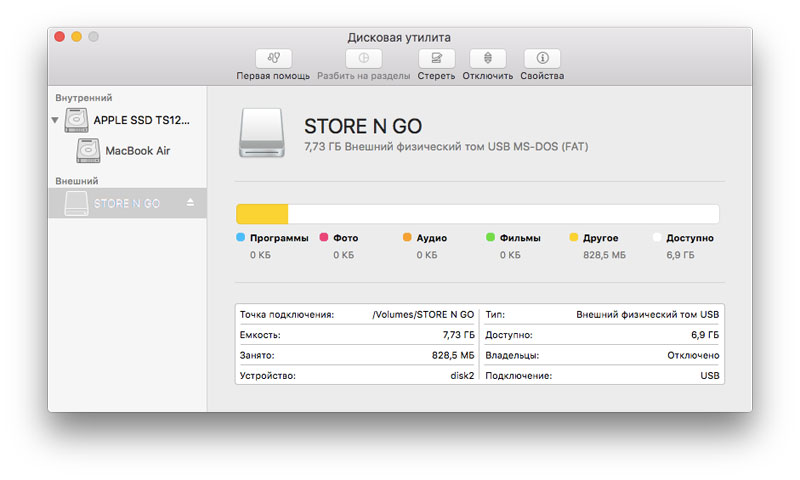
3 . Run Disk Utility (Finder → Programs → Utilities or through Spotlight search(keyboard shortcut Control + Space)), connect the USB drive and make sure that it appears in the left side of the window menu.

4 . Select the flash drive on the left side menu and click the button Erase».
5 . Enter the following formatting options:

- Name: any;
- format: Mac OS Extended (Journaled);
- scheme: GUID Partition Scheme.
and click the button Erase».
Attention! All data on the flash drive will be formatted! Make a backup first.
6 . Install and launch the application UniBeast. There is a small nuance here - the application does not have Russian localization, and to launch you will need to install English as the macOS system language. For this:

- open the menu → System Settings… → Language and region;
- in the left column with languages, drag English to first place;

- press the back button to return to the previous menu and apply new language by pressing the button " Reboot now».

7 . After launching the application, click the button Continue" until you go to the " tab Destination Select" Please note that on Mac you must have 7 GB free disk space, and the distribution macOS Sierra should already be downloaded and located in the folder " Programs».
8 . On the " Destination Select» specify the path to the USB drive and click « Continue».

9 . In the selection section operating system(“Installation Type”) specify “m acOS Sierra" and click " Continue».
10 . Once on the screen " Bootloader Configuration» Select a boot mode depending on your computer model. Owners of systems with the old socket (Socket 1156) click on “ Legacy USB Support", the rest to " UEFI Boot Mode».

11 . Settings in the "tab" Graphics Configuration“are of a purely individual nature. If you want, adjust the graphics to improve performance, and if not, leave everything at default.
12 . Finally, all you have to do is enter your password. account Mac Administrator and click " Install" The recording procedure to a USB flash drive takes 10-20 minutes on average.

13 . Move the file MultiBeast downloaded in paragraph 2 of this instruction in root folder drive.
Installing macOS Sierra on PC
After completing the process of creating a bootable USB flash drive, the most main stage- installing macOS on PC.
1 . Insert the bootable USB flash drive.
2 . Start your computer and go to BIOS(to do this you need to press and hold special key. It may differ on different PCs, but basically it is F2, F8, F10, F11, F12 or Delete. Read the messages on the screen carefully).
3 . When you get into the BIOS, set the boot priority from USB, and only then with HDD and so on.
4 . After rebooting, select the USB storage device from the start screen and click Enter to continue the installation process.
5 . Go to the menu Utilities → Disk Utility And format disk, for what:
- select your drive in the left side menu;
- Click the button at the top Erase» (Erase) and repeat the point 5 previous instructions.

6 . Close Disk Utility, go back to the installer and select new disk to install macOS Sierra.

7 . After completing the first installation step, the system will automatically reboot.
8 . Login again boot menu, select USB and the installation process will complete.
9 . As soon as you get to work desk macOS Sierra, run the utility MultiBeast and install the necessary drivers For normal functioning network, sound, graphics and other peripherals.

10 . After completing all procedures in the BIOS, set priority to HDD.

Hackintosh is ready! But don’t forget that even a properly configured hackintosh still won’t 100% convey the feeling of communicating with a real Mac.
The new macOS does not contain many changes, but most of them improve the usability of the OS and integration with mobile devices. Apple devices to a completely different level.
How to install
It all starts with backups, so before you do anything, be sure to create a fresh one backup copy V Time Machine. It will keep you out of trouble if something goes wrong.
- MacBook Pro(from 2010);
- MacBook Air(from 2010);
- Mac mini (from 2010);
- Mac Pro(from 2010);
- MacBook (from 2009);
- iMac (from 2009).
Now we have two options: update macOS via Mac App Store or install the system again using a bootable USB flash drive. Let's look at both.
Update via Mac App Store
A simpler method that will require a minimum of body movements from you, and will also save everything installed applications and settings. Its disadvantage is that along with your data, all errors will be transferred to the new OS. If your Mac works fine, nothing slows down or glitches, you can safely update. To do this we do the following:
- Open the Mac App Store and go to the update tab or download macOS Sierra directly from the main page.
- We wait for the download to complete and agree to the requests of the installer, which will start automatically.
- After installation is complete, log in using your Apple ID. Ready.
Installing the system from scratch

This method is guaranteed to get rid of previous errors in the OS, if there were any, but you will have to reinstall all your applications and customize them for yourself. Otherwise, the process is not much different from the update.
Don't forget to make a backup. A clean install will format the drive and you will lose all data.

All! Now you can enjoy the brand new macOS Sierra on your Mac.
Installation of proprietary OS from Apple, known as mac OS on personal computers created for Windows systems, is always associated with numerous difficulties and nuances. This operation requires certain technical knowledge of the installer, however, in most cases, this process ends unsuccessfully. How to protect yourself from such a failure, and what you need to take into account, we will discuss in this review.
So, if you are one of those who decided to install a completely new operating system on your PC, known as Sierra, from Apple, then we recommend that you first pay attention to the products of the tonymacx86 programming laboratory. It was they who created utilities capable of porting Apple’s proprietary OS to “traditional” personal computers designed for Microsoft systems. The universal installation utility UniBeast will allow you to install Sierra on your home or work Windows PC without any difficulties.
Using the instructions below, consisting of a series of sequential steps, you will be able to independently install macOS Sierra on personal computer in the easiest way for you.
Things to consider:
- A macOS Sierra OS image burned to disk.
- The latest version of the UniBeast utility, as well as its supporting version, MultiBeast.
- USB flash drive, minimum 8 GB.
- Desktop PC or laptop with computing processor from the company (only!) Intel.
Step-by-step description of installing macOS Sierra on a Windows PC:

Step 1: First of all, download the disk image of the future macOS systems Sierra. It can be found on trackers or in the official App Store.
Step 3: Download setup files image macOS disk and the UniBeast program, then create an image of a bootable flash drive. This is what you need to create using the downloaded UniBeast program. Launch the program for Mac.
Step 4: In the left panel, select the required USB drive and click Erase. This button is located on the top panel. Bootable USB flash drive with which we are working, we need to rename it SierraInstaller (any name in Latin will do, as long as it does not contain spaces). You also need to make sure that the correct file format was selected, namely OS X Extended (journaled). Click on Erase again.

Step 5: We launch UniBeast again, which we downloaded in the second step. We skip the first menus, click Continue and agree, where you need to select Agree. In the Destination Select menu, select a working USB drive and click Continue.

Sometimes the program produces an error at this stage. Therefore, make sure that the executive file is named exactly “Install macOS Sierra” (was downloaded in step 1), has already been moved to program folder(directory).
Step 6: In the Select OS Installation menu, check whether Sierra is selected in the settings and then click on continue.
Step 7: The Bootloader Configuration menu follows. In case you have an older processor system (Socket 1156), select the boot type Legacy USB Support. Click Continue.

Step 8: You don't have to go to the Graphics Configuration menu, as it is optional. Optionally, you can select acceptable graphics for better performance.
Step 9: Enter New Password admin (if necessary) and finally click Install. Now it all depends on the PC performance as well as the USB data transfer speed. On average, this takes up to half an hour.

Step 10: Next, we launch another program that needs to be downloaded. It is called MultiBeast for Sierra (on the website of the same manufacturer UniBeast). Then we move the downloaded MultiBeast program to the USB drive used for the image.
Step 11: After this, installing the “Apple” OS will be very similar to installing a traditional “window” operating system. We connect the drive with the macOS image to the USB port of the PC and launch step-by-step installation systems. First, go to the BIOS and select the appropriate drive.
Step 12: Reboot the computer again after exiting the BIOS. When start screen download, select the Boot Mac OS option.
Step 13: Also in the menu of this screen, select our flash drive and click Enter key, to continue. Using the macOS installer, format the disk. Next, in the menu bar at the top, go to the Utilities section and here select the Disk Utility sub-item.
- Select the disk on the left. Click Erase.
- Toggle the Partition Scheme checkbox and click OK.
- Rename the disk to Macintosh HD, select OS X Extended again.
- Confirm specified changes by clicking on erase using the Erase command.

Step 14: When all installation processes are complete, close the Disk Utility menu and return to the installer. Here we specify Macintosh HD so that we can then install Sierra. We carry out standard procedure for installing the operating system.

Step 15: Once the installation is complete, the computer will automatically restart. Once it turns on, open the boot menu.
Step 16: Select the USB partition and also Sierra and complete the macOS Sierra installation process.
Step 17: On last step, your eyes should see a new desktop installed macOS Sierra. Using the same MultiBeast utility we install everything necessary drivers for Wi-Fi, audio, graphics, etc.

That's all! Now you are the user of an excellent and efficient hackintosh, with which you can work on a project of any complexity, or simply use this OS as something familiar, with which you will be comfortable working for many years.
We all know about stability and high performance operating rooms Apple systems, but over time, many notice that their nimble poppies begin to “think” when performing this or that action. It’s not critical, of course, but it’s unpleasant, especially when you realize that when taken out of cellophane it solved any problem with lightning speed.
There may be many reasons for this, but the main one is one. Each time you update the system, you inevitably drag new version all accumulated over the years system garbage and other nasty things. And no matter what the developers say, this is true. Therefore, it will not be superfluous sometimes (it is enough through a release, that is, once every 2 years) to install the system from scratch. Of course, it’s much easier to click the “update” button in the App Store, but clean install will return your mac to its former speed, and you will enjoy using it! This article describes a clean installation - the most latest version Apple operating systems.
Preparatory actions
Clean installation of macOS Sierra from a flash drive - step-by-step instructions
If you still don’t risk putting the system into a clean state, then I strongly recommend that you go through the Mac utility before updating the system.
- So, insert the created bootable USB flash drive
- Reboot the Mac while holding option (alt)
- Next you need to select as bootable media flash drive

- We've been waiting for a while

- Now you need to open Disk Utility and format HDD poppy

- To do this, you need to select in the program internal disk computer (most likely called Macintosh HD), then erase and without changing the disk name and format again erase(at the bottom).

- After formatting is complete, close Disk Utility and select Reinstall macOS

- Next, we only select that the disk is formatted and after the installation is complete, we enjoy the new, clean operating system.
Note! I do not recommend restoring a previously created backup first. Along with all the programs, you will get back the old errors. Don’t be lazy to install all the software again, and you can grab documents and multimedia from the folder that Time Machine created
That's how easy and simple we got virgin clean system, of course, it’s not so easy if we just updated, but all our torment is more than compensated for by the quick and stable work Mac.
Even more interesting and useful in Telegram channel@proyabloko. Subscribe, it will be interesting!
The new macOS Sierra, unfortunately, is not supported by everyone Apple computers, but it would be strange if enthusiasts did not find a way to get around these restrictions. As it turns out, you can install macOS on older Macs (though not on all of them), and now we’ll tell you how to do it.
So, you will need:
Mac Pro, iMac, MacBook Pro (Early 2008 and newer)
MacBook Air and MacBook Unibody aluminum (Late 2008 and newer)
Mac Mini and a white MacBook (early 2009 and newer)
IMPORTANT! Before installing, check out this table to see if Sierra can be installed on a particular Mac.

Then download the application to install (you can borrow a copy), and then . In addition, you must have a flash drive of at least 8 GB.
Insert the USB flash drive, open Disk Utility and format it to Mac format OS Extended (journaled). After that, open the installation utility and select there installation application macOS Sierra.

If everything is correct, the utility will successfully recognize the application.

In the same utility, select your flash drive and click Start Operation.

Once the operation is complete, boot your Mac from the flash drive you just created.

The installer will appear on the screen, but you need Disk Utility.

Select the drive or partition where you want to install macOS Sierra, format it in Mac OS Extended (Journaled) format.

Continue installing the operating system on the partition you just created.

Once the installation is complete, reboot and start the system from the USB flash drive again. This time open macOS app Post Install.

Select the Mac you are using - the utility will automatically determine which patches need to be installed. Select the partition where you installed the OS and click Patch.

When the patch is installed, click Reboot. After rebooting, you can enjoy macOS Sierra even on a Mac that is not officially supported by the system.

Be careful and keep in mind that all actions you perform at one's own risk. Just in case, we recommend making a backup copy of your computer. As readers tell us, the method really works.
Based on materials from dosdude.com


