Is it possible to remove standard applications on Android? How to remove regular or stock apps from Android
The Android operating system has been around for quite some time and is well known to a wide range of users. However, search query statistics tell us that some users still have difficulties with even simple questions about using Android. It is to them that we address this article, in which we will tell you how to remove unnecessary applications from your smartphone or tablet. When it comes to ordinary applications, this is not at all difficult to do, but if you need to remove system programs, you will need some tricks.
How to remove third-party programs
There are several ways to remove programs that you installed or received with your device, but are not system programs. The first one is to use the standard Settings application.
1. Go to the settings of your gadget and open the “Applications” section.
2. Swipe left or right to the “Third Party” tab.

3. Find the application you need and tap on its name to open its properties.

4. Erase all program data by clicking on the “Erase Data” button so that no garbage remains after deletion.
5. Click on the “Delete” button and wait until a message appears indicating that the program has been correctly removed.
The second way to remove unnecessary programs is using the standard Play Store application.
1. Open the Play Store application.
2. Pull down the menu from the left side of the screen. Click the “My Applications” button in it.

3. Find the name of the program you are interested in on the “Installed” tab. Tap on its icon.
4. On the program properties page that opens, you will see the “Uninstall” button, after touching which the application you have selected will be uninstalled.

The above methods for removing programs work on almost any version of Android and do not require any additional tools. However, there are also a large number of third-party utilities that provide additional functions. They can remove applications in batch mode, make backup copies of programs and user data, can temporarily “freeze” processes, and much more.
How to remove Android system apps
All Android smartphones and tablets come into our hands with a number of standard programs already installed. Among them there are vital and irreplaceable utilities that should never be touched, but there are also not very useful programs that most users want to get rid of.
If you do not have superuser rights, you will have to limit yourself to disabling unnecessary programs. To do this, open the device settings, go to the “Applications” section and swipe to the “All” tab.

Here you will see a list of all programs installed on your gadget, including system ones. Find the required element and in its properties you will see the “Disable” button. If this button is active, then you can disable this application without any consequences. Thus, it is not possible to deactivate all programs, so you have to resort to the following method, which requires root.
If you have superuser rights, then you can get rid of system applications simply by deleting the corresponding .apk file in the /system/app directory. To do this you will need any file manager that has access to this folder, for example
In the process of searching for the right application, it is not uncommon to test dozens of other applications. And after suitable applications are found on the Android device, there remains a lot. If you do not remove these applications, you will quickly run out of memory and your device will start to work extremely slowly. In this article we will talk about how to remove applications on Android.
The easiest way to remove an application on Android is to use the standard application manager, which is built into the operating system itself. With it, you can remove any applications except standard ones. To do this you need to have some knowledge.
So, in order to access it, you need to open Android Settings and go to the “Applications” section. After opening the “Applications” section in Android settings, you will see a list of all installed applications, sorted alphabetically. Find the application you want to remove from this list and click on it.
After this, a screen with information about the application you have selected will open in front of you. There are several buttons on this screen: Stop, Delete, Erase data and Clear cache. In order to delete the application you need to click on the “Delete” button.

After clicking the “Delete” button, a pop-up window will appear asking you to confirm the deletion. In this window, you just need to click on the “Ok” button, after which the application will be removed from your smartphone or tablet.

Uninstalling applications via Google Play Market
If you cannot find the application you need in the list of installed ones, then you can use the Google Play Market application. Open Google Play Market and enter the name of the application you need into the search, and then go to its page. There will be two large buttons on the application page: Delete and Open. Click on the “Delete” button and then confirm the deletion by clicking on the “Ok” button.

Uninstalling an application through third-party applications
Another way to remove applications is through third-party applications. Quite a few applications have been developed for the Android operating system to remove and manage other applications. For example, you can use the Easy Uninstaller application. This application is completely free and you can use it.
The main advantage of Easy Uninstaller over the standard application manager is a simpler uninstallation process. At the same time, Easy Uninstaller allows you to remove several applications at once, which can be very convenient if you want to do a thorough cleaning on your Android device.
Easy Uninstaller is very easy to use. All you need to do is launch this application, check the boxes next to the applications, and click on the “Delete” button.


Once confirmation is received, the selected applications will be removed.
It should be noted that the methods described above do not work for standard applications that were preinstalled by the manufacturer of your Android tablet or smartphone. You need ROOT rights, as well as special software. For example, you can use the System app remover.
Very often, Android smartphone manufacturers equip their firmware with a large amount of software that users will never need. At the same time, such software takes up a sufficient amount of memory on the internal storage and cannot be moved to the card. Moreover, all these programs “hang” in RAM and “eat up” a significant part of the RAM and CPU performance. Today we will talk about how to deal with this and teach you how to remove system applications on Android.
You need to carefully remove unnecessary applications (for example, maps, the launcher itself, music, cloud, Facebook, Google movies, YouTube, etc.). The fact is that some of them are necessary for the operation of the system and, if they are removed, its functionality will be impaired. For example, if we remove the standard browser and do not install a third-party one, then when we try to access the Internet, the OS will throw an error.
Moreover, if you delete, for example, the wireless connection service (and this can be done easily), Wi-Fi or Bluetooth will simply stop working and can only be restored by flashing firmware. The list of necessary components can be continued for a long time.
Therefore, before you start uninstalling, be sure to make sure that the program is not needed for the OS to work and its absence will not harm it. Also pay attention to the prompts of the uninstallers themselves.
Methods for removing and disabling system software
So, let's get straight to working on the standard programs on your phone or tablet. This can be done in a variety of ways, both using third-party software (in most cases) and standard tools. You should know that all of these options, except one (does not remove all programs) require Root rights. You can get them in different ways depending on the firmware (Android 2, 3, 4, 5.1, 6.0, 7, 8) and smartphone model. The KingRoot program often helps.
Root permissions are administrative privileges in Android that allow you to modify the firmware files itself.
Disabling using standard means
This method is the simplest and works without Root rights. However, it also has disadvantages. The fact is that not all programs can be disabled. Let's look at how it works:
- Lower your device's notification bar and go to its settings. This is usually a gear icon.

- Scroll the contents of the window a little lower and find the settings item called “Applications”.

- Next, select the application you want to disable.

- If this program supports the shutdown function, you will see a corresponding button. Just press it.

- Next, select the item marked in the screenshot from the pop-up menu.

- Programs disabled in this way are not deleted: they simply stop until you run them yourself.

Attention! When you disable the standard software using the described method, the updates that were installed on it will be automatically deleted.
Program "Remove system applications"
Next we move on to using third-party software. The first application on our list will be “Uninstall system applications”. You can download it from the Play Market, which is what we will do now.
- Go to the Android application store and write the name of the program in the search bar. As soon as the desired result appears in the results, click on it.

- Install the program by tapping the button marked in the screenshot.

- We allow access to location, multimedia, Wi-Fi and other functions.

- The download of the program we need will begin. Since its size is small, it will not take much time.

- So, the download is complete, so let’s proceed directly to working with the application.

- At the first launch, we will need to provide the same Root rights that were mentioned in the introductory part of the article. Click the button marked in the screenshot.

- A list of all applications, including system ones, will open. We check the boxes that we want to delete and press the button marked “2”.

- We will be warned that we have identified applications that are important for the operation of the system. Think twice if you see such a message. In our case, everything is correct, so click “Yes”.

- The removal process will be completed in a matter of moments.

Ready. The program will disappear from your smartphone at the same moment.
Let's consider another option, which, if anything differs from the first, is only in appearance. We will also download the program from the Play Market.
- We begin to write the name of the utility in the search bar of the Google store and, as soon as our program appears in the search results, tap on it.

- Next, press the familiar green button.

- Allow Easy Uninstaller all required permissions.

- We are waiting for 5 MB to be downloaded from the network and installed on our Android.

- We go to the home screen and see a new shortcut in the form of a trash can. This is exactly what we need.
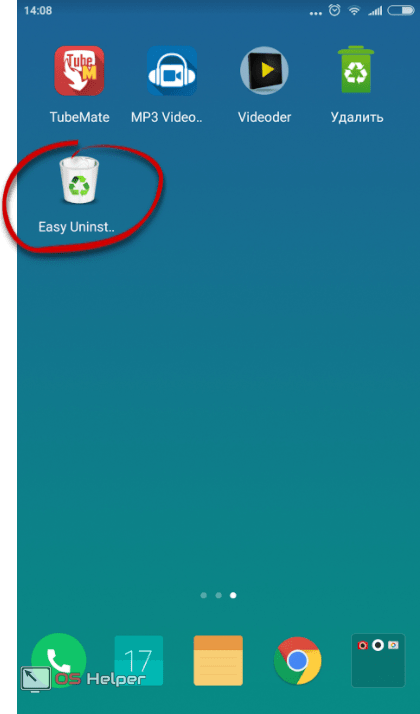
- In the list of programs available for removal, mark one or more items and press the button marked “2”.

- Once again we confirm our intentions by clicking on “OK”.

That's all. The application or applications will silently disappear so that they no longer burden our phone.
CCleaner
Here's another interesting option. Surely, few of you knew that the well-known program for cleaning the disk and phone storage is capable of removing pre-installed applications. Nevertheless, it is true. Below we will show how it works.
- In the same way as in previous cases, we are looking for the application in the Play Market.

- We install it by pressing the familiar button.

- We are waiting for the download of all files necessary for CCleaner to complete.

- Let's launch our cleaner. Today it will act as an uninstaller.

- So, when the program opens, go to its main menu. To do this, click the button with the image of three horizontal stripes (marked in the screenshot below).

- In the menu that slides out from the left side, click on the “Application Manager” item.

- A list of installed and system software will open. To begin the removal procedure, click on the icon with the image of a trash can.

- And again we are warned that if we thoughtlessly “demolish” the standard software, we can easily “kill” our operating system, which, unlike a computer, is not so easy to repair. If you understand this, you can continue. Click the button circled in the picture.

- Mark the programs or games that need to be uninstalled and tap on the “Delete” button (marked with the number “2”).

After this, the program, game or their combination will be removed from Android.
Via file manager
This option for removing unnecessary applications from Android differs from the above. Here we will do everything ourselves, while the previously described uninstaller programs worked in automatic mode. So let's get started.
- We will use one of the best file managers. This is ES Explorer. Let's download it using Google Play.

- Click the button labeled “Install”.

- We allow the application all types of access that it needs to function properly.

- The program is downloading. Since it “weighs” a little more than 10 MB, it will not take up much of your time.

The application is installed and ready to use. Next, we will look at how to remove standard programs. Launch the tool.

- Open the main menu of ES Explorer. We have marked it in the picture below.

- Now we need to allow our file manager to work with operating system components. To do this, enable the “Root Explorer” function using the trigger marked in the screenshot.

- Naturally, in this case we will need to provide the program with Root rights.

- When access to the firmware files is allowed, return to the main ES Explorer screen and go to the menu.

- Next, we need to go to the “Device” directory. This is our file system, and not the file system of the drive, but the system disk or firmware.

- So, to uninstall the same application, you need to erase files from several places. Let's visit the first one first. Go to the “system” directory.

- Then open the “app” folder.

- In Android 5 and above you will see application folders. They contain APK files. In earlier versions of the operating system they will be located here without directories. One way or another, we need to delete the selected application with or without a folder. To do this, click on the object and hold it until the button marked “2” appears.

We confirm our action by tapping “OK”.

So, we have cleared the first path, let's move on to the second.
- We return to the root directory of the firmware and go to “data”.

- Then we open the “app” directory and “remove” all traces of the unnecessary program.

- Go to “data” again.

- We go to the directory marked in the picture below and delete the data of the unnecessary program from here.

That's all. The method is one of the most complex and dangerous for the OS. We recommend using it only for people who are well versed in the topic.
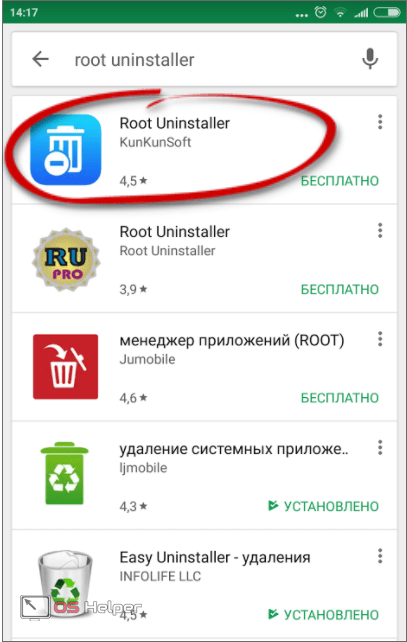
We are gradually moving on to another option for removing pre-installed Android applications. This time it will be another utility called Root Uninstaller. Let's look at how to work with it.
- In the old fashioned way, go to the Play Store and enter the name of the tool in the search bar. When the desired object appears in the search results, tap on its icon.
- Click the button marked in the screenshot.

- We wait for the installation of all the necessary files to complete.

- Go to the home screen or menu and select the application you just downloaded.

- As in other cases, we will need to provide access to the operating system files. Otherwise, nothing will work.

- When the program opens, we will see a list of all third-party and standard applications, as well as, if any, games. Tap on the one that needs to be removed.

- An additional menu will open with several options.
Identification of the various buttons:
- Freezing. The application or game is blocked: it does not occupy RAM and does not load the processor. However, the occupied disk space is not freed and the program is not removed;
- Delete. The application is completely removed from Android;
- Backup. A backup copy is created, which in case of failures will help correct the situation and restore what you deleted;
- Reset. The software is cleared of all updates and data received during operation.
There are also a number of additional functions that are not particularly important to us.

- As soon as we click the delete button, a warning will follow in which we will need to confirm the action taken. In order to do this, click “OK”.

Attention! To ensure data safety and guarantee stable system operation, be sure to use backup tools before deleting each program!
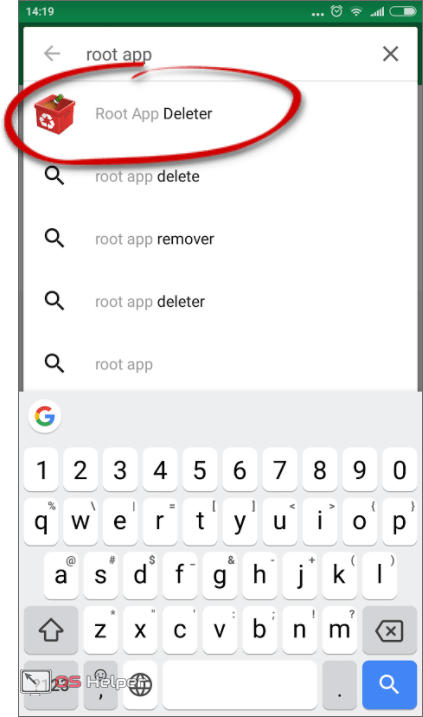
From the name of this program it is clear that it requires superuser permissions to work, although they are required for our entire list. So, let's look at how to work with Root App Deleter in more detail.
- The first thing we will need to do is download the application to our phone. To do this, we will use the Google Play store. Enter the name of the program in the search field and select the desired result from the results.
- On the Root App Deleter home page, click the familiar button labeled “Install”.

- The program “weighs” only 700 kilobytes. This is very little, especially compared to competitors.

- So, the list of uninstallers has been replenished with a red icon, click on it.

- There are several tiles in the main menu of our application. We will work with the uninstaller. Click on the item marked in the screenshot.

- Next, we will be asked to select one of the program removal modes. This may be a beginner in which a backup copy of the existing software is automatically created before uninstallation. There is also an expert mode in which programs are deleted immediately and irrevocably. Choose the algorithm that suits you.

- As a result, a list of programs available for removal will appear. We will uninstall the most unnecessary of them. At least in our opinion. Click on the application name.

- Since this is beginner mode, there is no delete button, but there is a disable button. This way we can test the operation of the system and, if everything is fine, we will remove the software completely in expert mode.

- As in other cases, you cannot do without Root rights. Tap on “Provide”.

Ready. The program is disabled and no longer consumes phone resources.
Titanium Backup
Next up is the famous backup app. Among other things, the tool can remove any software, and if SuperUser is present, even system software. So let's figure out how to work with it.
- So, go to Google Play and look for Titanium Backup there. The main thing is to find the Root version. Otherwise, nothing will work. See screenshot attached below.

- Then, as in other cases, press the button indicated in the screenshot.

- We are waiting for the download of the small file to finish.

- And we launch our Titanium Backup by tapping on its icon on the home screen.

- When starting, the program will request access to the firmware files - we provide it.

- And here a small obstacle awaits us. The fact is that for Titanium Backup to work properly, you need to enable USB debugging on your phone. Don't be alarmed - there is nothing complicated about it. Initially, click “OK”.

- Next, let's move on to the settings of our device.

- Scroll to the bottom of the list and select “About phone”.

- Next, you need to quickly start tapping on the “Build number” item. In our case, there is a non-standard add-on to Android - MIUI, so here we click on its version.

After this, an additional item called “For Developers” will appear in your settings.

We just need to switch the trigger marked in the screenshot to the active position.

Now you can continue the instructions for removing useless system applications from Android through Titanium Backup.
- Go to the “Backups” tab and click on the program that we want to “demolish”.

- Here we see several points of working with the software. Below is their designation.

- After clicking the delete button, we will be warned one last time that we have not backed up the program and that if we delete the system software, the operating system may crash. Despite everything we click “YES”, we still advise you to create a backup.

A little earlier, we removed standard applications from the system using the same program. However, now we will use another tool, which is also included in the functionality of ES Explorer. It works like this:
- Launch ES Explorer from the icon on the desktop or in the application menu.

- On the main screen, tap on the marked icon.
- Select the application that you want to remove.

- Click the “Uninstall” button.

Root rights are not required in this case, since the system remembered ES Explorer after the first grant of permissions.
- The uninstallation will begin, which looks exactly like a standard Android uninstall.

That's all - the program or game has been deleted.
There is also an option to remove built-in applications using a PC through the Debloater program, but it does not always work and is quite complicated. It is better to use one of the methods described above.
Results and comments
So, now the question of how to remove factory applications on Android is completely revealed to you. We have provided a lot of methods, one of which will definitely work. It is important to perform a backup before any action, so that you can restore the data later if necessary. You can also disable the software rather than uninstall it in order to check the functionality of the system without it.
One way or another, if something doesn’t work out and you still have questions, describe the situation in the comments, and we will certainly try to help.
Video
Also, for greater clarity and completeness of the picture, we suggest watching a training video on this topic.
This can happen to anyone - when you try to delete an application, it turns out that it cannot be deleted. Moreover, in this case we are not talking about a built-in application in the firmware, which cannot be removed without root rights, but about the most common one, which you installed on your device.
For example, some time ago we talked about this and also showed an application called Volume Unlock, thanks to which you can turn on the device by pressing the volume up button. When running, the application receives administrator rights, so there is no easy way to remove it. But let’s show you clearly what it looks like.
Go to settings and find the “Applications” section.

Here we see a list of applications. Select the one you need (in our case, Volume Unlock).

And what do we see? That's right, the "Delete" button is inactive.

If you encounter a similar problem, no problem, it can be solved. To do this, go to Google Play and type in the search the word “uninstall” (without quotes) or uninstaller. Select an application from Rhythm Software and install it. This is an extremely small free application that does not even require additional rights.

After installing the application, open it and see a list of all installed applications. Select the one you need by tapping on it once, and then click on the “Delete selected applications” button, which is located at the top of the screen.

We agree with the deletion and see a window in front of us in which it is written: “It is impossible to delete the package because it is selected for device administration." Click “Administration Settings”.

A window opens and uncheck the application.

In a new window, disable the application’s administrative rights by clicking on the “Disable” button.

After this, we get to the application page and see that the “Delete” button is activated.

Click on it and the application is deleted.
Of course, this way you can remove virus applications that cannot be removed in the usual way. To remove system applications, you must have root rights.
Second way
For this method, we thank the user with the nickname Android, who in the comments suggested a less complicated method for removing such applications. He talked about another method that requires enabling USB debugging. A user with the nickname Valery reported that you can use this method without USB debugging, for which we thank him. And yet we show an example with USB debugging - just in case. We advise you to immediately open the “Security” section (see the last three screenshots) and if this does not help, try enabling USB debugging.
Go to settings. Here, find the “About phone” (or “About tablet”) section.


After opening this section, it will appear in the settings:

Go into it and check the box next to “USB Debugging”.


Here you will see a check mark for an application that cannot be removed in the usual way.

Simply uncheck the box, then click Disable.

The application can now be uninstalled as usual.
The issue of deleting programs or games installed on a phone or tablet with the Android operating system arises for users regularly. The game may become boring, the program may become irrelevant, and space in the device’s memory needs to be freed up for something more necessary. In addition, very often the manufacturer includes in the firmware some standard programs that are of very dubious usefulness, but occupy the internal storage of the device and consume its resources.
In this article, we will reveal some secrets regarding how to remove applications installed on Android, both standard and installed by the user.
How to remove standard android applications installed by the user
The easiest way to remove programs and games installed on the Android OS is by the user himself. To remove an unnecessary application from the memory of your phone or tablet, perform the following operations:
1. Go to Menu -> Settings -> Applications;
2. Select the application you want to remove;
3. Click the "Delete" button;
If you have selected an application in which the “Delete” button is unclickable (inactive), then this application is a system application and it is impossible to remove it using standard methods.
Uninstalling an application via Google Play Market
Some users who frequently download applications using the Google Play Store may find it more convenient to remove such programs in the following way:
1. Launch the Google Play Market application on your phone or tablet;
2. Click on the characteristic Google Play Store icon at the top of the screen (a bag with an arrow to the right);
3. Select “My applications”, a list of everything that you have installed will open in front of you;
4. Select the one you want to uninstall from the list of installed programs and click the "Uninstall" button.
5. The application will be deleted from your device’s memory.
How to remove stock apps on Android
Standard applications that are installed in the operating system along with the firmware, as a rule, cannot be removed using the methods described above. Such applications are called system applications, and to remove them you need to perform additional operations. However, the only difficulty in deleting standard applications is the need to obtain Superuser (Root) rights on your phone or tablet.
In short, a Superuser, or Root in the Android operating system, is a system user with unlimited access rights. The so-called “rooting” of Android devices can take place differently on different phones or tablets. In many Chinese smartphones, manufacturers include root rights in the standard firmware from the factory, thereby making our lives easier. Tier 1 brands generally believe that this level of control over their devices is not beneficial for ordinary users, and their phones and tablets have to be manually unlocked to gain root access.
Obtaining Superuser rights is a simple operation in itself, but it is the subject of a separate article. In the meantime, we will give some recommendations for removing standard programs, assuming that you have already received Root on your smartphone or tablet:
All standard applications are located in the device memory in the /system/app folder;
You can access this folder only using specialized software, for example, the Root Explorer application. Using his example, we will further explain how to remove unnecessary applications;
Think carefully before deleting standard applications. Perhaps some of them, which seem useless to you, are actually responsible for the operation of services needed by the system. Consulting about this on forums dedicated to your device seems to be good practice for us;
Google applications (Maps, Mail, etc.) can be safely deleted if you don’t need them. It is not recommended to remove Google services, since they are responsible for the operation of Google services, and uninstalling them can lead to problems with the operation of these services and even the entire firmware.
If you have decided exactly which standard programs you want to get rid of, use Root Explorer to go to the /system/app folder of your device. There you will find all the *.apk application files you have installed.
1. Enable R/W mode in Root Explorer;
2. Delete the apk files of the application you do not need;
3. Together with the apk file, delete the odex file of the same name for this application;
4. The application will be deleted from your device’s memory.
Exactly the same algorithm of actions is preserved for any other file manager that can use root rights to access the system partition and remove programs from there. Some system applications may also be located in the /data/app folder, check and remove them from this folder too.
We hope that this short instruction will be useful to you, and you will learn how to remove standard Android applications, and a bunch of unnecessary programs that the manufacturer has crammed into your phone or tablet will not take up precious space on your device after reading the article. Be careful when deleting system programs and uninstall only those whose purpose you know for sure, so that you do not have to re-flash the entire operating system due to failures. Good luck!


