How to start a computer from a disk. How to configure the BIOS to boot from a disk or flash drive. In text form
The developers of the Windows operating system provide for its automatic launch. But if the kibios (BasicInput-OutputSystem) setting is not set correctly or there are malfunctions in the system itself, automatic startup is impossible and you need to enter the BIOS - the basic input-output system.
How to run windows via bios on a computer
BIOS is a built-in program on the motherboard that is responsible for the smooth operation of the operating system (in our case, Windows) and PC components. In order to enter BasicInput-OutputSystem, you need to press the button at the bottom of the screen within 3-5 seconds of booting the computer, usually BIOS Setup or Press DEL to enter setup. You can also enter the BIOS during boot by pressing one of these keys: Delete, Ins, Esc, F1, F2, F10. All sorts of key combinations are possible, it depends on the operation system, manufacturer, etc. Most often, you will be told which keys or combination of keys to press.

If you have already entered the basic input/output system, use the arrows on your keyboard to select the “Boot” section and press Enter to enter. Next you need to run the following commands: Advanced BIOS Features → BootdevicePriority. Your next steps will directly depend on the root cause of the problem in the operating system and the need to start it through the BIOS. If Windows malfunctions or is damaged, then you will need to insert the installation disk into the drive and specify the CD/DVD-ROM as the first boot device. If you want to install the OS not from the installation disk, then in the same FirstBootDevice section, specify HardDrive (the name may differ, as long as it is a hard drive). After you have made changes to the settings you need, click SaveandExitSetup or you can do the following Esc → Exit → Save and Exit Setup. If you were able to resolve the hard drive problem, Windows will boot the next time you try. When booting from the installation disk, follow the installation device wizard prompts. It will prompt you to fix errors that are found during the startup process.

How to start a laptop from disk via BIOS
In order to start a laptop from a disk via BasicInput-OutputSystem, you will need to change the parameters of the boss. To begin, insert the installation disk into the drive, while the laptop must be turned on. Reboot the OS and immediately press F8 (in different models this may be other keys or a combination of them). Next, you should execute the following commands: InternalDVD-Rom → Enter → Press any key to boot from CD → any key (this algorithm of actions is suitable if you start Windows from an installation disk). You can also enter the BIOS using another method. Turn on the laptop, press F2, then Start BIOS and Enter.
After this, you should make the necessary changes Boot Settings → Boot Device Priority → First Boot Device → Internal DVD-Rom. After this, do not forget to save all changes; to do this, in the main menu, press Save&Exit and then Enter. After this, the computer will reboot and you will see Press any key to boot from CD. You can use not only the Windows installation disk, but also any other storage device.
Now you can easily run Windows via BIOS on your computer or laptop. And you can independently adjust the operation of your operating system.

Hello, I wanted to write detailed instructions for installing Windows, as I remembered that some may have difficulty installing boot from disk. Therefore, in this article I will tell you how to set the BIOS to boot from disk.
There are different types of BIOS and some people are at first confused about where to boot from disk. Now I will try to show you and after this article I think you yourself will be able to install boot from disk in any bios.
Types of BIOS

How can I set the BIOS to boot from disk?
The main types are Award BIOS And on I will show them based on how to boot into BIOS from CD-ROM to boot Windows from a CD or DVD. I also recently updated the article, so it’s possible that your BIOS will be there too.
Award BIOS

Here we choose Advanced BIOS Features

This is where we set the download from CD-ROM, then save ( F10 yes).
AMI BIOS (American Megatrends, Inc.)

Select a tab BOOT.
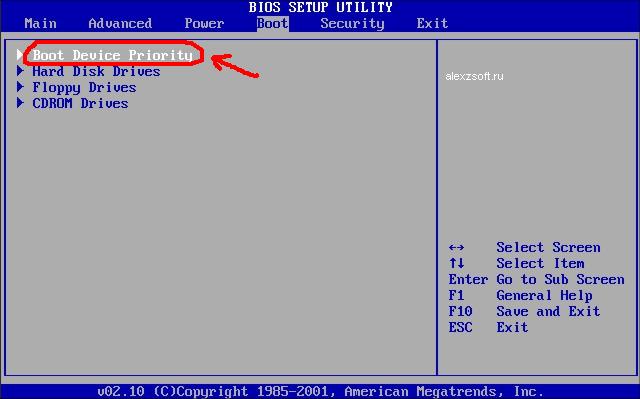
Click Boot Device Priority And Enter.

Choose CDROM. After save (F10).
What other types of cr-rom installation are there?
In addition to selecting Enter, there are other selection keys, for example these:

If you don’t know English, I’ll explain what’s written on the right: Press the Up or Down arrow to select a device, then press F6 to move the device up the list or F5 to move equipment down the list. Click ESC, to exit to the menu.
Therefore, use the arrows to select CD-ROM and then click F6 until the CD-ROM device is at the very top. Sometimes the choice is the plus keys (+) and minus (-). And sometimes a list of active and inactive devices appears. In which pressing the key R you set the CD-ROM to be active to enable booting from disk. After all installations save (F10+enter).
Modern BIOS
In modern BIOS everything is simpler. There are several options to choose from. The first one is when the BIOS loads, you can simply drag the disk to the first place with the mouse and save the changes by pressing F10. But if you don’t have such a function, then go to advanced settings (Advanced Mode) or if there is a boot tab.

In the advanced settings, go to the boot tab and go down until you see the device boot lines. We go to point number 1 enter.

Download options will appear. Select DVD-ROM and save with F10.

Also, if you have a bios password, you can reset it by removing the battery on the motherboard for about 10 minutes. If that doesn’t help, you can use. You can also try calling the initial device boot dialog before loading Windows. To do this, before loading Windows, you need to press the boot key of the device, they may be different for everyone F1 to F12, and can also be a key Enter.
Don’t be afraid to do something extra, you can always leave without saving, and from experiments, your experience and knowledge only increase =)
I think after studying the article I will put boot from CD-ROM It won’t be difficult, what do you think?
In the last article we talked about that. And now I’ll tell you how to configure your computer’s BIOS to install Windows from a disk or flash drive.
1. What is BIOS and UEFI
Each motherboard has a special program for booting the computer and configuring the parameters of various devices. This program is flashed (programmed) into a special chip on the motherboard and is therefore called firmware.
Previously, all motherboards had firmware called BIOS, which had a simple graphical interface with white letters on a blue background and was limited in functionality. For example, in the BIOS it was impossible to use the mouse, select a language, and there were no graphic elements (pictures) due to the limited capacity of the BIOS memory chip. Also, motherboards with BIOS did not support disks larger than 2 TB due to limitations of the old disk partitioning system (MBR).
Nowadays, many motherboards have a new type of firmware called UEFI, which features an improved graphical interface using a beautiful background, hand-drawn buttons, the ability to select a language (including Russian) and some improvements. For example, support for a new type of disk partition (GPT), allowing the use of hard drives with a capacity of more than 2 TB.
What type of firmware your motherboard has can be found in its manual, on the website of the motherboard or laptop manufacturer, and also visually when entering the Setup configuration program. The Setup program is also flashed into the motherboard and is used to change BIOS or UEFI settings.
2. How to enter BIOS Setup
To enter the Setup program, immediately after turning on the computer, press the “Delete” button on the keyboard. On some motherboards and laptops, the “F2”, “F10” or “Esc” keys are used for this. You can read which button to press in the messages that appear immediately after turning on the computer.
In text form

Graphically

If you don’t have time to read, then press the “Pause” button on your keyboard to pause the download. You can continue loading by pressing any key. If you press the key designated to enter Setup, you will immediately be taken to the motherboard setup program.
Classic BIOS

UEFI interface

3. Basics of working in Setup
3.1. Control keys
The Setup program is a set of various parameters grouped on separate tabs, depending on their purpose. On the right or below there will be a description of the keys with which all actions are performed.

To navigate between tabs, you usually use the “right” and “left” arrows on the keyboard. To move between lines within one tab, use the down and up arrows.

To change values, use the arrows to navigate to the required field, press the Enter key, and then use the arrows to select a new value from the drop-down menu. For this, the “+”, “-” or “Page Up”, “Page Down” keys can also be used.
To return up a level or to the previous page, press the Esc key. The “Esc” key on one of the main tabs will mean exiting the BIOS without saving the settings, which you will need to confirm or refuse to exit.
In the Setup program with the UEFI interface, you can perform all actions using the mouse.
3.2. Saving settings
This is a very important point. After making all the necessary settings, go to the “Exit” tab, select the “Exit and Save Changes” item using the arrows (“Exit and Save Changes”, the word order may be different), press “Enter” and confirm saving the settings by selecting the “OK” arrows or “Yes” and “Enter” again.
You can save the settings much easier and faster by pressing the “F10” key on the keyboard and confirming your decision. This key works in many versions of BIOS, UEFI and is often indicated in tooltips (bottom or right).
3.3. Cancel Settings
If you accidentally changed something or are not sure about the correct settings, then go to the “Exit” tab and select “Exit and Discard Changes” or press the “Esc” key until the message about exit without change settings and confirm the action (“OK” or “Yes”).
3.4. Restoring settings
To restore all settings to optimal defaults, go to the “Exit” tab and select “Load Setup Default”. After this, you can immediately change other settings or simply exit the BIOS and save the settings (“Exit and Save Changes” or “F10”).
4. Download options
Insert a bootable disk or flash drive into the computer on which you plan to install Windows. Now, in order to start installing Windows, you need to configure the BIOS (or UEFI) using the Setup program to boot from a disk or flash drive. You can also use the special boot menu of the motherboard (Boot Menu) for this. The last option is simpler and more convenient, but we will consider both methods.
5. BIOS setup
5.1. Changing boot priority
Go to the "Boot" or "Download" tab.

Install your DVD drive or flash drive first in boot device order.

If you install Windows from a disk, then the first item is to select a device like “ATAPI CD-ROM”, a name indicating the manufacturer or model of the drive. For example, “CDROM:PM-HL-DT-STDVD-RAM GH22NP” (this is an LG DVD drive).
If you plan to install Windows from a flash drive, then first choose something like “Removable Dev.” or the name of the flash drive indicating the manufacturer. For example, “USB: Patriot Memory” (this is a “PATRIOT” flash drive).
Transcend JetFlash 790 8Gb
The second should be a hard drive, which is designated as “Hard Drive”, “HDD” or the interface to which it is connected, the manufacturer and model of the disk. For example, “SATA:3M-SAMSUNG HD502HJ” (this is a 500 GB Samsung hard drive with a SATA interface).
Please note that in the “Boot” section there may be other items responsible for boot priority, such as “Hard Disk Drives” or “Removable Device Priority”.

They also need to check that the DVD drive or flash drive comes first.

If you have two hard drives, then the one on which you are installing the system should be higher. But in this case, I recommend disconnecting one of the disks to avoid confusion and possible errors in installing the system. It can be connected after installation.
In the Setup program with the UEFI interface, everything is done similarly. Look for the “Boot” or “Download” section, find your DVD drive or flash drive there and move it to the very top of boot priority. Plus, you can use a mouse for this, which is easier and more convenient.

5.2. SATA controller operating mode
In principle, this is not so important, but many people are interested in this issue, so I decided to clarify it a little. SATA drives can operate in compatibility mode with older IDE drives and in the more modern AHCI mode. AHCI gives a small increase in hard disk performance when multiple simultaneous accesses are made to it. This mode of disk operation occurs mainly on servers and is practically useless for an ordinary home computer.
When setting up the BIOS, it is possible to select the operating mode of the SATA controller.

These settings may be located in different places and have slightly different names, but the principle is the same everywhere. You are offered IDE compatibility mode or the new AHCI mode.

In general, IDE compatibility mode is recommended for Windows XP, since it does not natively have SATA drivers and simply will not see the hard drive, which will not allow Windows to be installed. Drivers can be built into the Windows installation distribution, but this makes no sense, since it will not affect the speed of operation and may add problems.
There is an easier and more convenient way to boot from a DVD or flash drive for both BIOS and UEFI - boot using the “Boot Menu”.
To call the boot menu, the “F8”, “F10”, “F11”, “F12” or “Esc” keys can be used. They can often be seen in prompts on the initial boot screen of your computer. You can also find out this information from the instructions, on the website of the motherboard or laptop manufacturer, by searching on the Internet, or at random.

Immediately after turning on the computer, press and hold the “Boot Menu” key until the boot device selection menu appears.

Use the down and up arrows to navigate to the DVD drive or flash drive and press Enter.
Sandisk Cruzer
The advantages of this method are obvious - you don’t need to delve into the BIOS, you don’t need to return the BIOS settings back later (although this is not always necessary), and it’s enough to call this menu just once, since after you start installing Windows, this will no longer be needed. Additionally, using the "Boot Menu" does not change the BIOS or UEFI settings.
7. Download problems
Friends, due to the fact that many people had problems loading when installing Windows and some wrote about it in the comments, I decided to make a separate section where I collected methods known to me to solve these problems.
- If the computer stops booting at the very beginning and asks you to press F1, after which it enters the BIOS, then you most likely either have a low battery on the motherboard (the timing may be off), problems with the processor cooler (failure, not connected there) or hard drive (errors in SMART).
- If, when you turn on your PC, the message “Reboot and Select proper Boot device or Insert Boot Media in selected Boot device and press a key” appears, this means that the boot area on the disk or flash drive is not found or is damaged. Try booting from the installation disk or flash drive using the Boot Menu (Section 6 of the article), if that doesn’t help, make the bootable media again using the Windows USB/DVD Download Tool utility.
- If, after restarting the computer, the Windows installation starts from the beginning, then remove the boot disk or flash drive and restart the computer, the installation should continue from the hard drive.
- Disconnect all unnecessary USB devices (flash drive, 3G modem, smartphone, printer) from the computer. You only need to leave the mouse, keyboard, DVD or flash drive from which you are installing Windows.
- If you have several hard drives, then disconnect all drives from the motherboard except the one on which Windows will be installed.
- Reset BIOS settings to default (described in this article).
- If the installer does not see the disk or error 0x0000007B appears at the end, change the SATA controller mode in the BIOS from AHCI to IDE or vice versa.
- If every time you boot your computer or laptop itself enters the BIOS or opens the boot menu, then set the Boot Pop Menu option in the BIOS to Disable (if any).
- Disable Fast Boot in the Advanced section of the BIOS, and in the Boot section set the Launch CSM option to Enable (if available).
- In the Boot section of the BIOS, change the boot mode from EFI (UEFI) to Legacy (if available).
- Set the Secure Boot option in the BIOS to Disable (if available).
- Select the version of Windows you are installing in the BIOS (if any).
- If you have a laptop, one version of Windows is installed, but another is not, and the advice on setting up the BIOS did not help you, then contact support or the manufacturer’s forum. Updating the BIOS can also help, after which additional options may appear in it (sections 8-12).
- If possible, from a DVD, since there are many different problems with flash drives.
- Make from .
- Insert the flash drive into the USB 2.0 connector on the back of the computer (motherboard) or the USB 2.0 connector of the laptop. Booting from USB 3.0 does not always work.
- Try using the Boot Menu, as described in paragraph 6 of this article. This method is simpler and more reliable than setting boot priority in the BIOS and you can determine whether the computer sees your flash drive.
- An underscore on a black screen indicates that the computer freezes while accessing a flash drive or hard drive. If the download continues without a flash drive, then that’s definitely the problem.
- If the computer does not see the flash drive or does not want to boot from it, use a DVD or other flash drive for installation.
- If this is not possible, then change the type of flash drive from “removable media” to “hard disk” using the “BootIt Next Generation” utility, format it with the “HP USB Disk Storage Format Tool” utility and make it bootable again using “Windows USB/DVD Download Tool". You can download all these utilities below in the “Links” section.
- If the problem occurs after selecting the Windows installation partition, then use the tips for setting up the BIOS (sections 7-12). During installation, remove old partitions from the disk or do this using the Acronis Disk Director boot disk.
- If the installer reports that it cannot install Windows on the disk, then try running it or back.
Let me remind you that to exit the BIOS and save the settings, use the F10 key.
8. Links
In the following articles we will look at how to install, and.
Sandisk Cruzer
Transcend JetFlash 790 8Gb
Sandisk Cruzer
Instructions
Related article
Sources:
- how to start bios
Often, for example, to install an operating system or revive a computer, the user needs to boot not from a hard drive, but from an optical or removable drive. The selection of boot sources is carried out through the BIOS of the computer motherboard.

Instructions
Enter your motherboard's BIOS menu. To do this, after (before loading) press the DELETE button (in most cases). Some motherboards require pressing another (for example, F1) or a combination of them. In any case, at the first boot lines there is always a message about which keys can be used to get to the BIOS menu.
If you have a motherboard with AWARD BIOS (the most common), look for the Advanced BIOS Features section. In it you will see the items First boot device, second boot device and third boot device, corresponding to the first, second and third boot source.
In AMI BIOS (used in ASUS boards), go to the BOOT section, where you will see the Boot Device Priority item, in which you can set the order of boot sources.
note
Be careful when working with the BIOS, some settings affect the performance of the computer.
Sources:
- how to start a disk in bios
Insufficient computer performance may result in the need to change the installed BIOS version. The more common name for this operation is flashing the BIOS. This operation will also allow you to install new components on motherboards.

You will need
- Uninterruptible power supply, new version of BIOS firmware from the manufacturer's official website.
Instructions
Open the case and examine the motherboard. You need to find the BIOS chip on it. Often it is covered with a sticker label by sellers. If the warranty period has long expired, remove the label and inspect the markings of the microcircuit.
Boot and run the utility from DOS, selecting “Without multitasking support” in the settings. Run the distribution installation file. Specify the path to the new firmware version. To the question: “Save the old one?” answer - YES. After a few minutes, the program will inform you that the BIOS replacement is complete. Restart your computer.
Video on the topic
note
It is necessary to protect against possible voltage surges. Flashing is very sensitive to this - errors can lead to damage to the board. For such work, it is necessary to connect the computer to the electrical network via UPS.
Helpful advice
On older versions of motherboards, the chips have a characteristic window by which it can be easily identified. Unfortunately, such microcircuits are not built on flash BIOS; therefore, they cannot be flashed. If there is no window, and the markings on the chip begin with the number 28 or 29, then this means you have a flash BIOS.
Installing the operating system through BIOS is the most correct way. Even if you do not understand anything in this menu, you can easily install the system on your computer. Everything is done by pressing a couple of keys.

You will need
- Computer, disk with Windows OS.
Instructions
First of all, you need to make sure that the system disk is multiboot. To check this, insert the system disc into the drive. If a window opens on the desktop with the option to install the system, the disk is multiboot. If a window appears displaying folders, the disk is not a folder. Once you are sure that the Windows disk supports multiboot, restart your computer after copying the necessary files to a separate media.
During reboot you should regularly press "F9". This provokes a forced start of the system from the disk. After some time, you will need to confirm launching from disk by pressing ENTER. After clicking it, a window will be displayed allowing the user to select installation parameters. Select "Automatic from disk". The system will restart again - this time there is no need to press F9.
In the next stage of installation, you need to remove all partitions. For the correct actions, pay attention to the tips that will be located at the bottom of the screen. Once you have deleted all the sectors, the disk partition will appear showing the volume. Divide this partition into the required number of disks (leave 30-40 GB for the system partition).
As soon as the partition for the system is created, install Windows into it, first selecting the “ Normal” option. The installation of the operating system will begin automatically, you will only occasionally have to make adjustments, for example, username, time zone, etc. Once the OS installation is complete, install the necessary codecs and drivers on your computer.
Sources:
- installing windows via bios
Provided the personal computer is operating normally, the Windows operating system starts automatically after it is turned on. However, in some cases this does not happen, for example, when Windows, for one reason or another, stops functioning normally or the BIOS settings are incorrect. In such cases, you need to enter the BIOS to start Windows.

Instructions
BIOS (Basic Input-Output System) is a small intermediary program between the components (physical parts) of a personal computer and the operating system. The BIOS is built into the computer's motherboard.
The user has the main opportunity to enter the BIOS, as a rule, only in one short moment - within a few seconds after turning on the computer, when the computer. At this moment the following message appears on the monitor screen (usually at the bottom): “: BIOS Setup”, “Press DEL to enter setup” or similar.
To enter the BIOS, in most cases you need to press the Delete (Del) button on the keyboard at the specified moment. In some cases, instead of the Delete key, at this moment you need to press the Esc, Ins or F2 key, less often - F1 or F10. There are also BIOS versions that require you to press two or three different keys simultaneously to enter. Usually, on the monitor screen at the above-described moment of booting the computer, it is indicated which keys must be pressed to enter the BIOS.
After entering the BIOS, use the arrow buttons located on the keyboard to select the “Boot” section and press the Enter key. Then you need, in the same way, to select the subsection “Advanced BIOS Features” and then – “Boot Sequence” (“Boot device Priority”, “Boot device Select”, “Boot Sequence” or a similar name).
Further user actions depend on which Windows:
If the reason is that the computer is trying to boot Windows from a location other than the hard drive where it is installed, then in the “First Boot Device” item you must specify “Hard Disk” (“HDD”, “IDE”, “ Hard Drive").
If the reason is that the operating system or, then you need to insert the Windows installation disk into the computer’s drive and in the “First boot device” item specify “CD/DVD-ROM”.
After this, you must select the action “Save and Exit Setup”, or first press the Esc button on the keyboard, then select the “Exit” menu and then “Save settings and exit”.
In the first case, the next time you turn on the computer, the operating system will boot. In the second case, when you turn on the computer, the Windows installation disk will launch, and to find and correct errors in the operating system you will need to follow the instructions that will appear on the monitor screen.
Related article
Sources:
- how to start bios
The motherboard BIOS stores all the necessary settings regarding connected components, and also contains some diagnostic methods and processor power settings. The BIOS memory can be changed by writing new firmware to it.

Instructions
Find the exact model of your motherboard. This can be viewed on the board itself, or in the dxdiag diagnostic utility, or in special programs like Everest. Without knowing the exact model, you will not be able to find your exact BIOS version. You can find and download similar software on the website softodrom.ru.
Go to your motherboard manufacturer's website and find the model information page. Go to the downloads section and download the latest stable version of BIOS firmware to your computer. Also download the flashing software. As a rule, it can be found on the same manufacturer’s website, or through Internet search engines.
Copy the firmware program and the file with the new BIOS version to the floppy disk. Boot your computer into DOS mode - a startup floppy disk or any LiveCD containing the DOS operating system will do for this. At this point in time, almost all operating system distributions on disk contain LiveCD. If you don't have such a disk, purchase it at the store.
Go to the floppy disk partition and run the flashing program. Specify the location of the new BIOS version and wait until the firmware process goes through all stages. Do not turn off the computer's power, as this may cause serious problems with the entire computer system. After restarting the computer, go to the BIOS and set new settings for all components.
It is recommended to connect the computer through an uninterruptible power supply while flashing the BIOS, since suddenly turning off the computer during the flashing process will lead to irreversible damage to the motherboard. If you do not know the BIOS on your computer, contact a specialized computer technology center.
Video on the topic
The program that controls the computer, allows you to run applications, ensures the security of working with data, and performs many other functions is called the operating system. Installing the Windows operating system is for the most part an automatic process, however, there are a number of steps that the user must perform.

You will need
- -Windows installation disk:
- -device for reading CD/DVD discs.
Instructions
Insert the Windows installation disc into your CD/DVD drive and restart your computer. When the message “Press any key to boot from CD” appears, press a key on your keyboard. Alternatively, the F8 key can be used.
When available tasks appear, use the up and down arrow keys on your keyboard to navigate, select Install Windows from the list, and press Enter.
Read and accept the license agreement. Select the drive on which the operating system will be installed, confirm your selection by pressing the Enter key. Next, select a method for formatting the disk of your choice, press the Enter key and wait until the formatting process completes and the installation data is copied.
The computer will restart. After the reboot, set all the necessary parameters that the computer asks for: “Regional and Language Options”, “Setting program ownership” and so on. When prompted, enter the product key found on the Windows installation disc or in the included insert.
Also, when prompted, enter data in the fields “Computer name and administrator password,” “Network settings,” “Workgroup,” and so on. After this, the files necessary for the correct operation of the operating system will be copied to your computer. In the left corner of the window you can track what stage the installation process is at. In the central part of the screen you can find information about new features in Windows.
After copying all the necessary data, the computer will restart again. Don't press any keys, the program will do everything on its own. Wait until the operating system detects all devices connected to the computer, and then remove the installation disc from the CD drive.
Customize the appearance of the “Desktop”, screen elements, fonts and the display of other system components to your liking using the “Control Panel” or by calling the properties window of the desired device or folder.
Video on the topic
There are times when, after turning on the computer, the operating system does not load normally. For example, if there is a disk in the optical drive, it begins to spin up, which significantly slows down the startup of the OS. Or at some point the system simply freezes. The reason for this may be an incorrect setting in the BIOS menu. In this situation, you can try to start the operating system through the BIOS.

You will need
- - a computer with Windows OS.
Instructions
First you need to get into the BIOS menu. To do this, you need to press the Del key immediately after turning on the computer, when the initial information about your system appears. Sometimes, instead of the Del key, another one can be used, for example, one of the F keys. On many models of modern motherboards, the initial screen displays a list of keys for entering different settings modes. In this list you can see which key is used to enter the BIOS. You can also find out about this from the instructions for the motherboard.
A list of devices will appear that you can set to boot first. Among them, you should select the hard drive (HDD, Hard Drive), then press Enter. Exit the BIOS after saving the settings. After this, the computer will restart. Now, after turning on the PC, your operating system will load first.
Tweet
Let's say you have a boot disk with Windows in your hands. Or the Dr.Web LiveCD anti-virus disk. Or maybe you want to install Linux. You insert the disk into the computer, but suddenly the question arises: “What to do next?” If you are an inexperienced (yet) computer user, this question will be one of the first to arise. Experienced users also sometimes need to know the boot order in different BIOS versions. So my instructions are suitable for everyone.
So, we are faced with a task: we need to tell the computer which disk it should boot from first. To do this you need to go into the BIOS settings. How to do this - read on.
Which button should I press?
The very first question that arises for an unprepared user. How to boot from a boot disk or flash drive?
Two solutions:
- Open the boot menu with a list of connected boot devices and select the one you need from the list.
- Configure the motherboard BIOS so that the operating system loads primarily from the desired device, and not from the hard drive.
Option 1 simple, but not all BIOS support such a menu. In any case, it's worth a try. Typically, the boot menu appears when you press F11 or F12 immediately after turning on the computer. Less often - Esc, F8 or other buttons. Sometimes it is supported but disabled. In this case, read the instructions for your computer's motherboard.
Option 2 It always works - there are boot settings in almost every BIOS. I will tell you about the setup.
We need to get into the BIOS settings. BIOS (or its improved analogue UEFI) is a special system that boots immediately after turning on the computer. The BIOS does not depend on Windows or anything else because it is located on a memory chip soldered into the motherboard. You can read more about terminology.
Typically, to enter the BIOS settings, you need to press the Delete, F2 or Esc button 1-3 seconds after turning on the computer. How to find out which button to press: after turning on the PC, look for the line Press Del to enter Setup on the screen (where instead of Del there may be F2 or another key). This will be the inscription about which button to press. Example:
Another example:

Instead of a black screen with diagnostic text, the logo of the laptop or motherboard manufacturer may be displayed, then the prompt will look like this:

By the way, in the last two screenshots there are hints for the boot menu button (which is called easier) - on the first it is Esc, on the second F12. Let me remind you that this option is preferable, but is not always available.
There is no inscription on the boot screens of some laptops, then look at the keymap
Press the desired button and get into the BIOS. If you press the wrong button, nothing bad will happen, because... the computer will simply ignore your actions or show some other BIOS add-on that will not contain what you need. Then you need to press Reset (reboot button on the system unit) or Ctrl Alt Del to restart the computer.
After pressing the required button and the BIOS screen appears, an ambush awaits us - there are many versions of BIOS, their settings look different. There is good news - they all most often have the same points, so you can figure out what's what. There are two BIOS versions that are very different from each other, we will look at them below.
Please note that similar tips can be found in the instructions for your laptop or desktop computer motherboard. If you do not have instructions in paper form, you can always download it from the model page on the manufacturer’s official website.
After reading this article and looking at the explanatory illustrations, you will be able to configure booting from the Windows installation disk on any computer.
Popular BIOS version. It is, in particular, on many Acer laptops:

We need to get to the Boot section. Press the right arrow three times:

Here is a list of devices from which you can boot. The names of the lines are different on each computer, but the first two words always tell you what kind of device it is:
- IDE CD – CD/DVD drive
- IDE HDD - hard drive
- USB HDD – portable hard drive
- USB KEY – flash drive.
To set the disk drive first (line starting with IDE CD), i.e. change the boot priority, use the up/down arrows to highlight this item, then press F5/F6(on some versions of this BIOS you need to press – or), put it first in the list. It will be something like this:

To save settings made, click right arrow to get to the menu Exit(Exit), select menu item Exit Saving Changes(Exit and save changes) and press Enter twice in a row.
Note: The Exit Discarding Changes menu option allows you to exit the BIOS without saving the settings you have made.

The computer will restart and instead of loading Windows, it should start booting from the selected drive. That is, for example, the installation of Windows will begin. Mission Complete!
The main menu of this BIOS looks like this:
 To change the boot order on AWARD BIOS, go to the menu Advanced BIOS Features:
 Select a menu item First Boot Device(First boot device), click Enter and put a dot opposite CDROM (Removable, if you need to boot from a flash drive or portable hard drive):

Press Enter, return to the previous settings page, go to Second Boot Device(Second boot device) and set it there Hard Disk– this will allow your computer to boot normally when the DVD or flash drive is removed.

Press Y on the keyboard, then Enter - the settings will be saved and the computer will restart.
Ready! Now, when a boot disk is inserted, the computer will boot from it first, and not from the hard drive. If the disc is not inserted, it will boot from the next device in the list.
Old version of AWARD BIOS
I've only seen this on old computers before 2003. The main menu looks like this:

To configure the boot order, you need to go to the BIOS FEATURES SETUP menu:  Paragraph Boot Sequence is responsible for the loading order. Buttons PageUp And PageDown(or Enter and arrows - unfortunately, I have no way to check) you need to set CDROM first, C second (this is the hard drive), third is not important - set any.
Similar to the aforementioned AWARD BIOS. It most often contains the inscription BIOS Setup Utility without any explanatory names.
Use the “right arrow” button on the keyboard to move to the tab Boot:

On the Boot page you need to go to Boot Device Priority:

There are points here 1st Drive, 2nd Drive– “First boot device”, “Second boot device”. You need to open 1st Drive and specify CDROM (for a disk drive) or USB (for booting from a flash drive) there; in 2nd Drive specify SATA or IDE, depending on what kind of hard drive you have and which item will be available in the menu.
Another AMI BIOS
Everything is clear here, look at the picture:

Buttons and – You can cycle through menu items by pressing a button F10 will call up the option to save settings.
Questions and answers
IN: I can't get into the BIOS settings. What to do?
ABOUT: Make sure you're doing everything right. 99% of problems are due to inattentive reading of the instructions. Everything can be solved if you ask the almighty Google the right question: “motherboard/laptop model, boot settings.”
IN: I configured it as it should, but the error “NTLDR is missing” appears or the cursor blinks at the top left of the screen.
ABOUT: You wrote the boot disk or flash drive incorrectly.
IN: How to boot from a flash drive (or portable hard drive) rather than from a DVD?
O1: You must specify USB-HDD, USB-ZIP or Removable in the boot settings. The item name may vary. In case of problems, read the instructions for the motherboard.
O2: If the BIOS does not support booting from USB devices, you can make a bootable DVD with Plop Boot Manager and, when booting from it, select the “USB” item in the menu that appears. The advantage of this method is that even on old computers, where USB operates in the slow USB 1.1 mode when booting, the speed will be fast - USB 2.0 mode will turn on. Minus - again, it is not always supported by some motherboards. Read more about Plop
IN:How to make a bootable USB flash drive?
ABOUT: If you need a flash drive with installation of Windows 7 or 8, then go to the section
IN:The article does not contain instructions for setting up my BIOS. Please write!!111
ABOUT: With the advent of motherboards that use UEFI instead of BIOS, a large number of externally different, but essentially identical screens with settings have appeared. Since the settings need to be the same everywhere, either read the article above carefully and find similar items in your BIOS, or read the instructions for your motherboard/laptop.
IN: I configured the BIOS, now nothing loads at all. Help!
ABOUT: In 10 cases out of 10, the problem is inattention or an incorrectly made bootable flash drive/disk. Reset the BIOS settings either by removing the battery for half an hour from turned off computer, or the Load Default Settings menu item. Then do everything again, carefully reading all instructions.
IN: When booting from a flash drive, a blue screen appears.
ABOUT: You made a mistake somewhere when creating a bootable USB flash drive. Read the instructions more carefully or look for another one - there are many ways to create bootable flash drives.
IN: I made a boot disk/flash drive, configured the BIOS, but it still boots from the hard drive.
ABOUT: Either you prepared the boot disk/flash drive incorrectly, or you configured the boot incorrectly. If you are unable to read the instructions carefully, consider whether you will do everything else correctly? Maybe it’s better to contact experienced people (service center)?
Conclusion
Using the information from this article, you can launch bootable disks on any computer or laptop - any LiveCD, installation disk with Windows or Linux, any bootable USB flash drive (if the BIOS supports booting from USB devices).
On modern computers, there are versions of BIOS (or UEFI) with support for a mouse, beautiful menus, and so on. Despite the different appearance, everything is configured according to the same principle as I gave above.
Don't forget after installation (or why else are you setting up the BIOS) to return the boot settings back so that the computer boots normally from the hard drive!


