How to make a forged mailbox. Making a mailbox with a “mail has arrived” signaling system. Mailbox: a bright accent at home
Owners of their own houses or summer cottages still receive letters, subscribe to newspapers and magazines, and there is also a need to deliver bills or parcels. And in order for all this correspondence to be delivered to the addressee, he needs to have a special cell at his place of residence. Of course, the modern market offers a wide variety of models and variations of this product, but it’s so nice to make a mailbox with your own hands, put a little of yourself into it, and even thanks to the unusual design, decorate a residential building or summer cottage. This article will talk about how to make a mailbox.
There are plenty of options for creating a mailbox with your own hands. They may differ from each other in shape, size, color, design and material of manufacture, as well as in design style. What types of mailboxes are there?
Types of mailboxes for a private home
Most of the models discussed are quite easy to do yourself, and you do not need to purchase expensive materials or equipment. So, what kind of mailboxes can you find today? First of all, it should be said that the style of the post determines the overall appearance of the site or the exterior of the house.

- It is also important when creating a mailbox to take into account the amount of correspondence sent. That is, if the owner receives a lot of letters, magazines, newspapers or advertising booklets every day, then a more capacious product will be needed, but if there is a minimum number of letters, then you can build a small box with an original decoration. Very often, a mailbox is used not for its intended purpose, but as a decorative element. The product is installed in a visible place and perfectly complements the overall appearance of a private house or garden area.
- There are several style solutions for designing a mailbox. The most famous American and English designs for receiving correspondence. The traditions of Europe and America are somewhat different from domestic ones. For example, in American cities, postal boxes are needed not only for receiving letters, but also for sending. If there is correspondence in the box, the postman takes it and takes it to the post office. But how can you determine that a message needs to be sent? It was for this purpose that special flags were invented on every mailbox in the states. If the flag is raised, it means the postman needs to look inside; if it is lowered, it means the box is empty.

- Another feature of such structures is that they are installed not like the usual structures on walls or a fence, but on lawns or areas near paths leading to the house, and are fixed on vertical supports (metal, wood and even stone). In shape, such products resemble a small container or house, which has a semicircular hinged lid at the end.
- This is a standard look, but in many states there are often competitions for the most original letter box. That is why near some houses you can find unusual structures in the form of fairy-tale characters, animals or any abstractions, as well as mounted on various stands. In addition, very often purchased products are simply decorated in a special way and thus stand out from the crowd of others.
- A slightly different tradition exists in UK cities. Here, mailboxes are installed directly on the ground near the front door or near the path with the entrance to the property. In appearance, this design resembles a small cabinet, which may have brick or stone walls. Of course, other materials are also used - wood, metal and even plastic.

- Such a structure should be compatible in style with the house and the site, that is, if the walls of the building are made of brick or have it in the design, then the mailbox will be made of this material, or a stone gate, usually complemented by stone structures for receiving letters and press . To make it easy for the postman to put the correspondence, and for the owner to easily retrieve it, the boxes are installed as if on a stand, which is an inseparable continuation of the structure. That is, this product is stationary and does not involve moving from place to place.
- Still, the most common type of mailboxes in our country are traditional ones, or otherwise called standard mailboxes. Their main feature is that they are rectangular in shape, and correspondence enters through a small slot. In order to remove letters or newspapers, you need to open the door or move one of the walls. Such structures are very often installed on apartment doors. These products are slightly larger than American mailboxes and more mobile than English ones. They can be made from a wide variety of materials, and also have different shapes.
- Of course, modern mailboxes are no longer just a rectangular box; there are decorative elements and an original appearance. It is these products that are the easiest to manufacture, convenient to use, and at the same time can perfectly decorate any building, be it a multi-level cottage or a small country house. They are installed on fences, walls of homes, and even on a free-standing stand.

How to make a mailbox with your own hands
So, if standard, commercially available products are not the ultimate dream and you really want to create something of your own, original, then it’s time to get creative. First of all, you need to decide on a specific idea, the appearance of the future mailbox. Then, you should decide what materials will be needed to implement the plan. Let's look at how to create your own wooden mailbox. This is the simplest option, and at the same time it is possible to create a real masterpiece from which it will be so pleasant to take letters out.
- Assembling the structure is somewhat reminiscent of creating a birdhouse; many people were probably involved in this type of activity in childhood. To build a mailbox, you will need a simple set of tools: a hammer, a saw, a ruler, a pencil, a screwdriver, hardware or glue. The materials you will need are wooden boards, boards or sheets of plywood, chipboard, MDF, etc.
- Next, determine the size of the mailbox. Specific parameters are selected based on what you plan to receive. If these are only letters and small advertising booklets, then a small product will be enough, but if the box is designed to receive large-sized magazines, then its dimensions should be appropriate. In any case, it is always better to make it a little larger than the standard one, then you won’t have to worry that not all printed materials will fit inside.

- The next step is to define the design. This concerns not only the features of the form, but also what elements will be needed for decoration. After all, the box for the press and letters must be combined with the exterior of the house, which means that some details must have something in common. This stage also involves the selection of a specific material and future color scheme.
When the choice of shape, materials, colors and decorative elements has been made, you can begin to manufacture the parts.
Step-by-step instructions for creating a mailbox
- For work you will need blocks of wood, plywood, preferably moisture-resistant (or use special impregnations that will help make the parts sufficiently resistant to precipitation and other weather conditions), metal corners, wood glue, a screwdriver, self-tapping screws and a hand or automatic saw or jigsaw will also be useful . In addition, depending on the design of the lid, it is necessary to prepare a hinge device, as well as a lock with which the door will be locked.

- Since our box has a more complex shape than just a rectangle, it is recommended to first create a frame from beams. For this purpose, it is enough to use slats with a cross section of 20-10 mm. The length will depend on the specific model, but approximately 20-40 cm is sufficient. The resulting base for the product will be shaped like a cube, but will have a small triangular roof.
- The next step is to secure the walls. Durable plywood is perfect for this purpose, but ordinary boards of small thickness can also be used. You will need two pieces for the side walls, two for the front and back panels and two for the top and bottom, as well as two pieces for the roof. Of course, we should not forget that all parts should be treated with impregnations, which will protect the finished structure from natural factors and extend the service life for a longer time.

- The plywood is screwed to the frame using corners and self-tapping screws; for greater reliability, the bottom of the mailbox can be additionally glued with adhesives, and all joints of the finished structure can be coated with moisture-resistant sealant. Don’t forget to make a cut on the front or top panel. Through this gap the postman will place letters and press inside. It is also necessary to make an opening door. It is possible that the roof of the house will serve as the opening part. To do this, attach this element using hinges.
- In cases where it is difficult to make a gap in plywood, for example, with insufficient experience, you can use a little trick. Use not a whole piece of plywood, but two halves that will not reach each other at a certain distance. Usually, a 1-2 cm slot is enough for these purposes, but when you plan to receive larger correspondence, you can leave more.
- Having completed all of the above procedures, we can assume that the box is almost ready. All that remains is to paint it or decorate it in any other way and install it in a permanent place, and also take care of protecting letters, magazines and newspapers from rain. Indeed, in cases where the slot for incoming correspondence is located at the top, moisture can easily penetrate inside. This is why you should install a special canopy over the box. It is best if it is made of metal.
The described method involves creating the simplest version of a mailbox, which you can do yourself even without special skills. Of course, in cases where it is possible to make more complex shapes and designs, you should not deny yourself such pleasure. After all, a mailbox is not just a box for receiving letters, it is also a wonderful decorative element.
Mailbox decoration options
- There are several fairly common ways to decorate a mailbox. First of all, you can use paints and apply any patterns, ornaments, and sometimes entire paintings to all structural elements. Even without artistic skills, you can accomplish this task yourself. Stencils made of paper, cardboard or plastic can help with this.
- Acrylic paints are best suited for painting on materials such as wood or metal. In order for the image to last for more than one season, it is first recommended to cover the entire surface with a layer of white primer, and apply a moisture-resistant varnish on top of the image, which will also protect the structure from damage caused by rain or snow.
- The next decoration option assumes that the mailbox will be decorated with a type of creativity such as decoupage. This is also a fairly simple method that does not require special skills. It is enough to select the required design depicted on a napkin or decoupage card. Next, the surface of the structure is painted white (this is one of the standard solutions), and then small fragments or the entire design are glued to the walls of the mailbox using PVA glue. When the glue is completely dry, apply several layers of varnish on top.

- Another solution that will help make the mail original is to attach several decorative tassels, beads, shells and other elements to the box. In order for such decoration to hold securely and last for many years, you should choose good glue.
- Even an unusual coloring will make the mailbox an original decoration for the entire summer cottage or private house. And if you turn on your imagination, use improvised materials and various artistic techniques, you can get real works of art. With the right approach, you can even decorate the box with fresh flowers, which will grow in small containers on the sides of the structure.
Original solutions for creating mailboxes
- Not only can decorations add originality to a mailbox, but it is also possible to use unusual items to create the design itself. Old interior items or unnecessary things are suitable for these purposes. For example, a product made from a plastic bottle or large-diameter PVC pipe will look very unusual. This option is perfect for people who do not subscribe to a lot of newspapers and receive correspondence in small quantities. It is enough to attach a round door to the tube, which will serve both for delivering letters and for removing them.
- A similar option would be a box made from a round log or thick log. Here you should remove the core and place a suitable container inside; it can be a metal pipe, sealed on one side and with a welded door on the other. At the same time, this lid can be decorated with tree bark so that the feeling of naturalness is complete.

- If a more spacious design is required, then an empty system unit would be an excellent option. This product can be installed on any support and can even be screwed to a fence. All that remains is to build a door and decorate the box accordingly, so that the postman immediately understands that this is a box for letters and newspapers.
- In general, making a mailbox that you won’t be ashamed to install in your own home is not that difficult. You can use plexiglass, metal, wood and even cardboard using gluing, welding or assembly technologies. In addition to choosing the material and shape, it is equally important to properly secure the finished box or install it in a permanent place.
- The installation location can be a fence, a gate, a house wall, or even a separately placed support. It is important not to forget when designing a product to think in advance about the method of fastening. For example, in cases where mail is placed on a gate (wooden or metal), it is necessary to make small holes in the back wall and secure it with nuts and bolts. If you plan to install the structure on a stand, then the fasteners should be in the bottom panel.
To summarize, we can say that despite the fact that technological progress in the world has reached unprecedented heights, paper letters and the press have not gone out of fashion to this day. This means that products such as mailboxes are still needed. And not always things bought in a store can perfectly complement the style of a private home or summer cottage. That is, if you really want an original decorated and designed place for receiving correspondence, then the best solution would be to do this element yourself.
Anyone could make a mailbox with their own hands. It is only important to objectively evaluate your skills and abilities in creating such things and choose a model that the craftsman can make. You can make your own mailboxes using simple patterns; even beginners can do it. But more complex forms require sufficient experience and knowledge from the manufacturer.
The easiest way would be to make a mailbox from wood or plywood; the main thing is not to forget to saturate the parts with an antiseptic.
What is important to consider when starting to create a mailbox?
For those who have not yet chosen what their future mailbox will look like, it is important to determine the fundamental parameters before creating it:
- What material will it be made of?
- What will its dimensions be?
- What design to choose for it.
After the choice is made, you can begin drawings, purchasing the necessary materials and directly creating the product.
Wooden mailbox - manufacturing

For beginners, the easiest way is to make a mailbox using a very easy pattern from an affordable and easy-to-work material - wood. The process of making this type of mailbox is described below.
A homemade wooden mailbox will require the following materials and tools:
- a wooden beam made of inexpensive wood (pine, for example) at least 30 cm long;
- dense plywood sheet with good moisture resistance;
- substances for the protective treatment of wood;
- self-tapping screws for wooden products;
- two hinges for the door;
- door lock and hinge;
- metal sheet 30 cm long;
- screwdriver;
- hacksaw or jigsaw.
You need to prepare four guide rails from a wooden beam, the thickness of which will be 1 cm, width - 2 cm and length - 30 cm. Then you should make plywood blanks for the walls of the future mailbox. The dimensions of the front and back walls will be 30 cm in length and 25 cm in width. The side panels, there should be only two of them, will have the following dimensions: length 30 cm, width 6 cm. The dimensions of the top and bottom panels should be 25 cm wide and 6 cm long.
Since all these parts are wooden, even before assembling the mailbox, they should be treated with substances that will ensure long-term protection of the finished product from rain, snow and insects. This will allow the future mailbox for a private home to be used for a very long time.

After all the main parts are ready and processed, you can begin assembling the product. All four guide rails must be connected to the back wall, bottom and side panels. To do this, it is best to use prepared screws and a screwdriver.
Although there is another option - you can put all the parts on glue, in which case it will be better if you use good wood glue.
The top panel of a wooden mailbox should contain a slot into which the postman can drop letters, newspapers and other correspondence. A skilled craftsman will easily make the required gap in the middle one centimeter wide. There is a simpler recipe for beginners. The remaining plywood panel 25 cm long and 6 cm wide can be cut using a jigsaw (or hacksaw) and made into two panels 25 cm long and 2.5 cm wide. Thus, the master will be able to make a 1 cm wide slot by attaching these two thin panels to the finished frame on top. This simple technique will make it easier to make a homemade mailbox.
Since the press slot is located in the upper part of the structure, it is reasonable to provide a canopy above it, which would protect all newspapers and letters from possible precipitation. Such a protective panel can be made from a metal plate. Here it is important to adjust its dimensions well to the dimensions of the mailbox itself, and then attach the metal cornice to the top of the product with hinges. It is important to take into account that the cornice itself does not interfere with the postman throwing mail into the slot.

The front wall is secured last, since it will serve as the mailbox door. With its help, the owner will be able to collect all correspondence from it. To do this, use prepared loops and a lock. The loops should be small and not bulky. At the same time, they need to be very durable and ensure quiet and reliable movement of the door itself. The padlock hinges are attached on the opposite side, one on the door and the other on the side panel.
You can improve the finished product by installing an alarm that will notify the owners about the receipt of mail. To do this, you need to make another bottom plywood strip and attach it at the bottom, forming a double bottom. The second plywood is attached to the springs. Between these springs, contact plates from the telephone switch should be placed. The connecting wires from the box need to be laid into the house to the battery and lamp, the latter will light up every time correspondence gets inside. This simple mechanism will always notify the owners of the arrival of mail.
Models of homemade mailboxes
Mailboxes come in a variety of shapes and designs. These products can vary in shape and cost, they are made from all kinds of materials, and the design can only be limited by the imagination and skill of the person who creates them.
Wooden mailbox. This is a very simple and affordable option for a mailbox. Depending on the skills of the craftsman, such boxes can be very simple in execution, or they can be carved and show the pinnacle of skill if they are made by professionals who have been working with wood for a long time.

You can build a simple mailbox from a plastic bottle and two metal brackets.
Mailbox made from a plastic bottle. This is a small and compact option; large packages of correspondence will not fit here, but it will always look original. Moreover, it is very easy to make such mailboxes from a plastic bottle with your own hands. To do this, a plastic container is placed in a metal or plastic pipe of the appropriate size and secured in a place accessible to the postman.
Metal mailbox. To make such a device, you need to be able to work with metal and use more complex tools - drill, welding, grinder, etc. However, such a box will last a long time, so the time and effort spent on it is worth it.
Mailbox made of plexiglass or plastic. This is not always easy to do, because the plastic parts will have to be secured with glue or sealant. Here it is important to choose a good substance for gluing, otherwise the master will have to tinker with such a model for a long time.
Mailbox made from a watch. For this option you will need an old cuckoo clock. The clock mechanism should be disassembled, and the front part of the former clock should be secured to a wooden box. In this case, the hole from which the cuckoo used to jump out should coincide with the hole in the wooden base box. This will be the slot into which the postman can drop correspondence. At the same time, do not forget about the door through which the owners can pick up newspapers and letters.
Log mailbox. First of all, you need to choose a good and thick log. Wood should be cut out of it and a metal box prepared in advance should be inserted into the resulting hole. The mail door should be on the front of the box.
The door itself can be trimmed with tree bark so that it does not “fall out” from the overall design of the mailbox.
Installation of a mailbox
After the wooden mailbox is ready, it still needs to be installed in a place that will be convenient and accessible for both the postman and the owners waiting for mail. There are different options for installing mailboxes; they can be attached to different surfaces:
- to the fence - the product is attached to clamps;
- to the wall of the house - the product is attached to dowels or anchors (their size depends on the wall itself);
- to another hard surface, for example, to a wooden or metal gate;
- to a separate rack (American mounting option).
This simple recipe will help you figure out how to make a mailbox easily and quickly, using simple and affordable tools and materials.
Mailboxes have long been replaced by e-mail, but this does not prevent owners of private mansions, country houses and cottages from decorating their plots with non-standard, original, universal and original boxes, many of which seem to be real works of art. A similar device designed for collecting correspondence can be purchased at hardware stores or built independently. The question of how to make a mailbox with your own hands worries many people who want to show ingenuity and distinguish themselves with unusual taste.
Most options for mailboxes are not particularly original. Ordinary metal or wooden boxes with small padlocks are now unlikely to surprise anyone. With this approach, you can certainly forget about a bright and expressive element of the exterior. Creativity and enthusiasm will help you achieve success in this business! Thanks to the ideas we have proposed, you will be able to make a beautiful, high-quality, functional and, most importantly, individual mailbox.
A homemade correspondence box can be designed as:
- animal figurines;
- boxes with forged elements;
- flower bed;
- system unit;
- portfolio;
- hollow
Of course, you can come up with other options, but this is the work of professional designers or personal preferences, because you can even paint a postal block for correspondence in a street telephone booth, which became famous in England.
House

With certain skills and the necessary carpentry tools at hand, you will be able to build an original mailbox yourself. It is very common to make such a product in the form of a house. It is created according to the principle of a birdhouse, the technology of which is known to almost every person. To do this you will need several wooden boards, a hacksaw, a knife, nails and glue. Once the box is ready, be sure to use any additional items to decorate it.
Animal figurines

On summer cottages and in private houses you can often see street mailboxes made in the form of figures of animals and birds. To become the author of such a masterpiece, it is enough to be able to have a creative approach to business and know how to handle tools. Today on the Internet you can find a lot of ideas and step-by-step instructions for making boxes in the shape of a cow, dog, owl, horse, etc. Choose any option you like and start implementing it on your site!

Absolutely any items are suitable for decorating mailboxes. If your imagination has “gone on vacation”, leaving you without interesting ideas, try using forged elements, compositions of rhinestones and beads, or all kinds of wooden figures to decorate your box. It is recommended to make such a homemade box from wood that has been pre-treated with special protective agents. It will look no worse than its more elaborate counterparts.
Snowman

It has long become a tradition to decorate and transform the exterior of the house on the eve of the New Year holidays. Christmas wreaths are usually hung on the door, and mailboxes are turned into snowmen, Santa Claus, deer, elves and other symbolic characters. You can do all this with your own hands, armed with fir branches, colorful ribbons, Christmas tree decorations and other decorative elements.
flower bed

A mailbox in the shape of a flower bed looks very original. To create it, you need to purchase a special device for several flowerpots placed on the sides. In addition, you need to build a small rectangular plastic box in which correspondence will be collected. You should end up with a design in which the letter box will be in the center, and it will be surrounded by 4 flowerpots located parallel to each other. Such a box can be nailed to the door or hung from the canopy above the entrance to the house.
System unit

You can create a more spacious mailbox design using an empty system unit, the main thing is that it is not very bulky. Build a door from any durable material and decorate the unit accordingly. This product can be installed on any support or screwed to a fence.
Briefcase

By making a metal mailbox stylized as a retro briefcase, you will be able to stand out from your neighbors, emphasizing your individuality and unique style. To make such a mailbox-briefcase, you will need skills in working with metal. For people who feel like a fish in water in this matter, it will not be difficult for them to draw a sketch of a briefcase and use it to recreate an effective model of a letter box and mail.
Hollow

It's no secret that natural wood is one of the most popular materials not only in construction, but also in creativity. It allows you to conduct various experiments, giving mailboxes different shapes and changing the external design. A round log or thick log will be an excellent basis for creating an unusual mailbox. You can remove the core and turn the wood into a neat hollow. Do not forget to make a door out of wood, otherwise birds or animals that come to your territory will mistake the postal structure for their home.
Recommendations for making an American style mailbox
There are many different options for making such products, but many people want to move away from standard forms and show off something extraordinary and stylish. Today, American-style mailboxes are very popular. We are talking about metal boxes made in the shape of a half-pipe. They require the presence of a special flag signaling mail delivery and a house number. A distinctive feature of such boxes is their installation on a special rack along the road. To make an American mailbox yourself, you will need a small wooden stand or metal pipe. Tools you will need for work:
- plywood;
- drill;
- saw;
- hammer, nails, screws;
- wood screws;
- slats/bars;
First you need to build a mailbox - it's quite simple. Wood is best suited for this purpose. You need to take 4 small sheets of plywood and nail them together to form a box. To obtain an arched shape, the edges of the top of the box must be carefully cut down into a rainbow shape. When the box is ready, it will need to be attached to a support made of wood or metal. This is done using a drill and screws. After connecting the 2 parts of the structure (box and support), varnish the wood and don’t forget to decorate your mailbox. To fully experience the atmosphere, write the house number on the box and take care of the red flag.
Experts recommend installing a visor over the hole for lowering letters, which will prevent moisture from getting inside. When deciding to build a wooden box, you should use corners to fasten all the parts, which will make the structure more durable and increase its service life. Don't forget about a small padlock that will protect your correspondence from unkind eyes and hands.
Conclusion
As you can see, there is nothing difficult in creating an impressive mailbox with your own hands. Even those who are not particularly creative can do an original design of a place to receive correspondence - the main thing is that there is a desire to do something truly extraordinary. Thanks to various variations of such designs, they can be made from the simplest materials. It is only important to take into account that the appearance of the mailbox must be harmoniously combined with the overall ensemble of your site. It is no exaggeration to say that a beautiful hand-made mailbox, decorated with various decorative elements, will become a source of pride for many years.
Anyone can make a mailbox with their own hands. And the advantages of such a design will be much greater than those of standard blue boxes, which abound in private sectors in cities and countryside. Firstly, they will stylistically fit the overall design of the site. Secondly, it is also a way of self-expression, manifestation of the owner’s individuality. And thirdly, they are more practical, since the volume is calculated based on the amount of correspondence received by the owners.
How to make a mailbox with your own hands
The mailbox can be located either at the front door or near your gateTo begin with, they decide on the location, the required capacity and realistically assess their capabilities - the cost of materials and manual skills.
Depending on these parameters, the type of product is selected. Mailboxes for a private home are: 
- standardized;
- European;
- American;
- exclusive.
If it is not possible to completely make a mailbox yourself, purchase it and, after imagining the decor, transform it into an exclusive masterpiece. The classic is a rectangular box that you can make yourself. You will need a sheet of metal or wooden beams, fasteners or a welding machine. The opening for correspondence is usually made from above and covered with a visor. Remove mail from the bottom tier or front or back wall.

Europeans pay a significant role to this element of the exterior. They have beautiful mailboxes, they are usually painted in a variety of colors - from strict to bright. Sometimes the boxes look like a smaller copy of a private house and are made of brick.
 American mailboxes are well recognizable and are placed horizontally on a wooden or metal post.
 Americans are constantly trying to diversify the look of their mailbox with the help of different decorative shapes. The peculiarity of their design is the semicircular lid, side doors and a flag signaling the presence of mail.
 A DIY mailbox made from scrap materials can amaze with its originality.
 When choosing a material, the main thing is practicality and stylization. The correspondence should not get wet, and the external shape should fit into the overall design.
Wooden mailboxes
Cardboard allows you to practice your skills, which is determined by its low cost. But a wooden mailbox is stronger and more durable. You will need timber (100*7.5*5 cm), thick plywood (65*45 cm), a thin piece of plywood (65*65 cm), a stainless steel piano hinge (13 cm) for the door, and a lock. And in any owner’s arsenal there will always be screws or nails for fastening, but you may have to buy sandpaper for cleaning the edges, a jigsaw and wood glue that improves the sealing of seams. Experienced craftsmen advise using additional corners for fastening to make it easier to repair the product during multi-season operation.
When starting work, it is advisable to complete a layout drawing. This will eliminate the likelihood of errors in the dimensions of the walls. The roof of the box can be made flat, slightly raised, with a bend in the center - it all depends on the skills of the owner.
 Example of a mailbox drawing
 Wood is susceptible to moisture, which causes rot. Therefore, before fastening the entire structure together, it is necessary to treat each element with special means.
You can decorate with napkins for decoupage with coating (varnish). This will give the spirit of antiquity. And if the prevailing note in the design is a gentle feminine style, then the design should be supplemented with all kinds of ruffles, images of animals and people, creating the impression of aristocratic pretentiousness.
Tin mailbox
This is a rather complex design that can only be completed by someone who has the skills to work with metal (welding). A set of tools is required (grinder, drill). You will need direct sheets of metal and rivets-fasteners. But this design will last much longer and looks very presentable.
As in the previous model, you need to equip the front wall with a handle and a lock. Additionally, before decorating, it is advisable to apply several layers of primer along the outer perimeter.
This homemade mailbox can be made in both classic and American style. It can be mounted both as a free-standing structure and on a fence.
Plastic pipe mailbox
Unnecessary leftovers from renovations can also be used to create an original mailbox. Plastic sewer pipes, half a meter long and with a diameter of at least 20 cm, will be an excellent alternative to labor-intensive options with wood and metal. In general, the box is almost ready. All that remains is to cut out suitable circles for the front and back walls. To do this, a horizontal blank is made from shorter remains by cutting one side of the work. This makes it easier to apply dimensions.
Fasteners for the front door wall can be bolts or ropes. The back is secured with glue or heat treatment. Decorating will help give a neat appearance. The general stylistic atmosphere of the site will tell you how to decorate a mailbox. If natural colors and textures predominate, then you can paint it to look like wood. The stains will resemble the natural coloring of wooden decks. Using paint and then coating the surface with varnish, you can also imitate stone or brick. 
Without a suitable piece of pipe, use any other plastic object of suitable volume. When wondering how to make a mailbox from a plastic bottle, they focus on a model with a sewer pipe. It should be noted that this design will not withstand a large amount of correspondence.
The advantage of alternative plastic options is the low cost of the material and ease of installation. The box can be secured either to a post at the front entrance or to the fence of the site.
Making a mailbox with your own hands is not difficult. And the process of its creation itself is fascinating in its essence. And as a result, the owner will acquire another important decorative element, which serves as the final chord in the design.
A mailbox is an integral part of any home. How to make your own mailbox, unique in design and having a notification function about the arrival of mail, is described in this article.
If you have a house, then you have your own address to which you receive mail - press, letters and other notices. To receive correspondence, you can buy a mailbox at any appropriate store and hang it on the front door. This solution, in addition to being expensive (high-quality mailboxes are quite expensive), is also bad because the ready-made options are faceless and, accordingly, are not able to decorate your home. We will tell you how you can make a unique mailbox with your own hands, which has two undeniable advantages over purchased ones:
- located on the inside of the fence, that is, located on the territory of the personal plot, and having a decorative appearance, it will serve as a decoration for the garden;
- the box is equipped with an autonomous mechanical mail arrival alarm, that is, the box will have a simple, reliable and fail-safe mechanism that is triggered when mail arrives, thereby informing the owner that the mail has arrived.
In the end, such a mailbox will cost you less than a purchased one, and you can make it yourself in one day.
So let's get started.
Tools and materials
To make a mailbox house we will need:
- Circular saw or hand saw.
- Drill or screwdriver.
- Sheet metal or any other sheet material. A cut tin can will do just fine.
- Lumber trims.
- Wooden skewers. We will use them as dowels.
Manufacturing instructions
1. We start by making the base platform. To do this, we use a rectangular piece of plywood 20 mm thick. We cut out a rectangle according to the dimensions indicated in the photo, sand it with sandpaper and cover it with primer.

2. We cover the edges with decorative coverings.


4. After painting the platform to the bottom using self-tapping screws, we fix the stand and the slope, which are made of a profile pipe.

5. We fix the platform at the place where the mailbox is installed.

6. We make a damper on the outside of the fence. We cut a vertical hole in the corrugated sheet of the fence. From a metal plate 1.5 mm thick we make coverings for the gap and the damper itself. We fix the damper using a self-tapping screw in its upper part to the coverings on the crack. The flap moves to the left or right, thereby opening the entrance to the slot through which mail enters.

7. Let's start manufacturing the mailbox parts.

8. Assembling the frame. We additionally secure the parts at the gluing points with wooden dowels.

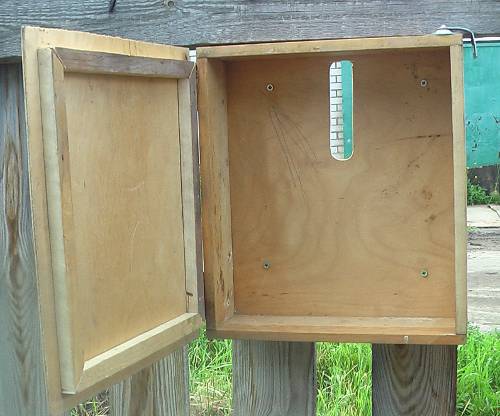
9. We fix the left side wall to the frame and begin to make the signaling device. It consists of two metal plates connected to each other by a metal axis and located in relation to each other in perpendicular planes. We fix the plates to the axle using metal rivets. On the plate that will be located outside the mailbox, we apply a thematic design (postman), use metal scissors to cut along the contour of the design and paint with acrylic paints. The second plate should cover the entrance hole from the inside of the box. Thus, the empty box is made ready by lifting the right plate. When placing mail in the box, the plate falls, raising the left plate with the postman drawn. It is its appearance that signals the presence of mail.

10. The signaling device axis is fixed using corner metal hinges to the platform with self-tapping screws.

11. Fix the front wall and insert a thematic drawing into the opening of the future window.

12. We make parts of the window frame. Before installing the frame, we insert glass into the opening.

13. Glue the right side wall. In the center of the wall we make an imitation of a door and decorative cashing from fiberboard. We also make a back wall from fiberboard with a vertical slot into which mail will flow into the mailbox.

14. We decorate the outer corners of the house and the lower part with wooden corners.

15. Let's start making the roof. Glue the roof base frame together.

16. Glue a piece of fiberboard to the bottom part. Next, we glue two pairs of rafters onto the frame. All connections must be additionally secured with dowels.

17. We attach the roof frame to the house using small hinges, since the roof will serve as a mailbox lid.

18. We make the roof gables from fiberboard and glue the ebb on the front side.

19. We attach a rough roof from scraps of boards or clapboard to the rafters.

20. Using small nails, we fix tiles cut from tin onto the rough roof.

21. After fixing the tiles, we make the ridge and wind strips.

22. Making a porch.

23. We install the structure in place. Your unique mailbox is ready.

Evgeny Dubinin, rmnt.ru (based on materials from user Valley)


