How to assemble a computer yourself - simple rules for choosing components. How to choose components for a computer What is needed to assemble a computer
- 1. System unit - how to choose components?
- 2. Installation of the processor, RAM and cooling system.
- 3. Applying thermal paste to the processor
- 4. Installing the motherboard into the case
- 5. Connecting the case controls to the motherboard
- 6. Installing the power supply
- 7. Installation of drives
- 8. Installing a video card
- 9. Laying cables and completing work
Each of us has at least once encountered a situation where, having trusted a sales consultant, we chose a ready-made personal computer, and after a few months we realized that for the same money we could have purchased a much more productive option. To ensure that a similar story does not happen to any of our readers in the future, we have prepared instructions on how to assemble a computer yourself.
This process actually turns out to be much simpler than many non-technical users assume, but it still has a number of nuances, which we want to dwell on in detail in our material. We’ll start with a brief reminder of what a computer consists of and how not to make a mistake in choosing components.
System unit - how to choose components?

When a buyer walks into a computer hardware store and sees the breadth of choice of motherboards, processors, video cards and other components, it seems to him that in order to connect all these devices together he needs to have at least a doctorate in technical sciences. But not everything is so bad, computer hardware manufacturers took care of us and many years ago adopted a single standard - Advanced Technology Extended, which unifies all the computer hardware.
Selecting components is the most difficult task when assembling a PC, much more labor-intensive than connecting them together, but this material is dedicated to the latter task, and you can find a comparison of the characteristics of video cards and processors in our other publications.

The basis of our entire future system is the motherboard, as follows from its name. It has virtually no effect on performance, but is responsible for the proper operation of all components of our computer.
The entire process of assembling a PC essentially consists of connecting components using connectors and wires to the board, and therefore you should first evaluate what kind of computer you would like to have as an output and, based on this, choose a motherboard with a certain number of RAM cells suitable for desired processor socket and so on. Another important characteristic of the motherboard is the form factor - the size of the case you will need depends on it, so be careful and when purchasing a large E-ATX board, do not expect to fit it into a compact case.
Installation of the processor, RAM and cooling system.
To build a computer at home, we suggest starting with an “open bench” rather than immediately installing your components into the case without knowing whether the system works or not. The process is as follows: we connect all our parts to the motherboard, update the board firmware, install the operating system and test the resulting assembly for errors and conflicts. If they are not identified, then we are happy to install it all in the case.
Let's start the process by installing the heart of our future PC - the processor. We must remember that the two market leaders in processor production - AMD and Intel - fundamentally use different socket designs; the former have the contact pins on the processor, while the latter prefer to place them in the socket.

To install an AMD processor, you need to lift the metal lever, insert the legs into the holes provided for them, and then return the lever to its original position. Thus, we will close the processor contacts with the socket contacts and securely fix this position.

When installing Intel, you should lift the lever and the clamping cover, and after installing the processor, do these steps in reverse order. Both types of processors should be installed in a strictly defined position, which is indicated by arrows on the processor itself and the motherboard socket.

As for cooling the processor, you need to remember that they are all installed differently and the only reasonable action would be to strictly follow the instructions. For example, AMD has a passion for fasteners using plastic lugs, while Intel, in principle, does not use such a design solution. In general, most processor coolers are quite universal, and therefore can work with chipsets from both companies, but be careful when choosing - there are also models that are loyal to only one brand.

Do not forget that many coolers can be installed in two positions, which determines which wall the heated air will exit through - the back or the top. Therefore, before installation, weigh the potency of both options and your body and choose the most productive one.

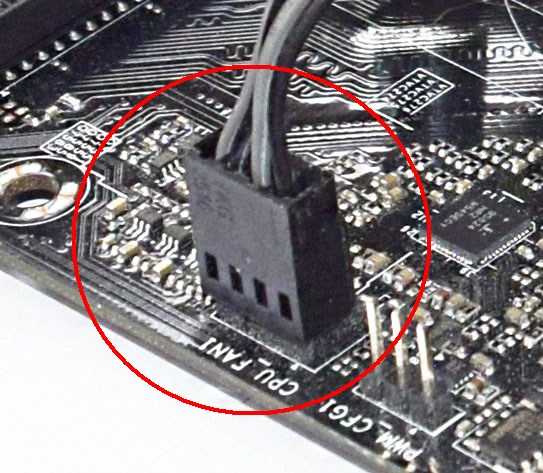
After we have secured the radiator and installed the fan on it, all that remains is to connect the power connector to the corresponding connector on the board, called CPU_FAN. More expensive motherboards can provide two similar connectors designed for two coolers at once.
So, to complete the initial work, all we have to do is install the RAM modules into the DIMM slots. Each stick has a security key that prevents you from inserting it the wrong way around; also, you will not be able to insert memory of one type, for example DDR3, into a slot on the motherboard that is not intended for it. Thus, installing RAM is the simplest process in the algorithm for assembling a personal computer.

Most processors have a dual-channel set of RAM, and therefore it is recommended to insert an even number of sticks. It must be remembered that a fairly large processor cooler may block the RAM slots on some motherboards, and therefore it is worth thoroughly studying their compatibility before purchasing.
Applying thermal paste to the processor
Many beginners make a common mistake and think that assembly consists solely of assembling parts a la a construction set. No less important for the performance of the processor than itself and the cooling system is thermal paste, which helps their tandem demonstrate maximum performance. As a rule, a small layer is already applied to the fan base, so this is not necessary during first assembly.

However, if it is missing, simply add a couple of drops of the composition and spread them in an even layer over the area of the heat distribution cover of the CPU. On the contrary, excess will reduce the thermal conductivity between the processor and the cooler, which will negatively affect the performance of the computer. If you decide to assemble a computer with your own hands, then at least do not harm it.
Installing the motherboard into the case
The main line when choosing a case for you should be the one that is responsible for the supported form factors of the motherboards. The following are the maximum possible sizes of installed components - believe me, when the time comes for wiring, you will thank yourself for choosing the most comfortable case in which you can install all the desired hardware without unnecessary manipulations.

To install the motherboard, you first need to tighten the external and internal threaded mounting nuts. As a rule, all the bolts and nuts come with the housing, they are standardized, so it is unlikely that you will need to look for something unique to install your assembly. Having secured the plugs and tightened the nuts, you can move on.
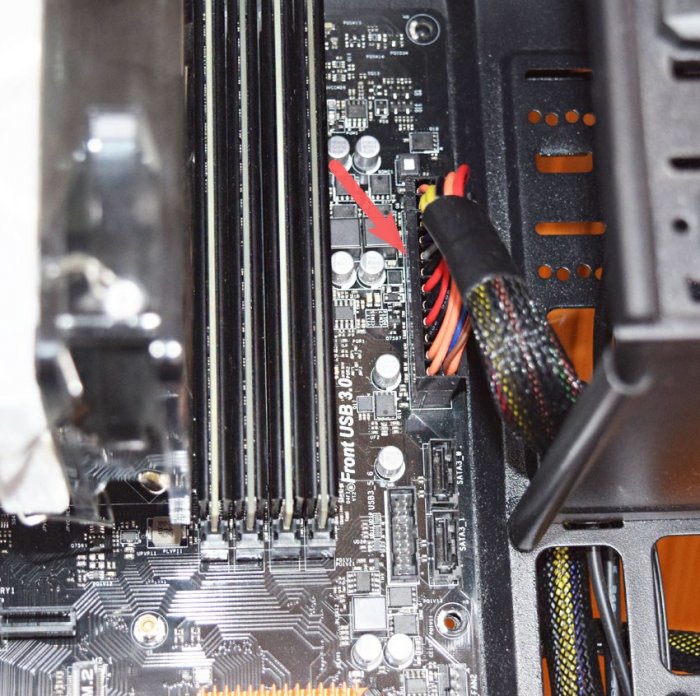
Connecting Case Controls to the Motherboard
The panel of a standard case is usually equipped with on/off buttons, as well as USB ports and a headphone jack. As a rule, these interfaces are located at the bottom of the motherboard, and therefore we find them and connect them to the case.

The set of wires is very standard:
- PWR_SW is responsible for the on/off button;
- RESET_SW activates the reset key;
- HDD_LED (“plus” and “minus”) activates the drive activity indicator;
- PWR_LED (“plus” and “minus”) is responsible for the operation of the computer status indicator.
Installing the power supply
It's time to install the power supply and connect the cables to the motherboard. All connectors have keys that will prevent incorrect connection, so even an inexperienced user can handle it. Each connector speaks for itself, and if it says SATA on it, then it is probably intended for a device with the same interface.

Recently, the power supply compartment has been located at the bottom of the case for better ventilation, so make sure that the wires are long enough for components located in the part of the video card remote from the unit. After installing the unit, we stretch two main cables - a 24-pin cable to the motherboard itself and an 8-pin cable to the processor. When purchasing a power supply, we advise you to immediately purchase a bundle of nylon ties so that your bundle does not get confused between PC parts.

Installing drives
There are several drive form factors: 2.5-inch, 3.5-inch and solid-state drives with an M2 connector. The latter are installed on the motherboard itself, but the first two must first be installed in the case.

Installing a drive into a slot with a slide is as simple as installing RAM, and therefore we will not dwell on this point in detail. All that remains is to connect cables to them from the motherboard and power supply unit, which have a SATA connector.

If you want to install an optical drive, then the algorithm is the same - we fix it in the 5.25-inch bay, remove the front plug and supply power.
Installing a video card
Since we set out to assemble a PC correctly, we cannot do without a paragraph dedicated to the video card. It is installed last and the power cables are pre-wired for it. The graphics accelerator needs to be installed in the very first PCI Express x16 port, but modern video cards take up two or even three slots, so access to the downstream port will be blocked.

After these procedures, all that remains is to remove the two plugs on which the radiator will be installed, and also tightly screw the video card to the motherboard and the back cover of the case. The number of power cables will depend on the power of the video card and in extreme cases you will have to add cables to the power supply or use adapters.
Laying cables and completing work
The entire list of components has been combined into a single system, so it’s time to put the finishing touches on it. If the assembly is standard, then you just need to choose what to connect the coolers to: the motherboard, reobass or power supply. After this, you just need to carefully lay the remaining cables and tie them with nylon ties, and then close the housing cover.

After that, we connect a monitor and other peripherals to the system unit, install the operating system and use the brand new assembled computer.
We hope that our material on how to assemble a computer yourself will help you save money and choose the most successful combination of elements, without paying attention to the tricks of computer equipment sellers!
How to build a gaming computer? This question has been very relevant lately: ready-made assemblies presented in stores usually use equipment 1-2 generations older than the current one and are unreasonably overpriced. In such a situation, there is only one way out - independently assembling a computer to suit your needs. This option is several times more profitable than buying a ready-made machine: you choose the components yourself, and the price does not include assembly of the PC in a store. The result is a much more powerful and personalized machine at a lower price.
Unfortunately, now not everyone is able to do such work on their own - this is due to the diversity on the component market and the high complexity of the project. Our article will help you understand the issue and assemble yours without any extra effort.
The best place to start is by analyzing the configuration and setting priorities. To put it simply, you need to decide what you want to get as a result and which components should be given special emphasis, and which ones can be purchased in the basic version. Read the information below and we will help you make a choice.
- CPU .
Something you definitely shouldn't skimp on. In fact, it sets the speed of the entire computer, and it is unlikely that a gaming PC with a weak processor will be able to run modern games even if it has the maximum versions of other components;

- video card. For a gaming computer, it is just as important as the processor. However, there is relative freedom of choice here: if you want to play games that are about two years old, then you can choose not the most wholesale solutions. If the games require the most modern ones, then definitely the maximum configuration;

- RAM. Not only the amount of memory is important, but also its type and speed. Games that were released a couple of years ago do not have increased memory requirements, but we would recommend not saving in any case: the more memory, the more operations your computer can perform simultaneously without accessing the hard drive;

- drives. The comfortable speed of the system depends on their speed, and the volume determines the amount of installed software and stored information. This item allows you to combine selected components, but if the speed of the system is not important to you and you are willing to put up with the relative slowness of loading and rendering the interface, you can save money. This is unlikely to affect games;

- motherboard. Many people believe that the motherboard is just a socket for other components, and you can ignore it and take the cheapest option. Such people are only partly right: the cheapest option neutralizes the power of the remaining parts, but even the most expensive solutions are not entirely justified. This is the case when our choice is the golden mean;

- cooling. If you are not going to get carried away with overclocking, take a simple cooling that matches your processor, and you will be happy, but if you are going to squeeze the maximum out of your computer, it is better to take an expensive option - there is less risk of burning out the processor;

- power unit. Treat it exactly the same way as you treat your motherboard: too little - it won’t last and will lead to reboots, too much - an unjustified waste of money. However, there are certain subtleties here too;

- frame. If you are not a fan of neon lighting and a dozen additional screens of dubious functionality, then make do with an inexpensive but spacious case with good air circulation. No more is needed.

So, you have decided on the approximate project configuration. Now let's move on to the next point - the specific choice of components.
Deciding on the components

Now we face the most difficult part - deciding on specific models of components. Here we will provide recommendations for three options - budget, medium and maximum. You should have decided on the option in the previous paragraph.
Note! When choosing and purchasing parts, use sites like Yandex.Market - they will help you choose a store with the best price, and you can also read reviews for this particular hardware model.

A couple of years ago, we would have made a reservation in this part of our instructions: we choose Intel and only Intel. AMD used to specialize mainly in solutions for the office segment, but with the release of modern processors based on the Ryzen architecture, this company is joining our race. So what are we paying attention to? We are interested in frequency, architecture, number of cores and cache memory.
There is a widespread opinion: there is complete stagnation in the processor camp, the architecture, for example, Sandy Brigde is completely no different from Kaby Lake, it is better to take a processor with the highest frequency and number of cores. This is wrong.
Food for thought. Let's make a small note about the design of the central processor. The much-loved “multi-core” of modern processors is very often confused with simple multi-threading - and there is a significant difference in these two concepts. There are two types of cores - physical and logical. This is especially true for Intel chips with their proprietary Hyper-Threading technology. The bottom line is that with actual four cores, the processor performs calculations in eight threads - just as it would be if there were eight cores.

The trouble with this solution is that there are actually still four cores and the difference in performance between a system with physical eight cores and a “4+4” system is not the 5-10 percent that marketers love to tell us about, but a quite noticeable 20 percent . This is especially noticeable in “processor-dependent” games, like GTA 5 - such games use all available processor cores.

The next characteristic is frequency. If earlier, when processors were only a few tens of megahertz, each new ten gave a huge increase in performance, but now, when the industry has reached its maximum and the average value for all companies hovered somewhere at the level of 3 GHz, an extra 100-200 MHz is not will make you feel better. Let's remember and save it as a constant: The minimum level is 2.5 GHz, and everything above 3.5 GHz is already an overclocking area and is only needed optionally.
Let's move on to cache memory. The essence of its work is that it is a volatile memory located on the same substrate as the processor, with a speed 2-3 times higher than RAM. These chips are used by the processor for internal calculations, and the higher this indicator, the more calculations the processor can perform without accessing external devices or writing its data to RAM. For us, all this means only an increase in productivity - by the way, a fairly significant increase.

Our parade ends with architecture—that “delta” to which the industry shifts every year. The processor architecture is updated annually, and the difference in performance averages 10-15 percent. This parameter is important only for “processor-dependent” games, but nevertheless, architectures older than 2015 are completely unsuitable in the modern world. What's newer - yes, you can already choose here.
So, having understood a little about the principles of processor operation, we can draw certain conclusions.

Note! Specific processor models are given here only as an example - we advise you to study the entire range on the market, and by comparing the materials in this article and reviews of specific models, choose your ideal option.

In this article, we will put aside debates about the benefits or harms of dual-channel or single-channel memory modes, and agree that our option is only single-channel. That is, under any conditions, the memory sticks must be identical and their number must be even. Or there can be only one bar - then there are no questions. It is this configuration that allows you to achieve maximum performance in games.
What can we say about memory? We are interested in its volume and speed, which is determined by frequency (and, therefore, type).
Food for thought. Yes, the type of memory basically determines all its characteristics except the volume itself. Type is the same letters SDRAM, DDR, DDR3 or DDR4. But it’s not these letters that are important to us, but the memory frequency. The frequency is determined by the type - for example, DDR3 will not be able to cross the threshold of 1866 MHz, higher than that the next generation of memory is required.
Note! It would seem that everything is simple - you need to take the maximum possible solution, but you must make a reservation - the maximum possible solution compatible with your processor.
In the last paragraph, you chose a processor, so don’t be lazy and go to its manufacturer’s website - usually the descriptions and technical documentation of the processor say everything about the supported memory.

We've sorted out the frequency and type, but what about the volume? The debate on this issue will probably never subside, but it is worth remembering: the minimum threshold is 4 GB. This is the minimum at which a comfortable existence is still possible in our days.


It's time to compile the two previous points. The choice of motherboard is determined primarily by the processor and memory. Yes, this is exactly the chronology and the motherboard should be chosen based on its processor and memory, and not the other way around. So, again take a look at the page with their characteristics - we are interested in the type of processor socket, more often called a “socket” and the type of RAM, those same DDR and DDR4.
Having decided on these main characteristics, you can move on. You should pay attention to the form factor of the board (if you make a mistake and take more than you need, the board will not fit into the case), the number of expansion slots and especially PCI-E x16, as well as the ability to connect drives. When choosing, it would also be a good idea to go to the board manufacturer’s website and check the candidate’s compatibility with the previously selected parts. It will be a shame if you discover incompatibility during the assembly process.

Motherboards come in different form factors, but the three most common are ATX, microATX, and miniITX. The most common and most convenient is the first: you can install up to 6 expansion cards in it, and there will most likely be more slots for RAM. MicroATX has only four expansion slots and two for memory, and miniITX has even less - one slot of each type. You should pay attention to the number of PCI-E x16 slots only if you are going to install several video cards on your computer - if not, then one slot is enough. As for drives, you should remember that there are several standards for connecting them - IDE, SATA. SATA 2 and SATA 3. The first two types are not used in modern times, but the latter are most often found together and combined. They differ in throughput and, as a result, speed.

So what can we say about the options?


So we got to the main point of a gaming computer - the video card. These devices are surrounded by the largest number of myths and prejudices among assemblers, but with them everything is relatively simple - even a little simpler than with processors. In fact, there are only three important characteristics that you should pay attention to - the frequency of the video core, the amount of video memory and bandwidth. Accordingly, the larger each of these parameters, the higher the settings in your games you will get.
Food for thought. Video cards are sometimes called a computer within a computer. These boards have their own video core (processor) and video memory (RAM) chips. The selection rules here are absolutely the same as in processors and memory - the higher the frequency, the better, the more video memory, the better. But there is one parameter that is much more important here. This is architecture. You will notice the difference between modern Maxell or Pascal and last year's Kepler literally by eye. In addition, video cards are the section where AMD stops catching up and turns into a real competitor for NVidia.

The choice of card now should be based on the resolution of your monitor and the expected graphics settings for games.

Drives
The place where systems and games are installed, the place where all your data is stored. There are two types of storage devices: conventional HDD hard drives and high-speed solid-state SSDs based on flash memory technology. The characteristics of both types are similar: form factor, connection bus, and, exclusive to HDDs, spindle speed. The difficulty is that in addition to the characteristics, there are several more use cases. They depend on your needs and your budget. Regarding the connection type, these are the same SATA 2 and SATA 3 that we talked about in motherboards.
There are also two forms of factors:
- Regular 3.5 inches and compact.
- "Laptop" 2.5 inches.
Hard drives come in two formats, and the performance is higher for the “big” brother, but SSDs come only in small ones. Needless to say, SSD is not only several times faster than HDD, but also much more expensive.


Note! In all cases, you should choose hard drives with the maximum spindle speed (7200 rpm). If you choose a slow hard drive, even if the system is not installed on it, it can still become a bottleneck that will negate all the power of your computer in games.
The last detail, the choice of which requires serious analysis. You can choose the rest of the details, like the drive and the case, based solely on your taste. So what do we have here? The power supply is a fairly important part of your computer; it determines how stable it can work. In addition, if the power of the power supply is not enough, this can lead to constant reboots, which cannot but affect the health of the system and the user’s nerves.

You should choose a power supply based on two important parameters - the approximate amount of other equipment, as well as the type of power supply for the motherboard and video card. Let us also agree that in our time the lower power limit of the power supply is 650 W. So what about food types? To do this, you will have to visit the websites of the motherboard and video card manufacturers again - there you will find out the necessary information.
Nowadays, there are mainly two types of motherboard power supply - 24+4 and 24+8. This means that there are 24 pins to power the board itself, and there are separate 4 or 8 pins to power the processor part. As for video cards, they usually require additional power via a standard six-pin connector, and it’s all about their number - some video cards do not have these connectors at all, and some can have up to three.
The division into options in this case is based solely on power.

Computer assembly
The hardest part is over. The most interesting thing remains - assembling our computer.

Preparing the body
Once you've taken your case out of the box, remove the side cover from it by unscrewing the two screws on the back panel, and remove all the hardware included with the manufacturer. Inside you can find bags with the necessary screws, various extension wires and stickers. Set these items aside until needed.
Installing the motherboard

Important! Make sure that the screwdriver does not touch the surface of the board, much less damage it. Be extremely careful.
Processor Installation

Cooling installation

Installing RAM
Make sure that the tabs near the RAM slots are pushed out to the sides. Remove the RAM from the package and install it on the motherboard, paying attention to the position of the key - the cutout on the strip should coincide with the protrusion in the slot. After correctly placing the strip in the slot, lightly press on its upper edge until it clicks: the latches should themselves come to a vertical position, securely securing our strips in their slots.

Installing drives

Note! Some case models have their own drive mounting system. There, special rocker arms and slides can be used, which are included in the delivery package of the housing. Study the instructions for it to find out the process of installing your drives in such a case.
Installing a video card

Installing the power supply

Front panel connection
All that remains is to connect the front panel controls to the motherboard so that you can turn on and restart the computer and use the USB ports. There are two generally accepted front panel connection standards. The connectors coming from the front panel are usually labeled, and the motherboard has markings that match the labels, but they can be small and unreadable, so we will provide a visual diagram of each of the standards.


As for the USB and audio ports, everything is even simpler with them - just plug their connectors into the USB and HD_Audio (or simply Audio) connectors, respectively. The main thing is to follow the keys (see illustration).

Let's sum it up
If, after all the manipulations performed, you turned on the computer and it started working, congratulations, you have just assembled a gaming computer with your own hands!
Yes, the described process looks quite complicated, but you just have to try and you will understand that the complexity is only apparent. We hope this article will help you in your business. Good luck!
Video - How to assemble a gaming computer
Hello friends! If you are a computer enthusiast, then learn on your ownAssembling a computer will not be difficult for you.
When I wrote this article, I immediately showed it to a person who had never assembled a personal computer. He read it carefully and began asking me questions, from which I realized that the publication urgently needed to be supplemented with many little details, only then would it become understandable to beginners. As a result, I almost completely rewrote the article several times and only now am I offering it for your consideration.
In my last publication, I explained to you, but today we will independently assemble a classic PC.It is best to assemble a computer on a table so that you can see everything and make it as convenient as possible. Let's start withapplying thermal paste to the processor and installing it in the motherboard socket, then we assemble the processor cooler and connect it, after that we insert the RAM modules into special connectors on the motherboard, then mount the power supply into the case and tighten the wires, secure the SSD, HDD in the system unit, and only after that install the motherboard in the case...
How to assemble a computer yourself
First, we need to buy thermal paste and apply a thin layer to the processor. It is inexpensive and is usually sold together with a special hard card, with the help of which it is literally smeared over the surface. Why do you need thermal paste? During operation, the processor heats up very much and, with the help of thermal paste, effectively removes heat from itself to the cooling radiator.

Installing the processor into the motherboard
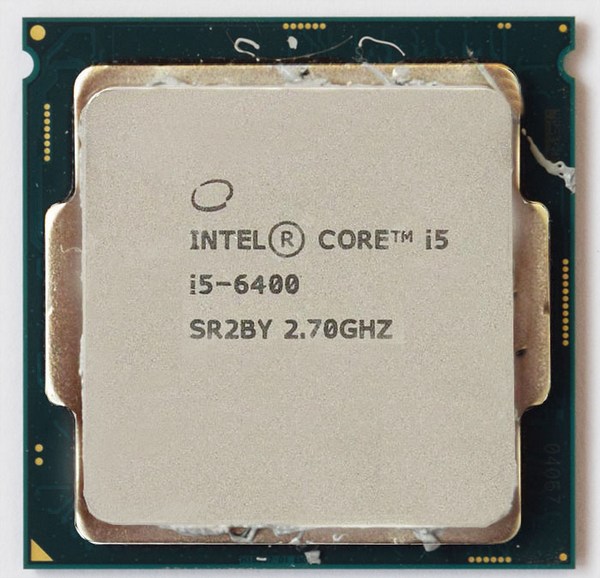
Now let's install processor in, in my case i5 6400 and Asrock z170m pro4s. Install the processor into the socket very carefully and carefully so as not to damage it. This especially applies to AMD processors, since unlike Intel processors, which have contact pads, first there are so-called “legs”, bending which the processor will stop working. So, we open the socket on the motherboard using the side latch and look at the keys that show us how to insert the processor correctly.


We take the processor in our hands and see that it has corresponding recesses and a triangle in the corner, thanks to which it will be difficult to make a mistake during the installation process.

With a gentle movement of your hand, simply place the processor in the socket,

We make sure that it does not hang out there and close the side latch.

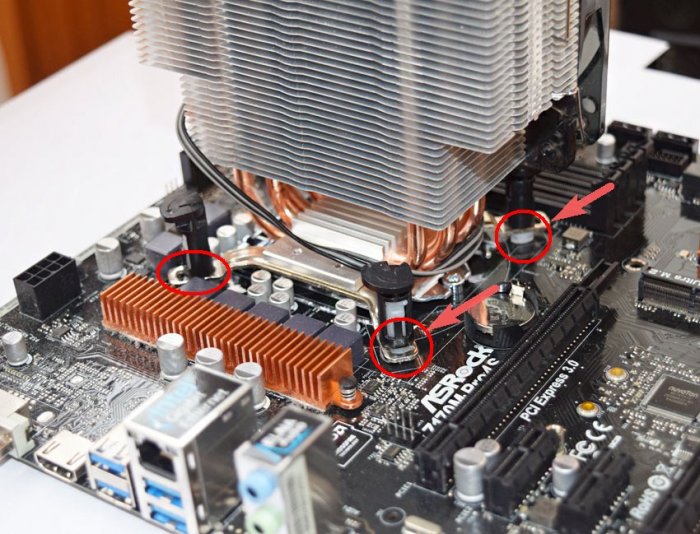
CPU cooler
Next, I prefer to outfit the motherboard in full and install RAM on it immediately, outside the case, because personally, with my large hands, doing this in a cramped space (inside the case) is problematic.
So, we look at the motherboard and see special connectors for mounting the cooler, and that’s where we’ll install it.

This is done simply, take the cooler, put the special legs into the holes and snap them into place.

After installation everything will look like this.


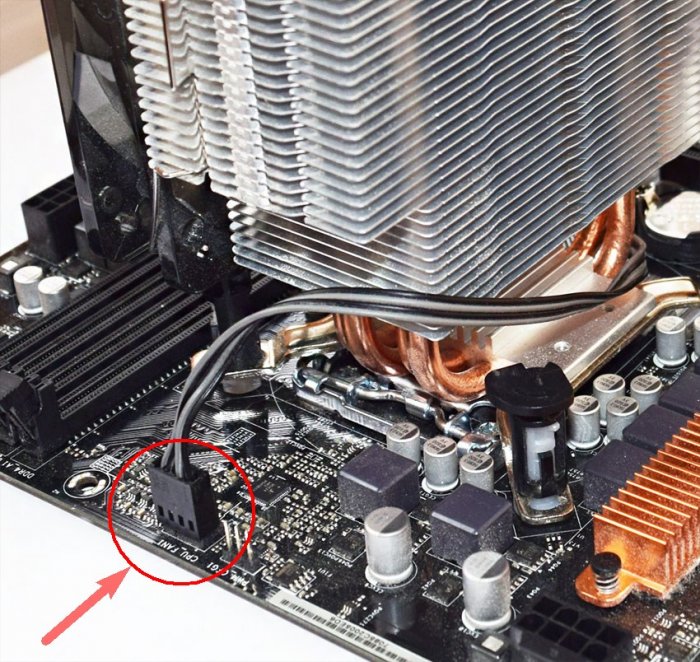
Don’t forget to also connect the cooler’s power to a special connector on the motherboard called CPU FAN.
RAM
power unit
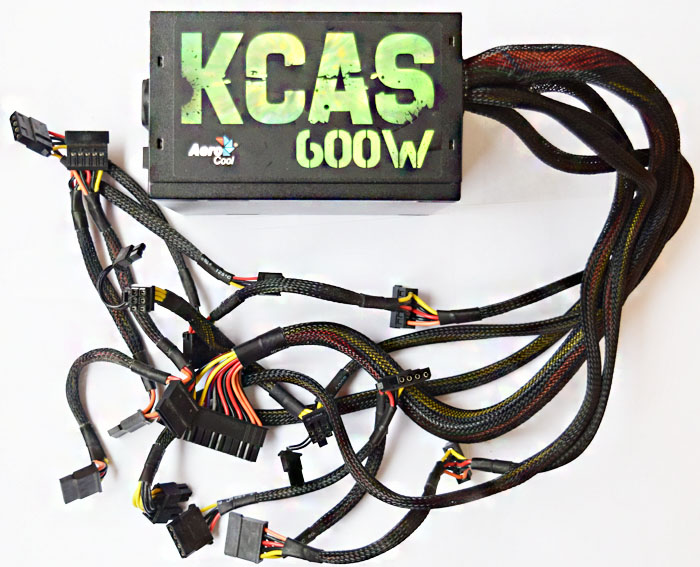
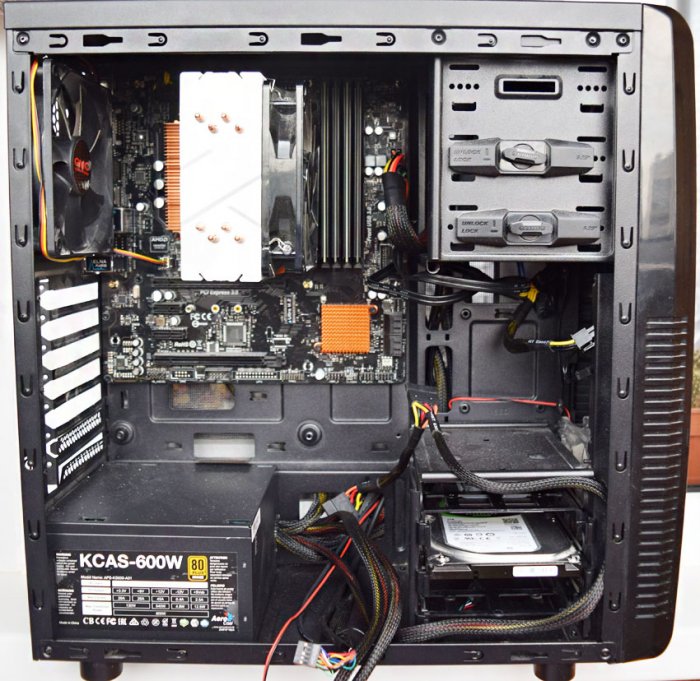
Now that the motherboard is fully charged, we proceed to installation in the case. Many people advise installing the motherboard into the case first, but I prefer and recommend that you start with the power supply, because if you follow my advice, you can stretch all the necessary wires properly and avoid damage to the motherboard, since the unit is usually very large and takes up a lot of space . One awkward move and you can easily damage the microcircuits - goodbye motherboard. In my case, the GMC Forge case and the Aerocool KCAS 600W power supply.
Installing the block is a very simple process. We install, stretch the wires as desired and screw the screws into special holes on the back of the case.


I would like to note that the power supply is always installed so that the fan is directed downwards when the unit is mounted at the bottom. The inside of the case has its own microclimate and its own temperature, so it will be better if the power supply draws in cool air from the outside rather than warm air from the inside.
Solid State Drive SSD and Hard Drive
Now before installing the motherboard for the same reason as with the power supply. We insert the solid-state drive and hard drive into the corresponding cages, if they exist; if they do not, then simply screw them to the case. I will have a Patriot Spark 128gb and a Seagate Barracuda 7200 1000gb working hard on my system.


Motherboard
Let's move on to installing the motherboard into the case. The mother itself has special holes for fastening; depending on the model, the number of these holes may vary. We insert the motherboard into the case in accordance with these fasteners and tighten it with the screws that are included with the case.

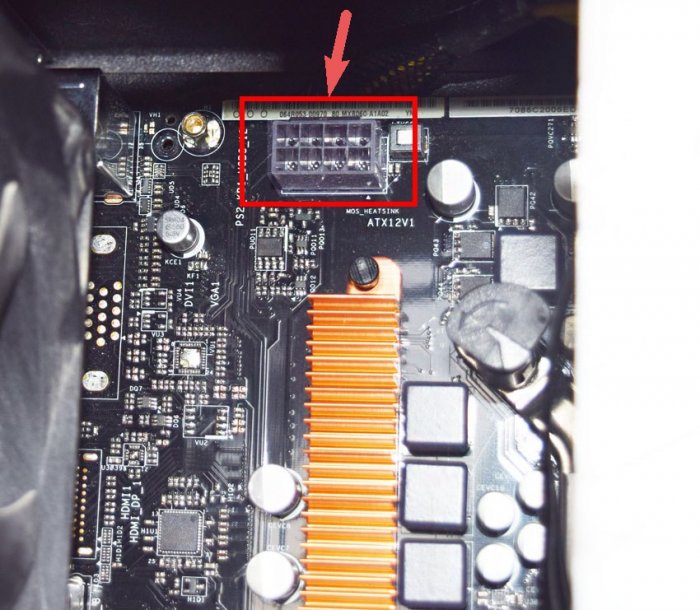
CPU power
And finally, all we have to do is connect all this stuff together. Let's start with powering the processor. The power connector can be 4pin or 8pin and is usually located directly next to the processor. We find the corresponding cable at the power supply and connect it.

Motherboard power


Case cooler
Let's move on to connecting case coolers for injection/exhaust. They are connected to the corresponding connectors on the motherboard with the name CHA FUN or SYS FAN or similar.


Now let's connect our drives using SATA interface cables to the corresponding slots on the motherboard.

Don't forget to connect additional power to our drives. In my case, this can be done from the back of the case.

Connecting Front Panel Cables to the Motherboard
And finally, I decided to leave the most difficult thing, which causes some problems for most users, namely connecting the power to the front panel. All connectors are located at the bottom of the motherboard. Let's start with the audio outputs. Take the wire with the name AUDIO and connect it to the connector with the same name.

These instructions can help you in assembling your PC system unit yourself.
Of course, these are just general principles for assembling a computer, and more precise information in each specific case can always be found in the motherboard manual that comes with each of them.
You may ask, “Why systemic?”
Everything is very simple, it is the motherboard (system) that is a kind of skeleton on which all the other components of the computer are hung: processor, RAM, video card, hard drive, power supply, etc. are connected.
Choosing a workplace
A regular table can serve as a workspace for assembling a computer. Clean its surface from foreign objects and install it near a water pipe or at least central heating.
You will need a set of components (components) of the system unit of your future PC, which corresponds to its main purpose (home, multimedia, graphics processing, gaming, etc.).
You must decide what your computer will be like in advance and configure it accordingly according to your requirements.
The components must be compatible with each other, and the configuration must be balanced and optimized.
The basic PC package includes:
- CPU;
- Cooler;
- RAM strips (one, two or more);
- Video card (if it is not integrated into the motherboard);
- HDD;
- Sound and network cards (if they are not integrated into the motherboard);
- Power supply, if it is not included in the computer case and was purchased separately.
For example, in the workplace there may be such a picture.
Prepare your tool kit
A Phillips screwdriver is the main tool that is needed during the entire process of DIY PC assembly. It is desirable that it was magnetized.

Pliers can be useful for removing various plugs from the housing.
You may also need tweezers for working with small bolts and installing switches.
Place components and tools on a clean, non-conductive surface near the assembly table.
In new cases, all fasteners, power cord, legs and plugs are located inside the case. We place the case on the mounting table and unscrew the 4 mounting screws on its side or rear wall.

After this, you need to open both side walls of your case, to do this, as a rule, you need to move them back a little, after which the side walls are freely separated from the case.
Now the computer case must be placed on its right side, when viewed from the front panel.
View from above.

Electrical safety and component protection measures
Take a long enough flexible copper wire, strip its end and attach it with a screw to any point on the body.
Thoroughly clean a small section of the water (heat) pipe from paint and rust and wrap it with a clamp made of sheet metal, preferably non-ferrous.
Attach the other end of the wire to the clamp. By grounding the case in this way, you will fulfill the main safety requirement of these installation works - protect the microelectronics from damage by static electricity that can accumulate on your body.

To remove the static charge, it is now enough to touch the grounded case with your hand.
But even in this case, you should learn and follow strict rules: do not touch the chip housings and connector contacts of printed circuit boards, take the boards only by the edges, and do not use much force when installing them in the slots.
The installer's hands must be clean and dry. There is no risk of electric shock when installing the system unit.
But for the future, you should firmly understand the rule of operation and repair: before opening the system unit, turn off its power and remove the plug from the socket.
Any work may only be carried out in a de-energized unit. To be honest, this rule is more likely to protect delicate microelectronics from “crooked hands” than vice versa.
Motherboard
The motherboard is the basis of the system unit. Get to know her in general. Examine the main connectors and their corresponding modules.
Processor socket (socket) – this socket is used to install the processor.
The processor socket and its sockets on the motherboard must match. For example, a socket 775 .
On the motherboard it looks like this.

On the processor.

There is a fan power connector nearby. The DIMM socket is used to install memory modules. It's better when there are 4 of them.

24-pin power supply cable provides connection to a standard power supply ATX.
He is the one on the right (8) in the photo below. The photo also shows all the cables coming from the power supply.

The already outdated ATA device connector allows you to connect ATA devices of the DMA type 33/66/100, and SATA – modern hard drives.
PCI-E – designed for connecting video cards with the appropriate interface.
As a rule, this is a PCI-Ex16 connector.

The PCI slot allows you to add expansion cards. See photo above.
Computer assembly process
Now you can start installation. And it begins with the installation of the main device - the processor - into the motherboard socket.
At this stage you need a motherboard, processor and .
The processor has a mark on the corner that should match the mark on the socket.
To install the processor, you must “open” the contact plate; to do this, you need to lift up (all the way) the lever located on the contact plate, while its upper part will move slightly, freeing the contact holes.

The processor should fall into the socket without much effort.

After installation, the contact plate should be closed by lowering the lever until it clicks.

Then you can attach the radiator with the cooler and connect it to the appropriate contacts.


Please note: before installing the fan, the contact surface between the fan and the processor must be coated with a special thermal conductive paste (usually included with the fan).

But you can also purchase separately on the radio market, for example, KPT - 8.

Installing other devices
Installation of memory modules and video cards, installation of the system board.
The RAM also has a recess slightly to the side of the middle of the bar, which should coincide with the corresponding plug in the connector.

To install RAM, the slot must be “opened” by moving the latches to the sides.
These slot latches should return to their original position after installing the module.

It is advisable to mount similar pairs of memory modules in slots of the same color in order to implement the so-called. dual-channel operating mode and get 10-15 % performance increase.

If you are building a PC with a separate video card, now is the time to insert it into the expansion slot PCI-E.

Before installation, you should remove the plug in the back wall of your case just below the slot, so that a hole is formed in the back wall for the video card connectors to come out.
Carefully align the contacts of the card with the slot, move the slot latch slightly to the side and insert the card with a little force, then release the latch.

If your card is high-power, it is powered not through the slot, but by an additional power cable. Don't forget to connect it to the connector on the system board.

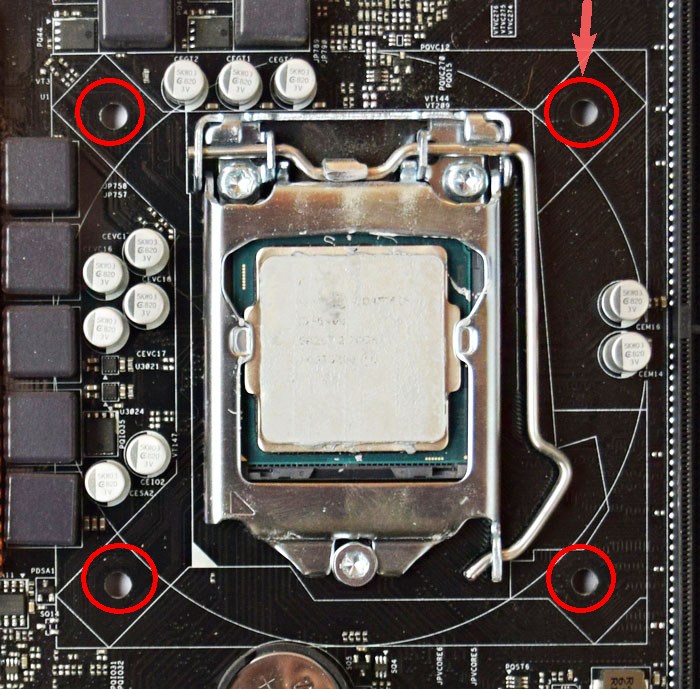
The motherboard can now be installed in the case. Modern cases usually have built-in special mounts for the motherboard.
Align the mounting holes for your motherboard with the corresponding mounting locations for the case.
If there are no corresponding mounting points on the case under some of the holes for mounting the motherboard, that is, the motherboard seems to be “hanging in the air,” special plastic stops must be inserted into such holes.
After this, attach it with screws to the corresponding housing mounting points.

Now you can connect the power cable coming from the power supply; its connector is also unique, so you will not be able to reverse the polarity of the power supply.

Connecting external drives
Magnetic disks store all the PC information and the operating system that is loaded from the disk at startup. Protect discs from mechanical damage, impacts, and shocks.
When moving the system unit over long distances, it is better to remove the hard drive and move it separately.
There are two standards for connecting external drives, that is, magnetic and optical drives - the old ATA or PATA interface and the new one.
The new one differs from the old one in convenience and speed. But PATA devices are still available, so let’s look at both interfaces.
To connect you will need a special data cable.
It must be connected to the disk with the side that has the inscription “ MASTER“. Connector with the inscription “ SYSTEM” is connected to the system board.
Very often there are no inscriptions on the train. Then you should remember that the connector “ MASTER” corresponds to the end of the cable that has the 3rd intermediate connector “ SLAVE“, designed to connect a slave (auxiliary) disk or optical drive.

Thus, you can connect two ATA devices with one cable.
All PATA drives have switches (jumpers) that should be set in accordance with the “MASTER” or “SLAVE” mode.

After connecting the cable to the drive, install it in the slot in the front of the case and secure it with screws. Then connect power to the drives using the 4-pin connector coming from the power supply.


The SATA interface is simpler and more convenient, there are no jumpers, and the thin cable does not restrict the ventilation of the case.
On the motherboard, SATA connectors are usually located at the bottom right.

The power cable is also different.

Optical drives are connected in the same way. Usually a DVD-RW drive is installed.
Old connection interface.

New connection interface SATA.

After connecting the data cable, install the DVD drive into the case and secure it with four screws. Connect the power cable.
Then you need to connect the power button cables, the hard reset button and various PC operation indicators.
Their connection is described in detail in the instructions for the motherboard.

Check that all boards and drives are installed correctly. Replace the housing cover (to the right of the front panel) and secure it with screws.
Replace the left cover and secure it with screws.
At this point, the assembly stage of the PC system unit is completed.
The remaining components and devices (peripheral devices) are connected to the system unit through the corresponding connectors located on the rear wall of the unit, for example.

Also, to improve the cooling system, additional fans can be installed in the system unit.

We looked at the main stages of assembling a computer yourself.
You should get something like this approximately.

As a rule, if the components are selected correctly, no problems should arise and the assembly process will take a maximum of 30 to 60 minutes.
Well, in the future you will need, or some other one.
But that's a different story. Follow the link above. Good luck.
I would be grateful if you share this article on social networks:The computer configurator with compatibility check allows you to quickly assemble a system unit with the technical characteristics required by the user. Using our online designer, you can easily assemble a reliable office machine, a home multimedia system unit, or a powerful gaming setup.
Computer assembly online
Nowadays, like many years before, assembling a computer from independently selected components is popular. This is a good opportunity to choose what you want. Nothing limits you; there are hundreds of options available for assembly, among which there is sure to be one you like.
Our online store offers the opportunity to assemble a computer online through the configurator. In it, this process is presented in the form of categories of components, from the processor to the power supply. Each category contains an expanded range of models with descriptions of characteristics for ease of selection.
To simplify the selection of components, the configurator has a compatibility filter for the main components of the assembly. For example, by selecting a specific processor, the following components are automatically filtered by compatibility. Also, you will be presented with a choice to install the operating system. After completing the assembly process, you receive the final result based on three parameters: price, technical data, rendered image. After placing an order and confirming it by phone, our specialists assemble this kit and check its functionality.
The advantage of this method of purchasing a system unit is that you not only choose the components you want, but also have the opportunity to choose the brand or manufacturer of the part.
Having assembled a certain configuration and completed by pressing the assemble/buy buttons, the assembly is assigned a specific serial number, by typing it in the product search bar, you can find this PC and send a link to it to friends or acquaintances for consultation or recommending them for purchase.
An important feature of our configurator is the “get an expert’s opinion” function. By sending your request through this form, you will receive a detailed response with a recommendation to the email you specified.
Try it and see for yourself - assembling a computer online is easy and simple! In case of difficulties, you can always get advice from our specialists on all issues that interest you.


