How to make a vector from a raster in Illustrator. What is a “raster”: definition, classification, translation into vector
This online service was initially described as free, but currently requires payment. In the free version, there is a limit on the number of images processed and the service logo is attached to the result.
Found this wonderful one yesterday online tool for converting raster images into vector. So wonderful that, to be honest, it’s a pity even for you, Dear Reader, to talk about it:(
Only boundless devotion to the ideals of the blogger made me overcome greed and write (what a multifaceted word) this post :)
For those who don’t know the differences between raster and vector images, here’s a little help:
All graphic formats are divided into two types - raster and vector. Each has its own advantages and disadvantages. Raster images are closer to the real image and are easier to work with. We can say that they are a snapshot of a real image with a fixed precision. Vector ones are the embodiment of pure artistic abstraction. By their nature they are close to the drawings of artists. Vector drawings are compact and versatile. Representing essentially the idea of what should be depicted, they undergo any transformation without loss, unlike raster images, which lose quality with almost any change. One of the wonderful properties of vector drawings is that they can be enlarged to enormous sizes without losing image quality.
James Diebel and Jacob Norda from Stanford University created an online service called VectorMagic, which can really ruin the mood for developers of paid tools ( Adobe Live Trace And Corel PowerTRACE) for converting bitmap images into vector format. If you don't believe me, look at the results of comparing the above-mentioned programs with VectorMagic.
The service works quite quickly (we make a small allowance for the complexity of the conversion) and the results are simply shocking. I tested VectorMagic with several images and the results were the best. VectorMagic has a good system for automatically detecting image characteristics and adjusting the transformation parameters, so that the user basically does not need to know anything special about the process itself.
As source images, you can use images in the format JPG, GIF, PNG, BMP and TIFF. As a result, depending on your desire, you can get a drawing in three different vectorization quality options and in three different formats: EPS, SVG and PNG. After the vectorization process is completed, it is possible to switch to repeating the process with a different quality (both higher and lower) and minor editing.
Let's look at image translation using an example:
1. Go to the VectorMagic website and download the drawing. To upload an image, use the “ buttons Review" And " Upload“:
2. After loading the web application, a window will appear with an assumption about what our drawing is - a photograph (artistic drawing), a logo with blurred edges or a clear logo. You can agree with the program, or you can select everything manually. Let's show a little independence and choose to define the drawing as a photograph:

... and then click on the button “ Next” in the lower right corner of the window.
3. On the next page, select the output image quality. I chose the best:
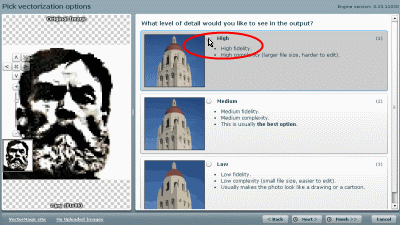
Click “ Next” and move on to the next point.
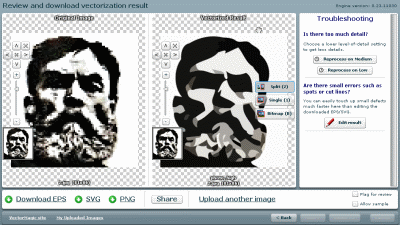
4. Here you will need to wait a little. At the end of the translation process we see two images - on the left is our raster image, and on the right is the one obtained as a result of the translation (vector):
Instructions
Draw a picture or select a photo. Scan image, photograph it, that is, convert it into digital format in one way or another. Import the image into the graphics editor of your choice. As you gradually zoom in, notice that image gradually breaks up into separate ones, each of which is painted in its own color. These squares are called rasters, and they are the basis of your image.
Analyze the file size. Choose a color model that suits you (RGB, CMYK) that will help you display it correctly. Using the editor, remove or add details, adjust the frame, sharpness, and color scheme. Select (the optimal display value on the screen). Resolution (raster), that is, the calculation is based on the number of pixels that your picture contains horizontally and vertically. Small resolution is considered to be up to 500 pixels along one edge, medium resolution is up to 1024 pixels along the edge, everything else is considered high resolution. Large ones “eat up” a lot of memory and can take a long time to load onto the network.
Select the compression algorithm you need and save the image. For small images and animations of two or three frames published on the Internet, *.gif is suitable; the optimal ratio of quality and file compression is provided by the *.jpeg format; for working with transparent and backgrounds, especially in small pixel images, *.png is used. These formats are mainly used in web design. The *.bmp format provides very high quality color rendering, but the files are large in size, while the *.tiff and *.raw formats, despite the size of the resulting file, allow you to save images obtained directly from digital devices, convey the smallest shades of color and are widely used in professional photography and printing.
note
The disadvantage of raster images is the impossibility of scaling them without losing the quality of the original file.
Helpful advice
To work optimally with a raster image, be sure to know the final format you need (resolution, dots per inch, image size).
Sources:
- Raster and vector images. General provisions and comparison.
Vector graphics is a way of representing objects using geometric primitives - points, lines, polygons. In contrast, raster graphics use fixed-size matrices consisting of dots (pixels). Software converters are used to convert an image into a vector format.
You will need
- Adobe Illustrator
Instructions
note
Many vector graphics editors have a function for converting a raster to a vector. just run some coreldraw or inkscape, import a raster image there and start the conversion.
Helpful advice
How to make a vector image from a raster image, Adobe Illustrator, tracing. Typically, tracing is used for images only with solid colors and with extremely clear contours, since the presence of gradient or simply complex colors leads to the formation of a very large number of vector contours.
Sources:
- how to convert a rastovo image into a vector one
Raster graphic arts is a way of expressing images in the form of rectangular matrices. Each cell of such a matrix represents a colored dot. An element of such a grid is called a pixel.

On the Internet, I found an image of the logo. Is it possible to convert it from raster to vector in Photoshop, and automatically? No you can not. Alas, while vector trends in Photoshop are as follows, everything that was done in this direction remained unchanged 5 versions ago. Since then, it has not been touched, not changed, and nothing new has been added to the vector. Have you needed vector tools in Photoshop? Here they are, want more? Whatever else you forgot about Photoshop, master Illustrator. Approximately this line of thought motivated the developers who introduced the simplest vector operations into Photoshop. Now let's get down to business.

The raster is converted into a vector through selection areas. First, we create a selection, then we convert the selection lines into vector paths, then we fill the vector paths with fill layers, thus creating a vector mask. In order to understand all this not at the level of army commands - click here, click there, it is worth learning how to work with vector drawing tools, understand how vector contours can interact with each other, and learn how to create a vector mask. But don’t worry, you don’t have to sit down to read it until the weekend; you’ll already understand how to convert a raster into a vector in Photoshop if you read the article to the end.
Logo highlighting
I would especially like to note that in order for the translation into vector to be of high quality, the image itself must be large in size. This is true in the case of tracing in Illustrator, but for Photoshop it is even more important. My image is 1500 pixels wide, when we finish converting it to vector, I will show how Photoshop translates a small image and we will compare the results.
- Choose the Magic Wand Tool
- Set the Tolerance options to 20 or 30.
- There, click on the Add to Selection icon. I wrote in detail about their work in the article Add, Subtract, Intersect and Exlude in Photoshop where we talked about vector tools, but in selection these options work the same way.
To be honest, I don’t care how you select the logo, whether using a manual lasso or using the Color Range. It’s just that in this situation, specifically in this image, the easiest way to do this is with the Magic Wand Tool.

Converting the selection to a vector path
Don't switch from the Magic Wand Tool.
- Right-click on the selection area.
- From the menu that appears, select Make Work Path.

- In the window that appears, set the tolerance to 1.0. The higher the tolerance value, the smoother, stylized and imprecise our contours will be.
In the illustration below, I selected the Path Selection Tool and selected the path so that you can see it.

Saving a path in the Path palette
This operation is not required, but recommended.
- In the window that appears, enter a name and click OK.
Switch to the Path palette. If you can't find it, click Window > Path
Double-click on the path in the palette.

Creating a vector mask
The process of creating a vector mask is perfectly described in my article Vector Mask in Photoshop. We will carry out this process quickly and without details.
Make sure your kennel is selected in the Path palette
Select Layer > New Fill Layer > Solid Color from the menu
In the window that appears, select a color and click OK

That's all. Everything would be more accurate if it weren’t hronofag.ru Remember I told you that the smaller the image, the worse it will translate. I bet you have some kind of dirty scan on your hands, shoved into Word, which the customer demands to be converted into a vector? I guessed? In this case, the image is compressed with JPG compression, reduced, then enlarged, then again reduced to the size of the avatar, and ketchup was also spilled on it. Is it possible to efficiently convert such a picture into a vector in Photoshop?
First, take a look at our logo. Despite the excellent resolution and clear edges, Photoshop was unable to create good and even contours. The illustrator does it 100 times better, but the article is not about the illustrator. As you can see, the contours are not smooth everywhere, even in the rectangular parts of the logo. And the circles are completely oblique.

Now I will reduce the image by 2 times, then by another 2 times and show you the result of converting it into a vector.

Here is a clear example of how the size of a raster image affects the quality of tracing. And this despite the fact that the image is of very high quality despite the size. Well, I'll reduce the quality. Let's save the image in JPG at the worst quality.

Let's convert it to a vector. Excellent result, the only thing missing is ketchup. Just right for a satisfied customer, grunge or vintage treatment!

And yet I slightly manipulate the truth. The fact is that all this is reasonable for Illustrator, who creates a vector based on a picture. Photoshop doesn't create a vector based on an image, it creates outlines based on a selection. Logically, the better and smoother the selection, the smoother the curves will be. And the Magic Wand tool, which we used to select these areas, will no longer be suitable for selecting such creepy images. Yes, you will be able to make high-quality selections, using all the selection tools, you will even be able to enlarge them and create a more or less even outline based on them, which will still not be ideal. Going this way is simply a waste of time. The only working option is to draw the logo from scratch in Photoshop.
All graphic files are divided into two global types - raster and vector. Sometimes you need to convert from a raster to a black and white vector. For example, for tracing black and white icons, QR codes, barcodes, pictures with raster inscriptions, receipts or pictures on a blog.
What is the difference between a raster file and a vector file?
Raster graphics
A raster file represents a sequence of colored squares (pixels). The number of points in a file is determined by its horizontal and vertical dimensions. For example, a 640x480 file contains 307,200 pixels. A raster file can be represented as a mosaic. You cannot stretch a raster image without losing quality.Popular raster formats: JPEG, GIF, PNG, TIFF, WEBP, BPG.
Vector graphics
Vector graphics represent many different geometric shapes described by mathematical formulas. The overlay of these shapes on top of each other forms an image. For example, an ordinary square is described by four equal segments, each of which is connected at its ends to the ends of the other two at an angle of 90 degrees.Popular vector formats: SVG, EPS, WMF, PDF.
From raster to vector
Vectorization algorithm
Tracing occurs in several stages:- The vectorizer scans the image and finds all areas with pixels colored the same color.
- Borders are approximated by 1 px thick segments.
- A triangulation with a line constraint is constructed.

Potrace based converter
Sometimes you need to automatically convert images that users upload from raster to vector format.There is a very simple and free way to implement such a conversion using the vector editor Inkscape. Inkscape uses Potrace to vectorize images.
After tracing, the image can only be black and white. On potrace it is written that color support may be implemented in the future.
An example of converting from PNG to SVG. The potrace function only accepts files with the PNM extension as input, so before tracing PNG you need to convert:
Exec("convert image.png image.pnm");
exec("potrace image.pnm -s -o image.svg");
This method has been implemented and you can look at the quality of tracing of any image. An example of vectorization of a blurry barcode. And this is an example of a traced logo. This is how the converter copes with photographs.
How to make the output picture colorIn addition to manual editing, there is another option for coloring a black and white picture at the output. But the picture should be low-color. The solution is suitable for tracing colored icons, logos and buttons into vector.
You can highlight individual colors using the ppmcolormask (part of the Netpbm package):
Cat img.gif | giftopnm | ppmcolormask #641b1b | potrace
Then trace each part separately and superimpose them on top of each other at the end.
From vector to raster
Rasterizing a vector drawing is much easier. A grid with cells of a certain size is superimposed on the vector image and the image is discretized, after which it is encoded according to the output format.
One example of converting SVG to PNG using Imagick.
With this code you can convert SVG files to PNG24:
$svg = file_get_contents("image.svg"); $image = new Imagick(); $image->setBackgroundColor(new ImagickPixel("transparent")); $image->readImageBlob($svg); $image->setImageFormat("png24"); $image->writeImage("image.png"); $image->clear(); $image->destroy();
Here you can see the results of converting your images from SVG to PNG.
- Abstract
- You can convert from raster to vector on your website using potrace.
- Potrace only supports black and white vectorization.
On the Internet, I found an image of the logo. Is it possible to convert it from raster to vector in Photoshop, and automatically? No you can not. Alas, while vector trends in Photoshop are as follows, everything that was done in this direction remained unchanged 5 versions ago. Since then, it has not been touched, not changed, and nothing new has been added to the vector. Have you needed vector tools in Photoshop? Here they are, want more? Whatever else you forgot about Photoshop, master Illustrator. Approximately this line of thought motivated the developers who introduced the simplest vector operations into Photoshop. Now let's get down to business.
The raster is converted into a vector through selection areas. First, we create a selection, then we convert the selection lines into vector paths, then we fill the vector paths with fill layers, thus creating a vector mask. In order to understand all this not at the level of army commands - click here, click there, it is worth learning how to work with vector drawing tools, understand how vector contours can interact with each other, and learn how to create a vector mask. But don’t worry, you don’t have to sit down to read it until the weekend; you’ll already understand how to convert a raster into a vector in Photoshop if you read the article to the end.
Logo highlighting
I would especially like to note that in order for the translation into vector to be of high quality, the image itself must be large in size. This is true in the case of tracing in Illustrator, but for Photoshop it is even more important. My image is 1500 pixels wide, when we finish converting it to vector, I will show how Photoshop translates a small image and we will compare the results.
- Choose the Magic Wand Tool
- Set the Tolerance options to 20 or 30.
- There, click on the Add to Selection icon. I wrote in detail about their work in the article Add, Subtract, Intersect and Exlude in Photoshop where we talked about vector tools, but in selection these options work the same way.
To be honest, I don’t care how you select the logo, whether using a manual lasso or using the Color Range. It’s just that in this situation, specifically in this image, the easiest way to do this is with the Magic Wand Tool.
Converting the selection to a vector path
Don't switch from the Magic Wand Tool.
- Right-click on the selection area.
- From the menu that appears, select Make Work Path.
- In the window that appears, set the tolerance to 1.0. The higher the tolerance value, the smoother, stylized and imprecise our contours will be.
In the illustration below, I selected the Path Selection Tool and selected the path so that you can see it.
Saving a path in the Path palette
This operation is not required, but recommended.
- In the window that appears, enter a name and click OK.
Switch to the Path palette. If you can't find it, click Window > Path
Double-click on the path in the palette.
Creating a vector mask
The process of creating a vector mask is perfectly described in my article Vector Mask in Photoshop. We will carry out this process quickly and without details.
Make sure your kennel is selected in the Path palette
Select Layer > New Fill Layer > Solid Color from the menu
In the window that appears, select a color and click OK
That's all. Everything would be more accurate if it weren’t hronofag.ru Remember I told you that the smaller the image, the worse it will translate. I bet you have some kind of dirty scan on your hands, shoved into Word, which the customer demands to be converted into a vector? I guessed? In this case, the image is compressed with JPG compression, reduced, then enlarged, then again reduced to the size of the avatar, and ketchup was also spilled on it. Is it possible to efficiently convert such a picture into a vector in Photoshop?
First, take a look at our logo. Despite the excellent resolution and clear edges, Photoshop was unable to create good and even contours. The illustrator does it 100 times better, but the article is not about the illustrator. As you can see, the contours are not smooth everywhere, even in the rectangular parts of the logo. And the circles are completely oblique.
Now I will reduce the image by 2 times, then by another 2 times and show you the result of converting it into a vector.
Here is a clear example of how the size of a raster image affects the quality of tracing. And this despite the fact that the image is of very high quality despite the size. Well, I'll reduce the quality. Let's save the image in JPG at the worst quality.
Let's convert it to a vector. Excellent result, the only thing missing is ketchup. Just right for a satisfied customer, grunge or vintage treatment!
And yet I slightly manipulate the truth. The fact is that all this is reasonable for Illustrator, who creates a vector based on a picture. Photoshop doesn't create a vector based on an image, it creates outlines based on a selection. Logically, the better and smoother the selection, the smoother the curves will be. And the Magic Wand tool, which we used to select these areas, will no longer be suitable for selecting such creepy images. Yes, you will be able to make high-quality selections, using all the selection tools, you will even be able to enlarge them and create a more or less even outline based on them, which will still not be ideal. Going this way is simply a waste of time. The only working option is to draw the logo from scratch in Photoshop.


