Automatic photo processing in Photoshop. Batch photo processing in Photoshop. Renaming: quickly and usefully
A few years ago I told you about one very useful free computer program that allows you to massively change the size of images, their quality, name... Today we will talk about a similar (also free) program, but with much more functionality.
This miracle program is called - ImBatch. With her batch photo processing will become entertainment for you, not tedious work.
Today, almost everyone has a phone (smartphone) with a built-in camera and therefore the number digital photos on the computer disk is constantly increasing exponentially. How can you manage to change the size, name, quality of them all, convert them and apply various filters to them?
A free (for non-commercial use) will help you with this. computer program ImBatch, which is designed specifically for batch processing of many photos.
ImBatch - batch photo processing
Working in this program is very easy, simple and even pleasant, thanks to the many built-in skins (covers)…

There is nothing complicated in ImBatch - we add a photo (you can even add a whole folder at once)...


...select one image, several or all at once...

...and assign a task (of which there are a large number in the program)...


As you can see, you can batch crop photos, resize them, flip them, rotate them, change tags or delete them, rename all photos, adjust colors, contrast, and do many other operations. There is no point in listing them all - you will see everything yourself by running the program...

After you decide on the tasks, you can safely click on the magic button (at the top left of the program window) to start the process of batch photo processing...

Don't ignore the warnings - read them...


More detailed description of all tasks for batch image processing in the ImBatch program you will find on her official page . There are also video lessons - I recommend watching them.
By the way, under the “Tools” button you will find several useful utilities— editor context menu, script editor, EXIF and IPTC tag editor, as well as a monitor of new files in specified folders with images...

The free Easy Image Modifier program is designed to batch reduce the size of images. Using the program, you can reduce the size of several photos at once with the specified settings. Naturally, you can reduce the size and change the properties of an image one by one, processing only one specific photo in the Easy Image Modifier program.
Easy Image Modifier can also enlarge images. Just keep in mind that if you increase the image size, the quality of the photo may suffer.
Resizing an image may be necessary in many cases. Much more often you may need to reduce the size of photographs than, for example, enlarge images. Uploading images to the Internet, sending images via e-mail, all this requires reducing the weight of photographs.
To reduce the image size you can use a simple, tiny free Easy program Image Modifier. You can download the Easy Image Modifier program from the official website of the developer.
easy image modifier download
U free program Easy Image Modifier is older paid version- Easy Image Modifier Plus, in which some options are added to the program (saving in JPG2000, PDF formats, more advanced editing).
The Easy Image Modifier program supports the Russian language and does not require installation on your computer. After downloading the program to your computer, you will need to unpack the archive with the program. To launch the program, you will need to open the folder and run the “EasyImageModifier” file (type - application).
Since this program is portable, you can run Easy Image Modifier from any place convenient for you on your computer or, for example, from a flash drive. For ease of launch, you can create a shortcut to the program on the Desktop.
After launch, the main window of the Easy Image Modifier program will open. Under the menu bar on the left there are sections with buttons to perform certain actions. On the right are the buttons “Upload image”, “Upload folder”, “Process”. Below these buttons is located Workspace programs.
Using the “Upload images” and “Upload folder” buttons, images for processing are added to the program.
Adding Images
To add a photo to the Easy Image Modifier program, you will need to click on the “Upload Images” button. An Explorer window will open in which you can select required images to add to the program. You can add just one graphic file or select multiple images to add.
Files can also be added by dragging them into the program window.
After this, in the “Uploaded Images” area, which is located in the central part of the program window, you will see a list of added photos. You can process one image or add multiple photos to the program to resize the photo.
The added image will be displayed in a special window, which is located close to the main program window.

You can start editing one photo or add several more to this list graphic files for batch processing.
If you no longer want to edit some images, you can delete them from the Easy Image Modifier program by first selecting these photos using the “Delete Selected” button. If necessary, you can delete all photos added to the program by clicking on the “Clear list” button.
To add the contents of a folder to Easy Image Modifier, you will need to click on the “Upload Folder” button. All images from the folder will be added to the Easy Image Modifier program, including those folders that are inside the selected folder.
Then you can proceed to editing by selecting the appropriate item in the “Editing” section.
In this review, I added one image to the program. When batch reducing photos, exactly the same actions are performed. In most cases, it will be enough just to select the size for the images, the format in which the images will be saved, and select the folder to save. After this, you can start the photo processing process.
Resizing Photos
To reduce or increase the size, you will need to click on the “Resize” item on the left side of the program window. In the new program window, you will need to activate the “Activate resizing” item. In the appropriate fields you can change the image size by selecting the numerical sizes suggested by the program.
You can set your own in the appropriate fields to change the image size. eigenvalues. Images can also be changed by percentage if you activate the corresponding item. The photo will be resized to a percentage of its original size.
By default, the “Keep proportions” item is activated in the program. Depending on what exactly you will be doing, you can uncheck the box next to the “Decrease” or “Increase” items.

Rotate and flip
If you need to rotate the image or make mirror reflection, then click on the “Rotate/Flip” button.
Next, activate the “Activate reorientation” item. After this, you will need to select the appropriate setting from the drop-down list to rotate by the required number of degrees, or select a mirror image horizontally or vertically.

In a special window you can observe the changes that are displayed immediately after the settings are made.
Using the “Add Upholstery” item, you can fill the background around the image with some color by selecting the color and size of the background. This is a kind of photo frame.
Adding a watermark
You can add a watermark to your image to protect it from being copied and used by others on the Internet. To do this, click on the “Add watermark” button, and in the window that opens, activate the “Activate watermark” item.
In the Watermark field, enter the desired entry or the name of your site.

Then click on the button opposite the “Font” item (the button displays the font type and its size). After this, the “Font” window will open, in which you can select the font to apply the watermark. You can choose the font type, its style, size, and character set.
After setting the font, click on the “OK” button.


Finally, using the drop-down menu buttons, you can select the location of the watermark on the image.
Removing metadata from an image
If you will post your images on the Internet, then you may be advised to remove the metadata (EXIF) that is stored in the images. To do this, in the “Advanced” section, click on the “Edit file properties” button.
In the window that opens, activate the “Delete meta data” item. Here you can, if necessary, also change the file date by activating the “Change file date” item.
 <
<
Saving images
In the “Saving” section you can select the format for saving the image. By default, the program will save images in JPG format.
The Easy Image Modifier program offers the following formats for saving images:
- JPG - lossy compression, small file size.
- PNG - compression without loss of quality, average file size.
- BMP - uncompressed, largest file size.
After activating the “Quality” item, you can additionally, if necessary, adjust the image quality by moving the slider along the quality adjustment scale.

After clicking on the “Rename” button, if necessary, you can activate the “Activate name change” item to rename images.

After clicking on the “Set Destination” button, in the window that opens you can select a location to save the processed images. Here, by default, the “Activate Destination” item is activated so that the processed photos are saved in another location and do not replace the original files.
A folder has been selected in the program to be created on the Desktop. You can choose to save to any other folder on your computer.

Finally, in the main program window, click on the “Process” button to start the image conversion process. Next comes the process of converting the file or files if the photos are processed in batch mode.

Once image processing is complete, you can open the folder and look at the result.
Conclusions of the article
Batch editing photos in the free Easy Image Modifier program allows you to reduce the size of images, choose a display method, add a watermark, and remove metadata from the image.
Easy Image Modifier - batch image processing (video)
Tools for automating actions in Photoshop can significantly reduce the time spent on performing the same type of operations. One of these tools is batch processing of images (photos).
The meaning of batch processing is to record actions in a special folder (action), and then apply this action to an unlimited number of photos. That is, we process it manually once, and the rest of the images are processed automatically by the program.
It makes sense to use batch processing in cases where it is necessary, for example, to change the size of photographs, raise or lower the lighting, or make the same color correction.
So let's get started with batch processing.
First you need to place the original images in one folder. I have three photographs prepared for the lesson. I named the folder « Batch Processing» and placed it on the desktop.

If you noticed, this folder also contains a subfolder "Ready photos". The results of processing will be saved in it.
It’s worth noting right away that in this lesson we will only learn the process, so many operations with photos will not be performed. The main thing is to understand the principle, and then you can decide for yourself what kind of processing to do. The procedure will always be the same.
And one moment. In the program settings, you must disable warnings about color profile mismatches, otherwise, every time you open a photo you will have to press the button OK.
Let's go to the menu "Editing - Color Settings" and uncheck the boxes indicated in the screenshot.


Now you can start...
After analyzing the pictures, it becomes clear that they are all slightly darkened. Therefore, we will lighten them and tint them a little.
Open the first picture.
Then call the palette "Operations" on the menu "Window".

In the palette, you need to click on the folder icon, give the new set a name and click OK.

Then we create a new operation, also call it something and press the button "Record".

First, let's resize the image. Let's say we need images no more than 550 pixels wide.
Let's go to the menu "Image - Image Size". Change the width to the desired one and click OK.


As you can see, changes have occurred in the palette of operations. Our action was successfully recorded.

For lightening and toning we will use "Curves". They are called by keyboard shortcut CTRL+M.
In the window that opens, set the current on the curve and drag it in the direction of lightening until the desired result is achieved.

Then we go to the red channel and adjust the colors a little. For example, like this:

At the end of the process, click OK.
When recording an action, there is one important rule: if you use tools, adjustment layers and other program functions where the values of various settings change on the fly, that is, without the need to press the OK button, then these values must be entered manually and press the ENTER key. If this rule is not followed, then Photoshop will record all intermediate values while you drag, for example, the slider.
Let's continue. Let's assume that we have already completed all the steps. Now we need to save the photo in the format we need.
Press the key combination CTRL+SHIFT+S, select the format and location to save. I selected the folder "Ready photos". Click "Save".

The last step is to close the image. Don't forget to do this, otherwise all 100500 photos will remain open in the editor. Nightmare…

We refuse to save the source code.
Let's take a look at the operations palette. We check whether all actions were recorded correctly. If everything is in order, then press the button "Stop".

The action is ready.
Now we need to apply it to all photos in the folder, and automatically.
Let's go to the menu "File - Automation - Batch Processing".

In the function window, select our set and operation (the last ones created are automatically registered), specify the path to the folder with the sources and the path to the folder in which you want to save the finished images.

After pressing the button "OK" processing will begin. The time spent on the process directly depends on the number of photos and the complexity of the operations.

Use the automation provided to you by Photoshop and save a lot of time on processing your photos.
When a novice photographer is faced with the need to process a large number of photographs, the question inevitably arises: How to reduce the time spent on processing, how to automate routine operations?
To do this, Adobe Photoshop has several tools in its arsenal: operations or actions, scripts or scripts, and droplets.
Operations, otherwise also called action, macros or macro commands are recorded and saved actions on an image that can be applied to another image and also used in batch processing. Actions are also the basis for creating droplets.
Droplet is a small application, a kind of program that automatically processes all images dragged onto it. The droplet icon can be placed, for example, on the desktop and folders with images can be dragged onto it for processing.
Scripts or scripts are also programs, but written in one of the scripting programming languages. The use of scripts allows you to automate operations for which it is impossible to write an action, that is, the capabilities of scripts are much wider. The only negative is that to write scripts you need to master certain programming languages, for example, Java Script.
In this article we will record a simple action and look at how to use it in batch processing using the command Image processor
As an example, let's take the method of toning photographs using color fill in blend mode Hard light. Here is the original photo
First, let's create a set into which we will place the operation to be recorded. To create a set, click on the folder icon in the Operations palette. In the dialog box that opens, enter the name of the set.


Now, with active typing, click on the icon for creating a new operation

In the dialog box that opens, enter the name of the operation. If necessary, assign a color and keyboard shortcut so you can quickly launch the operation. Click Write down to start the recording process. Now in the palette Operations The recording icon will be active and turn red.


Before you start recording, it is advisable to plan all the steps and write them down on paper. A well-planned action works without errors and the stability of its operation does not depend on which version of the program is used, Russian or English. A properly recorded action will work in any environment. If this is not the case, it means that methodological errors were made during planning and recording, for example, the names of layers or channels were written down.
Now let's create an adjustment layer Color. To do this, click on the icon for creating an adjustment layer in the palette Layers, then select a layer from the list Color.


In the dialog box that opens, select the desired color. It is necessary in advance, even when preparing for recording, to write down the values of this color along the RGB channels, so that you can then enter it and immediately get the desired color.

Change the layer blend mode to Hard light

We will get something like this

Now you need to weaken the effect of the correction layer on the skin. Skin is known to be lightest in the red channel of the image. Let's make the adjustment layer mask active. To do this, press the key combination CTRL+\. The active layer mask will be surrounded by a frame

Now let's load the red channel of the image onto the mask. To do this, go to the menu Image - External channel. In the dialog box that opens, set the following settings Layer - Background, since it is from the background layer that we will use the red channel. Channel - Red, you need to check the box on the right Invert, since for the mask we need just the inverted red channel, Overlay - Normal, Opacity - 100%. After completing the settings, click OK. The adjustment layer's effect is now rendered through a mask based on the inverted red channel, which looks like this:


We got a slight toning effect on the image

You can now stop recording the action. Then, returning the image to its original state using the palette Story, you need to check the operation of the action. Now it can be used for batch processing.
Batch processing is best done using a script Image processor. It can be found in the menu File - Scripts - Image Processor.

Or, which is much more convenient, you can run the image processor from the module Bridge, having previously selected photos for processing in it. In Bridge Image processor is in the menu Tools -Photoshop - Image Processor.

Set Batch Processing Options in the Dialog Box Image processor is not difficult. You need to select the location to save the files, the format and quality of saving, as well as a set of actions and the action itself that needs to be applied to the selected images.

In the era of digital cameras, nothing is easier than taking a ton of photos. In the blink of an eye, you can find yourself with a mountain of photos that now need to be sorted, edited, etc. It doesn't matter what you decide to do with them, but before you do, you'll probably have to do some extra work with them. Some of the most common image edits are resizing, renaming, format conversion, color corrections, etc. You may feel intimidated by manually editing so many photos. Don't waste your time, just download one of the free tools below and start batch editing!
XnConvert (Windows, Mac, Linux)
The powerful XnConvert tool is not only cross-platform, but also cross-functional. What do I mean by this? While most of these tools only allow you to resize an image, or only batch renaming files, XnConvert manages to do all this at the same time. However, despite all its power, XnConvert remains a very easy to use application.
Drag your image into the Input tab and add actions located in the Actions tab. This can be anything from resizing the image, rotating it, adding watermarks, to adding watermarks, filters, borders and playing with the color palette. XnConvert handles everything. In the "Output" tab, you can create new names for files (XnConver does batch renaming), select a folder to save processed images, set the file format, and much more. Download from. website: www.xnconvert.com
PhotoMagician (Windows)

Although PhotoMagician is not as powerful as XnConvert, it offers its users several unique features. PhotoMagician's main function is batch resizing, but you can also use it to add some basic effects and to some popular file formats. All you have to do is select the starting and ending folders, and then apply one of the available resizing profiles or create your own.
PhotoMagician includes resizing profiles for many popular devices such as iPhone, iPod Nano, Sony PSP and several others. In the Conversion Settings tab, you can add simple effects such as sepia or grayscale, change the angle of the image, and much more. A nice feature of the program is the ability to select images by image size, file size and file modification date.
IrfanView (Windows)
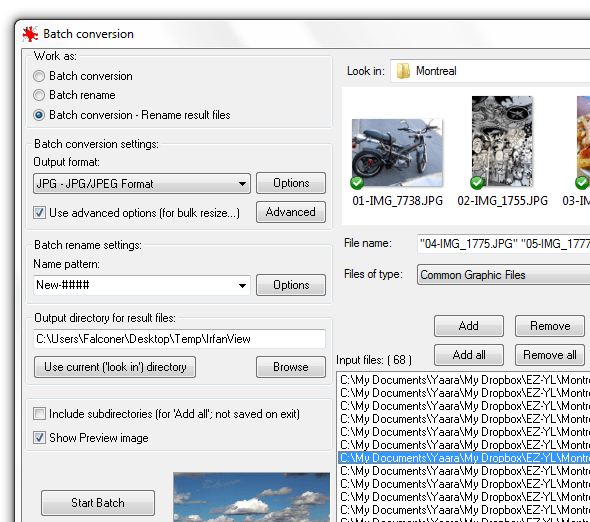
IrfanView is an excellent image viewer and editor that I've been using for many years, and for some time now includes a very nifty batch editing tool. IrfanView's batch editor can help you resize, rename images, convert and adjust multiple files at once. There is, however, one drawback. All these features are not easy to find. Luckily, you have this article to turn to for help.
After installing and launching IrfanView, go to “File –> Batch Conversion/Rename...”. This will open the editor where you can start working right away. Look at your images at the top of the window and drag them to the bottom area. You can also choose between batch converting and batch renaming, or you can do both. Click on the "Advanced" button to access additional options. In general, IrfanView's batch editing tools are quite powerful, so you can use them to fine tuning colors of images. Of. website: www.irfanview.com
FastStone Photo Resizer (Windows)

I use FastStone Capture as your main one, now that it has appeared FastStone Photo Resizer, I'm thinking about installing it on my work computer. Unlike Capture, Photo Resizer is completely free and, despite its name, can do much more than just resize a photo. Photo Resizer includes two main tabs: Batch Convert ( batch conversion) and Batch Rename. Unfortunately, you can't get FastStone to do these two things at the same time (at least I couldn't get it to), which makes interacting with the program a little awkward.
In the “Batch Convert” tab you can easily customize the format of your final files, and by clicking on the “Advanced Options” button you will be taken to a menu with additional features. Here you can resize, rotate the image, adjust color, add text and watermarks, and do just about anything you can think of.
After selecting all the options, you can save the settings to a file so that you can use them again without manual settings. If you want to rename the file, then you will have to re-upload your edited photos into the “Batch Rename” tab and carry out the process of changing names in it.Of. website: www.faststone.org
Picasa (Windows, Mac)

If you use Picasa as a photo viewer and downloader, then nothing could be easier than making some file edits, especially if you're already in it. There are several batch editing options here, but they don't all come from one place.
For batch change size, quality and batch adding a watermark, you need to select the photos and select “Export” at the bottom. After this, a dialog box will open in which you can perform all the necessary operations. For some batch filters, like rotation or rename, you need to click on “Photo -> Batch editing" Anything you mark here will be applied to all selected photos. Official website: picasa.google.com
BIMP (Windows)

SunlitGreen BatchBlitz (Windows)
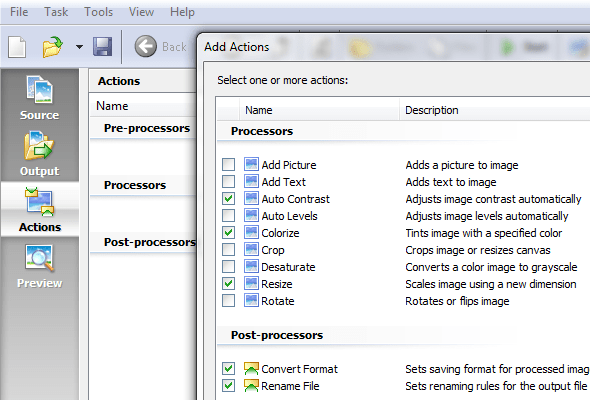
This is another program in the series of hidden installers, but unfortunately (or fortunately?) there is quite a lot hidden inside it. powerful tool batch processing, which you should definitely check out if you are Windows user. When installing BatchBlitz, be very, very vigilant, as the installer will try to “push” additional program Babylon will confuse you with Registry Cleaner. Just skip all those extra bells and whistles and get a clean image editor.
BatchBlitz is very easy to use: start working by opening a new Blitz session, through “File –> New”, find at the top required image and add it to the main window. Then switch to the Actions tab to make changes such as resize, rename, convert to another format, auto-contrast, rotate and many others. After adding actions, you can double-click each one for further customization.


