Delete temporary files in Windows 7. Creating your own optimizer
I am often asked: “Why is free space constantly disappearing on the system disk?”...
In this article, I want to tell you about this problem...
Loss of free space is directly related to the fact that the operating system Windows, does not know how to clean temporary files on its own. Which remain in large quantities after installing various programs, after running these programs, after downloading files from the Internet, or simply visiting websites.
In the folders that are defined by the system as folders for temporary files, a huge number of useless files—“garbage”—accumulate.
Purely for experimentation, I haven’t cleaned these folders for exactly three months. At the same time, I naturally worked actively on the computer, went to websites, downloaded something, installed and uninstalled programs, etc. In a word - I worked.
As a result, after three months, I looked into the folder that is defined by the system as a folder for storing temporary files. And what do you think? 38 gigabytes of garbage!
And this is just in three months of active work!!!
Second experiment. I recently bought myself a new laptop. And I installed the Windows 7×64 operating system and the software packages I needed on it.
When installing the system, it turned out that I did not have some drivers for a 64-bit system, so I had to visit the manufacturers' websites and download these drivers. And I also downloaded a new version of the antivirus program, installed it, but never activated it... (read why I didn’t activate the antivirus in another article “Antivirus - Do you need it!? Or can you live without brakes and problems!!!”)
Actually, after installing the system and the programs I needed, I went to the folder where the system stores temporary files (yes, yes, yes, I was not mistaken, it stores it! I don’t know why, but it stores it for something!!!) and looked The size of this folder is 7.9 gigabytes.
7.9 gigabytes - “slop”!!! Why store all this!? Will the system ever access these files??? Is it really impossible to make sure that these folders are cleared when, say, rebooting the system, or after, for example, three days, etc... Why? Why store it? Idiocy, or another flaw...
It should also be said that these folders also store files that you unpack from archives by dragging and dropping. And yet, I installed Windows on a completely clean partition, or rather, I created a partition when installing the system.
But, enough of the lyrics and tests... It's time to get to work... If the system doesn't clean up after itself, let's teach it how to do it...
As it turned out, many users do not even know where the system stores these temporary files that are unnecessary to anyone.
In order to find them, we need to open the menu Start, select icon My computer, (or Computer in case you have Windows 7 or Vista), click on this item with the second (right) mouse button and select the item in the menu that appears Properties.

We will open a dialogue Computer properties. In which we need to go to the point Extra options. (If you have Windows XP installed, the dialog will be slightly different; in it you need to go to the tab Additionally, as shown in the next paragraph.)

We have another dialogue System properties, in which we should go to the tab Additionally and press the button Environment Variables...

After which, a dialog box will open Environment Variables, in which we see the path to the “temporary” folders.

Of course, the path is specified through a variable, i.e. variable %USERPROFILE%— indicates your account folder (your user profile folder).
In windows 7 this is C:\Users\<имя Вашей учетной записи>
(for example, for me this is the drive - C, Users, Max).
In windows XP this is C:\Documents and Settings\<имя Вашей учетной записи>
(for example - C:\Documents and Settings\Max).
We follow the specified path and see a folder full of various files, and if you click on this folder with the second mouse button and look at its properties, you can be horrified when you see how many gigabytes it takes up.

There are remnants from unpacking archives, and caches of some programs, and pieces of installers, in short, mountains of rubbish... And naturally, it would be nice for all this to be cleaned independently.
To do this, let's create a "batch file" with a set of commands.
First, we create an ordinary Text document. To do this, click the second mouse button in any folder, or on the Desktop, go to the item Create and choose a new one Text Document.
We have an ordinary text document. Now let's rename it and change the resolution to .BAT or .CMD. If you have “Display file extensions” set in your system settings, then simply rename the file to del_.bat, changing both the name and the last three letters of txt to .bat.
If you do not see file extensions in Explorer, then open this text document in a regular Windows notepad, go to the menu File and select Save as...

A dialog box will open in which we enter the file name, along with the extension, and put it all in quotes, as shown in the figure:

If the file name and extension are not quoted, then notepad will automatically add the txt extension to your file.
After renaming, open our again del_.bat in notepad and write the following lines into it:
RD /S /q "%USERPROFILE%\AppData\Local\Temp"
pause
The first command deletes everything from the folder with temporary files, the second command pause— pauses the execution so that we can see the work done.
Team pause You may not use it at all. But first, it’s best to register it, after we make sure that everything works, we’ll open ours again del_.bat and delete the command pause.
Save the file, close Notepad and run our del_.bat.
As you can see in the figure, the path variables have been converted to real ones:

That's all, now you can open our file again in Notepad and delete the command pause.
In order for the cleaning of temporary files to take place automatically, the file del_.bat can be copied to a folder. In this case, garbage cleaning will take place every time we boot the computer. Or create a task in Windows Task Scheduler, in which write the path to our file del_.bat and set the execution interval, for example once every three days.
But keep in mind that when installing programs, especially those that ask you to restart the computer after installation, various modules may be written to temporary folders, which can continue to shadow install the program even after a reboot. In this case, if you decide to install a software package, move your file del_.bat from folder Startup, while the installation is taking place. And, after several reboots of the computer, return it back.
P.S.
Using this method, you can also clear the “Cache” of various programs that register their temporary files in folders other than those selected by the system. For example, a software package from Adobe, very badly “craps” on the system drive... To clean temporary files from the Adobe software package, you can add to our del_.bat the following commands:
RD /S /q "%USERPROFILE%\AppData\Roaming\Adobe\Common"
MD "%USERPROFILE%\AppData\Roaming\Adobe\Common"
The first command, as we already know, clears temporary files, but in this case, it also deletes the “Adobe\Common” folder itself, which Adobe programs need for normal operation. Therefore, we add a second command, which, immediately after deletion, creates the same folder in the same place, but this time empty.
P.S.S.
Also, it needs to be said:
— This method is not suitable for emptying the trash can.
- Don’t be afraid to use “hard” cleaning of temporary files, thinking that this is a system folder, and from the system folders, you can accidentally delete some important file... Don’t be afraid, the system will not allow you to delete something that cannot be deleted. Below is a picture of the folder after cleaning:

As you can see, some files still remain, but they are all very small in size.
Well, the very last thing - Keep in mind that you do everything at your own peril and risk; any incorrect spelling of a command, or path to folders or files, can lead to irreparable consequences!
Last time we looked at it, but this time I’ll tell you how delete computer junk manually, by using Windows tools and programs.
1. First, let's look at where garbage is stored in operating systems.
In Windows XP
We go in and delete everything in the folders: Windows temporary files:
- C:\Documents and Settings\username\Local Settings\History
- C:\Windows\Temp
- C:\Documents and Settings\username\Local Settings\Temp
- C:\Documents and Settings\Default User\Local Settings\History
For Windows 7 and 8
Windows temporary files:
- C:\Windows\Temp
- C:\Users\Username\AppData\Local\Temp
- C:\Users\All Users\TEMP
- C:\Users\All Users\TEMP
- C:\Users\Default\AppData\Local\Temp
Browser cache
Opera cache:
- C:\users\username\AppData\Local\Opera\Opera\cache\
Mozilla cache:
- C:\Users\username\AppData\Local\Mozilla\Firefox\Profiles\ folder\Cache
Google Chrome cache:
- C:\Users\username\AppData\Local\Bromium\User Data\Default\Cache
- C:\Users\User\AppData\Local\Google\Chrome\User Data\Default\Cache
Or enter it in the address chrome://version/ and see the path to the profile. There will be a folder there Cache
Temporary Internet files:
- C:\Users\username\AppData\Local\Microsoft\Windows\Temporary Internet Files\
Recent documents:
- C:\Users\username\AppData\Roaming\Microsoft\Windows\Recent\
Some folders may be hidden from prying eyes. To show them you need.
2. Cleaning the disk from temporary and unused files using
Standard Disk Cleanup tool
1. Go to “Start” -> “All Programs” -> “Accessories” -> “System Tools” and run the “Disk Cleanup” program.
2. Select the disk to clean:

The disk scanning process will begin...
3. A window will open with information about the amount of space occupied by temporary files:

Check the boxes next to the partitions you want to clear and click OK.
4. But this not all. If you installed Windows 7 not on a blank disk, but on top of a previously installed operating system, you probably have space-consuming folders such as Windows.old or $WINDOWS.~Q.
Additionally, it may make sense to delete system restore checkpoints (except the last one). To perform this operation, repeat steps 1-3, but this time click “Clean up system files”:
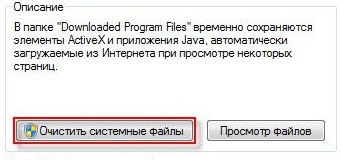
5. After the procedure described in step 2, the same window will open, but the “Advanced” tab will appear at the top. Go to it.

Under System Restore and Shadow Copies, click Clean.
3. Files pagefile.sys and hiberfil.sys
The files are located at the root of the system disk and take up quite a lot of space.
1. The pagefile.sys file is system swap file(virtual memory). You cannot delete it (it is not recommended to reduce it either), but you can and even need to move it to another disk.
This is done very simply, open “Control Panel - System and Security - System”, select “Advanced system settings” in the “Performance” section, click “Options”, switch to the “Advanced” tab (or press the win + R key combination, the command “execute” will open and there type SystemPropertiesAdvanced) and in the “Virtual Memory” section click “Change”. There you can select the location of the paging file and its size (I recommend leaving “Size as selected by the system”).

4. Removing unnecessary programs from the disk
A good way to free up disk space (and as an added bonus, increase system performance) is to remove programs you don't use.

Go to Control Panel and select “Uninstall Programs”. A list will appear in which you can select the program you want to remove and click “Delete”.
5. Defragmentation
Defragmentation of a hard disk, carried out by a defragmenter program, allows you to organize the contents of clusters, that is, move them on the disk so that clusters with the same file are placed sequentially, and empty clusters are combined. This leads to increase speed access to files, and therefore to some increase in computer performance, which at high level fragmentation the disk may turn out to be quite noticeable. The standard disk defragmenter program is located at: start>all programs>standard>utilities>disk defragmenter
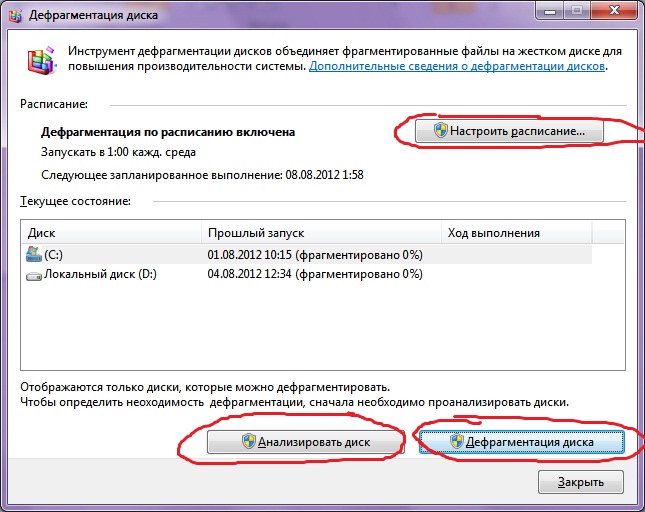
This is what the program looks like. In which you can analyze disk, where the program will show a diagram of disk fragmentation and tell you whether or not you need to defragment. You can also set a schedule for when the disk will be defragmented. This is a program built into Windows; there are also separate disk defragmentation programs, for example which you can download here:

Its interface is also quite simple.

Here are its advantages over the standard program:

- Analysis before disk defragmentation Do a disk analysis before defragmenting. After the analysis, a dialog box is displayed with a diagram showing the percentage of fragmented files and folders on the disk and a recommendation for action. It is recommended to carry out analysis regularly, and defragmentation only after appropriate recommendations from a disk defragmentation program. It is recommended to perform disk analysis at least once a week. If the need for defragmentation occurs rarely, the disk analysis interval can be increased to one month.
- Analysis after adding a large number of files After adding a large number of files or folders, the disks may become excessively fragmented, so in such cases it is recommended to analyze them.
- Checking that you have at least 15% free disk space To defragment completely and correctly using Disk Defragmenter, the disk must have at least 15% free space. Disk Defragmenter uses this volume as an area to sort file fragments. If the amount is less than 15% of free space, Disk Defragmenter will only perform a partial defragmentation. To free up more disk space, delete unnecessary files or move them to another disk.
- Defragmentation after installing software or installing Windows Defragment drives after installing software or after performing an update or clean install of Windows. Disks often become fragmented after installing software, so running Disk Defragmenter can help ensure peak file system performance.
- Save time on disk defragmentation You can save a little time required for defragmentation if you remove junk files from your computer before starting the operation, and also exclude from consideration the system files pagefile.sys and hiberfil.sys, which are used by the system as temporary, buffer files and are recreated at the beginning of each Windows session .
6. Remove unnecessary things from startup
7. Remove everything unnecessary from
Well, I think you know for yourself what you don’t need on your desktop. And you can read how to use it. , a very important procedure, so don’t forget about it!
Today I will tell you about temporary files. What is it temporary files? Files created when installing programs, while working on programs, and during system operation are called temporary files.
Temporary files
These files are called temporary because they should be automatically deleted after use, but this is not always the case. Majority temporary files have the extension .tmp, there are, of course, other extensions, but let’s not bother with them.
“Ordinary” users generally do not think about cleaning their computer (and indeed, most usually do not even know that it needs to be cleaned). And literally in a month a huge number of temporary files can accumulate. So what should we do?
Let's try manual disk cleanup. First, we look for the TEMP folder (there are two of them on the system drive). One is in the Windows folder, and the second is in the root directory (C:\Document and Settings\username\Local Settings\Temp). You can take and delete everything temporary files, it is the temporary files themselves from the folder, and not the folder itself. But it’s better to leave this to specialized software. There is, of course, the “Disk Cleanup” function (you can enable it by going to “My Computer”, right-clicking on one of the drives, selecting “Properties” and on the “General” tab we see the “Disk Cleanup” button). In my opinion (and most users) the function is useless, since it compresses old files and cleans out the recycle bin. But it does have one useful function - it can delete system restore points (since they can weigh several gigabytes).
Well, that's basically all I wanted to tell you about temporary files. My advice to you: use specialized cleaning programs; for example, I use
Temporary files in Windows 10 are storage of intermediate results of calculations during the operation of the operating system itself and third-party applications. During the installation of games and programs, a significant part of these files are created, and not all of them are deleted after the installation is completed.
Thus, during the operation of Windows 10, a lot of unnecessary documents accumulate on the computer, partly stored in special directories: Temp in the Windows folder and Temp in the folder with the current user’s name. But this is not all temp file storage, because program logs, for example, are stored in folders with the settings of these applications.
Today we’ll look at where temporary files are stored and how you can get rid of them using the operating system and using third-party utilities. In the first two cases, the OS will allow you to erase only those documents and directories that it itself considers unnecessary.
These do not include all the garbage present on the computer, but these methods of getting rid of temporary files are the safest for the operating system. Although CCleaner's advanced algorithms do not remove anything unnecessary from the system.
"Storage" Windows 10
The new OS is also equipped with a new tool for scanning disks and analyzing their contents in order to clean the system volume of junk files and logs. The new utility is launched through “Options” (Win→I), where we click “System”, then go to the “Storage” tab.

The window that opens displays all the drives connected to the computer, the hard drives used in the system and their partitions. Here you can also change environment variables, set the storage location for new applications, documents, images, videos, etc.
Select the system volume to visualize detailed data about it.

Let’s scroll through the list of all detected elements to the very end and find the “Temporary files” item, where under the section name contains information about the space occupied by these documents. Click on this area of the window.

You will be able to clear the directory with downloaded files, get rid of the trash that is in the Recycle Bin, and erase temporary files. As you can see, more than 600 megabytes of garbage were found in the installed operating system.
Click “Delete temporary files” and wait for the operation to complete, the progress of which is in no way visualized. After clicking the button, the window can be closed; this will not in any way affect the process running in the background.
Utility for cleaning partitions from temporary files
From previous editions of Windows, a program to keep the file system clean was transferred to the top ten, with regard to the presence of intermediate calculation files on disks. The operating principles of the tools are practically the same; the second program can additionally find some files.
You can launch it in several ways:
- enter “Disk Cleanup” in the search bar”;
- run the “cleanmgr” command in Start or the command interpreter (launched via Win+R);
- call “Properties” of the system volume and click “Disk Cleanup” in the main window under the data on the disk size, the amount of free and used space on it.

Click on the icon of the section that needs to be freed from temporary files, then check the boxes next to unnecessary elements.
Here, without fear of erasing anything unnecessary, you can mark absolutely all components.

To start the process, click “OK”. After a few seconds, the system or selected volume will be cleared of any temporary files found.
Let's turn to the leader in removing temp files for help
The best way to remove temporary files in Windows 10 is the free CCleaner app from developer Piriform.
1. Go to the address https://www.piriform.com/ccleaner and click “Download Free Version”.
2. Install the application, refusing to download other developer products if they are not needed.
3. Launch the application and go to the “Options” tab.
4. In the “Language” column, select “Russian”.

5. Return to the first tab.
6. Check the boxes for everything that should be deleted.
7. We do the same on the “Applications” tab (here you can get rid of logs and temp files of certain programs).
8. Click “Analysis”.
In the results window, you can examine a detailed report of each file and item found.
9. To delete all found results and empty the Recycle Bin, click “Cleanup”.

10. We confirm our intentions to permanently delete all listed objects, bypassing the Recycle Bin.

In case of clearing the history, cache, cookies of the browser, you must close it before starting the cleaning or confirm the completion of the process with the CCleaner program.
When the “Cleaning Complete” notification appears, you can view the results of the application.
Instructions
Most often there is a need to delete temporary files in Internet browsers, less often - . In the first case, this is done in order to enter or delete visited ones. In the second - in order to free up free space on drive C, if the disk is small and the system reports no free space.
In order to delete temporary files accumulated during Internet pages, you should contact the browser you are using:
1. Internet Explorer users should click the “Tools” section at the top of the menu, select the “Internet Options” menu item and in the window that opens, on the “General” tab, click the “Delete” button in the “Browsing history” section. You will be offered options for deleting temporary files, and by checking what you need, you can delete temporary files.
2.Google Chrome users need to click on the wrench icon in the upper right corner and select the “Options” section in the menu that appears. Going to the “Advanced” tab, you should click the “Delete about viewed pages” button. Once you've selected your options for clearing temporary files, you can delete them.
If you use any other browser to surf the Internet, the steps will be similar to the above, with a slight difference in the names.
In order to delete temporary Windows files, you will need to click on the “My” icon, go to drive C to the “Windows” folder and the “Temp” folder. This folder stores all temporary system files. You should select all files and delete them. Temporary files will be deleted and free disk space will be cleared.
Browsers create copies of visited pages in special folders or in a cache. These temporary files are used to load page content faster when visiting again. They can take up quite a lot of space, so they need to be removed from time to time.
Instructions
Temporary file names begin with a tilde and usually have a .tmp extension. To remove them using the right mouse button, right-click on the logical drive icon and select the “Properties” option in the context menu. In the “General” tab, click the “Clear” button and select all in the list files that you want to delete, including temporary ones.
To remove temporary files Internet Exploer browser, to open the context menu, right-click on the IE icon and select “Properties”. On the “General” tab in the “Browsing history” section, click “Delete” and in the new window, check the boxes files, from which you want to clean your computer. By clicking the “Options” button, you can configure the amount of hard drive space allocated for storing temporary files, the name of the folder in which they are contained, and the storage time.


