Your own provider: setting up FTP and TFTP servers. Mounting an FTP resource using Windows Explorer. What to do before creating an FTP server
Most often, users do not share files online large sizes use email or Skype. However, when you need to send an archive of photographs or a film several gigabytes in size, these services cannot be used. Public file sharing also creates some difficulties, for example, waiting for a timer and limiting the speed. The best solution in this case, create your own FTP server.
FTP ( File Transfer Protocol) is a protocol for transmitting information on the Internet and local computer networks. This is a program that does remote connection to a dedicated folder for viewing and sharing files, including large ones. Data exchange is possible from the computer to to a remote server and between other FTP servers.
Data is transmitted without traffic encryption, so attackers can easily gain access to logins and passwords. For safe transfer files, it is recommended to use a TLS-protected protocol - FTPS, which encrypts the data.
Your own FTP server has certain advantages:
- allows you to manage the server and its resources;
- provide users with different access rights;
- it does not require a static IP address.
- no speed limits;
- lack of payment to the hoster for hosting it;
Depending on the difficulty of access, you select software. To create an FTP server for private use with minimal settings, free software packages are quite suitable.
Microsoft added to Windows 7 Internet function Information Services (IIS), which provides general access from the network to a folder allocated for this purpose. Therefore, to create an FTP server for Windows 7, you do not need to install any additional software.
Installing an FTP server
Some standard features, which are not used very often, are disabled by default in Windows 7. Therefore, in order to activate them, you need to follow a number of steps.
To create an FTP server on Windows 7 you need to:
- Click “Start” and open the “Control Panel” section. For ease of viewing, you can select the “Small icons” mode.

- Go to the "Programs and Features" section, where select "Turn on or off" Windows components».

- In the list of the menu that opens, you need to select the components that should be activated by checking the box next to them. This is the “FTP Server” folder, there are two items in it: “FTP Extensibility” and “ FTP service", as well as the folder "Website Management Tools", and in it - "IIS Management Console". To start, click OK.

Setting up an FTP server
- Now you need to go through “Start” to “Control Panel” again.
- Find the “Administration” section and open “IIS Services Manager” in this section.
- Go to the “Sites” tab by clicking on the name right click, select “Add FTP sites” from the list.
- In the new window you need to specify the name of the future FTP server and the path to the directory with its data. You can proceed to the next configuration step by clicking the “Next” button.
- Now the server parameters are set. In the IP address field, select the one you need from the list. You can link it to specific address or make extended access by selecting “All free”. In this case, the standard port 21 should be checked. If you plan to constantly use the FTP server, then you should check the “Launch FTP site automatically” checkbox. Select the “No SSL” option; you can enable it later if necessary. Click “Next” again.
- In a new window, the authorization type is specified. In the “Authentication” item, you can allow login for regular or anonymous users. Here you can configure rights for them. Click "Done".
After the installation is complete, a new FTP server will appear in the “Sites” section.
Setting up Windows Firewall
Now it is imperative to configure the Windows Firewall to open ports and allow services to function.
Go back to the “Control Panel”, then “ Windows Firewall" Find section " Extra options».

In it, select “Rules for incoming connections”. It is recommended to set them to passive mode. To do this, right-click and enable the “FTP Server Passive” and “FTP Server (incoming traffic)” rules. In the same way, for outgoing connections, enable the “FTP-Server” rule in the appropriate section.

Connecting users
In order for users to access the server, they must be connected.
- In the “Control Panel” tab, open the “Administration” folder.

Administration section
- Find the "Computer Management" section, then navigate to the " Local users" Right-click on the “Groups” line and select the “Create Group” function. In the new window, specify the name and short description of the group and click “Create”.
- Now you can connect users to the created group. In the “Local Users” folder, right-click on the “Users” line and select “New” from the menu list. Fill in the fields by entering your name and password, and here you should check the box to prohibit changing the password.
- To connect a user, right-click on his account and select “Properties” from the menu list, then the “Group Membership” tab and the “Add” button. Find the created group, add and click OK. This procedure must be performed for all server users.
- The next step is to determine the access rights of group users to the working directory. To do this, go to the “Site” directory, right-click on the name and open “Properties”. Next - the “Security” tab, in the “Change” item, specify the name of the group and click OK. Then you need to configure user rights.
- Enter the “IIS Services Manager”, right-click on the line “FTP Authorization Rules”, add an allowing rule. You can allow users to write and delete data, or you can only read.
Server installation and configuration is complete. However, now you need to know how to log into the FTP server.
Standard Windows features make it easy. Just open the “My Computer” folder, then specify the path to the server in the address bar.
Another way is to create a shortcut for connecting to FTP on your computer desktop.
To do this, open the “Control Panel”, right-click the “Network Neighborhood” section. In tasks, select “Add” new element V network", then click on the item "Select another network location" and "Next". Now a shortcut will appear in the “Network Location” section, which you just need to drag and drop onto your desktop.
Installing an FTP server.
The FTP server is included with Internet Information Services. To install it, open Control Panel -> Programs -> Turn Windows features on or off. Expand the IIS Services section and check the boxes next to the following components: FTP Service and IIS Management Console.
Setting up an FTP server.
Open Control Panel -> System and Security -> Administration -> Computer Management (you can quickly: Start menu -> right click on Computer -> select Management from the menu). In the window that opens, expand the Services and Applications group and open IIS Service Manager. In the Connections window, select the Sites folder, then in the right Actions window click on the Add FTP site link.

In the FTP site creation wizard, specify its name and location (by default c:\inetpub\ftproot).

Next, specify the binding and SSL parameters. I leave the binding section unchanged. I disable the “Start ftp site automatically” option (I only need ftp from time to time). In the SSL section, I select the “Without SSL” option.

In the next window, leave everything unchanged and click Finish.

The site has been created. Now you can go to additional options for fine tuning(for example limit maximum amount simultaneous connections). Select the newly created site, on the right in the Actions panel click on Additional options.

The next step is setting up the Windows Firewall. Open Control Panel -> System and Security -> Windows Firewall -> Advanced Settings. In the “Rules for incoming connections” section, find and activate “FTP server (incoming traffic)” and “FTP Server Passive (FTP Passive Traffic-In)”. The last rule allows the ftp client to connect to passive mode.


In the “Rules for outgoing connection” section, find and activate “FTP Server (FTP Traffic-Out)”.

If the system has additional firewall(Comodo, Outpost, etc.), then you also need to open port 21 (TCP) for incoming connections and port 20 (TCP) for outgoing ones.
If you connect to the Internet using a router, and you want to make your server accessible to Internet users, then you need to configure port forwarding on the router. On my Dlink DI-804HV this is done in the Virtual Server section.

192.168.10.4 — IP address of the ftp server in local network.
Setting up user rights.
If you leave everything as it is, then any user can connect to the FTP server (anonymous access is enabled) with read-only rights (you can download, but you cannot write or change files). Let's assume that we need to make access for trusted users who would have the rights to write and change files.
Open Control Panel -> System and Security -> Administrative Tools -> Computer Management (Start -> right click on Computer -> select Management from the menu). Next, expand the Local users and groups group ( this setting available only in Business and Ultimate editions). Right click on the Groups folder and select Create Group from the menu.

Enter the name of the group - FTP Users, a description (you don’t have to enter it) and click the Create button.

Now you need to create a user. Right-click on the Users folder and select New User from the menu.

Enter the user name (for example ftp_user_1), password (at least 6 characters), check the boxes next to the options “Prohibit the user from changing the password” and “Password does not expire.”

The user has been created. Now you need to assign it the previously created group Ftp Users. To do this, open the user properties and go to the “Group Membership” tab. By default, a new user is assigned the Users group; delete it. Click the Add -> Advanced -> Search button. A list of user groups will open. Select the FTP Users group and click Ok. As a result we get:

Click Ok and move on to the next step.
At the stage of creating an ftp site, we needed to select a working directory (c:\inetpub\ftproot). Now you need to configure access rights to this directory for the FTP Users group. Open c:\inetpub in Explorer, open the properties of the ftproot folder, go to the Security tab and click the Edit button. In the window that opens, click the Add button and select the “FTP Users” group (as when creating a user). Set the permission level - " Full access» and click OK.

Final stage. Open IIS Services Manager again and select our ftp server (Test FTP). In the FTP site control panel, select “FTP Authorization Rules”. Add an allowing rule. In the window that opens, select the “Specified roles or user groups” option. At the bottom in the text field, we manually write the name of our group (FTP Users), then check the boxes in the Permissions section opposite Read and Write and click OK.

This completes the setup.
At the beginning we did not select the option automatic start server, so don’t forget to start it manually (right click on the site name -> Manage FTP site -> Start).
How to connect?
Option using Windows Explorer.
Open Computer (Vista, Win 7) or My Computer (XP).
For anonymous access just enter in address bar server address (ftp://192.168.10.4).
To log in with a username and password, enter an address like: ftp://[username]:[password]@[ftp server address]. For example ftp://ftp_user_1: [email protected]- to connect from a local network. To connect from the Internet local address replace it with an external or domain name.
In this article we will talk about the following things:
- how to set up an FTP server on a computer connected to the router;
- how to provide access to it from worldwide network Internet.
Setting up the FTP server program
Installing FileZilla Server
Download and install any FTP server that you like or are used to working with. For example, we will download free program Filezilla Server from the official website: https://filezilla-project.org/download.php?type=server
Run the downloaded installation file:

Click I reject:

Click I reject again:

Click Install:

Click I agree:

Next:


Install:

Setting up a FileZilla FTP server
Launch the program interface.

Enter settings: menu Edit -> Settings:

Now you need to configure passive FTP mode.
1) Select a section Passive mode settings;
2) Check the box Use custom port range;
3) Set a convenient range of ports for use in passive mode;
4) In the field Use the following IP register your external IP;
5) Click the button OK to save settings.

Now you need to set up user accounts and specify home directories.
Enter the menu Edit and select Users:

In chapter General click Add:
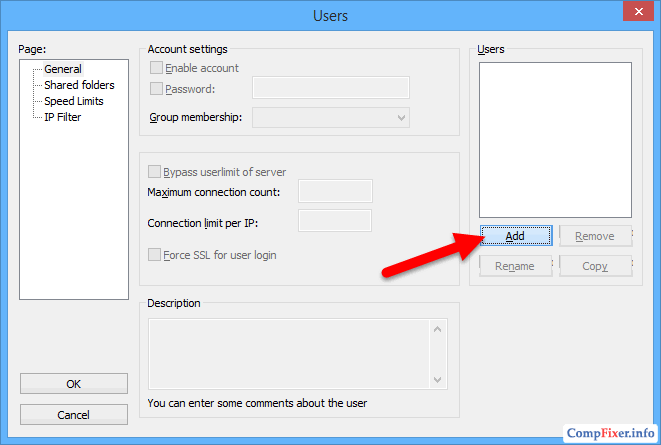
Enter your username and click OK:

1) Check the box next to Password. This will indicate that this account will require a password.
2) Set a password for this account;
3) Go to section Shared folders:

In chapter Shared folders click Add:

and select the folder that will be open to this user for access via FTP protocol. After selection shared folder click OK:

Set permissions for given user in folder.
In area Files you can allow or deny following operations with files:
- Reading;
- Record;
- Delete;
- Change.
In area Folders You can allow or deny the following folder operations:
- Creation;
- Delete;
- View list;
- View subfolders.
After you set permissions for this user in current folder, press OK to save settings:

Computer settings
After setting it up FTP programs-server, you need to allow incoming connections in the firewall.Let's go to Control Panel and choose Windows Firewall.

Right-click on Rules for incoming connections and choose Create a rule:

Select an option For the program and press Further:

Set the switch to position Program path and using the button Review specify the path to the file FileZilla Server.exe.
Then, click Further:

Select an option Allow connection and press Further:


Give the rule a custom name and click Ready:

Setting up a router: creating port forwarding rules
Now we need to create port forwarding on the gateway. The gateway can be a router, modem or other device. Log in to the router’s web interface (read the article about what a web interface is and how to access it:) and open the port forwarding section. Read more about port forwarding in our article: What is port forwarding.
Create two rules.
Rule #1: forwarding external port 21 to port 21 of the computer where the FTP server program is installed.
Rule No. 2: forward a range of ports to the same range of ports on a computer with installed program FTP server.
Saving the setting.

How to remotely connect to an FTP server
To access the FTP server, you can use either an FTP client, a browser, or even Explorer. Of course, it is preferable to use an FTP client. We recommend the free program FileZilla client . You can download it on the official website: https://filezilla-project.org/download.php?type=client
In field Host enter either ) or the external IP address of the router. Then, enter the username you created in the FileZilla Server program on your computer, the corresponding password and click the button Fast connection:
If in port forwarding in the router settings you did not change port No. 21 to non-standard, then the field Port You can leave it empty - the program will connect to port 21 by default.
FileZilla is great manager FTP, which allows you not only to use a client, but also to create a server. In this article we will look at how to configure the FileZilla server program to create a working server for various situations, for example, to connect a PS3 via FTP over a local network. Your task may be very different from the one described, but in general, setting up the FileZilla server application is the same. This article will introduce you to this.
What to do before creating an FTP server
Of course, before you run the server over a local network or over the Internet, you need to prepare your computer for this. First, decide on the program you will use. It is recommended to install FileZilla server, because it is a specialized application that can be downloaded for free and for which there are a lot of lessons on the Internet. In addition, there is not only FileZilla server, but also a client version, which is very convenient.
You need to install exactly one program this kind of because two servers may enter into a settings conflict and later you will not be able to connect to either of them.
Now it’s worth briefly remembering what FTP is. This is a special protocol, over 40 years old, which is used to transfer data from one remote device to another. There is a server that is configured so that certain data from there can be downloaded via FTP, and this is done using a client. You just need to configure and install FileZilla server to run such a server.
Now that you understand FTP and the fact that you only need to install one server, it's time to download FileZilla server. It is best to download the program distribution from the official website. On other resources, along with the installer, you can inadvertently download a couple of Trojans that do not fit into your computer at all. After you download required file, you can try installing the program on your computer. At the first stage, the installation of FileZilla server takes place in a standard way— you need to agree to the presented license. And already in the second step, it is important to correctly configure the list of packages that are installed on the computer. If you don’t want to figure it out for a long time, you can install it right away standard set FileZilla server distributions, which is enough for normal functioning programs.
On the third step FileZilla installations sever you need to select the path where to install the program. With this you decide for yourself, but with the fourth step it is better to select the first or second item from the drop-down list. You will be offered a method to start the program. It's much better if operating system will perceive the installed server as a service, and will add the program to autorun. This is much more convenient than every time after starting, going to the “Control Panel” and manually starting the server.
During installation, it is very important to configure the port on which your FTP server. According to standard setting, all servers are set to 14147, which is not very correct, because everyone knows about it, including FTP server hackers. Therefore, it is necessary to change this number to any other. After this, you will need to agree or disagree with the program running after installation and wait complete completion installations.
Setting up an FTP server in FileZilla
After you have completed the installation and launched the program for the first time, a small window will appear in front of you with several forms that need to be filled out. You will need to specify the IP address, port number and password, which are required to log into the administrative part of the created server. That is, this is not general data for client authorization, but personal data for admin authentication on your computer.
To configure the FTP server itself, you need to go to the Edit and Settings section, where all the program configurations are located. You can set the basic settings in the General Settings menu section. In the Listen on these port form, you can specify a non-standard port value that the client needs to connect to the server. In the field below, which is called Max. number of users specify the maximum number of clients connected to the FTP server. Even lower, you can specify the number of threads, and the last three settings items are timeout configurations. Please note that the default settings specified in this paragraph are quite suitable for connecting the PS3 to a computer via a local network. If you want to place your server on the Internet, then you will need to change the port, the number of users and timeouts to increase the level of security.
The next settings item is needed to generate a welcome letter for all clients who connect to your server over the network. But the fact is that if you need FTP in order to connect the PS3 to a PC, then this item does not need to be filled out. But if you want to take your server to the open spaces global network, then you can write a parting word for users.
In the IP Buildings section, you should specify the IP addresses that can connect to your server. Please note that if FTP is needed to connect the PS3 platform, you can specify the device's IP address. But if you plan to connect via PS3 first to the router and then to the server, then it is better not to specify a specific IP address, since many routers use dynamic IP rather than static. And in the IP Filters section you can write specific addresses for which entry is prohibited. But in the beginning you are unlikely to have such addresses - this will happen over time, when ill-wishers will appear trying to hack the server.
It is better not to touch the Passive mode settings section at all. You will only need to change anything there if the client is connecting to your server via a router in passive mode. In this case, you will need to specify the external IP address of your computer, as well as the range of addresses on which the router operates. You may have to change this settings item when you try to set up a PS3 connection with a PC. After all, the PS3 is often connected to the computer via a router.
In settings server program FileZilla has many parameters that are generally best not to change. They seem to do nothing, but if you change the configurations incorrectly, then you may have problems in the future and clients will not be able to connect to the created server. For example, do not touch the settings item called Security Settings, as well as the Miscellaneous section. For home network required to connect a PS3, these settings will still not be needed.
In the Admin Interface Settings section, you will be able to change the settings that you entered when you first launched FileZilla. That is, specify a different port, IP address, password and other authorization data for the administrator. In general, it's unlikely that someone will try to hack your PS3, so don't take protecting your home network too seriously. However, it is always better to be careful, so it is recommended to enable session logging in the Logging tab. At least this way you can find out if someone has been using your PS3 without permission.
After you have decided on all the basic settings, you can configure users and their rights in the Edit section in the Users item. Typically, on a home network there is a small group of users who need access to remote device. Through this menu item you will be able to configure these clients and give them specific set right
Now, in order to connect to the server, the client must enter its IP address, your login and password (which you set in the Users section), as well as the port, if it has been changed. That's all the wisdom of working with FTP servers. As you can see, this is not difficult at all, even if you want to connect the PS3 platform to your computer!
One of my materials mentioned the possibility of using this server to implement some tasks. In this material I will try to outline in as much detail as possible the basics of setting up the FileZilla FTP server for Windows. This server It is relatively easy to set up, consumes few resources, is invisible during operation, and also has a convenient console with very informative logging. You can manage the server remotely. The main purpose of an FTP server is to provide direct access to files and folders to users connecting to the server, this is exactly what I will talk about
What do we need:
1.
FTP server Filezilla - follow the link, scroll down the page and see FileZilla Server version 0.9.41 at the time of writing this material, download
2.
FTP client or any browser to check the functionality of the FTP server
# Installation
Launch the downloaded distribution and begin the installation
1.
In the first step, click I agree
2.
Next you need to select the installation components, nothing complicated here, leave it as is or remove the shortcuts, you don’t need to install Source Code
3.
Select the installation location, you can set it as default
4.
In the fourth step, you need to select the parameters for the server service, there are 3 options:
A. Installing the server as a service and starting it automatically
b. Installing the server as a service and manual start, when the system starts, the server will not work
V. Server installation as normal application and automatic start
The choice depends on how regularly and for what purpose the server will work, if necessary permanent access in automatic stealth mode, then option A, if to solve one-time problems, then the option B

In addition, you need to select the port through which the control panel will connect to the server; it should not be occupied by other software; in most cases, you can leave the default port, i.e. 14147
5.
Selecting a method for launching the server interface, I recommend choosing Start manually, because By by and large the interface will be needed once - during initial setup and only occasionally will it be necessary to make changes, so there is no point in keeping it always running, leave the checkbox, then the interface will be launched immediately after the installation is complete, click Install
#
Settings
Upon completion of the installation, the server manager will be launched, first a window will appear asking you to set up a connection to the server, because the server is on the same PC as the manager, then how Server Address leave
127.0.0.1
, we don’t touch the port either, it was the one that was specified during installation, or we change it if it was changed earlier. We leave the password blank, because By default it is not there, you can install it later. Check the box and connect
# Basic server configuration
Select from the menu Edit -> Settings, this is the basic server configuration, let's make some nice changes. I will not dwell on all the options, but will point out only the most significant and useful for the majority of users
1.General Settings. You can change port 21 to some other one; usually this is not necessary, but it can be useful to protect your server from unnecessary attacks, i.e. Port 21 will be unavailable and those who are not aware may assume that there is no server. You can also specify the maximum number of simultaneously connected users, which helps to reduce the load on weak machines. Below you can specify the number of processor cores that will be used by the server to distribute the load.
- IP Filter- a filter for restricting access by IP ranges, in the first list we enter the addresses and ranges that we deny access to the server, and in the second those addresses from the first list of ranges that will be given an exception, i.e. access granted
2.Miscellaneous. IN additional settings there are some useful things. The first checkbox (if checked) allows you to hide the file sent by the user in the server interface window, the second checkbox will launch the application minimized. The third checkbox will allow files opened for writing to be transferred, it is not recommended to do this - you can damage the files, the fourth checkbox
3. Logging. Logging itself is disabled by default, but can be enabled. The size can be limited, then when the limit is reached, the file will be overwritten. You can also set the log in one large file(not recommended) or create logs by day + activate the option to delete after the required time period
4. Speed Limits. Ability to set download and upload speed limits. You can just do it general limitation speed or add the required number of rules by day and hour. Useful to prevent the FTP server from downloading the entire channel
5. Autoban. The name speaks for itself; if a user enters incorrect credentials several times in a row, his address is blocked. The number of attempts and the blocking period are indicated. Useful against brute programs that perform banal searches; they can be stopped using this method
When the settings are complete, you can click OK
# Adding users

Go to the menu Edit -> Users. First, I will describe the general procedure for adding users
1.General. Here we create a new account. Click Add, a field appears to enter the user name and select the group to which we want to add it. If there is no group, then it cannot be selected accordingly. For servers with a small amount It is not necessary to create groups of accounts; you just need to create several accounts and assign your rights to each one
Then check the box Password and enter the password for account. Below you can set limits for the user on the number of connections and the number of connections from one IP. Null values will mean no restrictions

2. Shared folders. Here, for a specific user, we select the folders to which he will have access and rights to these folders
If there are already several users, then in the right window we select the one to whom we will add rights, then on the left click Add, and select a folder on the PC, if you need access to several folders, then add more, one of the folders should be marked as HomeDir, those. the folder that the user will go to by default when connecting to the server. Sometimes it is necessary to give access to different disks PC to one user, there is one nuance here - you can add as many folders as you like within one drive, but in order to give access to another drive, you need to make an Alias, i.e. alias link from the HomeDir directory disk to required folder another disk. To do this, create access to another folder on another disk, then right-click on the created folder - Edit Aliases, in the HomeDir folder field to which the user has access + we also add an alias virtual folder, which will send us to a folder on another disk. in our case it turns out D:/Temp/Soft. Now, when connecting to his main folder, the user in Temp folder will still see the Soft folder and be able to go to it, while it will be on another drive

Now about the rights to files and folders. Choose required user and folder, and work with the checkboxes, depending on the required capabilities
Read- read only, i.e. you can view files and folders on the server and download them
Write- allows you to overwrite existing files
Delete- deleting files and folders
Append- adding new files to the server
Create- create new folders
List- view the contents of folders
+Subdirs- view all folders that are nested in the main one
If we create an anonymous user, i.e. which will be used by several users at once to obtain any data from the server, then we need to create an academic record with the name anonymous without a password, add the necessary directories to it and assign rights to them. Usually anonymous users only need to read (for security reasons first of all), i.e. enable rights for it Read, List, +Subdirs
3. Speed Limits & IP Filter. Here, as in the main server config, you can make individual settings for an account regarding restrictions on addresses and speeds, convenient for creating exceptions to the basic rules
Save the settings. If desired and large quantities You can create several groups of server users if there are differences in rights for them. To do this you need to go to Edit ->Groups. The group rights configuration is no different from the configuration individual user, after creating a group, you can simply create a user and select a group for him, after which he will have group rights
When setting up the server, it is quite logical and convenient to protect access to users from it; to do this, go to the menu Server, it will have 2 options - Active And Lock. The first option is active by default, and if you uncheck the box, then the server will be turned off and no one will be able to connect, at this moment it will be possible to configure it, when you turn on the server for the first time, all settings will be applied. Activation Lock allows you to leave the server running, but blocks it, i.e. users will see that the server is running, but will be denied access to it
After configuring the server, you can close administrative panel, it is not necessary to run it for the server to work


