Working with XML in .NET applications. Introduction to modern tools for working with XML
In the first article in the .NET blog, “Working with XML,” people in the comments demanded an article on LINQ to XML. Well, let's try to reveal the principles of operation of this new technology from Microsoft.
Let's create a base for maintaining a catalog of audio recordings. The database will consist of tracks:
- Name
- Executor
- Album
- Duration
First, let's create console application(I write my projects in C#, but the essence will generally be clear to everyone) and connect the necessary namespace
Using System.Xml.Linq;
Generating XML Files
Let's create an XML file of our database containing several test records already using LINQ:
//set the path to our working XML file string fileName = "base.xml"; //counter for the track number int trackId = 1; //Creation by nested constructors. XDocument doc = new XDocument(new XElement("library", new XElement("track", new XAttribute("id", trackId++), new XAttribute("genre", "Rap"), new XAttribute("time", " 3:24"), new XElement("name", "Who We Be RMX (feat. 2Pac)"), new XElement("artist", "DMX"), new XElement("album", "")), new XElement("track", new XAttribute("id", trackId++), new XAttribute("genre", "Rap"), new XAttribute("time", "5:06"), new XElement("name", "Angel (ft. Regina Bell)"), new XElement("artist", "DMX"), new XElement("album", "...And Then There Was X")), new XElement("track", new XAttribute("id", trackId++), new XAttribute("genre", "Break Beat"), new XAttribute("time", "6:16"), new XElement("name", "Dreaming Your Dreams") , new XElement("artist", "Hybrid"), new XElement("album", "Wide Angle")), new XElement("track", new XAttribute("id", trackId++), new XAttribute("genre" , "Break Beat"), new XAttribute("time", "9:38"), new XElement("name", "Finished Symphony"), new XElement("artist", "Hybrid"), new XElement(" album", "Wide Angle")))); //save our document doc.Save(fileName);
Now, after launching, an XML file with the following content will appear in the folder with our program:
To create such a file using XmlDocument, the code required about 2 times more. In the code above, we used the constructor of the XDocument class, which takes as a parameter a list of child elements with which we initially want to initialize the document. The XElement constructor used takes as a parameter the name of the element that we are creating, as well as a list of initializing elements. Conveniently, we can set both new XElement and XAttribute in these elements. The latter will be rendered into our file as attributes independently. If you do not like using such nesting of constructors and you consider such code to be cumbersome, then you can rewrite it in a more traditional version. The code below will output a similar XML file:
XDocument doc = new XDocument(); XElement library = new XElement("library"); doc.Add(library); //create the "track" element XElement track = new XElement("track"); //add the necessary attributes track.Add(new XAttribute("id", 1)); track.Add(new XAttribute("genre", "Rap")); track.Add(new XAttribute("time", "3:24")); //create the element "name" XElement name = new XElement("name"); name.Value = "Who We Be RMX (feat. 2Pac)";
track.Add(name);
//создаем элемент "artist"
XElement artist = new XElement("artist");
artist.Value = "DMX";
track.Add(artist);
//Для разнообразия распарсим элемент "album"
string albumData = "!}
Naturally, you need to choose the necessary method depending on the situation.
Reading data from a file
//set the path to our working XML file string fileName = "base.xml"; //read data from the file XDocument doc = XDocument.Load(fileName); //we go through each element in the new library //(this element is immediately accessible through the doc.Root property) foreach (XElement el in doc.Root.Elements()) ( //Output the name of the element and the value of the id attribute Console.WriteLine(" (0) (1)", el.Name, el.Attribute("id").Value); Console.WriteLine(" Attributes:"); //we display all the attributes in a loop, at the same time see how they convert themselves into a string foreach (XAttribute attr in el.Attributes()) Console.WriteLine(" (0)", attr); Console.WriteLine(" Elements:"); // print the names of all child elements and their values in a loop foreach (XElement element) in el.Elements()) Console.WriteLine(" (0): (1)", element.Name, element.Value )
Here in the code, I think, there is nothing complicated and comments are provided. After running our program, the following result will be displayed in the console:
Track 1 Attributes: id="1" genre="Rap" time="3:24" Elements: name: Who We Be RMX (feat. 2Pac) artist: DMX album: The Dogz Mixtape: Who"s Next?! track 2 Attributes: id="2" genre="Rap" time="5:06" Elements: name: Angel (ft. Regina Bell) artist: DMX album: ...And Then There Was X track 3 Attributes: id= "3" genre="Break Beat" time="6:16" Elements: name: Dreaming Your Dreams artist: Hybrid album: Wide Angle track 4 Attributes: id="4" genre="Break Beat" time="9: 38" Elements: name: Finished Symphony artist: Hybrid album: Wide Angle
Changing data
Let's try to go through all the library nodes and increase the Id attribute of the track element by 1.
(I won’t write further the declaration of the path to the file and the result of the output to the console, so as not to overload the article with unnecessary information, I compiled everything, everything works :)):
//Get the first child node from library XNode node = doc.Root.FirstNode; while (node != null) ( //check that the current node is an element if (node.NodeType == System.Xml.XmlNodeType.Element) ( XElement el = (XElement)node; //get the value of the id attribute and convert it in Int32 int id = Int32.Parse(el.Attribute("id").Value); //increase the counter by one and assign the value back id++; el.Attribute("id").Value = id.ToString() ; ) //move to the next node node = node.NextNode ) doc.Save(fileName);
Now let's try to do this in a more correct way for our tasks:
Foreach (XElement el in doc.Root.Elements("track")) ( int id = Int32.Parse(el.Attribute("id").Value); el.SetAttributeValue("id", --id); ) doc.Save(fileName);
As you can see, this method suited us better.
Adding a new entry
Let's add a new track to our library, and at the same time calculate the following unique Id for the track using LINQ:
Int maxId = doc.Root.Elements("track").Max(t => Int32.Parse(t.Attribute("id").Value)); XElement track = new XElement("track", new XAttribute("id", ++maxId), new XAttribute("genre", "Break Beat"), new XAttribute("time", "5:35"), new XElement("name", "Higher Than A Skyscraper"), new XElement("artist", "Hybrid"), new XElement("album", "Morning Sci-Fi")); doc.Root.Add(track); doc.Save(fileName);
With such a raised query to all elements, the maximum value of the id attribute of the tracks is calculated. When adding, we increment the resulting maximum value. Adding an element itself comes down to calling the Add method. Please note that we are adding elements to Root, since otherwise we will break the structure of the XML document by declaring 2 root elements there. Also, do not forget to save your document to disk, since until saving, no changes in our XDocument will be reflected in the XML file.
Removing items
Let's try to remove all DMX artist elements:
IEnumerable
In this example, we first selected all the tracks whose child element artst met the criteria, and then deleted these elements in a loop. The call at the end of the selection to ToList() is important. By doing this, we record in a separate memory area all the elements that we want to delete. If we decide to delete from the set of records that we are going through directly in the loop, we will get the removal of the first element and the subsequent NullReferenceException. So it's important to remember this.
On the advice of xaoccps, you can delete more in a simple way:
IEnumerable
In this case, there is no need to convert our resulting result to a list by calling the ToList() function. Why was this method not originally described in
Last updated: 10/31/2015
There are several approaches you can use to work with XML in C#. In the first versions of the framework, the main functionality for working with XML was provided by the System.Xml namespace. It defines a number of classes that allow you to manipulate an xml document:
XmlNode: Represents an xml node. The entire document or a separate element can be used as a node
XmlDocument : represents the entire xml document
XmlElement: Represents a single element. Inherited from the XmlNode class
XmlAttribute : Represents an element attribute
XmlText: represents the value of an element as text, that is, the text that appears in the element between its opening and closing tags
XmlComment : represents a comment in xml
XmlNodeList: used to work with a list of nodes
The key class that allows you to manipulate xml content is XmlNode, so let's look at some of its main methods and properties:
The Attributes property returns an XmlAttributeCollection object that represents a collection of attributes
The ChildNodes property returns the collection of child nodes for a given node
The HasChildNodes property returns true if the current node has child nodes
The FirstChild property returns the first child node
The LastChild property returns the last child node
The InnerText property returns the text value of the node
The InnerXml property returns all internal markings xml node
The Name property returns the name of the node. For example,
The ParentNode property returns the parent node of the current node
Let's apply these classes and their functionality. And first, to work with xml, let’s create new file. Let's call him users.xml and define the following content in it:
Now let's go through this document and output its data to the console:
Using System.Xml; class Program ( static void Main(string args) ( XmlDocument xDoc = new XmlDocument(); xDoc.Load("users.xml"); // get the root element XmlElement xRoot = xDoc.DocumentElement; // traverse all nodes in the root element foreach(XmlNode xnode in xRoot) ( // get the name attribute if(xnode.Attributes.Count>0) ( XmlNode attr = xnode.Attributes.GetNamedItem("name"); if (attr!=null) Console.WriteLine(attr .Value); ) // traverse all child nodes of the element user foreach(XmlNode childnode in xnode.ChildNodes) ( // if the node is company if(childnode.Name=="company") ( Console.WriteLine("Company: (0 )", childnode.InnerText); ) // if the node is age if (childnode.Name == "age") ( Console.WriteLine("Age: (0)", childnode.InnerText); ) ) Console.WriteLine() ; ) Console.Read();
As a result, I will get the following output on the console:
To start working with an xml document, we need to create an XmlDocument object and then load an xml file into it: xDoc.Load("users.xml");
When parsing xml, we first get the root element of the document using the xDoc.DocumentElement property. Next, the actual parsing of the document nodes takes place.
In the foreach(XmlNode xnode in xRoot) loop we go through all the child nodes of the root element. Because child nodes represent elements
To determine what kind of node is in front of us, we can compare its name: if(childnode.Name=="company")
In a similar way we can create User objects from xml data:
List
We present to your attention a new course from the team The Codeby- "Penetration testing of Web Applications from scratch." General theory, working environment preparation, passive fuzzing and fingerprinting, Active fuzzing, Vulnerabilities, Post-exploitation, Tools, Social Engeneering and much more.
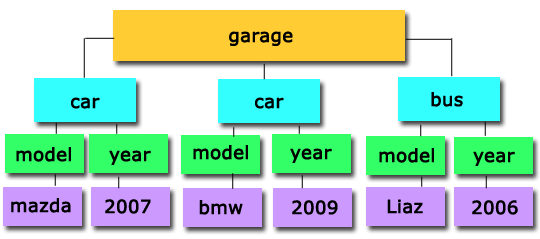
XML DOM 2
The previous article described general concepts regarding XML. In this article we will learn how to perform basic actions related to changing, adding, searching in an XML file.
XML file that is used for the example.
xml dom
At the moment, our file contains the following structure:

Relationship between nodes in XML DOM, basic moments:
1. Any node in the DOM tree has a parent ParentNode. In our example, garage is the parent of both car elements, and both car elements are, in turn, parents of model and year elements.
How to get the parent of the car xml element?
Console.WriteLine(elmRoot["car"].ParentNode.Name); //Result: garage
2. A parent can have children ChildNodes. For example, for the garage node the children are both car elements. The car elements also have children model and year.
ChildNodes, is a collection that stores all child xml elements; to access the desired element, you need to specify its index. (The index always starts from zero!)
For example: how to get the first child element?
ElmRoot.ChildNodes;
3. As in ordinary life, a child can be born first FirstChild, or last LastChild.
If we take the car element as an example, then
FirstChild is model LastChild is year
4. In turn, there are also connections between the child elements; they can be brothers or sisters, if we draw parallels with real life.
A child may have, for example, a Previous Sibling brother and a Next Sibling brother
Console.WriteLine(elmRoot.ChildNodes.FirstChild.NextSibling.Name); //Result: year Console.WriteLine(elmRoot.ChildNodes.LastChild.PreviousSibling.Name); //Result: model
If the element is not found, then an exception is thrown: NullReferenceException, so when working with xml, always use try catch blocks.
Console.WriteLine(elmRoot.ChildNodes. LastChild.NextSibling.Name); Console.WriteLine(elmRoot.ChildNodes. FirstChild.PreviousSibling.Name);
LastChild is NextSibling;
FirstChild is PreviousSibling;
Using the methods described above, you can easily move to the desired node and get any value you need.
How to get the value of an xml element?
The xml value of an element can be obtained using the InnerText property, for example:
Console.WriteLine(elmRoot["car"].FirstChild.InnerText); //Result: Mazda
Another way to get the same xml element value:
Console.WriteLine(elmRoot.FirstChild.FirstChild.InnerText); //Result: Mazda
The sequence of movements along the DOM tree:
Garage -> car -> model -> Mazda
We get the year:
ElmRoot["car"].LastChild.InnerText; //Result: 2007
Subsequence:
Garage -> car -> year -> 2007
Another example: 3 ways to get the same result.
Console.WriteLine(elmRoot.LastChild.FirstChild.InnerText); Console.WriteLine(elmRoot["car"].NextSibling.FirstChild.InnerText); Console.WriteLine(elmRoot.ChildNodes.Item(1).FirstChild.InnerText); //Result: BMW
If you need to get the year for an element with the value Mazda:
Console.WriteLine(elmRoot.FirstChild.LastChild.InnerText); //Result: 2007
For BMW (two ways, get the same result)
Console.WriteLine(elmRoot.ChildNodes.Item(1).ChildNodes.Item(1).InnerText); Console.WriteLine(elmRoot.ChildNodes.ChildNodes.InnerText); //Result: 2009
How to change xml element values?
Using property InnerText() You can both get and change the value of an xml element, for example, change the year.
//Set a new value elmRoot.FirstChild.LastChild.InnerText = "2010"; //Display the new value on the console screen Console.WriteLine(elmRoot.FirstChild.ChildNodes.Item(1).InnerText); //Result: 2010
At the same time, you need to remember that all changes occur with the virtual xml file; if you open the physical file, you will see that the year 2007 is still indicated in it.
In order for the changes to take effect, you need to use the Save method, for example:
ElmRoot.Save("xml file name or stream");
Now the information will be changed in the “physical” xml file.
How to get the number of child elements?
Console.WriteLine(elmRoot.FirstChild.ChildNodes.Count);garage -> car contains 2 children: model and year
Console.WriteLine(elmRoot.FirstChild.FirstChild.ChildNodes.Count);
garage -> car -> model contains 1 child xml element.
Accessing Child Elements
by index
ElmRoot.ChildNodes.Name; elmRoot.ChildNodes.Name; //Result: car
Using a loop
Foreach (XmlNode nod in elmRoot.ChildNodes) ( Console.WriteLine(nod.Name); ) //Result: car, car
How to get xml element name?
elmRoot.Name; //Result: garageCreating a new XML element
Let's create a new element in our XML document so that it differs from the other two (car), let's call it bus (bus).
When creating a new element, we will use the recommendation from the msdn website and instead of the standard new XmlElement we will use the CreateElement method.
XmlElement elm = xmlDoc.CreateElement("bus");
Creating and adding a new xml element
Let's create a new xml element named "BUS".
XmlElement elmRoot = xmlDoc.DocumentElement; Console.WriteLine(elmRoot.ChildNodes.Count); //car, car XmlElement elmNew = xmlDoc.CreateElement("bus"); elmRoot.AppendChild(elmNew); Console.WriteLine(elmRoot.ChildNodes.Count); //3 car, car, bus xmlDoc.Save("xml file name");Explanation:
1. First we get a root element to which we will attach new elements.
2. As a check, we will display the current number of child elements of the garage element: 2 (car and car)
3. Create a new BUS element
4. Using the method AppendChild adding a new element to the tree
5. Let’s use the check again and display the current number of elements for the garage element, now there are 3 of them: car, car, bus.
6. For changes to affect the physical file, save
In the XML file itself, the new element will look like this:
How to add a new xml element?
Task: create a new XML element and add some text content to it, for example the year of manufacture.
String strFilename = @"C:\lessons\Auto.xml"; XmlDocument xmlDoc = new XmlDocument(); xmlDoc.Load(strFilename); XmlElement elmRoot = xmlDoc.DocumentElement; XmlElement elmNew = xmlDoc.CreateElement("bus"); XmlText new_txt = xmlDoc.CreateTextNode("2006"); elmRoot.AppendChild(elmNew); elmRoot.LastChild.AppendChild(new_txt); Console.WriteLine(elmRoot.ChildNodes.Name); //bus Console.WriteLine(elmRoot.ChildNodes.LastChild.InnerText); //2006 Console.Read();
In XML file:
For clarity

Now let’s create a “bus” node with the same architecture as car, that is, add nodes: model, year and some text content.
Creating an XML Element with Children
string strFilename = @"C:\lessons\Auto.xml"; //create a new xml document in memory XmlDocument xmlDoc = new XmlDocument(); //load the xml file into memory xmlDoc.Load(strFilename); //Get the root element XmlElement elmRoot = xmlDoc.DocumentElement; //Create 3 elements: bus, model, year XmlElement elmBUS = xmlDoc.CreateElement("bus"); XmlElement elmModel = xmlDoc.CreateElement("model"); XmlElement elmYear = xmlDoc.CreateElement("year"); //Set values for elements: model, year XmlText year_txt = xmlDoc.CreateTextNode("2006"); //XmlText mod_txt = xmlDoc.CreateTextNode("liaz"); add otherwise //Add two child elements to the bus element: model and year elmBUS.AppendChild(elmModel); elmBUS.AppendChild(elmYear); //Add values to the model and year nodes elmModel.InnerText = "liaz"; elmYear.AppendChild(year_txt); //Add a new xml element bus to the tree elmRoot.AppendChild(elmBUS); //Check if everything is added as it should Console.WriteLine(elmRoot.ChildNodes.FirstChild.InnerText); Console.WriteLine(elmRoot.LastChild.LastChild.InnerText); //If everything is in order, then use the Save method xmlDoc.Save("xml file name");Result:
How can I shorten this code? For example, as follows:
String PathXmlFile = @"C:\lessons\Auto.xml"; XmlDocument xmlDoc = new XmlDocument(); xmlDoc.Load(PathXmlFile); XmlElement elmRoot = xmlDoc.DocumentElement; XmlElement elmBUS = xmlDoc.CreateElement("bus"); XmlElement elmModel = xmlDoc.CreateElement("model"); XmlElement elmYear = xmlDoc.CreateElement("year"); //Add values to the model and year nodes elmModel.InnerText = "liaz"; elmYear.InnerText = "2006"; elmBUS.AppendChild(elmModel); elmBUS.AppendChild(elmYear); elmRoot.AppendChild(elmBUS); //If everything is correct, then call the Save method xmlDoc.Save("xml file name");
Let's shorten the code a little more, for this we will use the InnerXml property:
XmlDocument xmlDoc = new XmlDocument(); xmlDoc.Load(PathXmlFile); XmlElement elmXML = xmlDoc.CreateElement("bus"); string txt = "
Result
Get a list of elements using GetElementByTagName
GetElementByTagName returns XmlNodeList, which contains all descendant elements belonging to the specified element, for example, we need to get all the car models that are stored in the garage:
XmlDocument xmlDoc = new XmlDocument(); xmlDoc.Load(strFilename); XmlNodeList modelName = xmlDoc.GetElementsByTagName("model"); foreach (XmlNode node in modelName) ( Console.WriteLine(node.InnerText); ) //Result: mazda, bmw, liaz
Access using index:
String PathXmlFile = @"C:\lessons\Auto.xml"; XmlDocument xmlDoc = new XmlDocument(); xmlDoc.Load(PathXmlFile); XmlNodeList modelName = xmlDoc.GetElementsByTagName("model"); Console.WriteLine(modelName.InnerText); //Result: liaz
How can I change the text content of a newly created "bus" element using the GetElementByTagName method?
String PathXmlFile = @"C:\lessons\Auto.xml"; XmlDocument xmlDoc = new XmlDocument(); xmlDoc.Load(PathXmlFile); XmlNodeList modelName = xmlDoc.GetElementsByTagName("model"); Console.WriteLine(modelName.InnerText); //Received the value: liaz
Or you can change the name liaz to Ikarus
Console.WriteLine(modelName.InnerText = "Ikarus");
Language is not the son, but the father of thought.
Oscar Wilde
Abbreviation XML stands for Extensible Markup Language, translated as “extensible markup language”. Like HTML, it is a subset of SGML (Standard General Markup Language), the “grandfather” of markup languages. We have come across the XML format more than once. This is the format of configuration files, a file describing object data sources.
XML is a universal, platform-independent standard for describing information that can be used to represent hierarchical data and unify the information transferred. Without knowledge of it, it is impossible to understand SOAP and, therefore, web services. XML has become the de facto standard for data transmission on the Internet. The XML and related formats standard is defined by the W3C (World Wide Web Consortium). For example, we create aspx pages in the XHTML format - transitional between HTML and XML, the standard of which is also defined by the W3C. The XHTML standard imposes stricter rules for proper document formation, similar to those in XML.
Let's understand the main difference between XML and HTML. XML is designed to describe data and focus on what exactly it is. HTML is designed to show data and focuses on how the data looks. If in traditional HTML the concepts of “presentation” and “visualization” are often confused, then when working with XML we clearly separate these concepts. XML tags are not predefined by the creators of the language, unlike HTML tags. Each document author defines his own tags.
The standard requires that a program that processes an XML document must stop if it encounters an error. And if the browser detects an unclear tag in the HTML, or the absence of a closing tag, it simply ignores it.
At the beginning of an XML document, its declaration, or prologue, always appears. It specifies the version of the XML standard to which it conforms.
is an error in XML.
Tags can have attributes. Attribute values must be enclosed in quotation marks. The order of the attributes does not matter. There may be text between the opening and closing tags. XML preserves all whitespace found in the text. If there is no text, you can use an abbreviated form of notation. Example XML tag:
| |
This is a short form of the tag
| |
Does this remind you of anything? The rules for describing ASP.NET elements are exactly the same.
There is an xmlns attribute that defines the namespace. Its value can be any unique name. There is an agreement to use URLs because they are unique. Namespaces have a meaning similar to how they are used in the .NET Framework - to avoid mixing up similar names used by different developers. The namespace name is separated from the name by a colon.
XML files represent hierarchical information that can be represented as a tree with a single root.
XML documents that satisfy all syntax requirements are called well-formed. To describe data, XML uses DTD (Document Type Definition) - a definition of the document type. If the file matches the DTD, it is considered valid.
Browsers IE 6.0, FireFox 1.5 display XML files with syntax highlighting. Parent nodes can be expanded and closed. For example, when closed, the root node of the BirthDay.xml file looks like this:
The Visual Studio and VWD Express development environments check the correctness of xml documents right during editing.
AdRotator
Control element AdRotator allows you to display advertising banners and automatically replace them with others. The banners themselves are described in an XML file or other data source. The advertisement is updated every time the page is refreshed. The AdvertismentFile property specifies the name of the XML file. The skeleton of an XML file is as follows.
|
|
Inside the Advertisements node there are nodes
These nodes have 5 attributes, all of which are optional.
An example of an AdvertismentFile file, it is called ads.xml.
|
|
A control element is placed on the page. Its AdvertisementFile property points to this file.
| |
If the Keyword property is set, the control displays only advertisements that match its content. Since it can be changed dynamically, you can tailor advertising to the user's needs. The keyword must appear at least once in the ad file, otherwise there will be an empty rectangle instead of an ad.
In previous versions of ASP.NET, you could only work with XML files. You can now use any data source by binding to the data source control. In this case, you must specify at least 3 source fields in the ImageUrlField, NavigateUrlField and AlternateTextField properties.
| |
Document Conversion Files
It is known that CSS (Cascading Stylesheets) are often used to format HTML files, although this is not necessary since browsers associate a certain appearance with all tags. Element
Sets the paragraph - bold font - the browser knows how to show them.
Since XML does not use predefined tags, their meaning can be anything:
|
To output XSLT transformations for each XML element, use the xsl:for-each XSL tag. The :for-each element locates elements in the XML document and repeats the pattern for each one.
Data can be sorted using the xsl:sort tag, which must be inside the xsl:for-each element:
The final look of the transformation file:
Famous Quotes
|

If you want to see the result of the document transformation in the browser, include a declaration after the XML declaration
| , |
or select Show XML Output from the XML menu and specify the transform file.
The same XML document can be transformed using another XSL file:
Masters of Aphorism |
The result will be quotations separated by a horizontal line.
Document Schema Definition Files
According to the modern standard, a valid document must match the file associated with it XSD(XML Schema Definition) - An XML schema definition file that defines a particular language, that is, describes what elements and types can appear in a document. XSD schemas are intended to replace DTD (Document Type Definition), the difference between them is that XSD files themselves also use XML syntax. XSD schemas allow you to determine which tags are allowed, whether they are required or not, whether they can be repeated in a document, and so on. Thus, XML describes data, and XSD describes the structure of that data, or metadata. In programming terms, XSD is a description of types, while an XML file describes objects of those types. A working draft of the XSD 1.1 standard is available at http://www.w3.org/TR/2003/WD-xmlschema-11-req-20030121/.
The schema definition file begins with a description of the namespace prefix, which is then included in all elements of the file. http://tempuri.org is used to set the URI for ASP.NET namespaces.
For example, this definition specifies that the element "Author" is of type string, must appear once and only once, and if not specified, takes on the value "Pushkin".
| |
The maxOccurs="unbounded" parameter specifies that the element can appear any number of times.
The ref parameter allows you to refer to something already described in this file a global element or attribute to avoid repeating the same elements.
- define simple and complex types.
XSD has predefined types - much the same as .NET. They are converted to .NET types while the application is running. Based on them, you can build complex types similar to the structures of programming languages. A complex type consists of a sequence of element declarations. Let's define a complex type
| |
Tag
Tag
The following example defines a simple type nested within the MyValue element definition.
- Add new groups and attribute groups.
A complex type definition can include attributes. Let's say we want to build a schema for a file like this:
Attributes can only be of simple types.
- Add annotations.
Annotations allow you to insert descriptions of existing elements, thereby adding documentation to the file.
| |
You can also edit XSD files in Visual Studio 2005 through source, and with the help of a designer. For an XML document, you can automatically generate a corresponding schema. In the XML document properties window, you can specify both a schema file and a transform file. In this case, the studio automatically checks the file for compliance with the schema, and even IntelliSense substitutes tags from this file.
XmlReader class
Using the XmlReader class, you can retrieve data from XML documents faster than other methods.
XmlReader is an abstract class. To start reading, static method Create is passed an object of the XmlReaderSettings class. This function counts the number of nodes in a document.
| using System.Xml; using System.IO; private int CountNodes(string xmlFile) ( int NodesCount=0; XmlReaderSettings settings = new XmlReaderSettings(); settings.IgnoreWhitespace = true; settings.IgnoreComments = true; using (XmlReader reader = XmlReader.Create(xmlFile, settings)) ( while ( reader.Read()) ( if (reader.NodeType == XmlNodeType.Element) ( NodesCount++; ) ) return NodesCount; |
The XmlReader class allows you to retrieve CLR classes from a document. Let us have a restaurant menu.
Let's write a function that will calculate the sum of prices and calories in the menu.
| protected void Page_Load(object sender, EventArgs e) ( int ItemsCount = 0; decimal DishesTotal = 0; UInt16 CaloriesTotal = 0; XmlReaderSettings settings = new XmlReaderSettings(); settings.IgnoreWhitespace = true; NameTable nt = new NameTable(); object food = nt.Add("food"); object price = nt.Add("price"); object calories = nt.Add("calories"); string MenuFile = Path.Combine(Request.PhysicalApplicationPath , "menu.xml"); using (XmlReader reader = XmlReader.Create(MenuFile, settings)) ( while (reader.Read()) ( if (reader.NodeType == XmlNodeType.Element && food.Equals(reader.LocalName )) ( ItemsCount++; ) if (reader.NodeType == XmlNodeType.Element && price.Equals(reader.LocalName)) ( DishesTotal += (UInt16)reader.ReadElementContentAsDecimal(); ) if (reader.NodeType == XmlNodeType.Element && calories.Equals(reader.LocalName)) ( CaloriesTotal += (UInt16)reader.ReadElementContentAsInt(); ) ) Response.Write(String.Format("You ordered (0) dishes worth (1:C), ( 2) calories", ItemsCount, DishesTotal, CaloriesTotal)); ) |
XPathDocument class
The class provides reading and in-memory storage of XML documents for transformations using XSL. You can navigate the document in any direction and gain random access to any element using XPath expressions.
Let's take the XML document "Quotes.xml" and the XSL transformation file "Quotes.xsl". The result of the XML document transformation will be sent to the output stream of the page.
| <% XPathDocument doc = new XPathDocument(Server.MapPath("App_Data\\Quotes.xml")); XslCompiledTransform xsl = new XslCompiledTransform(); xsl.Load(Server.MapPath("App_Data\\Quotes.xsl")); xsl.Transform(doc, null, Response.OutputStream); %> |
Due to the fact that table tags are defined in the transformation file, a table with the necessary information will appear on the page.
XML Control
The XML control provides a way to transform an XML document using an XSL style sheet. The DocumentSource property allows you to specify the XML file in which the data is located, and the TransformSource property allows you to specify the XSLT transformation file.
In the previous example, the same result could be achieved by placing an XML control on the page.
| |
XMLDataSource
Source element XML data DataSource provides a simple way to connect XML documents as data sources to elements that display information. You can also set XPath request in order to filter the data. Like SqlDataSource, it allows you to edit, delete, add data records. To do this, you need to access the XmlDataDocument object located in it by calling the GetXmlDocument method. After editing, the document is saved using the Save method.
Unlike tabular data in a DBMS, data in XML files is hierarchical, so XMLDataSource is convenient to bind to hierarchical controls, such as Menu.
XML Data Binding Syntax
As applications use XML data more and more frequently, a method has been introduced to bind data obtained from an XMLDataSource.
These methods work in the same way as Bind and Eval, which were discussed in Lecture 7.
Let's apply this syntax to a DataList element that receives data from an XmlDataSource:
Conclusion
In this lecture we looked at working with data XML type. XML provides universal method to describe and exchange structured information, independent of applications and developers. This completes the consideration of working with data sources.
Goal of the work: gain practical skills in processing data presented in the Extensible Markup Language format ( XML).
Job objectives:
– study data description technology XML;
– study main library classes FCL, supporting the processing of data presented in the format XM L;
– complete a practical task on developing an application in C#.
Brief theoretical information
Format XML is a way of storing data in a simple text format, which means that the data can be read by almost any computer. This circumstance makes this format very suitable for use when transmitting data over the Internet and can even be directly read by a person.
XML is a markup language that can be used to describe arbitrary data. Based on this language it is possible to organize the storage of information and its exchange, independent of either specific applications or the platform on which they are executed.
XML- documentation. The completed data set is known in XML as XML-document. XML-a document can be a physical file on your computer, or it can be just a line in memory, but it must be complete and follow certain rules. XML-the document consists of several different parts, the most important of which are XML elements that contain the data that actually makes up the document.
Microsoft. NETFramework uses an object data model XML Document Object Model( DOM) to provide access to data in XML-documents, and additional classes for reading, writing and navigating within XML-document. These classes are supported by the namespace System.XML. An example of a description of a book catalog in the DOM is shown in Fig. 8.1.
The description of an XML document includes statements written in accordance with the requirements of its syntax. While creating XML-document instead of using a limited set certain elements It is possible to create your own elements and assign them any names the user chooses. That is why XML language is extensible. Consequently, this language can be used to describe almost any document: from a musical score to a database.
Catalog
Rice. 8.1. Hierarchical document structure
For example, a book catalog could be described as shown in Listing 8.1 (line numbers are not part of the document XML). For creating XML-document in the environment VisualStudio . NET you should use the command File\ NewFile and select the template name in the drop-down list of templates XMLFile.
Listing 8.1. Text XML-document
Line 1 of this listing contains an announcement XML, identifying text as a document XML.Despite the optionality of the announcement XML, the document must include it to identify the version being used XML, since the document is without declaration XML may be further considered as appropriate latest version XML, which may result in errors. Information parameter version indicates version XML, used in the document, parameter encoding– document encoding ( utf-8).
Line 2 contains a comment starting with the characters . Comments can be posted throughout XML-document.
IN XML- the document data is marked using tags(elements), which are names enclosed in angle brackets ( < > ). Tag names in XML-document (such as CATALOG, BOOK,TITLE,AUTHOR,PAGES,PRICE, PDATA in Listing 8.1) are not XML language definitions and are assigned when the document is created. For tags you can choose any correctly specified names, for example INVENTORY instead of CATALOG or ITEM instead of BOOK. Line 3 contains the root tag - CATALOG, which opens the markup of the entire document. When it finishes writing the root tag, the framework automatically inserts the end tag (line 18 of Listing 8.1), marking it with the symbols .
Note. Trying to create more than one root element in XML-document is an error.
The root element can contain an arbitrary number of nested elements. In Listing 8.1 XML-the document has a hierarchical structure in the form of a tree with elements nested within other elements and with one top-level element Document element, or Root element(in our example - CATALOG), which contains all other elements. Root element CATALOG includes descendant elements BOOK. In turn, the element BOOK consists of descendant elements TITLE, AUTHOR,PAGES,PRICE, PDATA.
Well-formed XML documents. The document is called correctly formed(well-formed) if it meets the following minimum set of rules for XML-documents:
– XML-the document must have only one root element - element Document. All other elements must be nested within the root element;
– elements must be nested in an orderly manner. If an element begins inside another element, then it must end inside that element;
– Each element must have a start and end tag. Unlike HTML, XML does not allow the end tag to be omitted even if the browser is able to determine where the element ends;
– the element name in the start tag must exactly match (case sensitive) the name in the corresponding end tag;
– the element name must begin with a letter or an underscore ( _ ), followed by letters, numbers, and symbols: dot ( . ), dash ( - ) or underscore.
These are the basic rules for correct formation XML-document. Other concepts of the XML language (attributes, primitives, relationships) have their own rules that must be followed. We can say that if a document is created correctly and no errors occur when displaying or using it, then this is a correctly formed document. If you make a mistake in any tag HTML-page, then the browser will simply ignore the corresponding tag, and the error is in the tag XML-page will make it impossible to display it. If one of the errors is present, the analyzer built into Internet Explorer (sometimes called XML-processor, or parser) determines its position
FCL Library Classes for reading XML files. Working with XML-documents support the following library classes FCL: XmlTextReader, XmlDocument, XPathNavigator.
Class XmlTextReader is an abstract class that performs reading and provides fast delivery of uncached data. This approach is the least expensive in terms of server resources, but it forces data to be retrieved sequentially, from start to finish.
Class XmlDocument represents an implementation of the model DOM. This class holds data in memory after calling a method Load() to retrieve them from a file or stream, provides a tree view of the document in memory with navigation and editing capabilities, and also allows you to modify the data and save it back to the file.
Class XPathNavigator same as class XmlDocument, keeps in memory XML- entire document. It provides advanced data search capabilities, but does not provide the ability to make changes or save them.
Class XmlTextReader. Let's look at a simple example. Place elements on the form richTextBox And button(Fig. 8.2). When you click a button on an element richTextBox The file whose contents were presented in Listing 8.1 will be loaded. The code for the function called when the button is clicked is shown in Listing 8.2.

Rice. 8.2. Reading results from Xml-document
Listing 8.2. Button click handler code
//Cleaning the element richTextBox1
richTextBox1. Clear();
// Call a static method Create() returning a class object
// File book.xml is in the same location as the executable file
// programs
// Method Read() moves to the next node Xml-document
while (rdr.Read())
if(rdr.NodeType ==XmlNodeType.Text)
richTextBox1.AppendText(rdr.Value + "\r\n");
Class XmlReader can also read strongly typed data. There are several methods ReadElementContentAs, performing reading, among which ReadElementContentAsDecimal(),ReadElementContentAsInt() ,ReadElementContentAsBoolean() and etc.
Listing 8.3 shows how to read values in decimal format and perform mathematical operations on them. In this case, the price of the element increases by 25%. The results of running this code are shown in Fig. 8.3.

Rice. 8.3. Reading results from Xml - document
only titles and prices of books
Listing 8.3. Reading data with strong type checking
// Cleaning the element richTextBox1
richTextBox1. Clear();
// Create a stream to read from a file book. xml
XmlReader rdr = XmlReader.Create("book.xml");
while (rdr.Read())
if (rdr.NodeType == XmlNodeType.Element)
// Checking the element name
if (rdr. Name == " PRICE")
// Method ReadElementContentAsDecimal() performs
// convert element content to type decimal
decimal price = rdr.ReadElementContentAsDecimal();
richTextBox1.AppendText("Currentprice= " + price +
"rub\r\ n");
// Price change by 25%
price += price * (decimal).25;
richTextBox1.AppendText("Newprice= " + price +
" rub\r\n\r\n");
else if (rdr.Name == "TITLE")
richTextBox1.AppendText(rdr.ReadElementContentAsString() + "\r\n");
Class XmlDocument. This class and its derived class XmlDataDocument used in the library .NET to represent the document object model DOM.
Unlike class XmlReader, Class XmlDocument offers not only reading but also writing capabilities, as well as random access to the tree DOM.
Let's look at an example in which an object of a class is created XmlDocument, the document is loaded from disk and a list window with book titles is displayed (Fig. 8.4).

Rice. 8.4. Display book titles in a list.
In the application form class, create a class object XmlDocument:
XmlDocument_doc = new XmlDocument();
The button click handler code is shown in Listing 8.4.
_doc.Load("book.xml");
// Get only those nodes that are needed
XmlNodeListnodeLst = _ doc. GetElementsByTagName(" TITLE");
// View in class loop XmlNodeList
foreach (XmlNodenodeinnodeLst)
listBox1. Items. Add(node. InnerText);
Let's introduce into the application the ability to display information about a book whose title is highlighted in the list, for which we'll add an event handler listBox1_ SelectedIndexChanged as shown in Listing 8.5.
Listing 8.5. List item click handler
private void listBox1_SelectedIndexChanged(object sender, EventArgs e)
// Create a search string
string srch = "KATALOG/BOOK";
// Search for additional data
XmlNode foundNode = _doc.SelectSingleNode(srch);
if (foundNode != null)
MessageBox.Show(foundNode.OuterXml);
MessageBox.Show("Not found");
The results of the application are shown in Fig. 8.5.

Rice. 8.5. Displaying information about the selected list item
Using a class XmlDocument You can also insert nodes into an existing document using the method Create- Element() .
For example, to create a new element BOOK you need to write the following code:
XmlElement newBook = _doc.CreateElement("BOOK");
Create elements nested within an element BOOK, you can use the following code:
// Create a new element AUTOR
XmlElement newAuthor = _doc.CreateElement("AUTOR");
newAuthor.InnerText = "C.Baydachny";
The complete code of the button click handler is shown in Listing 8.6, the results of its operation are shown in Fig. 8.6.
Listing 8.6. Button click handler
privatevoidbutton1_ Click(objectsender, EventArgse)
_doc.Load("book.xml");
XmlElement newBook = _doc.CreateElement("BOOK");
// Create a new element TITLE
XmlElement newTitle = _doc.CreateElement("TITLE");
newTitle.InnerText = ".NET Framework 2.0";
newBook.AppendChild(newTitle);
// Create a new element AUTOR
XmlElement newAuthor = _doc.CreateElement("AUTOR");
newAuthor.InnerText = "C.Baydachny";
newBook.AppendChild(newAuthor);
// Create a new element PAGES
XmlElement newpages = _doc.CreateElement("PAGES");
newpages.InnerText = "498";
newBook.AppendChild(newpages);
// Create a new element PRICE
XmlElement newprice = _doc.CreateElement("PRICE");
newprice.InnerText = "590";
newBook.AppendChild(newprice);
// Create a new element PDATA
XmlElement newpdata = _doc.CreateElement("PDATA");
newpdata.InnerText = "2006";
newBook.AppendChild(newpdata);
// Add to current document
_doc.DocumentElement.AppendChild(newBook);
// Write the document to disk
XmlTextWriter tr = new XmlTextWriter("bookEdit.xml", null);
tr.Formatting = Formatting.Indented;
_doc.WriteContentTo(tr);
tr. Close();
XmlNodeListnodeLst = _ doc. GetElementsByTagName(" TITLE");
// View in class loop XmlNodeList
foreach (XmlNodenodeinnodeLst)
listBox1. Items. Add(node. InnerText);
When using classes XmlDocument And XmlReader The following features must be taken into account. If you need random access to a document, you should use the class XmlDocument, and if you need a threading model, then classes based on the class XmlReader. Class XmlDocument is highly flexible, but its memory requirements are higher than those of the class XmlReader, and performance when reading a document is lower.

Rice. 8.6. Running application window
with added node
Class XPathNavigator. Class XPathNavigator is part of the namespace System. Xml. XPath, designed to increase performance. This space provides only reading of documents, therefore there are no editing tools in it, and classes are built to ensure fast execution on a given XML-document loops and selection operations in cursor style.
The best way to use classes from a namespace System. Xml. XPath is document viewing book. xml in a cycle.
Place elements on the form listBoxAndbutton. The button click handler code is shown in Listing 8.7, the results of executing this code are shown in Fig. 8.7.
Listing 8.7. Button click handler
privatevoidbutton1_ Click(objectsender, EventArgse)
// Create an object with the name doc class XPathDocument and transfer
// in its name constructor XML- file book.xml
XPathDocument doc = new XPathDocument("book.xml");
// Create an object with the name nav class XPathNavigator object based
// XPathDocument. An object nav can be used read-only
XPathNavigator nav = ((IXPathNavigable)doc). CreateNavigator();
// Create an object XPathNodeIterator for directory nodes
// and its child nodes
XPathNodeIterator iter = nav.Select("/KATALOG/BOOK");
while (iter.MoveNext())
// Method SelectDescendants() class XPathNavigator selects everything
// descendant nodes of the current node that meet the selection conditions
XPathNodeIterator newIter =


