How to turn an external hard drive into a flash drive. How to build your own external hard drive
Windows users with a standard set of knowledge about the capabilities of the operating system are unlikely to encounter the need to divide the memory of a USB drive into two halves. However, such an operation may be necessary if certain versions of Windows are recorded on a flash card with the possibility of subsequent installation or reinstallation of the system.
The USB drive itself has almost completely replaced CDs due to the following reasons:

In general, splitting a flash drive into two parts will be needed for many purposes. The end result of such an operation is that the flash card is recognized by the computer as one of the hard drives. Fortunately, you don’t need any special knowledge to do this: just learn about the following methods.
How to turn a flash drive into a hard drive?

At the moment, the following options for dividing a flash drive into two parts are known:
- the use of special programs or so-called utilities. You should look for them on the website of the brand that owns the specific USB drive model. Downloading from third-party resources can be not only unsafe, but also pointless;
- replacing drivers. In this case, the digital signature of the initially installed flash drive driver is checked. As a result, the user must save the driver without this signature;
- installing the Hitachi Microdrive driver. Drivers for cards from this manufacturer will help you split drives of almost any other brand into two parts.
All of these are quite simple and, moreover, free methods that are worth considering in more detail.
Using Utilities
Using such a program, you can not only turn the drive into a hard drive, but also achieve the opposite effect. The most famous utility of this kind is Lexar Bootit.

With its help, it is possible to store the most common OS - Windows, regardless of the latest version.
How to install Lexar Bootit utility?
- Download the archive with the program from the official website of the brand. It is worth paying attention to the fact that the mentioned site contains versions for both MacBooks and personal computers.

- Run the program. A prerequisite is to run as an administrator.


- Next, the user will be presented with a selection of portable devices. Accordingly, you should choose the flash drive that you plan to share.

- Click on the “Flip Removable Bit” button.

- Confirm completed actions.

- Remove the flash drive using Safe Eject, and then plug it in again. In the “Volumes” tab, “Basic” should be indicated opposite the “Type” characteristic.

In case of problems with the operation of the utility, it is recommended to restart Windows. As a rule, in this case, the “transformation” of the card into a disk occurs within a few minutes.
Replacing drivers
This operation is considered more complex, but in case of inaccuracies with the previous method, it can become a worthy replacement.
How to install a third-party driver instead of the standard version of the flash drive itself?
- Find the required flash drive in the “My Computer” tab.

- Right-click to open the menu and select the “Properties” line.


- In the fourth tab “Drivers”, select the “Update Driver” button.

- In the next window, select the location of the utility.

- Next, select the pre-downloaded driver and confirm with the “Next” button.
- After this, a warning window will appear in front of the user. The system will notify you that the driver does not have a digital signature. Among the two options offered, you should select “Install this driver software anyway”.

This completes the installation process. Be sure to restart the computer itself and reconnect the flash card.
Installing the Hitachi Microdrive driver
In this case we are talking about the so-called filter driver. This method is considered one of the most reliable and, importantly, safe.
How to install Hitachi Motodrive filter driver?
- Determine the type of your operating system - 32-bit or 64-bit. To do this, you need to open the “Control Panel”, and then the “System” tab. The bit capacity of your computer will be indicated there.


- Download the Hitachi Microdrive driver depending on the information received. Accordingly, downloading should be done from the official website of the mentioned brand.

- On the flash drive icon in “My Computer”, go to the “Properties” menu using the right mouse button.
- Open the “Equipment” tab, click on the “Properties” button.
- In the very last tab “Details”, click on the button and select “Device Instance Path” from the list. Next, copy the code to the clipboard.


- Next, open the downloaded driver. You can use any type of text editor to open it.


Important! For a 64-bit system, open the “cfadisk” file.
- The user is presented with two lines, each of which contains the word “Disk”. The data after this word should be replaced with the code you just copied.

- After the manipulations have been performed, the file must be saved.

- Go to the “Drivers” tab, select the “Update Driver” button, then follow the instructions described in the “Replacing Drivers” section.
As in previous cases, the computer restarts.
Video - Convert micro SD into HDD hard drive Windows 10
In this article we will show you how to make sure that USBflash drive or SDthe card was detected in the Windows system like a regular local hard drive. You might ask, why is this necessary? The fact is that Windows by default defines USB flash drives and memory cards as removable drives, which cannot be divided into several partitions using Windows standards. And even if you split the flash drive into two or more partitions using third-party utilities (in the same Linux), then only the first of them will be available in the Windows OS (by the way, built-in appeared in Windows 10 1703). Those. Windows supports normal operation with multi-partitions only for HDD drives, which are defined in the system as local (i.e. non-removable).
RMB bit and USB media
Windows operating systems recognize USB flash drives as removable/removable devices due to the presence of a special bit descriptor on each device R.M.B.(removablemediabit) . If, when polling a connected device through the StorageDeviceProperty function, the system determines that RMB=1, it concludes that the connected device is a removable drive. Thus, in order to convert a USB flash drive into a hard drive from the system's point of view, it is enough to modify this descriptor. This can be done directly (which is quite risky due to differences in hardware implementations of specific devices, and is not always possible), or indirectly, by replacing the response of a USB device using a special driver that allows you to filter information in the device response.
Advice. Some manufacturers produce special utilities for flashing the controller of their flash drives. First of all, try to find such a utility and/or firmware on the manufacturer’s website. This is the most correct way. If you don’t find such a utility, follow the recommendations from this article.
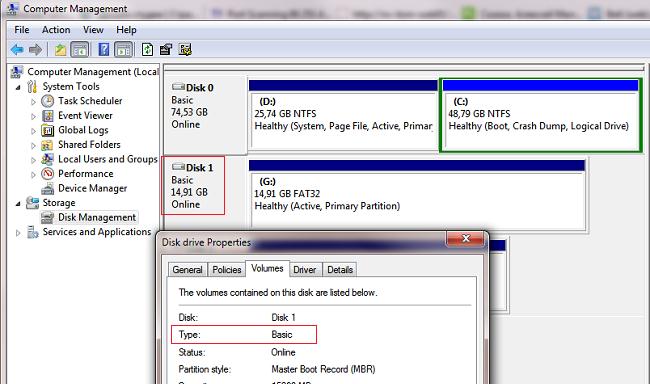
Connect a USB flash drive to any free port on your computer, then open Disk Management Manager ( diskmgmt.msc) and make sure that its type is defined in the system as Removable(Removable device) .
You can also see the device type on the Volumes tab in the disk properties (as we see here Type: Removable). 
Or using the diskpart command:
List volume

In this article we will look at two ways to change the RMB bit on a USB flash drive - by using the Hitachi filter driver (changes are made only at the driver level on a specific computer) and changing the bit in the controller firmware using the BootIt utility from Lexar (a more universal method, but there is a number of restrictions and is not applicable to all models of flash drives and SD cards). Although both of these methods are quite old and I originally tested them on Windows 7, they continue to be relevant and work equally well in modern Windows 10.
Lexar BootIt utility
Recently I came across a rather interesting utility - LexarBootIt. This is a free, portable program that can change the RMB of a removable drive to make a removable USB device fixed (or vice versa). Even though the Lexar BootIt utility is designed for Lexar devices (Micron, Crucial), it can also work with flash drives from other manufacturers. The BootIt utility supports all versions of Windows, from Windows XP to Windows 10.
Important. The utility is guaranteed to work for Lexar drives. Judging by the reviews, the “Flip removable bit” function does not work on fast USB 3.0 flash drives. In addition, when flashing the controller, you will lose the warranty on the flash drive and may make it inoperable.
You can download BootIt on the Lexar website (lexar_usb_tool) or from our website ().
- Run BootIt.exe with administrator rights
- Select your flash drive from the list of devices
- Click on the button Flip Removable Bit
- Save the changes by clicking OK.

Reconnect the device and use Device Manager to make sure that its type has changed from Removable to Basic.

If the BootIt utility did not help change the RMB bit on a removable drive, try using the following method, based on the Hitachi Microdrive filter driver
Filter driver for Hitachi Microdrive flash drives
In order for a USB flash drive or SD card to be recognized in the system as a hard drive, we need a special filter driver that allows us to modify the data transmitted through the system stack of the current device driver. We will use a filter driver for USB flash drives from Hitachi ( Hitachi Microdrive driver), which at the OS driver level allows you to change the type of flash drive device from removable to fixed (USB-ZIP -> USB-HDD). Thanks to the use of this driver, you can hide from the system that the connected device is removable. As a result, the system will consider that it is working with a regular hard drive, which can be divided into partitions that will be simultaneously accessible in the system.
Archives with Hitachi Microdrive driver:
- 32 bit systems - (3.0 KB)
- Hitachi Microdrive version for 64 bit systems - (3.8 KB)
You need to download the driver version for your system according to its bit capacity. Both archives have the same structure and consist of two files:
- cfadisk.inf– installation file with driver settings
- cfadisk.sys- Hitachi driver file
The next stage is identifying the device code of our flash drive. To do this, in the disk properties on the tab Details in the parameter Device Instance Path select and copy ( Ctrl+C) device instance code. 
In our example it would be:
USBSTOR\Disk&Ven_Linux&Prod_File-CD_Gadget&Rev_0000\0123456789ABCDEF&0
Let's say we plan to install the driver on 64 bit system. Using any test editor, open the file for editing cfadisk.inf. We are interested in the cfadisk_device and cfadisk_device.NTamd64 sections.
%Microdrive_devdesc% = cfadisk_install,IDE\DiskTS64GCF400______________________________20101008 %Microdrive_devdesc% = cfadisk_install,IDE\DiskTS64GCF400______________________________20101008
We change the value DiskTS64GCF400______________________________20101008 to the code of our device.
Important! In the device instance code, it is necessary to discard the part after the second “\” (in our example we discard 0123456789ABCDEF&0).
We get:
%Microdrive_devdesc% = cfadisk_install,IDE\USBSTOR\Disk&Ven_Linux&Prod_File-CD_Gadget&Rev_0000 %Microdrive_devdesc% = cfadisk_install,IDE\USBSTOR\Disk&Ven_Linux&Prod_File-CD_Gadget&Rev_0000
Save the file.
If the driver is installed on a 32 bit system, you need to download the recommended archive, unpack it and open the cfadisk.inf file for editing. Let's find the section :
%Microdrive_devdesc% = cfadisk_install,USBSTOR\Disk&Ven_LEXAR&Prod_JD_LIGHTNING_II&Rev_1100 %Microdrive_devdesc% = cfadisk_install,USBSTOR\Disk&Ven_JetFlash&Prod_TS1GJF110&Rev_0.00 %Microdrive_devdesc% = cfadisk_install,USBSTOR\ DISK&VEN_&PROD_USB_DISK_2.0&REV_P
Then we change the data in the last line, indicating the code of the instance of our flash drive, i.e. in our example we get:
%Microdrive_devdesc% = cfadisk_install,USBSTOR\Disk&Ven_LEXAR&Prod_JD_LIGHTNING_II&Rev_1100 %Microdrive_devdesc% = cfadisk_install,USBSTOR\Disk&Ven_JetFlash&Prod_TS1GJF110&Rev_0.00 %Microdrive_devdesc% = cfadisk_install,USBSTOR\ Disk&Ven_Linux&Prod_File-CD_Gadget&Rev_0000

Advice. If you want the USB flash drive to appear with a specific name in the device manager, you need to edit the value of the Microdrive_devdesc variable, for example like this:
Microdrive_devdesc = "Transcend 64GB DIY SSD"
Installing the Hitachi Microdrive driver instead of the native USB drive driver
All that remains is to replace the driver used by the USB flash drive.
Important! If the Hitachi Microdrive USB driver is installed on a 64-bit system, then... There is no digital signature for this driver, you will have to either.
Open the Drivers tab and click the button Update Drivers. 
Let's indicate the folder to the directory into which the downloaded archive with the Hitachi driver is unpacked: 
Let's select a new driver. 
We ignore the warning about the missing driver digital signature. 
Advice. In Windows 10 and Windows 8, when installing the driver, the following error appears:
Windows found drivers for this device, but an error occurred when trying to install the drivers.
Hitachi Microdrive
Third party inf does not contain signature information

To disable driver digital signature verification, run the following commands:
bcdedit.exe /set nointegritychecks ON
bcdedit.exe /set TESTSIGNING ON
Restart your computer and try to install the driver again.
All that remains is to restart the computer and, by opening the disk manager, make sure that your flash drive is now recognized as a regular hard drive ( Type: Basic), and the Hitachi driver is used as the driver.
By opening Explorer, you can also make sure that the icon of the flash drive has changed; it is now displayed as a hard drive, a regular drive. 
Now you can work with this flash drive like a regular HDD: create partitions, specify the active partition, create dynamic disks, install software that does not work from flash drives, etc.
Important. On other Windows computers without this driver, the second partition of the device will not be available.
To remove the Hitachi Microdrive driver, open the disk properties and on the Driver tab, click the Update Driver button - the system will install the native driver itself.

Advice. If after installing the Hitachi driver the system stops booting with BSOD, you need to boot the computer from the Windows installation disk / Live CD and manually delete the following files:
- cfadisk.sys in the %windir%\System32\drivers directory
- Directory "cfadisk.inf_amd64_..." from %windir%\System32\DriverStore\FileRepositoty
Restart your computer
You need to understand that this solution will only work on the system on which the appropriate driver is installed.
Greetings, dear friends! Advanced users who are new to computer technology love to experiment. Sometimes from the outside it may seem that they are suffering from outright nonsense - for example, they assemble a computer in a homemade case in the form of a pentagram and hang it on the wall, or try to overclock something that cannot be overclocked by immersing an ancient slow piece of hardware in a bath of liquid nitrogen.
Today I will tell you where all this can begin. So, the topic of the publication is how to turn a hard drive into an external drive and whether you need it.
Why is this necessary?
There are several reasons why you may need to make a portable hard drive yourself:
- Desire to save money: often buying a working stationary hard drive complete with a pocket is cheaper than an external HDD;
- There is an ownerless hard drive lying around the farm that I want to find a useful use for;
- It is necessary to copy a large amount of data from one computer to another, but there is no way to do this using a local network or the Internet;
- A 3.5” hard drive from a desktop computer must be connected to a laptop, which in most cases is physically impossible - the thickness is not suitable;
- You need to take a hard drive with important data on a business trip or vacation.
Whatever the reason, the main thing is that you can make a “fat” USB drive quickly: if you have experience, the procedure will take no more than 15 minutes, including setup.
Assembling the device
 Before you “shamanize” a new portable hard drive from an old hard drive, you will need the following components:
- The hard drive itself;
- Screwdriver (usually Phillips);
- Boxing;
- Suitable USB cable.
Boxing (as well as “pocket” or “controller”) is a special device adapted for our task. There are two standard sizes - 2.5 or 3.5 inches, for existing types of hard drives. Please note that when using some models, you need to unscrew 4 screws from the back wall of the hard drive, otherwise it will not fit into the slot.
As you know, modern hard drives have 2 connectors - power supply and a data interface (and if you don’t know, then read my publication about connectors on hard drives for a computer). As a rule, the pockets are designed for SATA drives of various generations. I haven’t come across IDE devices yet (I doubt that they still exist in principle).
When installing a hard drive, its interfaces are connected to the corresponding slots on the pocket, which are enclosed in a single block. A USB cable is connected to the same unit, transmitting power and data from the computer.
Most models of boxes do not need to be disassembled: just open the lid and place the hard drive there. You may need to secure the hard drive in your pocket with screws. In any case, when installing the hard drive, you should hear a characteristic click, which certifies that everything is connected correctly. 
Connection and setup
Don’t rush to use the resulting gadget as quickly as possible: it needs to be configured. After connecting the controller to your computer, do the following:
- Launch Disk Management (type Win+R and copy diskmgmt.msc to the line that opens;
- Find your now external hard drive in the list of devices, right-click on it and select create a new volume;
- When you launch the corresponding Wizard, select the appropriate volume parameters - drive letter, number of logical partitions, their sizes, and so on.
- Complete the procedure by clicking the “Finish” button.
But before that, you still need to set the following parameters for the new drive;
- File system – NTFS;
- The volume label is the name you specify;
- Cluster size is default;
- Formatting is fast.
After such manipulations, all data from the disk will be deleted. If you have important information stored there, then you know what to do.
- Gembird EE2-U3S-2 hdd 2.5 usb 3.0 ;
- AgeStar 3UB3O8 HDD 3.5 usb 3.0 .
As if installing an OS is not something complicated, and my opinion is that it is enough to be friends with the computer and have two more hands in addition to your head - one right and the other left. To install the OS on your computer, you need or.
But what to do if you have neither one nor the other, the optical drive does not work, or you have a netbook? After thinking a little, I remembered that I have an external USB pocket for an HDD and a free old 2.5' HDD too. In general, if you have a pocket hard drive, you can make it bootable.
There are utilities for this purpose that can be used to do this, but I decided to use standard Windows tools.
There are a lot of descriptions and videos on the Internet, but, unfortunately, there is one problematic point that the authors for some reason omit. Well, okay, I'll start in order.
Preparing an external HDD
Before working with a disk, be sure to transfer and save the necessary information from this disk to another medium.
I will carry out all settings using standard Windows 8.1 tools. There may be some differences from previous Windows releases, but if there are any, they are not significant.
First of all, I want to note that making an external HDD bootable is much more convenient. I divided the disk into two partitions, one contains the Windows distribution, the other partition is for my needs.
1. We connect the USB pocket and go to Disk management.
Attention! All data on the disk will be destroyed!
If you have Windows 8 installed on your PC,1 right-click: Start/Disk Management;
If Windows is earlier versions, open the Computer Management console: Start / Control Panel / Administrative Tools / Computer Management / expand Storage Devices / left click Disk Management.
See screenshot:


2. Select an external HDD drive. Be extremely careful; if you select another drive by mistake, all information will be destroyed.
In my case, this is Disk 1. As you can see in the screenshot, the disk is divided into two volumes (partitions):

3. Delete disk partitions:


4. Create new disk partitions. One for the distribution, the second will remain for your needs:
Right-click on a free disk field and select the command in the context menu Create a simple volume:

5. In the Create Simple Volume Wizard window that appears, click the button Further:
Specify the volume size as 4404 megabytes and click Next. Please note that the size is indicated in megabytes. And since 1 gigabyte is equal to 1024 megabytes, then 1024 × 4.3 = 4403.2 megabytes we get for the distribution section (mine weighs 4.18 GB, for example);


In this dialog, you need to format the new partition (FAT 32), click Further then Ready:

6. After this, you need to make the created partition active (don't forget because the computer will boot from this partition), for this:
Right click the mouse and select the command in the context menu Make the section active.
We respond to the confirmation request YES.

The external HDD looks like this:

7. We format the second partition on the disk in the same order, preferably in NTFS, but do not make it active.
Copying Windows to the active partition of an external HDD
Copying a Windows distribution to a bootable external HDD is quite simple and easy.
From boot DVD:
Open the installation DVD in Explorer, select all folders and files, and copy to the active partition of the external HDD;
From the ISO image:
By and large, an ISO image is a kind of archive. So you can open it using any archiver. You can also open the ISO image through Total Commander or Daemon Tools. Well, if you have Windows 8 or 8.1 installed on your PC, then open it with Explorer. Select all folders and files and copy them to the active partition of the external HDD;
That's it, your external HDD can act as bootable media. Just reboot and set USB HDD as boot priority in BIOS (depending on BIOS type).
- When you turn on the laptop, press F2, to ;
- Go to the tab Boot;
- IN Boot Priority order install USB HDD;
- Click F10, and then OK.
If it doesn’t work, then look at the article.
Save the changes and proceed.
As we can see from the text, preparing an external HDD for installing Windows is quite simple. And my description will not be complete if I do not talk about one problem that for some reason is rarely written about on the Internet.
Making the hard drive partition active
When I divided the hard drive into two volumes, for some reason unknown to me, not a single partition of the disk could be made active. This function was not available in the context menu.
The active partition is the partition from which the computer boots.
There are two ways to make a section active:
- Using the Computer Management console. We have already considered this method, but, unfortunately, for a number of reasons, the Make Partition Active command may not be available. The solution to this problem is also not difficult. Remember how to prepare a bootable USB flash drive from the Command Line.
- Using the Command Line, through the utility diskpart. The second method is a little more complicated, but more effective. You just need to do all the operations carefully and slowly.
Setting the active partition using the command line
1. Connect an external USB HDD;
2. Click Start/All Programs/Accessories/Command Prompt. Right-click and select Run as administrator.
 3.
In the window that opens, write the command diskpart and press the button Enter. An invitation line to work with the utility will appear – DISKPART>;
3.
In the window that opens, write the command diskpart and press the button Enter. An invitation line to work with the utility will appear – DISKPART>;
 4.
Enter the command list disk and press the button Enter. You will see all the disks installed on your computer;
4.
Enter the command list disk and press the button Enter. You will see all the disks installed on your computer;
 5.
We select the disk with which we will work. To do this, enter the command select disk 0, where “0” is the disk number in the list, i.e. for my external drive there will be a command select disk 1. Click the button Enter, the message Disk 1 selected will appear;
5.
We select the disk with which we will work. To do this, enter the command select disk 0, where “0” is the disk number in the list, i.e. for my external drive there will be a command select disk 1. Click the button Enter, the message Disk 1 selected will appear;
 6.
Next, you need to find all partitions on the selected disk. Enter the command list partition and press the button Enter.
6.
Next, you need to find all partitions on the selected disk. Enter the command list partition and press the button Enter.
 7.
We select the section we will work with. Enter the command select partition 1, where 1 is the section number in the list, i.e. for the section that we make active. Click Enter, a message will appear Section 1 selected.
7.
We select the section we will work with. Enter the command select partition 1, where 1 is the section number in the list, i.e. for the section that we make active. Click Enter, a message will appear Section 1 selected.
 8.
Mark the selected partition as active, to do this, enter the command active. Click the button Enter, a message will appear DiskPart: Partition marked as active.
8.
Mark the selected partition as active, to do this, enter the command active. Click the button Enter, a message will appear DiskPart: Partition marked as active.
 That's all. Good luck.
Also on the site:
How to make an external USB HDD (hard drive) bootable using standard Windows tools? updated: February 6, 2018 by: admin
External drives are very convenient for storing photos, music, videos and copies of important files. They can be used not only with computers, but also with various media devices to expand data storage, as well as with Wi-Fi routers as low-cost network management solutions.
Off-the-shelf hard drives often contain unknown drives, and the enclosures are not designed for reuse. Building your own external hard drive can sometimes be a cheaper solution that best suits your needs. And if you have an old internal hard drive lying around, you can turn it into a great external hard drive for just $10.
Selecting an internal hard drive
Internal interface
Modern hard drives have SATA interfaces; in addition, they are easy to identify, because... they have 7 contacts. If you buy a new hard drive, it will definitely be a SATA hard drive. If you are using an old one, it will probably be a 40-pin PATA (IDE) hard drive. Most cases support one or the other, so it's critical to know which internal hard drive you're using.
Size, height and volume
3.5-inch hard drives are used in desktop computers, while 2.5-inch hard drives are commonly used in laptops. 3.5-inch hard drives are larger in capacity than 2.5-inch hard drives, so if you want 2TB of storage, you should only choose a desktop hard drive. However, 2.5-inch drives are much more suitable for portable use. While most 2.5-inch drives are 9.5mm in height, some are as tall as 12.5mm. Before choosing a case, pay attention to the overall dimensions of your hard drive.
Speed rotation
7,200 RPM and 5,400 RPM are the most common rotation speeds for internal hard drives. 7,200 RPM spindle speed drives are faster than 5,400 RPM spindle speed drives, but they tend to run hot and use significantly more power than 5,400 RPM spindle speed drives. If you're choosing a faster hard drive that runs hot, the ability of the case to cool the drive will be an important consideration.
Choice housing
Plastic against aluminum
Aluminum cases are much more durable than plastic cases and are also inherently better for hard drive cooling. If you plan to use your external hard drive 24 hours a day, 7 days a week or plan to get a drive with a rotation speed of 7200 rpm, then it is recommended to choose an aluminum case. Plastic cases are usually cheaper than aluminum cases, but are not as good at cooling. Occasionally you can find a plastic case with a fan, but their disadvantage is that they are quite noisy, especially if the hard drive in such a case is located on a table. On the other hand, if you are using a 5400 RPM laptop hard drive for portable use, then a plastic case will do just fine.
External interfaces
The choice of frontend depends largely on how you want to use your drive and how much you plan to spend. A huge number of cases only support USB 2.0. Most media devices and routers only support hard drives with a USB port. USB 2.0 is the most suitable choice, it is compatible with the widest range of devices, but has the lowest performance of all interfaces currently available.
USB 3.0 is currently the fastest interface available for enclosures, and is also backward compatible with USB 2.0. The downside to USB 3.0 is the fact that it is not as widespread as USB 2.0.
FireWire is more common in Mac computers than in other personal computers. FireWire 800 (EEE-1394b) is faster than USB 2.0, but slower than USB 3.0. For the best experience with Macs, FireWire 800 is the best choice until someone comes out with an affordable case with ThunderBolt.
eSATA performs better than FireWire and USB 2.0, but it is the only interface that does not supply power to the hard drive through a cable and requires a separate network adapter. eSATA hard drives also have well-known connectivity issues. If for some reason you do not use only this interface, then it is recommended not to use it as the only interface.
Assembling an external hard drive
Assembling an external hard drive is a fairly simple process. Typically you need to insert the internal hard drive into the case and secure it with screws.

Like this. Once assembly is complete, insert the hard drive into your computer and format it.


