How to reinstall Mac OS: practical tips. Reinstalling mac os on macbook pro. How to reinstall Mac OS from an installation flash drive. What if I lose important data in the process
The Mac OS X operating system is rightfully considered one of the most reliable and stable, but, unfortunately, it is not completely immune from troubles. This is why a Mac user needs to know how to reinstall Mac OS X via Recovery on their own. This reinstallation is possible in all operating systems for Apple computers, starting with Mac OS X 10.7 Lion. Recovery mode allows you, if you have an Internet connection, to download the current version of the operating system and install it without writing files to media. Reinstalling Mac OS X via Recovery is very convenient for MacBook owners, since most new laptops are released without an optical drive, and creating a bootable USB flash drive can be quite a hassle, especially for a beginner.
Apple developers have provided the opportunity not only to download the operating system from the network, but also to restore from a backup using Time Machine, and also to correct files using a special “Disk Utility”. If you notice that your Mac's operating system is not working as well as before, you need to start troubleshooting the problem by checking the disk with the standard Disk Utility. If troubleshooting does not help, then you should think about restoring Mac OS X via Time Machine or downloading operating system files from the Internet. We'll look at how to reinstall Mac OS X from the Internet.
How to enter Recovery mode
- First of all, make sure your Mac is connected to the Internet
- Turn off your computer as usual. Sometimes when the OS freezes, this cannot be done using the menu - in this case, the device is turned off using the Power button
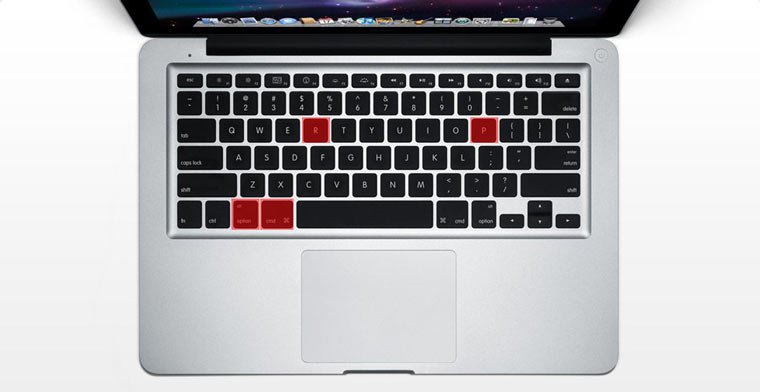
- Wait 30-40 seconds (this is done so as not to damage the device’s hard drive) and turn on the Mac using the power button. Immediately after turning it on, hold down ⌘Cmd and R on your keyboard.
- After completing the steps described above, the Mac OS X utility selection menu will appear on the computer screen

- Connect to the Internet via Wi-Fi
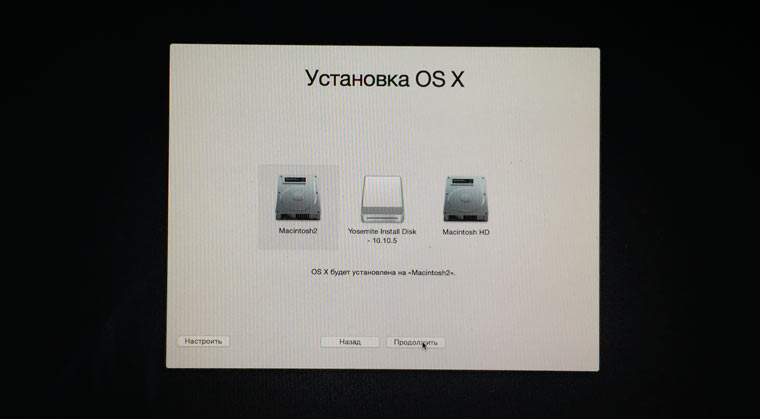
- Select "Reinstall Mac OS X" from the list
- Please be patient, as the volume of OS files is quite impressive and a lot depends on the speed of your Internet connection
It refused to boot. CMD+R Does not help. What should I do?
The start of the working day did not foretell anything bad. A cup of coffee, a good mood, the Power key and the MacBook displays the following sad picture:

A restless thought immediately flashed through my head about the safety of the data, the current version of the backup copy TimeMachine(which was not at hand) and possible loss of information.
Attempt No. 1. Booting into recovery mode
Being an interested user and an avid Mac user, I immediately tried to start the MacBook in recovery mode by holding down the keys CMD+R. Instead of the usual disk utility, the system greeted me with a window with an attempt network recovery.

Having chosen my home Wi-Fi network, I began to wait for further developments. After a few minutes, OS X's recovery progress was interrupted error -4403F.

Attempts to start the process again led to exactly the same result. Rebooting the router confirmed that everything was fine with the network connection.
Trying to diagnose the Mac, fix possible hard drive errors, or simply reinstall the system was now out of the question. Section with Recovery HD, in which the tools for restoration are stored, ordered to live long.
Attempt No. 2. Resetting PRAM and NVRAM
Mac computers were created by highly qualified engineers, so the correct organization of the entire system and the presence of “hidden hardware reserves” allows you to avoid a number of interruptions in its operation. One of these reserves is memory sections PRAM And NVRAM. It stores settings data that is not reset even after the computer is disconnected from power. To revive the fallen system, a decision was made reset PRAM and NVRAM settings.
1. Turn on the Mac.
2. After the white screen appears, quickly press the key combination CMD + Option + P + R.
3. Hold until the Mac reboots again and the Mac greets the sound.
PRAM and NVRAM reset completed.
Although they say that hope dies last, it, lifeless and barely alive, continued to lurk in my mind. Resetting PRAM and NVRAM did not affect the error when loading the system. The MacBook continued to test my nerves.
Attempt No. 3. Reset SMS
Having become accustomed to storing all the necessary data “in the cloud” or on removable media, the simplest solution to global problems has always been to reinstall the system “from scratch.” This case was special. I needed data stored in memory and I needed a working Mac today.
In the Mac environment there is something called system management controller SMC. The stability of the entire system depends on the reliability of its operation. Resetting SMC settings can cure a number of problems like:
- – constantly high rotation speed of the cooler even at minimal load;
– freezes while the system is leaving Sleep mode;
– errors related to the operation of additional peripherals or external monitors, as well as correcting system boot problems.
To reset the SMC, follow these steps:
- Laptops with built-in batteries
1. Turn off your MacBook and plug in the power adapter.
2. Press and hold the keys at the same time Shit + Control + Option + Power and hold until the MagSafe adapter indicator changes color.
3. Release all keys and press the key again Power.
- Laptops with removable batteries (older models)
1. Turn off your MacBook and unplug the power adapter.
2. Remove the battery from the laptop.
3. Hold down the key Power And hold for at least 5 seconds.
4. Release Power, insert the battery and connect the power adapter. Turn on your laptop.
- Desktops (iMac, Mac mini, Mac Pro)
1. Completely disconnect the computer from the mains power.
2. Wait at least 30 seconds.
3. Connect the power and wait another 5-10 seconds and then turn on the computer.
The above actions can become really effective and the system will start. In my case, a miracle did not happen.
Attempt No. 4. Recovery using a bootable USB flash drive
An attempt to revive the system using the above actions was unsuccessful. The only option left was to reinstall OS X using a bootable USB flash drive. For this step you will need:
- another computer running the OS X operating system;
- Flash drive with a size of at least 8 GB.
Preparing a flash drive
1. You will need to download the OS X Yosemite distribution from the Mac App Store.
2. To create a bootable USB flash drive, download the DiskMaker X utility (distributed for free). You will need it to deploy the distribution.
3. Format the flash drive using Disk Utility V Mac OS Extended (Journaled).

4. After the distribution has finished downloading, cancel the proposed installation and run the utility DiskMaker X.
5. Choose a system Yosemite (10.10). The utility will detect the distribution in the folder Applications. Click Use this copy(use this copy).

6. Select the drive installed in the USB port and agree to the warning about completely deleting all data present on the flash drive.

7. The process of mounting the distribution kit with OS X Yosemite to the drive will begin.

The copying process takes about 10-20 minutes and depends on the writing speed of the USB flash drive. During mounting, dialog boxes and folders may occasionally open on the screen. Do not pay attention.

Once the OS X Yosemite image has successfully deployed, remove the drive.
System installation
1. Insert the flash drive into the USB port of the “problem Mac”, press the key Power and hold down the key Alt.
2. In the list of available partitions for downloading, select OS X Base System. Please note that there is no section Recovery.
.

3. The Mac will boot into recovery mode. After selecting the main system language, the installation menu will open. In the top menu you will find a standard list of utilities.
Use disk utility and first try to check the access rights to the system partition and correct any errors. If after rebooting the system still refuses to boot, you will need to separate a partition of at least 20 GB in size in order to install a new system. You will find detailed instructions on how to partition a disk.
From the same menu, you can either begin the process of installing the system on a newly created partition, or restore the system using a TimeMachine backup (see).
CAREFULLY! Be careful when choosing the installation partition. The installation must be carried out not on top of the old partition, but on a newly created one.
After the installation is complete, you will have access to all the data located on the “damaged” partition with the old version of the system.
MAC OS, like Windows, sometimes requires reinstallation. This may be due to your MAC device being slow or due to it being sold (I don't think you'll be happy with a MAC being sold with your personal information on it). Or, on the contrary, buying a MACBOOK (PRO, AIR) or iMAC with a bunch of incomprehensible files or unnecessary programs. In general, there can be many reasons to reinstall MAC OS. In this article I will describe in detail how to reinstall MAC OS and get a “clean” operating system.
We'll go over the basic steps. Once the download is complete, do not start the installation yet. Section "Determining the compatibility of your printer's operating system." Recommendations for installing or updating software. Use a wireless or network connection.
Network usage. Please next to the products described in this article to speed up the support process and reduce callback situations. There are several options with a remote partition. We have instructions. Once the installation is complete, it will reboot and place the installer in your Applications folder.
So, before you start, you need to transfer all the necessary information to external media, since after reinstalling MAC OS, it will be almost impossible to restore anything.
In order to reinstall MAC OS you will need:
1 MACBOOK (PRO, AIR) or iMAC connected to a power source;
2 Internet access from MACBOOK (PRO, AIR) or iMAC;
What if I lose important data in the process?
We've put together a list of questions we frequently ask, along with answers and column links: to see if your question is covered. If not, we're always looking for new problems to solve! Send messages via email, including screens if necessary.
If you are a beginner, it is not recommended for you to take this tutorial. You should have enough on your drive, so either remove some cracks or move some of your old data to a separate external archive hard drive. The textbook you are about to read consists of six main sections.
3 This article and about an hour of time.
To reinstall MAC OS using the method described below, you must be using OS 10.7 or higher (10.8, 10.9). In order to check what version of the operating system you have installed, click on the apple in the upper left corner and select "About this MAC". The window that opens will contain information about the installed version of MAC OS.

Installation may take a little time, but it is by no means difficult. Check out our full video inside for details. Note. This is always a good idea when you change the partition table. Step 10: The installation process will now begin. The installation process will only take a few minutes. Step 11: You will see a blue screen Quick Transition. If additional driver installation windows appear, be sure to install them. This next step is very important because it updates the latest audio driver.
The initial driver is known to cause problems with the speaker, so it is important to update. You have two choices. Your mileage may vary depending on internet speed. And all applications are stored in the Applications folder. Drag the app to your Applications folder. Your application is now installed. Delete the downloaded file once you're done.
IMPORTANT!!! The following steps will delete all data on your drive, so you need to be sure that the necessary files are not on the MAC.
Then select the disk with the system, open the “Erase” tab on the right and click the “Erase” button.

Confirm deletion by clicking the "Erase" button.
If you perform a custom installation and deselect the software contained on discs 2 and 3, you will not be prompted to insert those discs. You need to install it separately. See "Note: Developer Software," in Chapter 2 for more information about obtaining and installing this software. As the first step of the installation process, the installer asks for your preferred language. Once you select it, you'll see the text "Preparing to Install," followed by the launch and appearance of the Installer's Introduction panel.

After that, close the Disk Utility window and select Reinstall MAC OS.

After this, confirm the installation, click the "Continue" button. With the release of the new OS X 10.10, OS X Yosemite will be installed.

Before going any further, take a look at the menus available in the installer utility. Some of them provide options of particular interest. You can now install the software. The safest bet is to start with the disc. Only one command is important in this menu.
Reinstalling Mac OS X Yosemite
Your choices: “Reboot”, “Run disk” and “Do not exit”. The File menu also only contains one important command. You won't be able to select this command from the installer's initial screen; instead, you can access it later - exactly when will depend on the installation you're doing. The command will likely be active by the time the Select Destination window appears and, of course, no later than after the installation is complete.
In the next information window, click “Continue”.

The next step is to read the license agreement and accept it.


Then select the installation drive. In this case, the choice is obvious. Click the "Install" button.
If you choose this command, you will get a list of all the files that will be installed by the current installer installation and the exact folders where each file will be located. You can save this list as a text document. Show a list of files in the installer.
Things to remember before installing from scratch
Selecting an item from this menu launches one of the separate utilities located on the disk; To exit any utility and return to the main Setup panel, select the Exit command from the application menu. Included utilities. By selecting this command, you can specify any bootable default boot disk. Security risk is a trade-off for the ability to recover from a forgotten password.


After this, the MAC OS download process will begin.

After this, the MAC will automatically reboot and MAC OS installation will begin.

After selecting a user, enter a new password and, optionally, a new password hint. When finished, close the password reset utility. You can only access the Reset Password command if you ran from the installation disk. If you run the Installer application from your hard drive, this option will not appear.
System profiler, network utility, terminal
Once you select the volume on the left, you can select First Aid or a variety of other options to reformat or partition the drive. In the "Disk Utility" section of the chapter. The main reason for including them here is for troubleshooting purposes later, especially if your problem is preventing you from getting started with your hard drive.
- Chapter 8, for more information about the network utility.
- Chapter 10, as well as many other places throughout the book, to cover the Terminal.
After the installation is complete, you will receive a “clean” MAC OS operating system; all that remains is to set some settings.
The next step is to select the country where you plan to use MACBOOK (PRO, AIR) or iMAC.

Select your keyboard layout.

In most cases, volumes behave the same as if you had two separate hard drives. The only time you will see that only one hard drive is working is when the hard drive fails, or if you need to reformat it. So, if you want two or more partitions, you must create them yourself.
There won't be a backup because you haven't used it yet, which means the process will be greatly simplified. Even if you don't want the second partition to boot, you can still use it to store backups of important personal files that are stored in the first partition.
You can connect to a Wi-Fi network (you can skip this step if you wish).

If you want to restore data made earlier using Time Machine or from a Windows computer, select the appropriate option; if you do not plan to restore anything, select “Do not transfer any information” and click “Continue.” The data that you transferred to external storage can be transferred later.
The best and safest backup option is to move or copy these items to another drive altogether, not just another partition of the same drive. If for some reason the drive fails completely, the failure could affect both partitions. In either case, you can erase one partition without erasing any others. With two partitions, you can wipe the boot partition without losing the second partition.
Below are some general instructions for dividing a disk into two partitions. Remember: this will delete all existing data for any and all existing partitions for that drive. So, when choosing a partition size, make sure that you will have at least a few gigabytes of unused space after the installation is complete. This will not result in a bootable partition. . Separation without erasing. Always back up your drive before using one of these utilities, in case something goes wrong.

The next step is to sign in with your Apple ID. In this example I won't do that.

Then read the license agreement and accept it.

After this, provide your credentials (username and password) and click “Continue.”
Where are the utilities located on the installation disk? When you select one of these applications from the Utilities menu, the installer launches a copy of the utility found there. The Window menu contains one final note. If you do experience a show stop error, you will almost certainly be warned about it directly using an alert in the installer window. In other words, you don't need to check the log. However, the log may be useful as a diagnostic tool if a problem occurs that does not cause another explanatory message to appear.

The last step is to register your MAC (this step is optional).

And in the end you will get a "clean" MAC OS.
Video of reinstalling the MAC OS operating system on iMAC/MACBOOK PRO/AIR.
For example, it can alert you to check for firmware updates. You have completed the introduction. The following is the license area that provides the Software License Agreement for the software you are about to install. Agree to the terms and then move on.
In this area, you will see an icon for each installed volume. For example, one of the problems may be that there is not enough free disk space. A dialog box will appear providing the following installation options. However, in some cases, such as if there is not enough disk space for the update, this option will be grayed out and you will have to select one of the remaining two. In fact, you can use it instead of updating to prevent potential problems. One exception: third-party software in the original Applications folder is not moved to the Legacy Systems folder; Instead, it is moved to your new Applications folder. When you first archive and install, all software you move is placed in a folder named "Previous System 1" in the Previous Systems folder. If you repeat this process, the previous system 2 will be created and used, etc. this process also moves the developer folder to previous systems. About the only reason you wouldn't choose would be if you thought files in your home directory were causing a problem that you didn't want to carry over to the new installation. It can also save third-party software that cannot be saved using standard archive and installation. This option does not save all system settings, only most of them. For example, it does not save the following: settings related to the use of the network time server; list of configured printers; your computer's time zone, your display resolution, and other settings if you have more than one display connected, such as location, and sharing preferences panel settings. Most of this is minor and can be easily discarded if lost. Note: If you move past the Select Destination area and then use the Back button to return, the Save Users and Network Settings option may be grayed out and unavailable. If so, select a different volume and then return to the original volume. In such cases, you want to keep any critical data on the drive before wiping.
Greetings to all! The question is really very useful, but as practice shows, not many users use this method of clean installation of the Mac OS X operating system. First, I would like to define what a clean installation of Mac OS is - this is a complete reinstallation of the same or another version of Mac OS X in advance formatted disk partition.
Why do many people strive for a clean installation?
The answer is simply banal, in order to get rid of all the bugs, changes made and errors of the already installed operating system. Errors can occur both due to the fault of the OS itself, for example, due to an error with access rights to folders and files, making any changes to system files when installing programs using the installation method, or due to the fault of the user himself who tried to configure something by forcibly replacing or changing system files. As a rule, such a change entails a number of consequences - the system begins to lag, slow down, and various errors appear during operation.
What you will need for a clean installation of Mac OS while saving data:
- Flash drive from 8 GB. The size of the flash drive depends on the installation method. If you have a saved installation image of Mac OS on your PC or in the App Store, then you can write it to a flash drive using the terminal (the easiest way), using disk utility (more difficult), for this you will need a flash drive of at least 8 GB . If there is no image, and you don’t want to use it from a torrent, then it is possible to install via the network using a recovery partition; to create a flash drive with a recovery partition, a 1 GB flash drive is enough - this method is perfect for owners of real Apple equipment; on Hackintosh, problems may arise problems, not always, but still. You can find out how to cut an installation flash drive on our website; we described a lot of methods for different versions of Mac OS, so don’t be lazy to look through the sections or use the search.
- Time Machine backup or installed system on another hard drive partition. After a clean installation, we lose all data: installed and configured programs, photos, music and much more, which takes a lot of time to restore and configure. This is exactly why we need a copy of Time Machine or the system on another partition; in this case, we will extract only the information we need and will not affect system files - the Mac OS installer itself will not allow us to replace them with damaged ones. As a result, we will get a brand new and clean OS, but with our own programs and personal files, documents, photos, videos, music, etc.
At first, the process is no different from a regular installation. We insert a flash drive, boot from it, go into disk utility and format the hard drive partition on which a clean Mac OS will be installed, and start the installation. After some time has passed, we will see this window; it is the settings from it that will allow us to save our data!
In this window, we need to select the first item - Transfer data from a Mac computer, Windows PC, Time Machine backup or boot disk. Select this item and click continue.
We choose what we will transfer from from an installed system on another partition or from a Time Machine backup.

Select the backup date from which you want to transfer data. In my case, there is only one copy, so the list is almost empty. If you use Time Machine for a long time and create automatic copies, the list will be more impressive.

After which we will be provided with a list from which we can choose what exactly we want to transfer. Programs, documents, music, photos, system settings and the like. From this list, select everything.

We select, confirm and wait for the information to be transferred to the new system. The duration of this procedure directly depends on the amount of data being transferred and the speed of the hard drive.
After which we log into ICloud or skip the step - this is the same as during a normal installation. With this method, an account does not require creation; it will be transferred from the specified location, so the password will be from the same account.
After this is done, we get the purest Mac OS, but with the full amount of our information and working programs on board, and we can immediately get to work, rather than copying, installing and configuring.
Attention hackintosh people. When transferring data in this way, all the kexts that you previously needed to install on the system, such as network, video, for USB, etc. , will be transferred from the copy and will not require re-installation. But if you manually patched ALC or another quest, you will have to repeat the procedure, since the installer will not skip the changed files. You can also delete a blank kext from the Mac OS library and install a modified one taken from a copy using the kext utility.
The second way to transfer data to the OS:
The second method is not much different, the procedure is absolutely the same, but it is already suitable for users who did not use the Migration Assistant during installation. You can also transfer all data from another installed operating system or Time Machine copy. But in a slightly different way.
And its update. Before you begin, it is important to decide what exactly you need to do. That is, it will be necessary to understand whether a complete reinstallation of the operating system or a simple update is required. You will also need to prepare the device for reinstallation (for example, if you are going to sell your device).
Additionally, you can restore from a TimeMachine backup if you have configured this. So, first things first:
- If you want to update your Mac OS, you can create a backup copy just in case, so that in case of unforeseen circumstances, you can restore the system.
- If you are going to restore the operating system, then no action is required. However, you can check for backups if you want to install one of them.
- For a complete reinstallation, you will need to create a copy, just as in the first point. Then be sure to deauthorize your computer or laptop from iTunes. To do this, launch the program, open the “Account” tab, select the authorization item, and then open the deauthorization item. Please note that your Apple ID password may be required. Next, sign out of iCloud after disabling Find My Mac if it was previously enabled. Also log out of your iMessage and FaceTime account. At this point, your preparation ends. Let's move on, friends.
Reinstallation
- First of all, please note that the following instructions provide for reinstallation with the installation of the version of the operating system that was installed when you purchased the device. That is, if you purchased a Macbook with OSX Mavericks, and then upgraded it to ElCaptain, then after reinstallation the laptop will have Mavericks again. It is also worth remembering that all your data will be deleted from your computer. This method is suitable for those who want to sell their device, give it to someone, or simply receive the device “out of the box.” If this method does not suit you, then go to the “Recovery” paragraph.
- So, let's get started: immediately after turning on the computer, hold down the key combination Option+Command+R.

- Once you see the Apple logo, you can release the buttons.
- If you did everything correctly, Disk Utility will launch, with which you will need to clean up the built-in hard drive. Please note that Extended journal format must be used. After this you can close the window.
- Now click on “Reinstall mac OS”. Follow the prompts on your computer or laptop screen to complete the steps indicated.
- When your device restarts, you'll see the Setup Assistant that opens when you turn on macOS computers for the first time. If you don't want to configure it (for example, as mentioned above, when selling the device), then use the Command+Q combination to turn off the Mac. This way, you will give the opportunity to configure the settings to another user, your future buyer. Ready! This completes the reinstallation.
Update
Updating macOS is much easier than any other operating system on your computer. This process is accompanied by fewer problems and questions. This will be especially noticeable by those people who have updated Windows at least once. In order to update your Mac computer or laptop, you only need an Internet connection and a little time.
- Launch the Mac AppStore.
- In shopping or in other sections of the store, find the new version of the operating system. Most often it is in the first places of the “Top Chart” or in the “Selection”.
- Click the “Download” button or “Install” if the system has already been downloaded previously. Wait for the operation to complete and continue using the now updated mac OS.
Recovery

Recovering with Time Machine
If you have a Time Machine backup, you will need to boot the device from the recovery partition using Command+R when you turn on the computer. In the mac OS Utilities window, select the item of the same name. Please note that all data from the disk will be cleared and replaced with information and files from your backup. The recovery itself is easy to do using the instructions on the computer screen.


