How to find windows 10 images. Windows lock screen – Interesting. Setting up the lock screen: possible problems and their solutions
Personalization in Windows is customizing the design of the operating system to suit your individual (personal) tastes and needs. According to his preferences, the user changes the theme, color, desktop background, sounds, screensaver, font size, avatar, etc. on his computer.
The combination of images, colors, sounds, and screensavers is called a theme. There are already themes ready for use on your computer, you can create and customize a theme as you wish.
In this article we will get acquainted with the personalization settings in Windows 10, you will learn where you can download official Microsoft themes and wallpapers (backgrounds) for your Desktop, how to install or remove a theme from your computer, where themes are stored on your computer, and how to extract the desired image from a theme.
Personalization settings can be accessed from the Start menu. Select "Options" and then "Personalization." It’s even easier to enter the settings as follows: right-click on a free area of the monitor screen, and select “Personalization” in the context menu.
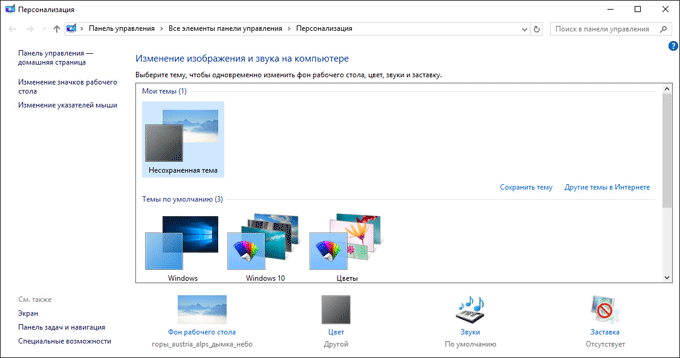
Personalization in Windows 10
In the “Personalization” window, in the “Background” tab, select an image for the Desktop background. The following options are available for displaying the background:
- Photo - a separate image serves as the background
- Solid color - the selected color will be used as the background
- Slideshow - background images will change at regular intervals
When choosing one of the options, you will need to make settings: select a photo, select a background color, select albums for the slide show. In each specific case, select the desired settings. Here you can select the background position: “fill”, “fit to size”, “stretch”, “tile”, “center”, “expand”.
In the “Colors” tab, select the main color for the Windows design. In the settings, you can enable automatic selection of the main background color, change color display options in the Start menu, on the Taskbar and in the Action Center.

In the “Lock Screen” tab, you can configure the background that will be displayed on the monitor screen when the computer is locked. There are three options for displaying the lock screen background: Windows Explore, Photos, Slideshow.

From the “Themes” tab, you go to the theme options and related options: “Advanced sound options”, “Desktop icon options”, “Mouse pointer options”.

We will look at the theme parameters in detail later. If necessary, adjust the sound settings and mouse pointer settings. Enter Desktop Icon Settings.
In the Desktop Icon Options window, select the icons you want to display on the Desktop, and then click OK. In order to remove an icon from the Desktop, uncheck the box next to the corresponding icon, and then click on the “OK” button.

In the “Start” tab, you can configure the Start menu settings. The user himself selects the settings according to his preferences: the number of displayed tiles, display of recommendations, order of applications, etc.

Saving a theme in Windows
Open the Themes tab and click on Theme Options. After this, the “Personalization” window will open. Here you will see the default themes and the themes you have added. Windows 10 comes with three default themes: Windows, Windows 10, Flowers. To activate a theme on your computer, click on the appropriate theme.
If the topic is named "Unsaved Topic", click the "Save Topic" link to save and name the topic.
How to download themes
Users find desktop themes and wallpapers on the Internet; many do not even suspect that they can download Microsoft themes and wallpapers from the corporation’s official website. Official themes and wallpapers can be found on the Personalization Gallery page. In the personalization gallery you will find themes, desktop backgrounds, language packs.
The site has a large selection of topics. Topics are collected in collections: “Animals”, “Art (drawings)”, “Art (photos)”, “Cars”, “Games”, “Holidays and Seasons”, “Movies”, “Wonders of Nature”, “Locations and landscapes”, “Plants and flowers”, “Branded themes”, “From the community”, “Panoramic (for two monitors)”, “With custom sounds”, “Compatible with Windows 7”, “Compatible with the new Windows”.
You can download and install any theme from this collection on your computer. Windows 7 users can download and install many themes from the Microsoft Gallery that support this operating system.

Enter the appropriate collection, select a topic, click on the “More details” link. Here you will see detailed information about the topic: the number of images in this topic, the color of the window, an example of an image on the computer screen. View all images included in the theme, if the theme suits you, download the theme to your computer.

How to Delete a Theme on Windows
If you no longer need this theme, you can delete the theme from your computer. The topic to be deleted must not be active at the time of deletion. Hover your mouse over a topic, right-click on the topic, and then click on “Delete Topic.”
How to download wallpaper
In the Personalization Gallery window, go to the Desktop Backgrounds tab. Wallpapers (backgrounds) are combined into collections of images: “Animals”, “Art (drawings)”, “Art (photos)”, “Cars”, “Games”, “Holidays and seasons”, “Wonders of nature”, “Locations and landscapes”, “Plants and flowers”, “Branded wallpaper”, “From the community”, “Panoramas”, “All wallpapers”.

After clicking on the picture, the image will be expanded. You can save the image you like to your computer to use as a desktop background.
Any image can be used on your computer as desktop wallpaper. To do this, right-click on the image, and in the context menu select “Set as desktop background image.”
Where are Windows 10 themes stored?
The default themes are stored on your computer in the “Web” folder. In order to get to this folder, follow the following path (standard desktop wallpapers for Windows 10, Windows 8.1, Windows 8, Windows 7 are stored in this location):
C:\Windows\Web
In the “Web” folder you will find three folders: “4K”, “Screen”, “Wallpaper”. The “4K” folder contains the official Windows 10 screensaver in various resolutions. The Screen folder stores images used for the lock screen. The “Wallpaper” folder contains folders with three official themes, which store the images included in these themes.
If you like a particular image from a theme and want to use that image as your Desktop background, you can copy the image to another location and then set that image as your Desktop background.
Themes downloaded to your computer yourself are stored in a different location. There are two ways to extract a single image from such a topic.
First way. Unpack the downloaded but not yet installed theme on your computer using an archiver, for example, WinRAR or 7-Zip. In the folder you will find all the images included in the theme.
Second way. You will find images that are part of a theme already installed on your computer in a folder named after the theme, which is located in the following path:
C:\Users\username\AppData\Local\Microsoft\Windows\Themes\
Where are the lock screen wallpapers stored?
You will find standard lock screen background images in the “Screen” folder. If the “Windows: interesting” option is selected in the lock screen background settings, then the Windows 10 operating system downloads images from the Internet to the computer. These images can not only be used as a lock screen saver, they can be used as a desktop background.
The downloaded images that are used as the lock screen background are located in this path:
C:\Users\username\AppData\Local\Packages\Microsoft.Windows.ContentDeliveryManager_cw5n1h2txyewy\LocalState\Assets
The Assets folder contains files downloaded to your computer. Copy the file from this folder to a convenient location on your computer. Next, rename the file, give the file some name with the extension “.jpg”, for example, “picture.jpg”.
After this, you can use this image as your desktop background.
Conclusions of the article
The user can customize the design of the Windows 10 operating system to suit their individual needs. These settings are called personalization. From the official website you can download and install Microsoft themes and wallpapers on your computer. You can use any image included in the theme as your desktop wallpaper.
Personalizing Windows 10 How to download Microsoft themes and wallpapers (video)
In this material we want to present the most beautiful and pleasing to the eye screensavers for Windows 10, which can delight you with their originality and appearance in those moments when your PC is inactive for a long time.
At one time, screensavers were very popular and could be found on almost every Windows design website. Today the fashion for them has largely passed. This is due to the elementary lack of necessity, which disappeared a long time ago with the advent of modern monitors.

Therefore, this selection has rather aesthetic and nostalgic purposes: perhaps some of the users, like us, will be pleased to see/remember something beautiful, since some screensavers are a real work of art. By the way, despite the title, screensavers should work in any version of Windows, although we tested screensavers for Windows 10.
Alas, most, despite their advanced age by computer standards, will one way or another ask you to register, but all of them have trial versions that offer many features and for free.
How to change the screensaver in Windows 10?
First, let’s clarify one important point: in the “Personalization” interface in Windows 10, unlike previous versions of the OS, there is no section with screensavers itself, which is why it may even seem that this function has been cut out from the system. But that's not true.
Using the built-in taskbar search, start typing "screensaver" or "change screensaver" and you will see the following result:
Clicking on it will open a window that is familiar from previous versions of Windows, where you can enable, change the Windows 10 screen saver or change its settings:
One more detail: we marked the link with an arrow in the screenshot above. You may need to walk through it to increase the time after which the system automatically turns off the display. The default is 10 minutes.
If for some reason you may need a screen saver for a long time, then the interval for turning off the display will have to be increased, fortunately this can be done in just a couple of clicks:
Mechanical Clock – screensaver with a mechanical clock
We will start our short review with one very famous screensaver, which you could well see on various working devices in computer stores. This is Mechanical Clock - a clock screensaver with amazing attention to detail, simulating a clock mechanism that always displays the exact time.
This screen saver, like most screensavers for Windows 10 in our review, is far from new, but the highly detailed, literally magical picture still looks attractive to this day.
An unusual effect is created by the smooth movement of all, even the most distant elements in this mechanism.
The sound part also did not disappoint: in addition to the usual “tick-tock”, the live clock strikes every 60 minutes. This, as well as the effect volume level, can be adjusted in the parameters.
By the way, this, like some other screensavers in the review, can also be used as animated wallpaper on the Windows desktop.
Christmas Evening – New Year's screensaver
Christmas Evening is a very cute screensaver for Windows 10 on the theme of Christmas and New Year. The picture shows us a cozy corner where in the center of the table there is a miniature clock, stylized as a snow-covered house, which is surrounded by gifts, New Year's toys, candles and other decorations.
On the street, which is visible through the windows of the room, it is snowing, there is a decorated fir tree with blinking garlands, and passers-by are walking, wrapped in warm scarves. Since the graphics of this screensaver are very good, there is even a slider in the settings to weaken it, which will be useful for the weakest Windows 10 computers.
In turn, the audio series contains well-known New Year and Christmas themes, accompanied by the neat sound of a ticking clock. This screen saver can also be used for your desktop.
Helios Screensaver - soap bubbles in Windows
If you don’t need fancy, “heavy” screensavers like those above and below, then pay attention to a screen saver called Helios. It is free, weighs less than 300 kb, and is similar in style to the animations built into previous versions of Windows. It just looks a little more interesting.
When launched, elegant soap bubbles begin to form smoothly against a dark background, with many beautiful particles. Some, changing shape and size, slowly flow into others and vice versa, and the camera sometimes looks deep into this action.
Helios slows down and speeds up, unobtrusively changing the perspective and viewing angle. The effect of iridescent color on the bubbles themselves looks very unusual, making the screensaver more attractive.
Note that Helios, unlike other participants in the review, must be manually placed in the Windows\System32 folder. This is where screensavers are stored in Windows 10. Helios may also noticeably freeze if you do not have the graphics drivers installed/updated.
Marine Aquarium – aquarium screensaver for Windows 10
One of the most attractive types of computer screensavers is, of course, live aquariums with swimming fish. They are represented in our selection by the third version of Marine Aquarium - one of the most famous virtual 3D aquariums.
In the free version (enter “testfish” in the window that appears), alas, only six types of fish are available to the user. More than twenty more will open only after paid registration. In addition to the usual inhabitants of the aquarium, starfish and a moray eel living in the cave will also be available there.
The aquarium camera is not static: it smoothly moves left and right, in addition, it can be moved using the corresponding keys on the keyboard. In the settings you can adjust the music volume, bubbles, frame rate, total number and specific fish, as well as background colors. Here's the video of the intro:
In addition, you can select a playlist of your music, and replace the developer’s logo with a digital or analog clock.
Dream Aquarium – another live aquarium with swimming fish
Another stunningly beautiful aquarium screensaver for your screen. This virtual world also offers several different landscapes to choose from. By default they alternate, but you can choose one if you wish.
Settings are opened by pressing Enter directly in the splash screen itself. Here you can add and remove aquarium inhabitants. There are 26 fish to choose from, plus the ability to create your own fish with a unique coloring, and there's also a cute fiddler crab.
The remaining settings allow you to adjust the aquarium lighting, air bubbles and fish feeding. A noteworthy option is that it attaches the camera to the general view of the aquarium or dynamically moves it behind the fish. I was amused by the ability to set your own image as the background of the screensaver. So we made the title picture for this text.
Icy Christmas Screensaver – ice on the computer screen
Another type of screensaver is different in that it adds all sorts of effects to your desktop when nothing happens to it for a long time. There are many such screensavers, but, unfortunately, since most of them were made quite a long time ago, some are simply incompatible with Windows 10.
Fortunately, this does not apply to Icy Christmas, which freezes your screen. An ice crust gradually begins to appear from each corner, which slowly covers the entire space. Despite its simplicity, the screensaver has a lot of parameters: the appearance of the ice can be customized in detail, it is even possible to specify the direction of the light rays.
By default, the Windows 10 screen saver works with the desktop, but in the settings you can instead set an image or a set of images (for example, photos) that will be covered with ice while the computer is idle.
Watery Desktop 3D – rain on your desktop
This screensaver also affects your desktop in Windows 10, only it does not freeze, but floods it with rain or even submerges it under water. The effects - raindrops and waves, we note, are made very high quality. Obviously, for this reason, the options even have the ability to weaken their visual performance.
Initially, the screensaver launches a random action, but you can choose something specific. You can choose from light or heavy rain, three types of waves and storm. You can also adjust the strength of the water vibrations themselves. We repeat, everything looks very realistic, take a look for yourself:
The Lost Watch – watch under water
The Lost Watch is one of the most beautiful screensavers in our review, not only in terms of graphics, but also in general the idea itself. Here is the cutest pocket watch with a chain that ended up under water. Droplets of water fall from above, and tree leaves slowly float by.
The watch, despite its original location, always shows the exact time. They even have a working second hand. The current date and day of the week are also displayed.
In the settings, you can specify the volume level, lower the quality of graphics for not the most powerful computers, select your own composition for background music and set a screensaver on the Windows 10 desktop. A particularly interesting option: you can add a miniature pendant under the clock, where the photo you have chosen will be displayed.
In the settings, in addition to the standard options for volume level and graphics quality, it is possible to select the type of fireplace. There is a choice of stone, traditional brick and a special Victorian style fireplace (pictured above). Of course, you can put your own music and use it on your desktop.
Photo! 3D Album – unusual slideshows
The final participant in our review is not even a screensaver, but a full-fledged creative application, the result of which, among other things, can be used as a screensaver. Photo! 3D Album offers several virtual locations - galleries, parks, beaches, where stands can display various paintings in neat frames.
These pictures can be images from your computer, be it any drawings or photographs. At your discretion, you can fit them into the free frames that are hung around the locations. For convenience, there are options that “adjust” the picture so that it looks better in the frame.
Once everything is ready, you can launch any of the virtual worlds to which you added your images. Agree, this is many times more interesting than a regular slide show.
By default, the program “walks” there itself, looking at your illustrations, but by pressing F1 you will transfer control into your hands. This will almost resemble a computer game, where WSAD is used for movement, Shift for acceleration, etc. If you use Photo! 3D Album as a screensaver, then in its parameters you will see several additional options.
Conclusion
As we already noted at the beginning, traditional screensavers are practically a thing of the past today, since they do not have specific functions, and on modern portable devices, when the user is inactive, it is more reasonable to simply turn off the screen rather than waste the battery on a screensaver, especially if the latter itself also consumes a lot of resources.
On desktop PCs, where screen savers came to us, there are no such restrictions. However, screensavers still disappear, which is clearly seen in Windows 10, where screensaver settings are not even included in the main personalization options.
On the other hand, during the popularity of screensavers, several such good and creative works were made that users cannot forget about them to this day. We showed ten such memorable screen savers in this material. We hope you enjoyed it.
When turning on the computer, the user plans to do many things. Therefore, it is important for him to quickly obtain all the necessary information from various applications even before logging into the system. The Windows 10 lock screen will help provide this information, as well as provide primary protection for your computer.
What is the Windows 10 lock screen
When you start the operating system, the first thing you will see is the lock screen. This is a window where you can get some information from applications on a beautiful background. The lock window has the following capabilities:
- Shows time, weather and other information from applications; what information will be displayed in this window depends on the specific settings;
- provides primary system protection - to log in you must enter a password in the lock window;
- allows you to customize the wallpaper of the window itself, including automatically changing images; A bright and pleasing picture on the lock screen will help the user get ready for a pleasant working day.
The lock screen is present natively in every Windows 10 system. Therefore, the only question is how to configure it correctly.
How to customize the Windows 10 lock screen
The lock screen has quite flexible settings that make it convenient to work with, and also has good tools for customizing its appearance. And, of course, if necessary, you can simply turn off the lock screen.
Turn on the lock screen
The lock screen in Windows 10 is always on by default. You can enable the lock screen pattern as follows:
After completing these steps, the lock screen will work properly and the wallpaper will return to the screen.
Video: Lock screen customization and personalization
Changing the image
You can set absolutely any images on your lock screen. Some people put photographs of loved ones there, while others put beautiful views of nature. This setting is performed in the following way:
- Go to the personalization settings menu through Windows Settings.
Go to the personalization menu through Windows settings
- Go to the lock screen settings section and click “Browse” under the row of pictures.
Click the Browse button to select an image for your lock screen
- Select one or more photos (if you select several, they will change automatically) and click “Select pictures” to confirm the action.
Select the required image and click “Select picture”
- Your image will appear in the lock screen wallpaper preview.
You can see how the selected image will look as a background in the preview window
- You can also set the pictures to change dynamically. To do this, in the drop-down list of the “Background” item, select the “Slideshow” line.
Select "Slideshow" as the background image type to keep the pictures constantly changing.
- The Slideshow mode has a number of additional settings. To see them, click on the corresponding line.
Select More Slideshow Options to customize how images change
- In the advanced options, you can change the settings based on your interests and needs. After saving the changes, the settings for the wallpaper or pictures are complete.
Set slideshow settings in the advanced settings window
There is another way to add an image to the lock screen without opening the personalization settings. For this:
- Open the drawing using a standard image viewer.
- In the program menu, select “Install as”, then left-click on the “Set to lock screen” option.
In the menu of any picture viewer, you can select the option to set a picture to the lock screen
Turn on the Windows Explore feature
There is another interesting feature associated with the lock screen. This is "Windows: interesting" or Windows spotlight. When this option is activated, pictures for the lock screen will be selected automatically from Microsoft servers. You can enable the option as follows:

Now the pictures will change every time you turn on the computer and will be selected by an intelligent system for analyzing your work on the device.
Adding Apps to Display
The lock screen allows you to add many applications - it can display the time, weather, exchange rates and much more.

Setting up this function is not difficult:
The next time you see the lock screen, it will already show the new application.
Displaying applications on the lock screen will allow you to get the information you need before you actually start working on your computer. This will save you time and increase efficiency.
Setting up automatic locking

The automatic lock feature allows you to display the lock screen after a certain period of inactivity on your computer. Automatic blocking is configured as follows:
Disabling the lock screen
Disabling the lock screen completely is not that easy. There are 2 ways to do this.
- First, let's look at how to disable the lock screen using the Group Policy Editor:
Press the Win+R key combination to open the Run window. Then enter the gpedit.msc command and click OK.
- Enter the command gpedit.msc into the Run window
- Open the folders “Computer Configuration”, “Administrative Templates”, “Control Panel”, “Personalization” one by one.
On the right side of the window, select the option to prevent the lock screen from being displayed.
- Find the "Prevent lock screen display" option in the Group Policy Editor window
Turn on the blocking of the lock screen using the appropriate marker.
- Enable the option to prevent the lock screen from being displayed
After restarting your computer, you can verify that the lock screen no longer appears. The second way to disable the lock screen concerns the Registry Editor. You should not open the registry editor if you are unsure of your knowledge, as changes to the registry can damage your computer. To disable the lock screen, you need to do the following steps:
- Open the Run window, but this time type regedit and click OK.
Type regedit in the Run window and confirm your entry
- In the Registry Editor, go to: HKEY_LOCAL_MACHINE - Software - Policies - Microsoft - Windows - Personalization. Create a 32-bit parameter.
Create a value named NoLockScreen in Registry Editor
- Set the name to NoLockScreen and set the value to one in hexadecimal.
Specify unit as the value when creating the parameter
- After restarting the computer, the lock screen will disappear completely.
If you need to get your lock screen back, simply disable the Group Policy service you previously enabled. If you disabled it through the registry, you need to delete the parameter you created.
Video: how to disable the lock screen
Removing the lock screen
If you are not completely satisfied with disabling the lock screen, you can remove it from your computer completely. To do this, just uninstall the application that is responsible for it. Go to the path C: - Windows - SystemApps and delete the Microsoft.LockApp_cw5n1h2txyewy folder.
You can simply delete the application folder to make it stop working
Instead of deleting the application folder, you can simply change its name. This will allow you to get the lock screen back if you need it.
Setting up the lock screen: possible problems and their solutions
Let's look at the problems you may have when setting up your lock screen:

Programs for setting up and changing the lock screen
There are several programs for customizing your lock screen. Typically they are used either to turn off the screen itself or to customize the background image. Let's highlight some of them:
- Windows 10 Logon Background Changer is a program that allows you to change the background of the lock screen. It works without installation on your computer and is very easy to use (there is a version in Russian). Just select a picture and the background image will be changed;
When you turn on or turn off your computer, the lock screen, where notifications from various applications are displayed on a beautiful background. This is one of the few visual components that moved into the top ten from the previous version of the system. The lock screen does not provide any special functionality, so it can be disabled without any consequences for Windows. For information on how to disable (enable) and change (customize) the lock screen, including through the new function “Windows: interesting” (Windows Spotlight), read further after the button of the same name.
How to disable (enable) the lock screen inWindows 10
There are two ways to disable the lock screen in Windows 10: using the Local Group Policy Editor gpedit.msc and by editing the registry. We will go the second way, because... In some OS versions the policy editor is not available.
So to disable lock screen press the key combination " Win+R" and dial regedit → "OK" → in the Registry Editor, expand the chain HKEY_LOCAL_MACHINE\SOFTWARE\Policies\Microsoft\Windows\Personalization → in the last section create " DWORD value (32-bit)" under the name NoLockScreen and also through the right mouse button set the value to " 1 " (screenshot below). If the section Personalization If you don't have one, you'll have to create it manually.

To enable lock screen perform the above-described manipulations with the system registry by setting the value of the parameter NoLockScreen equal to " 0 " → "OK". The changes will take effect immediately, but to check the functionality of the option, click " Win + L"(change user or lock the system), or better yet, restart the PC.
Setting the lock screen inWindows 10

Starting with Windows 8, Microsoft's operating system has learned to add your favorite images (background, photo) of nature, family and friends, plus create a looping slide show. In order to customize lock screen through " Start" select " Options"→ next" Personalization" → "Lock screen". The current background will be shown on the right side of the window, while some of its options will appear as tiles below. You can replace "Photo" with any of the presented ones or with something of your own by clicking on " Review" to select from the entire collection of images. Additionally:
- To show slides, tap the drop-down menu of the "Background" subcategory and stop at " Slide show" → select folders containing photos of the desired resolution (advanced settings are hidden under the link " More slideshow options");
- about the “Windows: Interesting” mode (screenshot), which was released with the release of the Threshold 2 batch update, read in detail in the third part of this review.
How to change the Windows Spotlight lock screen image (background)
After the announcement of the latest November update to the latest version of Windows, users had the opportunity to see a lock screen in the style Windows Spotlight(“Windows: interesting”), “smart” lockscreen (eng. lockscreen), which is not limited to providing the usual information - time, date and reminders. Using machine learning algorithms, Spotlight shows you various applications that he thinks can improve your productivity. Using the same principle, and respecting the user’s taste, background images are selected and downloaded from Microsoft servers.
To open them with any graphical viewer (editor)/ rename / delete / move to another folder:

- open Explorer and enable the display of hidden elements on the “View” tab (screenshot);
- Paste the path into the address bar of Explorer C:\Users\ [Your_Account_Name] \AppData\Local\Packages\Microsoft.Windows.ContentDeliveryManager_cw5n1h2txyewy\LocalState\Assets → "Enter";

- in folder Assets, by clicking on the file and the " key F2 ", rename all files as shown in the pre-final screenshot.

Now you know where the lock screen images are stored Windows 10 When you turn on the “Windows: Interesting” mode, all that’s left to do is to customize the system “for yourself,” according to personal preferences and taste.
The Windows 10 lock screen with its amazing images is always the focus of the user's attention.
Pictures change automatically every day and there is no way to independently indicate to the operating system how often it needs to receive new images for the screen.
There are also often cases when the same image does not change for several days in a row and you have to wait until she chooses a new one for you. And when this might happen, you have no idea.
There are at least two simple ways to help correct this situation. So, if your computer doesn’t want to change an already boring picture for too long, here’s what you can do.
LOCK SCREEN
The easiest is the first method, where you will have to click on the camera icon in the upper right corner with the question “Did you like what you saw?” and click on the “Dislike” link that appears.
After which you will immediately receive a new picture. The widget itself uses feedback to interact with the user and will select or exclude similar images from display.

The other method requires a more complex implementation. Open System Settings, go to the “Personalization” tab and click on “Lock Screen” in the left menu. In the “Background” section, open the drop-down list, set it to “Photo” and select any photo.

Press the Win + L key combination on your keyboard to lock the screen and make sure that the image has been replaced with the photo you selected above.


That's all! This will take a little more of your precious time, but the result will be more effective compared to the first method.
Take the opportunity to view a list of all computer tips in. Don’t be lazy to add a link to an article or blog on a social network - this will significantly help us in developing the resource. Thanks a lot!


