How to make a layer transparent in Photoshop. How to highlight transparent objects in Photoshop - SkillsUp - convenient catalog of lessons on design, computer graphics, Photoshop lessons, Photoshop lessons
Take a look at the drawing in format jpg, the well-known cartoon character Baby Mammoth who lost his mother.. I want to cry.. no, not because the baby mammoth can’t find his mother (although because of this too), but because the blue background hurts the eyes terribly! I just want to remove this blue and fill the background of the picture with such a color that it merges with the background of the page..
I think this is not a problem for you! Just think about opening it using the same Photoshop and filling the background with the desired color! but what if the main background of the page is some kind of complex texture?
An example where an image is overlaid on top of a texture:
Open Photoshop and draw a picture with a baby mammoth instead of a blue background? And then try to match them to the main background of the page? This is not an option!!!
So, I report that graphic formats gif And png- support transparency mode, thereby allowing you to make some areas of the drawing invisible to the human eye - which is exactly what we need!
Now in order:
1. Open the picture whose background you want to make transparent using Adobe Photoshop.
2. Open a bookmark "Image" >> "Mode" >> "Indexed Colors".

3. In the dialog window that appears "Indexed Colors" put a tick "Transparency" and press "OK"

4. Using the Selection Tool "Magic wand" And "Eraser" We erase the background in the drawing, actually making the parts we need transparent.
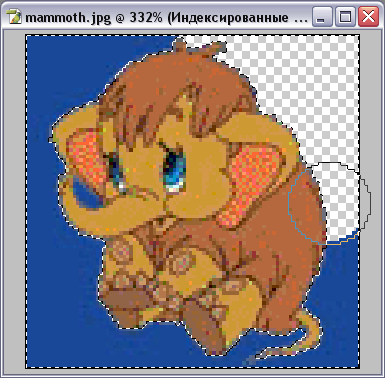
5. Well, we save our image in the format gif.. bookmark "File" >> "Save for Web..." in the window that appears, indicate (agree) that the picture will be saved in the format gif click "Save".. select a folder and write the name - I hope you can do all this..
The entire picture has been created with a transparent background!!
Now you can paste it back into our page, without forgetting to change the extension jpg on gif .
gif" alt="Baby Mammoth"> !}
The result of what we will create.
Selection is an integral part of any photo processing. However, often what we need to highlight is not as specific as it might seem at first glance. In this tutorial we'll show you how to make a selection of a glass that includes transparent elements. Let's start!
The picture used in this lesson.
Step 1: Selecting a Selection Tool
Selection is an integral part of the image editing process in Adobe Photoshop. The process of selecting parts of an image is not difficult, but sometimes transparent areas can complicate things. For this type of task, it is not enough to use the Pen tool ( pen tool). To highlight areas with variable level Transparency requires a tool or command that allows us to manipulate the brightness information of the color channels of an image. We are not only interested in simply cutting out the background - we are more interested in creating a mask in which we can obtain information about various levels brightness in order to determine this complex level of transparency. As a channel we simply use a grayscale image. We can effectively use this channel to create a mask because the mask also uses grayscale to store transparency information (pure white=100% opacity; pure black=100% transparency).
Simple transparency Complex transparency

Step2. Use channels to highlight
One of the main benefits of accessing separate channels in Photoshop is the ability to make selections of an area. You can use individual channels to make different selections of an image area. If you want to choose specific object in an image, use color channels that create the most contrast at the edges of that object.

Step 3. Select the most contrasting channel
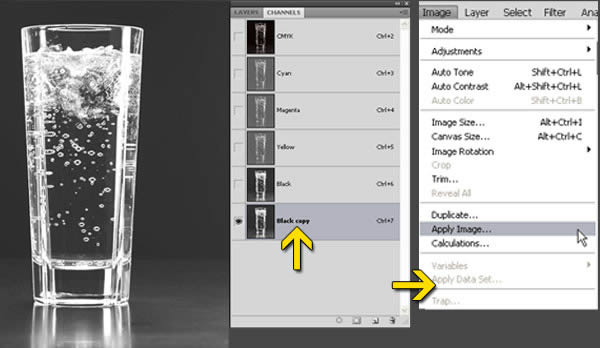
This original image. Although this is a CMYK image, the same method will work for an RGB image. The only difference will be in the channel panel. IN RGB image instead of four color channels and one combined channel there will be three color channel and one combined channel. Purpose this lesson is to remove the black part (background), but not to touch the glass, water, bubbles and reflection under the glass, so that we can place the glass on any background (plain or in a photo). In this tutorial we will use the Image command - External channel(Image - Apply Image).

Step4. Apply Image Functions
The Apply Image command allows you to blend one image layer and channel with the layer and channel of the active image. But remember - in order for the names of the images to appear in the Apply Image dialog box (if you need to mix channels of different images), the pixel sizes of the images must match. However, we will not use multiple images. We're going to mix a copy of the black channel with this same copy of the black channel. But the power of the External Channel (Apply Image) lies in the “Target Selection” (parameters at the bottom of the External Channel dialog box). Here you can set the blending mode or blending type you want to use during the blending in the External Channel (Apply Image).

Step 5. Select the most contrasting channel
Open the file in Photoshop. Then in the Channels panel, look through all the channels and find the channel with the best contrast. Finding a channel with good contrast is very important for good selection of the desired area of the image.

Step 6. Select the most contrasting channel
Here the best contrast between the glass and the background is near the black channel.

Step7. Duplicate the channel
Create a duplicate of the black channel by dragging it over the "create" icon new channel" (create new channel) at the bottom of the Channels panel. You can also click right click mouse over the black channel and select “duplicate channel”.

Step 8 Increase channel contrast using Apply Image
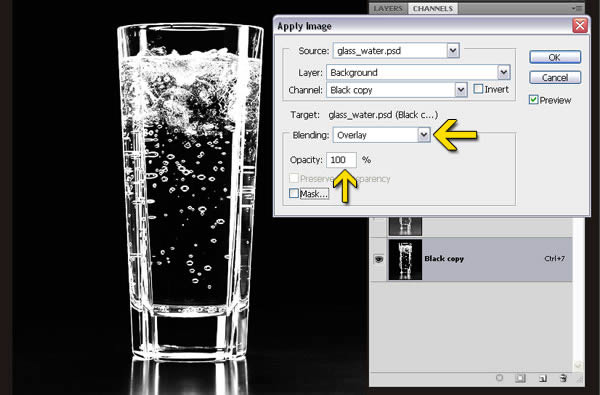
Then select a copy of the black channel and go to Image - External Channel (Image - Apply Image).
Step 9. Increase the Contrast of the Channel
First, mix once with Multiply to boost the black while converting any gray area from the background to black. Reduce the opacity to 50% to create an overlay that isn't too strong. We can also eliminate some of the white parts since they are not pure white.

Step 10: Multiply Blend Mode Concept
The Multiply blend mode takes the color information in each channel and multiplies the base color by the blend color. The resulting color is always darker. Multiplying any color by black will give black. Using the Multiply blending mode we eliminate all the gray parts from the background.

Step11. Increase the channel contrast
Next, do a double overlay with Overlay (Overlay) in order to increase the white. Now we can easily select the white area. Our goal here is to create an effective, fast and acceptable mask. This time in the overlay area we use 100% Opacity.
Step12. How the overlay blend mode works
An overlay with the Overlay option multiplies or intensifies colors, depending on the base color. Base color will not be replaced, but will be mixed with the matching color to reflect the lightness or darkness of the original color. White areas become lighter and black areas become darker. Using Overlay we will increase the strength of the white part, since we want to leave the white areas, but the final image is a mask of the black area.

Step13. Paint with a white and black brush to create an optimal image of the channel
You can still adjust the copy of the black channel using a brush and paint with white or black. Paint with white to leave areas of the image and paint with black to remove or hide areas. White means opacity and black means transparency within the channel.

Step14. Load the channel as a selection
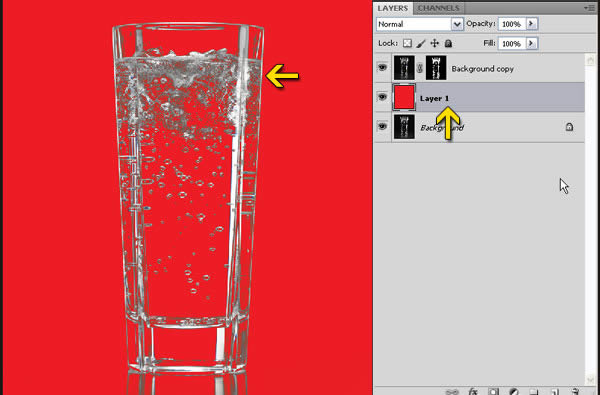
Load a copy of the black channel as a selection using either Ctrl-click on the channel or the first button at the bottom of the channels panel, which loads the contents of the channel as a selection.

Step 15: Duplicate the background layer
Then go to the Layers panel and copy the background layer by dragging it to the “Create” button new layer"(create new layer) located at the bottom of the layers panel. You can also right-click on the background layer and select Duplicate Layer.

Step 16. Create a mask with the image of the object
Then select a new layer (Background Copy) by left clicking the mouse. The selection is still active. Click on the mask icon at the bottom of the Layers panel to create a mask.

Step17. Create a colored background under the object
Now create a new one empty layer and fill it with red or blue. Check the quality of the mask. You will find that there are several gray areas within the mask.
Step18. Removing the gray area
There are two processes for removing this unwanted gray area. Although the first process below will give you the best way out, but still let's look at both options.

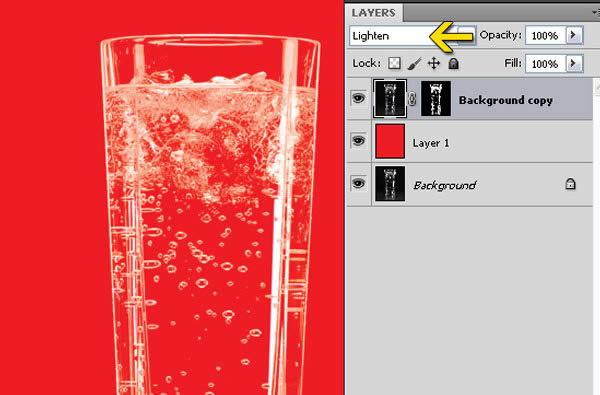
Step 19. Changing the Blend Mode
Process 1: Change the blend mode of the background layer copy to Lighten to remove the gray area.

Step20. Changing the blending mode
The Lighten blend mode examines the color information in each channel and replaces those pixels that are darker than the blend colors, while leaving those pixels lighter than the blend colors unchanged. This removes dark gray pixels.
Step21. Loading the selection
Process 2: Ctrl-click on the background copy mask thumbnail to load the mask as a selection. You can also load a selection from a copy of the black channel.
![]()
Step 22: Create a New Adjustment Layer
Then click on the “Create a new adjustment layer or fill layer” icon at the bottom of the “Layers” panel.

Step 23: Create a New Adjustment Layer
Select “Levels” from the drop-down list and create a new adjustment layer.

Step24. Convert the gray area to white
Then, in the Levels dialog, first drag the Midtone slider (middle) and then the Highlights slider (right), to the left to remove the "gray zone" (or rather, convert gray to white).

Step25. Finishing touches with a stamp
After applying the Lighten mode, if you look closely, you will see that there are several damaged parts in the white area. You can use the Clone Stamp Tool to fix these parts.

Step 26.
That's all. You can use the same technique to highlight complex objects with variable level of transparency. Below is shown how it was before and how it was after the work done.

Final result

Transparency in Photoshop is one of its great properties. Transparency allows us to see one image (object) through another, creating depth effects in the picture. With the help of transparency, collages of amazing beauty are created.
What we call “transparency” is called “opacity” in Photoshop. More precisely, adjusting the opacity of Photoshop tools allows us to achieve desired effect transparency. Opacity is set as a percentage. Absolute opacity corresponds to 100%, and absolute transparency corresponds to 0%. Just remember that if you set the background or tool's opacity to, for example, 80%, then the background or tool stroke will have an opacity of 20%. Such a simple relationship between opacity and transparency.
Using opacity in Photoshop, you can set the transparency of the background, the transparency of the color, the transparency of the image as a whole or just part of it, the transparency of the object and the transparency of the layer. The transparency effect in Photoshop can be achieved different ways: adjusting the degree of transparency (opacity) of the layer, adjusting the transparency (opacity) of Photoshop tools, applying a mask to the selected area.
How to make color transparent in Photoshop when applying a gradient, I already wrote in my article "".
Today I want to tell you how to make the background transparent in Photoshop, how to make a picture (drawing) and an object transparent. I think you will be interested not only in how to create transparency, but also in how to maintain it. The issue of maintaining transparency is especially relevant when preparing images for uploading to a website.
Let's move from theory to practice. I think you are eager to learn how to create transparency in Photoshop.
Background transparency
Often we need to have transparent background Pictures. Most relevant this question is when preparing a photo (picture) of a product for placement in the product catalog of an online store. Background transparency is also needed when creating logos and other images (drawings) for sites that often do not have plain background. The transparency of the background of the image allows it to harmoniously fit into the design of the site.
Let's assume that we are preparing a product catalog for an online office equipment store.
Transparency Tools
Photoshop transparency tools are any tools designed for drawing ("Brush", "Pencil", "Fill", "Gradient", "Stamp", "Rectangle", etc.). The transparency tool is also the Eraser tool. It allows you to change the transparency of an object (drawing) only in the place where we need it, without changing the transparency of the entire layer. We can assign any transparency level to each of the transparency tools. To do this, you need to use the tool settings control panel.


