What is recovery on Android: how to go to the menu and what can you do there? How to enter Recovery mode on different Android devices
Recovery mode (aka recovery) on Android is a special hidden menu and is available on any Samsung Galaxy smartphone. This is a great tool that can be used to wipe data, reset settings, format the system partition, install a custom kernel, new firmware and many other things that should allow you to improve your smartphone and its system.
Recovery mode can be stock or custom. Stock Recovery Mode is the first and original option that is installed initially on a smartphone and you can work with it immediately after purchase. This mode works on a stock smartphone or one already rooted, but not on a Galaxy smartphone that is flashed with custom firmware.
Custom Recovery Mode can be installed only after obtaining root rights on the smartphone. There are two most popular custom recoveries for Galaxy smartphones ClockworkMod - CWM and TWRP - Team Win Recovery Project. Both of them are very similar in their features and you can get the same features in either of them. Below you will learn how to boot a Samsung Galaxy smartphone into recovery mode.
How to boot a Samsung Galaxy smartphone into stock/CWM/TWRP recovery mode:
- Turn off the device completely.
- Press and hold the Volume Up button, Home button and Power button at the same time.
- Release the buttons when the smartphone screen turns on and you will see the stock/CWM/TWRP recovery logo.
To boot in normal mode, you need to return to the main screen of recovery mode and select “Reboot system”.
Why you need to root an Android device and what opportunities it provides is known to a fairly large number of users, which cannot be said about the hidden advanced menu of hardware settings, also called the engineering menu. Few people know about these settings, and even fewer mobile device owners know how to use them. What is the Android engineering menu and why is it needed?
The Android engineering menu is nothing more than a special subroutine designed for testing by developers of the operating system and device sensors. The interface of this program is represented by a set of options that allow you to change the hardware configuration of your mobile device. With its help, you can get comprehensive information about the hardware of the gadget, test the processor, RAM and physical flash memory, wireless connection modes, configure the parameters of the camera, display, microphone, speakers and much more.
Entering the engineering menu
All this, of course, is good, but how do you go to the engineering menu if there is no corresponding option in the Android interface? The advanced hardware settings menu is entered using a special code entered in the phone number dialing line. The menu should open immediately after entering the last character of the combination, but in some cases you may need to press the call button.
There is nothing complicated in the procedure itself, however, it should be taken into account that different models of mobile gadgets have their own codes. Below we have provided a list of codes for the most popular manufacturers.
Engineering menu codes in Android are universal, however, their correct operation on phones with “left” firmware is not guaranteed. You can also use special programs to access Android hardware settings, for example, "MTK Engineering Menu" or "Mobileuncle MTK Tools".

Such applications are especially useful on tablets whose firmware does not provide a dialer. The interface and set of available options in these programs are somewhat different, however, understanding them will not be difficult.
Whatever method you use, you need to exercise maximum caution when working with the engineering menu. Before starting work, it is strongly recommended that you write down all the initial parameter values so that you can restore the settings. It is unacceptable to experiment with the engineering menu just to find out what comes out of it, as you can render your device unusable!
To obtain a list of engineering codes for a specific phone model, you can use a special application Secret Codes, available on Google Play. On some mobile device models, full access to the engineering menu may require superuser rights (root).
What you can change using the menu
You know how to get to the engineering menu, now let's find out what settings can be made using it. The possibilities are more than wide. The menu subroutine supports changing the speaker volume level and microphone sensitivity, built-in camera settings, audio parameters, GPS, Bluetooth and Wi-Fi modules, and turning off unused frequencies to save battery power. You can also test key components of your device and external memory card, configure I/O operations, determine the exact temperature of the processor and battery, and the level of harmful electromagnetic radiation.
Another useful function is to gain access to recovery mode - an analogue of BIOS on computers, which in turn contains a whole set of settings. Recovery mode features include resetting the device to factory settings, updating the firmware, creating a backup copy of the operating system, gaining root access, and deleting sensitive user data. It is not possible to list all the engineering menu options in one article; the more sensors and components there are in a phone or tablet, the more extensive it will be.
Increasing phone volume through the engineering menu
Now let’s demonstrate how to work with hardware settings using the example of one of the most popular operations and learn how to increase the volume on Android through the engineering menu. So, go to the menu using Mobileuncle MTK Tools or by entering the “magic” code, then find and open the Audio subsection. If you entered the menu through the Mobileuncle Tools program, this subsection will be located in the senior section Engineer Mode, in other cases it is usually located on the Hardware Testing tab.

In the Audio subsection you will have the following options:
- Normal Mode – normal mode that works when a headset is not connected to the device.
- Headset Mode – headset mode that turns on when headphones or speakers are connected to the smartphone.
- LoudSpeaker Mode – loudspeaker mode. Activated when the speakerphone is turned on, provided that a headset is not connected to the device.
- Headset_LoudSpeaker Mode – loudspeaker mode with a connected headset. The same as the previous one, but with headphones or speakers connected.
- Speech Enhancement - this mode is activated when talking on the phone without using the speakerphone.

There may be other settings in the section, for example, Debug Info and Speech Logger, but it is better not to touch them. Select the mode for which you want to change the volume level (let it be Normal Mode), select Type in the list that opens and indicate for which function we will change the volume. The following functions may be available:
- Ring – adjust the volume for incoming calls;
- Media – adjust the speaker volume when playing multimedia;
- Sip – sound settings for Internet calls;
- Sph – sound settings of the speaker;
- Sph2 – sound settings of the second speaker (this option may not be available);
- Mic – change the microphone sensitivity;
- FMR – FM radio volume settings;
- Sid – it is better not to touch this parameter, otherwise problems with the interlocutor’s voice may occur.
Having selected a function, scroll through the current list, set the desired Value (from 0 to 255) and click to apply the new Set settings.

To change the volume level, you can also use preset templates - the Level option. Most phones have seven levels, from 0 to 6. It is advisable not to touch the Max Vol setting, just as you should not set the Value values too high, otherwise the sound in the speakers will begin to wheeze. Other modes in the Audio subsection are configured in a similar way.
Some smartphone and tablet models require a reboot for the new settings to take effect.
Reset
And the last thing we will look at today is resetting the engineering menu parameters to factory values. It may be needed if, after making changes, the device begins to work incorrectly. There are several reset methods. If the system boots normally, go to the settings and open the “Backup and Reset” subsection.


You can also reset the engineering menu by entering a special service code in the dialer. Usually it is *2767*3855#, *#*#7780#*#* or *#*#7378423#*#*, but your phone model may require a different code.
Another option is to use the recovery mode mentioned above. To get into it, use one of these combinations:
- Power button + volume down.
- Power button + volume up.
- Power button + Home button + Volume down/up.
- Power button + volume up + volume down.
In the list of options that opens, select “wipe data/factory reset” → “Yes – delete all user data” → “reboot system now”. The device will reboot and the settings will be reset.


There is another way to reset the engineering menu settings, but it requires superuser rights. Using any file manager that supports root rights, go to the root directory of the system, and then delete all or part of the contents of the folder data/nvram/apcfg/aprdcl and reboot.

Files in a folder aprdcl they are responsible for the engineering menu settings. It is not necessary to delete all files at once. If you mess up, say, your audio settings, all you need to do to restore the original settings is delete files that have an audio string element in their names. And one moment. Regardless of the reset method, always make a backup of your personal data and applications, as they may all be lost.
Like any operating system, Android has a special boot mode when the device turns on, but the system itself does not boot. This mode is called Recovery Mode, or recovery mode in Russian. This mode is present in any Android device and allows you to reset parameters, change firmware, restore firmware from a backup, or simply in case of a freeze. It is noteworthy that, unlike root rights, using Recovery Mode is not dangerous, and therefore is not blocked by the developer in any way. This function can be used by absolutely everyone and completely officially. Let's take a closer look at how to enter recovery on any device running Android, and what each menu item is responsible for.
Recovery Mode provides access to the system functions of the device
Ways to enter Recovery mode
On the device itself
Standard method. The principle of entering Recovery Mode is the same for all devices - when you turn it on, you need to hold down several buttons. Most often this is volume up, but the following options may also occur:
- Samsung - power on + volume up + “Home”.
- LG - power on + volume down.
- Google Nexus, HTC - power on + volume down, then tap Recovery.
- Certain Lenovo, Motorola models - power on + volume up + “Home”.
- Sony - power button, after double vibration, hold down the volume up.
If for some reason you cannot enter Recovery Mode using standard means, try checking the instructions. The listed combinations are valid in almost all cases and will work both to enter the standard recovery menu and the custom one. In addition, you can run it even when the tablet does not boot or the system freezes.
If you have root rights, you will need the Terminal Emulator application installed (https://play.google.com/store/apps/details?id=jackpal.androidterm). After installation, you will need to enable superuser rights and enter two commands: first su and then reboot recovery. The device will reboot.

Via computer
A prerequisite is that USB debugging mode is enabled (Settings - For developers - USB debugging, or select the appropriate item when connecting to a PC). Therefore, if this mode was previously disabled, the tablet will not start and you will not be able to use it.
You will need the ADB Run program (http://cloud-androidp1.in/Android/PC/Project_Site/AdbProgramm/), a cable and a working device.
- Connect your device to your computer.
- Launch the ADB Run program.
- In the program menu, press 4 and then 3 in sequence.

The device will reboot into Recovery Mode. You can perform the procedures you need.
How to use Recovery Mode
As we have already said, there is both a standard recovery and a custom or custom one. Many experienced users claim that the capabilities of the first one are quite scarce, so it is better to install the unofficial one. We'll talk about them a little later, but now we'll look at what Recovery Mode menu items you can find on your device.
Install zip from sdcard - installation of an archive with updates saved to a memory card. Through this menu, root rights are obtained and the firmware is installed.
Wipe data/factory reset - wipe data/reset settings to factory settings - completely clear the system partition, reset all settings to their original state. All apps and settings will be removed, but your media files will remain intact. Used for critical errors, system failures, or when new firmware is being updated. A particularly effective remedy in cases where the device does not turn on.
Wipe cache partition - clearing the system cache - the system partition in which temporary files and all program settings are stored. It is recommended to do this when the firmware is changed.
Backup and restore - system backup and restoration from previously created backups.

Mounts and storage - for correct operation, all sections of the system must be correctly mounted and connected. Often, this procedure is performed automatically, but sometimes something has to be corrected manually. You can also clear one of the partitions. We advise you to use this method only if there is a specific need, otherwise the file system will not load and the tablet will not work.
Advanced - additional settings, including rebooting Recovery Mode, clearing the dalvik cache, resetting system application permissions. Most often used by professional programmers.
Management, unless otherwise indicated, is carried out through (moving through the list) and power (selecting a menu item). In some cases, selecting is done with the volume up, and scrolling is done with the volume down. In any case, the system must indicate exactly how to manage menu sections. There are designs with touch control.
Unofficial Recovery
As mentioned above, the standard Recovery Mode very often has somewhat limited capabilities, so it is best to use third-party, unofficial developments. The most popular are two of them - ClockworkMod recovery (abbreviated as CWM) and TeamWin Recovery Project (abbreviated as TWRP). Both developments have excellent functionality and allow you to very quickly and conveniently modify or change the firmware, obtain root rights, reset settings to factory settings, or restore a backup copy.

CWM looks very similar to the standard one, only with a slightly different arrangement of menu items. Navigation through the menu is carried out using the volume buttons, and selection is made through the power button. There is a version with touch controls. Well, TWRP has an unusual tiled interface and is controlled via a touch screen. You can navigate through the menu by pressing the display, and you need to confirm the action by swiping. Some Android devices have one of these recovery installed either by default or with the standard one. Installing and downloading custom recovery may differ depending on the model, so look for information in the sections about your tablet model on specialized forums.

Conclusion
You can use Android and never go to the Recovery Menu. But if the phone does not turn on and does not enter Recovery, or you wanted to install custom firmware, then you will have to understand the reasons for the reluctance of the device to start.
This article is suitable for all brands that produce phones on Android 9/8/7/6: Samsung, HTC, Lenovo, LG, Sony, ZTE, Huawei, Meizu, Fly, Alcatel, Xiaomi, Nokia and others. We are not responsible for your actions.
Why doesn't Android go into Recovery?
Some smartphones do not have official Recovery at all, so you have to immediately install a custom one. If the message “No command” appears on the screen with the robot lying down, this means that Recovery is available, but there were problems launching it. To fix the problem, quickly press the power button and volume up key.
If Android absolutely does not boot into Recovery, then the reason for this behavior may be an error, which can also be eliminated by installing a custom Recovery. If installing custom Recovery does not help, you should contact a service center - there may be hardware damage that cannot be repaired using software methods.
How to enter the Recovery Menu
The login procedure differs depending on the mobile device manufacturer. To get into Recovery, you must first turn off the phone and then hold down a certain key combination. , controlled by the volume keys and the power button. You should not confuse Recovery with, which simply disables all third-party applications. Recovery is, rather, an engineering menu for managing the phone bypassing the system.
Keyboard shortcuts to enter Recovery on different phones:
- Lenovo - “Volume +” and “On”.
- HTC - "Volume -" and "On" or “Volume +” and “On”.
- Samsung - “Home”, “Volume +” and “On” press simultaneously.
- Meizu - "On" and “Volume +”.
- Xiaomi - "On" and “Volume +”.
- Fly - "On" and “Volume +” or “On.” and "Volume -".
- ASUS - "On" and “Volume +” or “On.” and "Volume -".

If the combination does not work and the phone does not connect, try looking for a combination specifically for your model. There are also universal ways to launch Recovery - using a computer or special applications. If you have a computer at hand:
- Download and install ADB and phone drivers.
- Connect Android via USB, .
- Launch ADB and run the command “adb reboot recovery”.
What to do if there is no computer? Install the Boot Droid application. In it you need to select the “Recovery” icon and click “Yes”.

You can also get into Recovery using Terminal Emulator. Type “su” in it, provide root access and execute the “reboot recovery” command.
Recovery features
Recovery Mode capabilities vary depending on the type. If this is the official recovery menu, then the functionality will not be the highest:
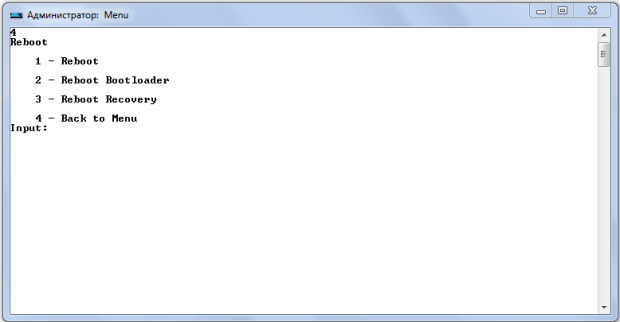
- Reboot to start Android normally.
- Installing updates.
- Factory reset.
- Clearing the cache.
- Creating a backup copy and restoring data.

Not many people know about the existence of a menu in the Android OS with advanced device settings - engineering menu
. And someone knows, but doesn’t know how to enter it and what to do with it.
In this article we will show how to enter the engineering menu and some of its capabilities.
You can enter the engineering menu simply by entering a special command (but I must add that this method does not work on all versions of Android and not on all devices)
Command to enter the engineering menu: *#*#3646633#*#*
Also on some versions of Android the command may work *#15963#* And*#*#4636#*#*
Immediately after entering, the command should disappear and the engineering menu should open. But on some devices you will still need to press the "Call" key
If this method does not have any effect, you can use an alternative!
And it consists of installing the program (which, by the way, is freely available on Google Play) " Mobileuncle MTK Tools 2.4.0"

This program will open access to the engineering menu (that is, it will work similarly to dialing a combination*#*#3646633#*#*)
There are a lot of settings there! There is huge scope for experimentation! Almost EVERYTHING can be debugged and adjusted!
For clarity, let’s briefly look at setting the device’s volume level:
Go to the program ---> select the "Engineer Mode" section


Because We are interested in adjusting the sound level, select ---> "Audio"

And voila, the menu we are interested in opens.

Max Vol - the same for the entire subsection, as a rule, it is set to 150 (you can change 0-160 - it changes if you select the Media item in the subsection).
If in some submenu, for example, Audio - Normal - Sph, the general level is not available for regulation, then enter another submenu, for example, Audio - Normal - Media - there will be an opportunity to adjust the general volume level.
Sub-items:
Sph - volume levels during a telephone conversation,
Mic - microphone sensitivity levels,
Ring - ringer volume,
Media - volume when playing music, movies, and games.
Ring volume levels are set in Audio - LoudSpeaker - Ring
Max Vol = 150
Levels: 120 130 145 160 180 200 (starts to wheeze more)
Phone speaker volume levels in Audio - Normal - Sph
Max Vol = 150
Levels: 100 120 130 135 140 145 150
Microphone conversation volume levels in Audio - Normal - Mic
Levels: 100 172 172 172 172 172 172
Media volume levels are set in Audio - LoudSpeaker - Media
Levels: 110 130 160 190 210 230 250
All the same can be configured for the Headphone mode, by analogy:
Speakerphone volume levels are set in Audio - LoudSpeaker - Sph
Max Vol = 150 (it is the same for the entire section)
Levels: 80 100 110 120 130 140 150 (more wheezing starts)
Now all volumes are adjusted within adequate ranges.
If you are not satisfied with the volume levels, you can set your values (the higher the value, the greater the volume when adjusting with the volume keys, or the greater the sensitivity of the microphone)
By analogy, you can configure most sections! Experiment!


