1c mobile platform. Automation tips. S:Small Firm Management
The 1C:Enterprise mobile platform is a set of tools and technologies for the rapid development of applications for mobile operating systems iOS, Android, Windows Phone / 8.1 / 10, using the same development environments (Configurator or 1C:Entrprise Development Tools) and the same development techniques, that are used for “regular” 1C applications. The result is autonomous, offline applications, but with the ability to exchange information with the outside world using a wide range of integration tools provided by the platform: Web and HTTP services, e-mail, etc. Since the exchange protocols are platform-independent, the 1C mobile platform, among other things, is a means of quickly creating a mobile front-end for almost any server solution.
Background
Back in the days of 1C:Enterprise version 8.0 (and subsequent versions), there was a software product called “Extension for Pocket PCs”. The extension allowed creating products only for Windows Mobile, Windows CE, etc. The product had its own configurator and server, and was supported until the release of 1C:Enterprise version 8.3. The latest version of the extension (8.2.9) was released in October 2013, and full support ended on January 1, 2015.The extension had limited use even during the heyday of Windows Mobile communicators, and the departure of such devices from the mobile market clearly did not add to the popularity of this software product. iOS and Android devices have taken over almost the entire mobile device market, and it has become obvious that support for these operating systems is one of the key points for a system that must be operated in the modern mobile world. It also seemed obvious that the main approach of the existing 1C:Enterprise platform should be used on mobile devices: the application developer should first of all think about solving application problems, and secondly, about what capabilities of the operating system he uses to solve these problems . In other words, we need a tool that isolates the application developer from the peculiarities of a specific mobile OS and development tool.
Mobile platform
Based on the experience of developing and operating extensions for pocket computers, it was decided to develop a specialized system that would satisfy several requirements:- it must support modern popular mobile operating systems and devices running them. First of all, these are iOS from Apple and Android from Google.
- this system should allow the use of developed applications in the style adopted on modern mobile devices. In particular, the interface should rely on manual control (literally) using touch screens.
- the system must provide a uniform software interface for implementing various specific mechanisms, regardless of the mobile OS used.
- the developer must use the same tool and the same development approaches as when developing applications for a “regular” computer.
- An application developer should develop an application solution in a familiar development environment, if possible using a single code for desktop and mobile systems.
- the interface of an application solution running on a mobile device should be similar for different platforms and, in general, be clearly recognizable.
The mobile platform was quite well received by the community, and various articles on this topic began to appear (for example, and). In order to develop a fully functional application that runs simultaneously on the vast majority of mobile devices, now required minimal time and knowledge, which is not fundamentally different from the knowledge of a “regular” application developer on the 1C:Enterprise platform. Of course, such a low barrier to entry attracts developers who need to provide some basic functionality for employees working on the road, management, and other mobile employees who need to work with the corporate system.
It’s easy to start developing a mobile application on the 1C:Enterprise platform. In the Configurator, you need to set the “Use Purpose” property of the configuration to the “Mobile device” value. In this case, some application configuration objects will become unavailable (characteristic type plans, charts of accounts, etc.), but properties specific to mobile applications will become available (for example, built-in multimedia tools and geopositioning of a mobile device, etc.).

At the same time, you can debug the main algorithms of the application (not directly related to mobile specifics) directly in the Configurator on the developer’s computer. At the same time, it is recommended to frame sections of the code in which “mobile” functionality is accessed with appropriate instructions to the preprocessor in order to avoid errors when executing the code on a personal computer:
#If the Mobile Application is a Client Then Data = GeopositioningServer.GetProviderName(); #TheEndIf
Starting with version 8.3.7 of the mobile platform, debugging the application directly on a mobile device has become available (more on this below).
Development on a mobile platform can follow different approaches, but there are a few main points that can be highlighted. From the point of view of building the mobile application itself, its functional richness and role in the IT infrastructure of the enterprise:
- a mobile application can be an integral and integral part of an enterprise’s existing information system. The mobile application will provide an interface and other capabilities (including data exchange) tailored to the capabilities of the existing information system. In this case, the mobile application is very tightly connected with the “regular” information system and cannot be operated in isolation from it.
- a mobile application performs specific tasks that have virtually no connection with the enterprise information system. There is only a minimum set of data that is exchanged between the mobile application and the information system. In this case, most likely, the mobile application will perform the exchange using some standardized protocol, which makes it possible to use this mobile application in completely different cases and situations.
The mobile application is developed as a completely standalone configuration, but may share some of the source code with the “parent” configuration. By the way, the “parent” configuration may not physically exist (for example, if you are developing some kind of universal application that can work with different systems using a universal protocol).
Mobile platform device
What is a mobile platform and what can it do?To be fair, the mobile platform is just one of the components of the entire complex, thanks to which 1C:Enterprise 8 works on mobile devices. So, the application developer operates with the following components:
- The mobile platform itself is the mobile part of the 1C:Enterprise framework. It can be a regular one (which is used during the build of the application for publication in the app store) and a mobile developer platform, which is used (surprise) during the development of a mobile application.
- Mobile configuration is the configuration of the 1C:Enterprise program system, written in the form of an XML file.
- The combination of a mobile platform and a mobile configuration results in a mobile application.
- Mobile application builder is a specialized application solution that can make a ready-made mobile application file from a mobile platform, configuration, screensavers, icons and other components, which can be uploaded to the Apple AppStore, Google Play, Windows Phone Apps / Windows Apps stores.
After the mobile application is on the target mobile device, it becomes necessary to use some kind of database (the data must be stored somewhere). As a database engine, the mobile platform uses its own database engine, which is ported to the mobile platform from the platform for a personal computer. It is compact and fast enough, but the main thing is that it provides exactly the same behavior that application developers are accustomed to when working on a platform for personal computers.
It is also worth noting that internally, the mobile application is built according to the same scheme as the work of a regular platform with a file version of the information base: there is a client part, there is a server part, there is a database, and there is client-server interaction.
The mobile platform itself is written as a native application, compiled into binary code for the main processor architectures currently used in the mobile world: this is the ARM v5 and higher architecture and x86.
In addition, special permissions may be required to interact with certain capabilities of a mobile device (telephony, GPS, working with the built-in camera, etc.). For iOS, they are set directly during the operation of the application itself, and for Android, permissions are specified when creating the application. The required permissions are specified when developing a mobile application and are used by the mobile application builder, but more on the builder a little later.
A little about the developer platform
While we are developing a mobile application, we are not bound by licensing restrictions imposed on mobile applications distributed through application stores. This means that we can use the 1C mobile platform in the same way as we use a “large” platform on a personal computer - install the mobile platform itself on a smartphone/tablet and load mobile application configurations into it. After launch, the platform will show us a list of applications registered in it:
To add a new application to the platform, you need to place an XML file with its description on a resource accessible from a mobile device via the HTTP protocol. The most convenient way to do this is from the Configurator, through the menu “Configuration \ Mobile application \ Publish”. In this case, the XML file with the application configuration is placed on a web server on the developer’s computer (accordingly, this computer must have a web server - IIS or Apache).

If you specify the “Restart from configurator” option for the application, the application on the mobile device will be automatically updated from the developer’s computer every time the developer updates the XML configuration file located on the web server.
When the “Debugging Allowed” option is enabled, step-by-step debugging of the application on a mobile device is possible from the Configurator on the developer’s computer (in the Configurator, the “Debugging via HTTP” option must be selected in the “Tools\Options” menu). If you set breakpoints in the code in the Configurator and select the “Mobile application - start debugging” command, the mobile application on the device will stop when the executing code reaches the breakpoint, and in the Configurator you can view the values of variables, the call stack, etc.
What can he do?
So, what can the mobile platform do? Enough:)If you don’t use specific 1C:Enterprise terms, the mobile platform provides the ability to work with regulatory and reference information, draw up documents describing some external actions, view reports, communicate with the outside world using Internet services, and much more. Those. it provides an application developer with the opportunity to write a fairly functional application, for example, a home finance accounting program, a field trading program, and the like.
But in addition to the usual functionality that is found on a platform for a personal computer, the mobile platform must provide work with specific capabilities that are unique to mobile devices:
- working with calls and call logs;
- working with short messages (SMS) and their list;
- contacts;
- calendars;
- geopositioning (without routing);
- allows you to take photographs, as well as video and audio recording;
- respond to changes in screen orientation;
- work with notifications (local and PUSH, both directly and through a special intermediary service);
- scan barcodes and QR codes using the camera
- Monetization of mobile applications (i.e. a way to give the mobile application developer opportunities for additional income):
- Work with the Apple In-App Purchase (for iOS OS) and Google Play In-App Billing (for Android OS) shopping services, with which you can organize various types of subscriptions, purchases of functionality, etc. in a mobile application
- Displaying advertising in mobile applications (iAd services for iOS and AdMob for Android are currently supported).
- etc.
If Telephony Tools.SupportedDialing() Then Telephony Tools.DialNumber(PhoneNumber, CallImmediately); endIf;
Hiding details about the mobile OS used from the application developer and providing him with unified mechanisms for using mobile functionality is an important task for us. We believe that we are successfully solving the problem. Differences in the implemented mechanisms are either absent or minimized. Except, of course, for cases where there is no functionality at all in one of the operating systems.
For example, the technique for working with PUSH notifications is very different between Google and Apple. We have made a lot of effort to unify the mechanism for working with PUSH notifications from application code. In the case of a mobile application, we succeeded almost 100%: the same application code on a mobile device processes the reception of PUSH notifications on both iOS and Android. And the code for sending PUSH notifications in the server application also looks the same. But in order to achieve such unification, we had to develop a special proxy server https://pushnotifications.1c.com/, which hides from the developer different techniques for working with Apple Push Notification Service (APNS) and Google Cloud Messaging (GCM). The whole difference lies in the different settings directly on the proxy site https://pushnotifications.1c.com/; to work with APNS, you need to upload an SSL certificate to the site (which Apple issues for the application at the request of the developer); to work with GCM, you need to specify a unique application identifier.
Obviously, it is impossible to implement all the features you want in a mobile application right away. And you always have to find a compromise between several very useful things. And if you are missing something, write to us about what business tasks (after all, a platform is, first of all, a tool for implementing business tasks!) you cannot solve and what mechanism would help you with this.
What does it look like?
The graphical interface of the mobile platform is a separate issue. In 1C:Enterprise, as you know, the interface is described declaratively. This, on the one hand, imposes some restrictions on UI development (for example, there is no possibility of pixel-by-pixel positioning), but, on the other hand, it allows the platform to uniformly render the interface on screens of different sizes, in thin and web clients. We tried to adhere to the same principle in the mobile platform. How well have we done this? Let's try to figure it out.In the first versions of the mobile platform (up to 8.3.5 inclusive), the graphical interface of the applications looked very familiar to sophisticated 1C users; in fact, he transferred the interface familiar from the “desktop” versions of 1C to the mobile world. But from the point of view of users who were not previously familiar with 1C, the interface looked somewhat archaic.
Taking into account comments and suggestions, we have radically revised our approach to the mobile interface in version 8.3.6. We can say that we have made a completely new mobile interface for our applications. It has a lot in common with our Taxi interface. The development model for mobile application developers corresponds to the development model in Taxi. At the same time, the mobile interface fully complies with the design approaches adopted in mobile applications. The interface fully takes into account the specifics of the mobile world: small screen size (which means the design of graphic elements should become more ascetic - without shadows, gradients), there is support for finger gestures, etc. Interesting fact: the new platform mechanism responsible for placing elements in the form (layouter) turned out to be so successful and timely for the mobile platform that it was released earlier (in version 8.3.6) than in the PC platform (in version 8.3.7) , for which it was primarily intended.
In the picture you can see how our interface has changed.
Application “Management of a small company” on mobile platform version 8.3.5:

It is the same on version 8.3.6:

And this is what the interface of the mobile platform looks like in real life:
The collector - and what kind of beast is this?
As mentioned earlier, a mobile application consists of several components (the mobile platform itself, configuration, various resources), which must form a single whole in order to place the application in the store. To make it easier to turn components into an application, a mobile application builder was developed. This is a configuration (application) created on the 1C:Enterprise platform, which stores in its database all the components necessary to create a mobile application. In order for the collector to do its job, you need to download and install various software packages that are needed for its operation (Java and Android SDK, etc.), then specify the paths to these packages in the collector settings and set some additional parameters (developer keys etc.).
After configuration, the assembler is ready for use. In general, working with the collector looks like this:
- Download the version of the 1C mobile platform on which we will build the application
- Loading the configuration from which we will build the mobile application
- We create a mobile application in which we indicate for which platforms (Android, iOS, Windows) the build should be performed, what configuration and platform should be used (in particular, indicate which certificate to use for building for iOS if the application works with PUSH- notifications).
- We build a mobile application for all selected platforms with one click
- “With another click” we send the collected mobile applications to the application stores (if it is an application for iOS or Android). The application must be downloaded manually to the Windows Apps / Windows Phone Apps stores, because... Microsoft does not yet provide an API for publishing an application in the store.
Applications on the mobile platform
The 1C company itself produces a number of applications on the mobile platform that are mobile clients of 1C server applications (1C: Document Flow, 1C: Small Firm Management, etc.). These applications implement some subset of the functionality of "regular" clients. In the case of the mobile version of 1C: Small Firm Management, the functionality is sufficient for full use of the program, and we have often seen a situation where the mobile version of the application is enough for clients to conduct business.Our partners use the mobile platform both to develop mass-produced mobile applications distributed through app stores, and for custom applications created according to the requests of specific clients. Among mass-produced applications, there are applications that use a non-1C back-end as a central data storage.
Among the mobile applications created at the request of clients, we can mention the mobile client for “1C: Manufacturing Enterprise Management”, created by order of a large machine-building holding. About a hundred employees of the holding use the mobile application in hot shops, where for safety reasons it is impossible to install desktop computers. The built-in camera of a mobile device is used to read barcodes of products and search for them in the item directory; the mobile application allows you to understand at what stage of the technological chain a given product is located, mark the passage of the next operation by the product, etc.
Conclusion
We tried to very superficially describe the mobile platform, what it allows you to do and why it turned out the way it did. This article says almost nothing about mobile Windows. There are several reasons for this: firstly, the version of the mobile platform for Windows was released relatively recently (“1C:Enterprise” version 8.3.7), and secondly, this version of the mobile platform does not have any significant differences from the implementation for other mobile operating systems . Naturally, we will increase functionality for Windows OS. As well as increasing the functionality of the mobile platform as a whole. So, in the near future we have support for external components in the mobile platform; this mechanism (long available in the “big” platform) will allow developers to implement functionality that is not available for some reason in the mobile platform.Traditionally, the strengths of the 1C:Enterprise technology platform are its ease of use for developers and the speed of creating and modifying business applications. The 1C mobile platform brought both of these trump cards to the mobile world. The 1C mobile platform is an opportunity to quickly develop an application that runs on the three most popular mobile platforms (iOS, Android, Windows Phone / 8.1 / 10). And thanks to the wide range of available platform-independent integration tools (Web and HTTP services, etc.), the 1C mobile platform is the ability to quickly create a mobile client for three mobile platforms for almost any server application that supports any of the integration methods available in the 1C platform (Web and HTTP services, file sharing, etc.).
Only registered users can participate in the survey. Come in, please.
Without going into details, the mobile platform is the same 1C file database as on a desktop computer, only it works in mobile operating systems - iOS and Android.
The main difference between mobile 1C and stationary one is that it uses a specialized interface focused on touch control on small screens, and also has the ability to interact with a mobile device (take a photo, get coordinates, send SMS, etc.). The 1C mobile platform is a set of tools that allows you to create solutions for mobile operating systems.
The development of solutions for the mobile platform is carried out in the same 1C configurator as
development of conventional solutions. Also, at the moment, another development environment is available in beta version - “1C: Enterprise Development Tools” based on Eclipse.
Mobile capabilities of the mobile platform
Since the mobile platform is non-stationary, it clearly must have some functionality that is available when working with a mobile device. For example, we are not surprised that a stationary platform can print documents to a printer? In this case, the stationary platform uses the capabilities of the operating system on which it runs. An example of close integration is the HTML document field in 1C, since in the case of Windows the Internet Explorer engine is used, and with Linux
- default browser engine. Now let's look at the list of features that the mobile platform has in mobile systems:
- Working with telephony - working with call logs (call history) or the ability to make a call
- Working with messages (SMS and MMS) - not only sending, but also reading received messages. This is convenient when you need, for example, to catch an SMS from a client bank and immediately enter an expense or receipt of money based on it. However, 1C cannot read existing SMS messages.
- Geopositioning tools - obtaining coordinates from satellites and networks. Getting a coordinate by address or an address by coordinate. Displaying data on a map
- Working with multimedia - the ability to take photos, videos and audio recordings
- Scanning barcodes - scanning barcodes with a phone camera: both linear (EAN13, Code39, etc.) and two-dimensional (QR, etc.)
- Working with e-mail - the main difference from landline is that in landline 1C you just have to register all the connection settings, and in mobile OS, for example Android, you already have local mail. Therefore, to send a letter you do not need to enter registration data into 1C itself.
- Working with contacts - reading, writing, editing contacts in your device
- Working with the calendar - creating and reading reminders in the calendar
- Screen orientation is the ability to track the fact that the device screen is rotated, which means you can, for example, redraw certain forms so that they look better in portrait orientation, and not just rotate landscape according to the “as is” principle and hope that 1C itself scales the form, as needed
- Working with notifications is one of the most interesting and quite difficult points to quickly explain. But in a nutshell, this is an opportunity to notify mobile 1C about something, for example, that it needs to be synchronized, etc.
The capabilities of mobile 1C are not limited to this list, but we will consider this in more detail in the following publications.
The list above is the standard capabilities of 1C, and there are also standard capabilities of the mobile system itself, which 1C can use in the same way as the stationary 1C works with printers
Where can I get a mobile platform?
You can download the archive with the mobile platform from the 1C update site. In addition, you can get a mobile platform from a landline platform for free. At the same time, the stationary version will not be the full version, but a training one.
So, we are interested in the mobile.zip archive, which contains the following files:
- 1CEnterprise_en.htm
- 1CEnterprise_ru.htm
- Android
- MobileAppMaker
In the .htm files you will find a license agreement that allows you to develop and test 1C on 50 mobile devices.
Next you will see three folders, each of which contains the files necessary to obtain
the final version of your application. Let's look at them in order.
The Android folder contains the following files:
- 1cem-arm.apk
- 1cem-x86.apk
- prjandroid-arm.zip
- prjandroid-x86.zip
Files with the .apk extension are a platform for developers that can be installed on the phone itself. And the remaining files are needed to compile the final version. Please note that Android devices use two processor architectures: arm and x86. Accordingly, for each architecture you need to use your own version of the application. Determining what architecture your device has is very simple - if you have an Intel processor, then it is x86, everything else is arm. The most important thing is not to confuse it, because if you try to install the x86 version on a phone with an arm processor, there is a considerable chance that it will install (although it may give an error during installation), but then it will not work correctly or will simply give an error upon startup and close.
The iOS folder contains files that are necessary to work with iOS devices.
- prjios.zip
- prjios_en_ru.zip
And in the last MobileAppMaker folder there is a configuration file “Mobile Application Builder”.
To be continued...
Good afternoon, dear readers, we bring to your attention a short article on creating a simple mobile application based on the 1C: Enterprise mobile platform for Android without compiling into an apk file.
To begin with, let’s briefly define the basic concepts and software that we will need for development.
1.Basic concepts
Mobile platform- a tool that allows you to implement applications that operate on mobile devices running iOS, Android, and Windows Phone operating systems.
Mobile app - is the end result of development . It is installed on a mobile device and has the ability to exchange information with the main application in Off-line mode. The following information transfer channels are available for exchange: File exchange, e-mail, Web services, etc.
The configurator acts as a development environment; the only thing that needs to be taken into account is that not all configuration objects and system mechanisms are supported by the mobile application.
2.Software setup
2.1 InstallationWeb servers
First, let's install the Web server. Work is possible with both Internet information services from Microsoft and with Apache. In our example we will consider Apache because it is easier to set up and stable in operation.
Using the " Next » go to the next window:
Into the fields "Network Domain" And "Server name" write " localhost" (or 127.0.0.1). This means that the server will run on the local computer.
In field « Administrator’ s Email Address» We indicate the mailing address, server responses will be sent to it.
Default Apache works with port 80. Many popular programs work with the same port by default, for example TeamViewer, Skype, which will not allow you to launch in the future Apache. There are 2 options to solve this problem, disable the use of this port in these programs, or change the port Apache.
To find out which programs are occupying port 80, you need to run cmd.exe (click Start - type cmd into the search - right-click “Run as administrator”) in the window that appears, enter the command netstat -ab.

In the screenshot we see that port 80 is occupied by Skype.
Let's leave the default port 80. Click " Next » select a standard installation. Click " Next » , change the installation directory if necessary, in the next window click “ Install, after which the installation process will start.
After the installation is complete, an icon will appear in the system tray; if we double-click on it, the following window will open:

If you still have problems with the standard port, you can always change it manually, to do this you need to go to the folder where it is installed Apache, select the folder " conf", open the file in it “ httpd.conf" Find the parameter in it "Listen" and change its values to the port you need, for example 8080.

After changing the port number, save the file and restart Apache. To do this, click on the icon in the tray
With the left mouse button in the menu that appears, select “ Restart».
Let's make sure that the Web server is working, go to the browser and enter http://localhost:8080/ in the address input field (where 8080 is the port that we installed), the following page should appear on the screen:

2.2 Platform setup
For successful operation, the following components must be installed:

2.3 Installation of the mobile platform
Download the mobile platform from the 1C website https://users.v8.1c.ru/. In our example, version 8.3.8.70 is used.
The downloaded platform is an archive that consists of the following folders:
- Android- contains files for assembly for Android;
- iOS- contains files for assembly for iPhone;
- Windows- contains files for assembly for Windows Phone;
- MobileAppMaker- contains the “Application Builder” configuration files.
Since we will be developing the application for a device running Android OS, we are interested in the first directory.
Let's look at its contents:
- 1cem-arm.apk is a mobile developer platform for the ARM architecture, the most commonly used;
- 1cem-x86.apk - mobile development platform for x86 architecture, used for Intel processors;
- prjandroid-arm.zip - a mobile platform designed for building mobile applications (for ARM architecture);
- prjandroid-x86.zip is a mobile platform designed for building mobile applications (for x86 architecture).
Let's install the mobile platform on the device; to do this, copy the file “1cem-arm.apk” to the phone’s memory, or if your device uses an Intel processor, “1cem-x86.apk”.
Let's go to the file manager on the mobile device, find our file and run it

During installation, you may receive a message about blocking applications not received from the Play Store.

In this case, you need to click the “ Settings" and in the window that appears, check the box " unknown sources» 
and repeat the installation.
2.4 Configuration settings
After all the software is configured, we will begin developing our mobile application. Let's create a new information base and go into it in configuration mode.
Go to the menu Tools -> Options
and check the boxes as shown in the screenshot:
Do you have a question or need help from a consultant?


Next, call the properties of the root configuration node and set the “Use Purpose” parameter as “Mobile Device”, and remove the “Personal Computer” flag. After this, the mobile application objects will become available. Some configuration objects will become unavailable.

2.5 Publishing application configuration
The next step is to transfer the configuration to the phone. To do this, first of all, we will create a directory; the path to this directory should be short, not contain spaces and consist only of Latin characters, for example C:\MobileApp. Further go to Configuration -> Mobile Application -> Publish . In the window that appears, fill in the parameters:
- Name - The name of the mobile application. The name must not be the same as the database publication name for the thin client.
- Update mobile application - if this option is selected, then each time the configuration is updated, the configuration on the device will be automatically updated
- Directory - path to the folder where the mobile application files will be stored.


Let's make sure that everything works, go to the browser at http://localhost:8080/Mobapp/, we should see the following xml file:


In the address field, enter the IP of the computer on which the configuration is published and the name of the publication itself separated by a slash. In our example, a non-standard port is used, so the address will look like this:

Click the download button, after downloading the following settings window should appear:

Set the parameters:
- « Restart from the configurator" - The application will be automatically updated when the XML configuration file located on the web server is updated.
- « Debugging enabled» - step-by-step debugging of the application on a mobile device is possible from the Configurator on the developer’s computer. Press the button " OK».
If after pressing the button " Download"a similar error will occur:

Now our database has been added to the mobile device, and we can launch it, click on it in the database selection list. The window that appears is empty because we haven't added any metadata objects yet. Let's start development.
- Setting up exchange between the Central Bank and the mobile application
Let's assume that we have a certain source database that contains only one directory: “Nomenclature”. And it must exchange information with our mobile application.
Let's go to the mobile application configurator and create a hierarchical directory called “Nomenclature”. Let's add a list form.

Let’s go to the work area of the home page and add the “Nomenclature” directory list form there, set the “Start Page Template” parameter as “One Column”.

Click the button " Update", the application on your phone should update automatically. If not, then display a button on the panel and press it. The following window should appear on the screen:

The next step is to create a new information security. We will add the “Nomenclature” directory to it, the structure of which will completely repeat the “Nomenclature” directory of the mobile application. This database will act as a Source.
Let's create a new Web service, call it "MobileExchange". In the properties, set the URI of the “MobileExchange” namespace. In this Web service, we will add a new operation and call it “Download Products”
Now let's write a code that will return a list of products from the source database in the form of an xml file. Let’s go to the properties of the “Load Products” operation and create a new function from the “ Method name" We will write the following code in the function:

Let's publish a Web service, for this we go Administration ->Publish on Web -Server . In the window that appears, set the name of the Web service “MobileExchange” and uncheck the “Publish thin client and Web client” checkbox. After that, press the button “ Publish».

After publishing the Web service, let’s go to the configuration of the mobile platform, open the list form of the “Nomenclature” directory and add a new command “Update nomenclature” to the command panel of the form. Before doing this, it is recommended to uncheck “ Autofill" at this panel.
Create a new action for the “Update Item” command and write the following code:

We update the configuration.
This completes the development. We go to the user configuration mode of the Source and fill out the nomenclature directory in an arbitrary way

We go to the mobile device, launch the application, and click the “Update item” button. If everything is done correctly, the following data should appear on the screen:

Conclusion
Let's summarize our work - we managed to configure and develop a mobile application from scratch and set up its exchange with another database. It is worth noting that the 1C Mobile platform allows you to do this quickly and conveniently.
Mobile application development is always associated with the need to learn additional technologies. What if we reconsider the question and use already familiar tools?
For the first time, the 1C company tried to enter mobile development market in 2006 year. At that time, there was a real rush to automate the work of remote employees using PDAs. New programs for solving such problems appeared like mushrooms, and a vendor like 1C with successful products for automating various business areas could not miss the chance to enter a profitable market.
By mid-2006, the company presented the release of a new product with the promising name “1C:Enterprise 8. Extension for handheld computers.” 1C developers, who saw the prospects of the 8th platform, began to hope that now, using one tool, it became possible without much difficulty to develop for the mobile operating system “Windows Mobile”, which was popular in those years.
In practice, everything looked much worse. This tool did not allow us to implement original ideas. Plastic bag " Extension for handheld computers» was more of an add-on for certain typical configurations than a full-fledged development solution. There was no provision to expand the configuration functionality by adding new metadata objects. Very simple things were left to third-party programmers: creating new forms for user interaction, processing user events.
Yes, there were all sorts of workarounds for the restrictions, but even they didn’t allow for real development. In addition to technical limitations, consumers felt a serious financial barrier. Companies that decided to implement the solution from 1C were required to purchase productive PDAs, purchase licenses for Windows Mobile, and also pay 1C for the delivery of the solution and the final application.
The solution from 1C was too expensive. Companies accustomed to saving money continued to use alternative solutions. Moreover, the developers of alternatives managed to equip their products with functionality for interaction with standard 1C solutions.
Technical limitations and high cost did not allow the product to repeat the colossal success of the desktop platform. The idea to conquer the mobile market of the building.
applications failed miserably.
Step forward
The loss and losses from an unsuccessful project did not put an end to the development of a promising direction. In 2013, the 1C company introduced the first stable version of the new platform 8.3, which has the function of developing mobile applications.
1C completely rethought its approach to solving the mobile “theorem” and took into account the mistakes of the previous unsuccessful product. The result is a completely new tool that has nothing in common with its predecessor and is focused on the most current mobile platforms - Android and iOS.
Mobile applications in 1C style
To fully get acquainted with the development capabilities for mobile platforms, we will try to develop a small configuration. Using an end-to-end example, you can better evaluate the available functionality and decide on the possibility of using the 1C platform to solve problems.
To work, you will need the latest release of the 1C:Enterprise 8.3 platform. The educational version of the distribution is available on the official 1C website. There is more than enough to recreate an example of its capabilities.
In addition to the 1C:Enterprise 8.3 platform, we will need a number of additional tools. This article will look at an example of developing an Android application. In this regard, you will have to download: Android SDK and Apache WEB server. The first component contains everything needed to build the application and an emulator for testing, and the WEB server is useful for quickly downloading the application to the mobile OS.
We will also require delivery of a “Mobile Developer Platform”. It contains a configuration to simplify the process of building the created mobile application, as well as a mobile developer platform. It must be installed on a mobile device or emulator.
To build an application ready for distribution via Google Play, you will need to download Apacheant And JavaJDK. This topic is beyond the scope of the article, so you can find out more about working with these tools and assembling the application in the corresponding section of my.
Configuring tools
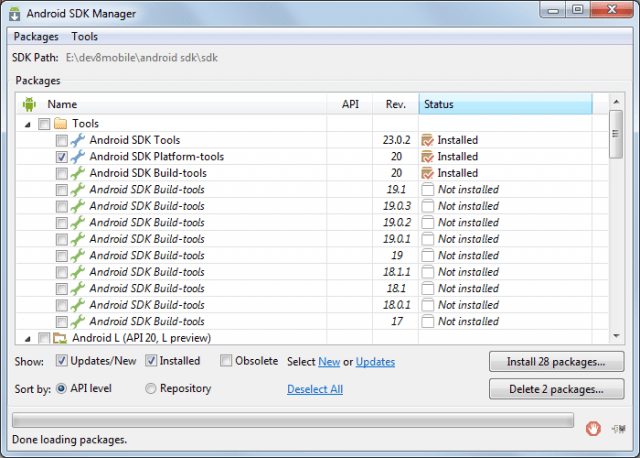
Platform " 1C:Enterprise 8.3" and the Apache web server are supplied with installers and are installed in a standard way. Android SDK you just need to unzip it into a separate directory and run “ sdk manager.exe" A window will appear in front of you with a selection of available packages for installation. To test the example discussed in this article, you will need to select and install: Android SDK Tools, A ndroid Platform Tools, SDK Platform API 17.
The last step will be to create a new information base. For those who are not involved in development under " 1C:Enterprise“I’ll explain that any solution for this platform consists of an information base and configuration. Adding a new database is done by clicking the " Add» start window. After adding the database, open it in " Configurator».
First mobile configuration
In the main menu of the configurator we will find the section “ Configuration" and select "Open configuration". The configuration tree (the objects that will make up the future application) will be displayed on the left side of the window. Select the configuration root in it and press the key combination “ Alt+Enter" The properties editor will open in the right part of the configurator window.

Let's call the configuration " TODO" and in the "Purpose of use" property we indicate " Mobile device" Please note that after performing the last action, some nodes of the configuration tree will become inactive. Unfortunately, it is not possible to use all metadata objects on the mobile platform.

To solve our problem, we will need to create several metadata objects in the configuration tree:
 Procedure AddTask(Task) ExportRecordManager = CreateRecordManager(); RecordManager.Period = CurrentDate(); RecordManager.Task = Task; RecordManager.Status = Task.Status; RecordManager.Record(); End of Procedure
 Listing 2. Code of the function “Get List of Unclosed Tasks()”
Function GetList of UnClosedTasks() Export Request = New Request; Query.Text = "SELECT |TaskStatusSliceLast.Task AS Task, |TaskStatusSliceLast.Task.ExecutionDate AS ExecutionDate |FROM | Information Register.TaskStatus.SliceLast(&CurrentDate, Status<>VALUE(Enumeration.TaskStatuses.Completed)) AS StateTasksSliceLast | |ORDER BY | Execution Date DESC"; Request.SetParameter("CurrentDate", CurrentDate()); Return Request.Execute().Unload(); EndFunctionWe've sorted out getting data from the information register and recording it, now let's teach our directory how to work with the register. To do this, add a common module to the configuration tree with the name “ Working With Tasks" You can do without it, but I would immediately like to focus on the possibility of breaking the code into modules. Many 1C developers still neglect this recommendation and describe all the logic in one place, thereby complicating subsequent code maintenance. Let's create a new procedure in the module " Create NewTask"(see Listing 3).
Listing 3. Code for the “Create NewTask” procedure
Procedure CreateNewTask(Link) Export If Link.ThisGroup Then Return; endIf; Request = New Request; Query.Text = "SELECT |TaskStatusSliceLast.Status |FROM |Information Register.TaskStatus.SliceLast(&CurrentDate, Task = &Task) AS TaskStatusSliceLast"; Query.SetParameter("CurrentDate", CurrentDate()); Request.SetParameter("Task", Link); Result = Query.Run().Select(); If Result.Next() Then If Result.Status<>Link.Status Then Information Registers.Task Status.AddTask(Link); endIf; Otherwise Information Registers.TaskStatus.AddTask(Link); endIf; End of ProcedureBefore creating a new record, a check is made for the presence of existing records for the task. If the record already exists, then you need to compare task statuses. If the status from the register does not differ from the status of the element being written, there is no need to create an additional entry.
As a finishing touch, let’s open the form of the “Tasks” directory item and create an event handler “ AfterRecordingOnServer" In it we will write a call to the procedure described in the third listing:
WorkWithTasks.CreateNewTask(CurrentObject.Link);
We are working on the interface
The main functionality of the application is ready - the user can create tasks, and each new task creates an entry in the periodic information register. Now let's move on to the interface. Let's bring work with tasks to the forefront. Surely it would be logical to immediately display a list of unclosed tasks and the ability to create a new one immediately after launching the application?
Let's find the node " General forms" and add a new form called " Desktop" Let's open the created form in the interface designer and add an attribute like " Table of Values" Let's call it “OpenZachi”. The table will contain two columns - " Task"(Reference Link.Tasks) and " Execution Date" (Date of).

The next step is to drag the added props onto the form. We should have an interface for a simple table. We won’t specify any dimensions; we’ll leave the worry of scaling the interface to the platform.
For the created table, in the Property Inspector, set the checkbox for the property " View only", and the property " Command Panel Position» set the value “No”. We will fill the table with dynamic information, so there is no point in editing it on the user's part.
Now let’s describe the “When CreatedOnServer” event handler for the form. Let's add one line of code to it:
OpenTasks.Load(InformationRegisters.TaskStatus.GetListofUnClosedTasks());
In the code, we refer to the procedure we described " Get the List of Unclosed Tasks” and the result of its execution is placed in the table.
Let's go back to the form designer and add a group of type “Regular group without display” with two buttons: “ Create" And " Update" Property " Grouping"For the added group, set the value to "Horizontal". To make the buttons more expressive, add images and change the default font.

Now select the button " Create" and give it the global command " Tasks: create" This will allow you to create tasks without entering the directory itself. By clicking the second button, we will update the contents of the table with tasks. To do this, you will need to create an additional form command.

All new form commands are created on the tab of the same name " Teams" The principle is simple - we add a new command, describe the action code in it and then associate the command with the interface, in our case with a button.
We should also not forget that we are developing a managed application, so we need to clearly distinguish between client and server code. When the button is clicked there will be a context " OnClient", and we will receive data from the database from the server. In code it looks like this:
&On the Client Procedure UpdateTaskList(Command) UpdateList(); End of Procedure &On the Server Procedure When Created on the Server(Failure, StandardProcessing) OpenTasks.Load(InformationRegisters.TaskStatus.GetListofUnClosedTasks()); End of Procedure
Now let's define our desktop form as the home page area. Open the configuration properties (select the topmost node and click “ Alt+Enter") and for the property "Working area of the home page" set the value " One column", then add our form to the list " Desktop».

The application is completely ready and it's time to test it in action. Try running the example and creating several tasks with a status other than " Completed" The information register has been replenished with new entries (this can be viewed through the menu item “ All functions") and some of them are displayed on the desktop.
Landing on Android
The configuration works great on the desktop, and now is the time to test it on a mobile OS emulator. To prepare a new emulator, run the command interpreter ( cmd.exe) and go to the “toos” directory of the Android SDK distribution. Run the command " android.bat avd", which will launch the virtual Android device manager. In it, click the “Create” button and in the window that appears, specify the parameters of the virtual device. In my work environment I decided to emulate Nexus S with Android version 4.2.2. (API Level 17).

After creating the device, we will immediately launch it. While Android is loading, let's return to the configurator and publish our application on the web server. In the main menu of the configurator, select the item “ Configuration» -> « Mobile app» -> « Publish" In the publishing settings window, we specify the name of the application (can be anything), the web server (in our environment there should be one) and the directory for storing the settings.


Specifying as the name " todo-mobile", the application will be available at the address - " http://host/todo-mobile" Click “ok” and try to access the published application using a browser. If successful, the server will return the XML code of the created configuration.

Let's return to the emulator and load the application with the mobile developer platform into it. The application file itself is available along with the delivery of the mobile developer platform and is called “1cem-arm.apk”. To install this application in the emulator, we will use the utility “ adb.exe" from directory " platform-tools»: adb.exe install –r 1cem-arm.apk.

After successful installation, open the list of applications in the emulator and launch the mobile developer platform. In the window that opens, click “ Add application" and in the "address" field we indicate the URL to our web server. I have this http://192.0.168.106/todo-mobile. Click " Add"and our configuration is successfully transferred to the mobile platform. The application is ready to use. Test the result and return to the configurator, it’s time to provide the applications with “mobile functionality”.


Sending SMS/MMS messages
Functions for working with SMS/MMS messaging is supported differently by mobile platforms. For example, when running an application on Android, the developer has the opportunity to subscribe to SMS and gain access to new messages immediately after receiving them. Unfortunately, this same feature is not available on iOS, so documentation should be at hand during development.
An object is provided for sending SMS messages SMSMessage. Let's look at an example:
&OnClient Procedure SendSMSMessage(Recipient, MessageText) NewMessage = New SMSMessage(); NewMessage.Text = MessageText; NewMessage.Recipients.Add(Recipient); Telephony Tools.SendSMS(NewMessage); End of Procedure
The code is quite simple and hardly needs comments. Now let's look at subscribing to incoming messages:
&On the Client Procedure ConnectMessageReceivingHandler() SubscribeToMessages = New AlertDescription("ProcessingNewMessages", ThisObject); Telephony Tools.ConnectSMSMessageHandler(SubscribeToMessages); End of Procedure &On the Client Procedure Processing New Messages (Message, Additional Parameters) // Processing a new message // Message. Sender, Message. Text; End of Procedure
Procedure " Processing New Messages" will be called every time a new SMS is received. Through the parameter " Message" an object of type " is transmitted SMSMessage» and we can easily obtain the text of the message and information about the sender.
Working with MMS messages is performed in the same way. First we create an SMS message, and then we add an attachment (for example, images) to it. With this simple action, an SMS turns into an MMS:
NewMessage= New SMSMessage(); Attachment = New MMSAttachment; Attachment.Data = Image; Attachment.ContentType = "image/jpeg"; MMSMessage.Attachments.Add(Attachment);
Making calls from a mobile application
A programmatic call is made using the “Dial Number” method of the global object “Telephony Tools”. Before calling the method, it is highly advisable to check the possibility of making a call:
If Telephony Tools.SupportedDialing() Then Telephony Tools.DialNumber(PhoneNumber, CallImmediately); endIf;
Parameter " Call Immediately» affects dialing performance. When it is equal to " True", dialing is performed automatically through the standard calling application. If set to False, the user will also see the standard dialer interface, but will need to press the " button to make a call Call».
Call log
The mobile platform allows the developer to interact with the call log. For example, you can easily get a list of outgoing, missed or incoming calls. This feature is only supported on Android:
Call Log = Telephony Tools.GetCall Log(); Selection = NewDataCompositionSelection; Selection Element = Selection.Elements.Add(Type("DataCompositionSelection Element")); SelectionElement.LeftValue = NewDataCompositionField("CallType"); SelectionElement.ComparisonView = ComparisonTypeDataLayout.Equals; SelectionElement.RightValue = CallLogCallType.Missed; SelectionElement.Use = True; List of CallLog Entries = CallLog.FindRecords(Selection); //The List of Call Log Entries will contain a collection of entries
Geopositioning
Almost any modern smartphone has geolocation functions. You can use this functionality from the built-in 1C language. Obtaining the current coordinates of the device can be divided into 2 stages: selecting a geopositioning provider and processing the received coordinates:
//Let's provide the choice of provider to the platform IdealProvider = Geopositioning Tools.GetMost AccurateProvider(); Coordinates = GeoPositioningTools.GetLastLocation(IdealProvider); //If the coordinates were received a long time ago, then update If Coordinates = Undefined OR CurrentDate() – Coordinates.Date > 3600 Then Geopositioning Tools.UpdateLocation(IdealProvider, 60); Coordinates = GeoPositioningTools.GetLastLocation(IdealProvider); endIf;
Working with multimedia features
The developer has the opportunity to take pictures, videos, and audio recordings using the built-in language: Take a Photo(), Make a video recording(), Make an audio recording().
Which mobile OS is better to develop for on 1C?
Despite my love for Apple technology, it is best to create mobile applications using the 1C platform for Android. There are several reasons for this, but the most important one is the supported functions. Unfortunately, many necessary things are not supported under iOS. For example, the inability to programmatically subscribe to SMS messages or interact with call logs may make it impossible to implement some ideas. Android is more friendly in this regard. Don't forget about the cost of the devices themselves. Not every company will be ready to splurge on purchasing mobile devices from Apple.
Instead of completing
Platform " 1C:Enterprise 8» has proven in practice its readiness to become a simple tool for developing corporate development. Applications for mobile platforms. The examples discussed in the article are additional confirmation of this. It is not at all necessary to spend resources on studying native tools if the functionality of the application fits into the capabilities of the mobile platform and the company is dominated by 1C products.
On September 28 of this year, 1C, without much noise and pathos, released an evaluation version of the platform 8.3.2.163, which was intended for testing. Those interested can read the full list of changes and improvements or, if they have a subscription, .
Of the listed improvements, I think the “Mobile Platform 1C: Enterprise 8” is quite “tasty”, which allows you to create an application for Android or iOS mobile operating systems using the usual 1C tools
Mobile platform, as the developers themselves write, “is the general name for a technology that allows you to create applications that run on mobile devices running the Android or iOS operating systems.”
“A mobile application installed on a device is a combination of a mobile platform and an information base.”
That is, to put it simply, you can compile your written configuration into an application for Android (.apk) or iOS (.zip). Then all this stuff can be posted on Google Play or AppStore. True, if an Android program can be signed with the key created there immediately in 1C, and it will be ready for publication immediately, then to publish the application in the AppStore it will first have to be compiled using the Xcode program on a computer with the Mac OS X operating system. And, Of course, publishing in any of these stores requires a developer license.
Everything sounds good, and I naturally wanted to try out the new features in action.
Creating a mobile application on 1C
To do this, we need a new version of the platform (), a file that takes , android SDK and JDK.
I’ll warn you right away: I’m not currently setting myself the task of showing the process of developing something specific on 1C, but I just want to check and show you that - yes, the world has gone crazy and you can really write a program for Android on 1C.
Well, let's try to write a kind of “helloWorld” for Google Phone. Let's make a program for test purposes - a configuration with one general form, which we will put on the “desktop”.
So, we create a new configuration in managed mode, and the first thing we must do, if we are writing for a mobile platform, is to indicate “Purpose of use” in the properties of the configuration itself.

And here we immediately notice that many configuration objects have become unavailable for use. We will no longer be able to use subsystems, routine tasks, XDTO packages, Web services, reports, business processes and much more. Also, many procedures and methods for some objects are not available. This should be taken into account when developing.
We make a “form”, create a string attribute with the title: “Hello, Habr!” - and throw it onto the form. Let's also create a button. In click processing, we will write a message output, for example.
&OnClient Procedure Command1(Command) Warning("It works!"); End of Procedure
This is enough for us to check its functionality, so let’s get to the fun part. We save the configuration to a file for the mobile application (Configuration->Mobile application->Write to file), launch in managed mode, and start processing MobileAppWizard.epf. This file is in the mobile.zip archive, which we downloaded at the very beginning.
And now we are asked to fill out the initial settings, where all required fields are underlined in red.

Mobile platform location - the directory in which the android.zip and ios.zip files necessary to form the delivery of the mobile application are located. They are all in the same mobile.zip archive.
We indicate the folder where we installed the Android SDK (you can download it). 1C sets the following requirements:
Android SDK Tools version - no lower than 20.0.3;
Version of Android SDK Platform-tools - not lower than 14;
SDK Platform version - API 8 (not lower than version 8.3).
And we also need a Java SDK (can be obtained at this address) Moreover, 1C warns us that JDK7 does not work in conjunction with the Android SDK.
We indicate the folders where our .apk file will be placed, the location of the signing key and an alias with a password. If you are doing this for the first time and you do not have a key, then you can fill in the “key parameters” and create a key for yourself (in this case, in the “key file” field you must indicate the folder where this key will be created).
Click “OK” and go to the second window.

In it, first of all, we indicate “Mobile application configuration” - the same file that we saved. Then the language, and only then click on the button with a “magnifying glass” and enter the representation there. We indicate “Application ID” - a unique name of the Java class that will be used in the future to perform the update. The identifier must be written in Latin, and 1C recommends starting its name with “com.e1c.” Fill in the version and build number and click the “Create” button. If everything goes well, the system will notify you that the .apk file has been successfully created.
We upload the resulting file to the phone and install it with our favorite manager, having previously allowed the installation of third-party applications in the system settings. Or install the program on the emulator via adb. I’ll say right away: on the emulator everything is terribly slow, but on the phone (I only tested it on the HTC Wildfire S) things are much better, but there are still problems. For example, my file turned out to weigh as much as 34 Mb, so the installation took quite a long time. After launch, we are greeted by a splash screen, and after a while the configuration itself starts. (sorry about the photo: I took it with a calculator)


So far, the new features look very “crude”: limited functionality of 1C, the inability to use the SDK directly, plus a large size and some “brakes”... But the very possibility of writing a program for a mobile platform on 1C is a little surprising! Personally, I'm of two minds about this. On the one hand, this “feature” is still more like a toy, because there is no opportunity to do something truly worthwhile. But on the other hand, this is clearly a big step by the 1C company towards mobility, and if this direction is actively developed, it can bring a lot of benefits. As an example, you can equip storekeepers with tablets. If it is possible to use “on-board” cameras, then you can free yourself from reading devices, and scan codes directly from the tablet, you can provide them to car drivers, and send transportation tasks or track the vehicle’s route and time in motion. In general, there are many options, and the fact that it will all be in a single information system will greatly please customers/managers, because for some reason they always have a panic fear of using a large number of different systems, they want to use all the functionality on single platform.


