Installing windows xp from a boot disk. Step-by-step instructions for installing Windows XP. Typical errors when installing the system
Probably every second computer-related website has an article about how to install Windows XP operating system. I thought that let my blog be no exception and remain on it Windows XP installation instructions.
You can install Windows on a blank hard drive; on top of an already installed system; or as a second (third, etc.) operating system. Each of these options has its own characteristics. Today I want to tell you how to completely reinstall your existing operating system while formatting the system disk.
In general, you can start installing Windows XP in two ways: 1) by booting from the installation disk; 2) directly from the installed system. The first option is preferable, and we will consider it.
A small digression: I did not take the screenshots used in the article myself. I borrowed them from the site compbegin.ru. I hope the author won’t be offended by me for this :)
So, for installation we need boot disk with Windows XP operating system. Only such a disk contains a special hidden partition with important system files that will allow the computer to boot directly from this CD.
We turn on our computer and first of all go to the BIOS to configure booting from disk. To do this, immediately after turning on, press the key on the keyboard Delete or F2(other keys may also be used, so you need to carefully watch the prompts on the screen).
Once in Bios, you need to find the section with the word Boot, and then change the order of boot devices in it so that the CD-ROM is in first place. Depending on the BIOS version, the device from which the computer will boot is either selected from the list or moved to the top using the keys F5/F6, +/-
.
After the changes have been made, we exit the BIOS, saving the settings. Before leaving, you need to insert a disk with Windows XP into the drive so that the computer can boot from it.
If any Windows operating system was already installed on your computer, then after rebooting you will see “” on the screen (this means “Press any key to boot from CD”). Accordingly, you need to press any button on the keyboard. If you wait more than 10 seconds, the current operating system installed on the hard drive will begin loading (then you will have to restart the computer again).  The Windows XP installer shell will appear on the screen. The OS will check the hardware installed on the computer and begin downloading installation files.
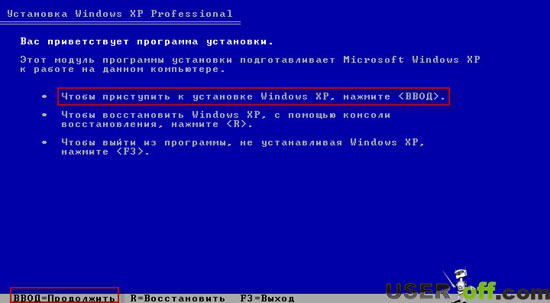
  At the end of this process, a window will appear asking you to begin installing Windows. Click Enter on keyboard.
  Next, accept the license agreement by clicking F8.
 It will then search for previous copies of Windows installed on your computer. If any are found, you will see a screen with a list of these systems.
  Here you will also be offered:
1) Restore the found copy of Windows by pressing the R key .
Recovery can help if Windows system files are damaged, deleted, or replaced by infected files.
If you select this option, you will have to go through the full system installation procedure, during which all system files of the old copy will be replaced with new ones from the CD. All your data, settings and installed programs will not disappear anywhere.
2) Install a new copy of Windows by pressing the Esc key .
Because we want to install a new Windows XP, then press now on the keyboard Esc.
You will not see a window with a list of installed systems if you are installing the system on a new hard drive, or if the previous copy of Windows has a different edition or service pack.
Because in my case, the operating system was already installed on the computer, and the hard drive was already distributed into logical drives. Therefore, a window appears listing all found partitions.  If the current partitioning of your hard drive does not suit you, you can delete existing partitions by pressing D(you can select the desired section using the arrows on the keyboard). After deleting a partition, the area it occupied becomes unallocated, and all data located on this logical disk is deleted.
The existing structure of the hard drive suits me, so I use the arrow on the keyboard to select the partition in which the system will be installed. Let it be C: Section2 (SYSTEM). Then I click Enter.
If the following window appears, just click Enter. Then select “Format partition using NTFS” and click Enter.
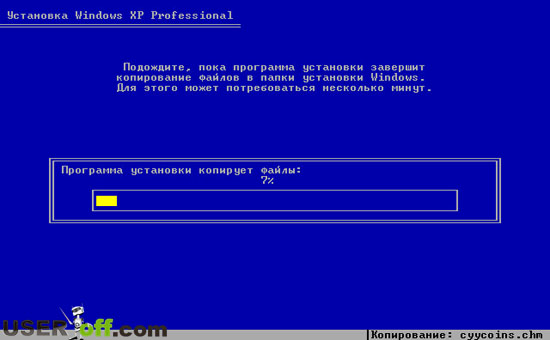
 The formatting process will begin:
 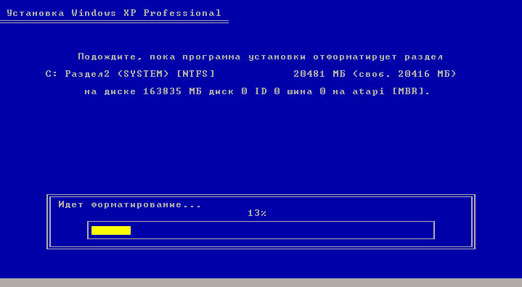 When it’s finished, Windows XP files will begin copying to your hard drive:
 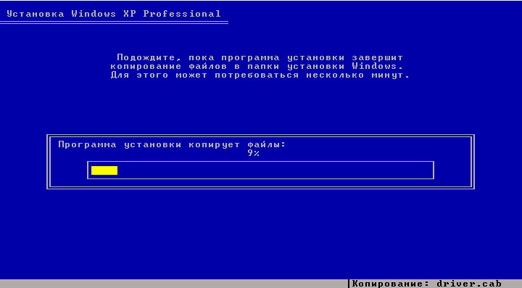 After the copying is completed, the computer will reboot. If after rebooting a screen appears that says “”, do not press anything (just wait 10 seconds). Otherwise, the installation will start again.
Next, Windows will offer to configure the language and region. Click “Next”.  In the “Setting program affiliation” window, enter some name (for example: Ivan) and the name of the organization (for example: Nome). Click “Next”.
  The “Product Key” window will appear, in which you must enter the Windows XP serial number.
  Next, come up with and enter a computer name under which it will be visible on the network (use Latin letters). The administrator password can be left blank.
  In the “Setting time and date” window, check all the settings and click “Next”.
  You will see the next two windows only if the Windows XP distribution contains a driver for your network card. In the first of them, we leave the marker in the “Normal settings” position, and in the second, we agree with the name of the working group WORKGROUP and simply click “Next”.
 Windows will then begin setting up the network and copying files. After the installation is complete, the computer will restart and offer to automatically adjust the screen resolution - click “OK”.
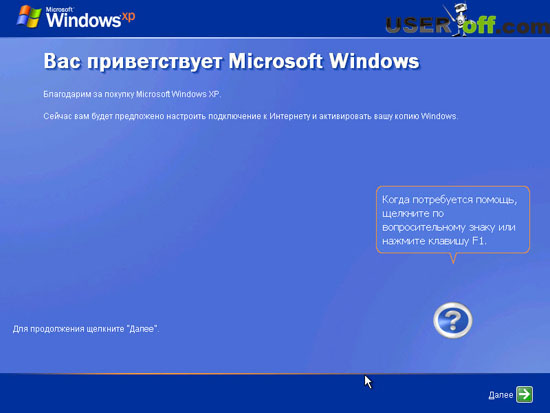
  A welcome screen will appear - click “Next”.
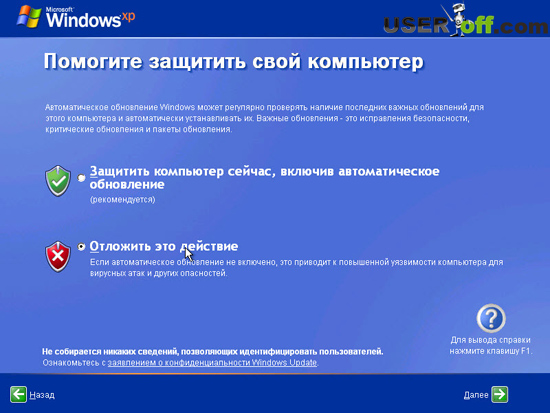
  The next window will ask you to enable automatic updates. You can select “Delay this action” and click “Next”.
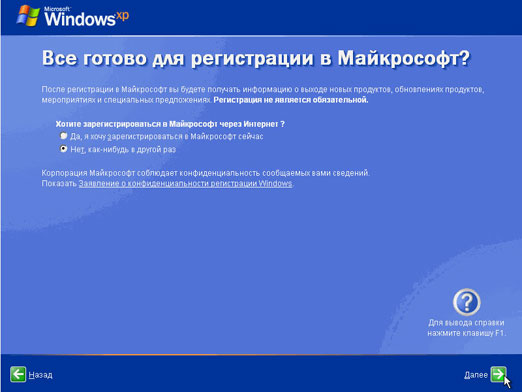
  If the network card driver was installed during installation, two more windows will appear in front of you. In the first “Test Internet connection” click “Skip”. And in the second, put the marker in the “No, some other time” position and click “Next”.
 The account creation window will appear. In the “Your account name” field, enter any name in Latin letters and without spaces. You can also create a second, third, etc. now. users, but for now one is enough. Click “Next”.
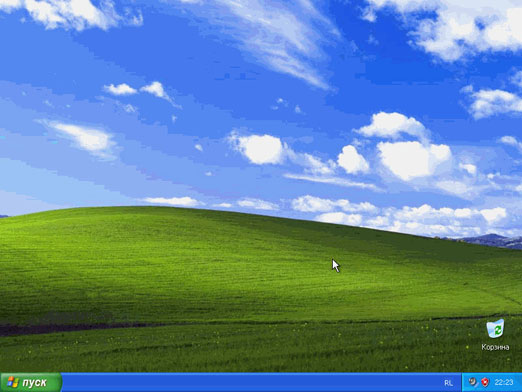
  This completes the installation of Windows XP. After clicking the “Finish” button, the Desktop will appear.
 Do not forget to return the computer to boot from the hard drive in BIOS.
Windows XP remains one of the most popular operating systems today. Users value it for its reliability and ability to work on weak old hardware. Step-by-step installation of Windows XP is a fairly quick and easy process. Below is a detailed description of it.
Preparing the computer for installing a new OS
The simplest way to install Windows XP is from an installation disk. If, instead of reading data from it, the system starts loading the old OS or a black screen appears that does not respond to button presses, then you just need to go into the BIOS and make the appropriate settings:
- Open the Advansed BIOS Features or BIOS/Boot Device Priority section;
- Select First Boot Devise;
- In the list that opens, select CDROM or the name of your drive;
- Save the result by pressing the F10 key and restart your PC.
 Note that there are a lot of BIOS versions for laptops today, so the described steps when installing the OS on a laptop may be slightly different.
Let's proceed directly to the installation
 The first window is a blue screen. It is at this stage that a step-by-step installation of software is carried out to install Windows XP on a SCSI (high-speed disk) or on a RAID array. To do this, press F6, after which the installation of the appropriate drivers will begin. But in most cases, users install the system on a regular hard drive, which does not require any intervention during the installation at this stage, you just need to wait for the next welcome screen.
- Install Windows XP. The standard choice in most cases is to install the system from scratch or restore the old one. A convenient graphical interface is used.
- System recovery using the console. This is the choice of professional users and craftsmen - recovery is performed from the command line using DOS commands. In this case, a complete reinstallation of the system is not performed.
 Next, the system proceeds to search for previously installed OS versions. If any were found, the list will be displayed on this screen below, and the menu will offer options for subsequent actions:
- restore old Windows XP;
- install a new copy of the OS.
 In the first case, you will be able to use previously installed applications. Only system files will be replaced, but the installation will be completed completely. The second option involves a complete reshuffle of the system.
No list will appear not only if Windows XP is installed on an “empty” computer, but also if the previously installed system has a different edition or service pack.
The most crucial moment of installation
The next installation point is perhaps the most important, and should be performed thoughtfully and carefully. You will need to identify the system partition and allocate disk space so that the virtual disk allocated for the system has enough space for its functioning.
Of course, you can use the same partition equal to the entire hard drive space for both the system and your personal data, but such an organization is guaranteed to create many problems in the future.
We split the disk into partitions
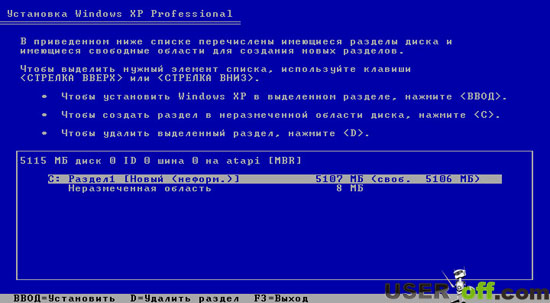
If you install Windows XP on a completely new disk, then you will have to distribute the partitions yourself, since this step-by-step procedure has never been performed before. The window that appears will indicate the size of the unallocated area - it will coincide with the size of the entire hard drive. 
Here you need to create a so-called The system partition is the one where the OS will be installed. To do this, you need to indicate its size in megabytes (1 GB is equal to 1024 MB) and press “Enter” on the keyboard. After this, you will again return to the window in which the hard drive is partitioned. The created section will already be displayed on a separate line with a Latin letter assigned to it (usually C). 
You should not skimp on the size of the system partition - the stability of the system will depend on it. The minimum space for installing Windows XP is 20 GB, but it is better to allocate not 20, but 40, or even all 60 GB.
Similarly, from the remaining unallocated area, we create other sections for personal data, however, you should not get carried away with the quantity - in this case, large files and folders will be distributed less efficiently, and navigation through the sections will become more confusing.
Format the system partition
Next, you will need to select the partition to install the system (in our case, drive C) and press the “Enter” key. A window will open asking you to format the partition.  Choose quick formatting using the NFTS system (FAT is obsolete). After formatting is completed, the process of installing system files will begin.
  The most difficult stage of installation has been completed.
By the way, if the disk that you partitioned is not formatted, then you can carry out this procedure with each of the created partitions for personal data even after completing the installation of Windows XP using standard means.
If you are rearranging the system and the disk is already partitioned, then you should simply select the partition with the system to be reinstalled, format it and start the installation process. If you decide to format the remaining partitions, then all information on them will be lost.
Finishing the installation
Once the system files have been copied, the computer will restart and the installation will continue.
We determine the initial parameters:

Good day.
Despite the fact that many computer users have long switched to new versions of the operating system from Microsoft, there are still customers who prefer the old versions. Like any mechanism that has worked for a long time, the OS can also fail. There are several ways to return your device to its previous state. Today I will tell you how to perform a disk recovery in Windows XP. This will help to revive your computer as soon as possible.
If you are not using the latest versions of Microsoft operating systems, it is advisable to always have a backup option in case of any malfunctions. And in general, you should always have a tool that allows you to return everything to its place at any moment if problems arise.
And one of the most effective is the emergency recovery disk. It's actually just an installation image. It is desirable that this be the one from which the current operating system was installed. If it is impossible to find it, you need to look for the same version. The main thing is assembly and bit depth.
In the absence of a distribution kit, we download and record it on any convenient medium. Which one exactly depends on the motherboard. If it was released a long time ago, it is likely that it does not have the ability to run from a flash drive. In this case, you need to use a plastic disk. To create the desired image, you need to use special programs, which I wrote about earlier.
Recovery( )
This procedure must go through the BIOS, since system areas are affected. The procedure can be called practically the only one that will help with non-working recovery in an already loaded operating system.
So, to launch the tool from a boot disk, we perform several steps:
We insert the appropriate USB flash drive or CD into a suitable drive into the port. Let's reboot.
Immediately after the first characters appear on the screen, you need to enter the BIOS. To do this, in most cases, use the " Del", although depending on the manufacturer they may be " F2, F11, F12" or other. Which button is suitable is written on the screen.

In the BIOS menu we go to boot - “ Boot" We select the desired device to be the first to start the system.

Click " F10", save and restart the computer.

Then the following message will appear on the dark screen: “ Press key to boot..." You need to press any button and the disc will start. If this is not done, the system will try to operate in standard mode.

We are waiting for the program to load the necessary drivers and offer options to choose from.

A list will then appear from which you can select a new installation or recovery. Don’t rush right away - select the first item by clicking on “ Enter" And don't worry - the process will go through without losing data.

The license agreement will appear. We indicate that we have read and understood it in detail by clicking “ F8».

But now a window will appear in which the running program will find an already installed solution. Select our operating system and click “ R", which will run the command " Recovery».
Hello, dear reader! Today I would like to look at a “fundamental” area of computer knowledge, namely, to explain how to install Windows XP on a computer from a disk.
In everyday life, it is generally accepted that anyone who knows how to do this already definitely knows at least a little about computers. I cannot judge how true this statement is, but I have no doubt that this material can be useful to many.
Attention! If you need an original installation disk from Windows XP or any other version, then write to me by email [email protected]. Thus, you will receive an image without viruses and 100% bug-free.
Today we will learn how to reinstall the Windows XP operating system, or as they more often say “reinstall Windows”. Let me note right away that using this article, you can not only reinstall the OS, but also install it on a new hard drive or clean partition.
At the end of the article you can watch a video tutorial.
The quality of the installed system largely depends on the distribution you will use. I do not recommend using various assemblies like Zver DVD and similar ones.
The right choice would be a distribution that has had minimal changes. Ideally, it is better to use the official version. Depending on which distribution you choose, you may be missing some of the following items during the installation process. This does not affect the performance of the system in any way; their number is reduced specifically in order to simplify and speed up the installation process.
You can make an installation disk yourself, use pre-installed drivers (integrated), and also configure all settings so that they are not specified when installing Windows. I will definitely tell you how this is done in one of my next articles.
After installing this version of Windows, you will be able to install any! If you don’t believe me, you can read an article about installing other versions of Windows on the blog:
Steps to take before installing Windows XP
Before I start telling you how to install Windows XP on your computer from a disk, first you need to make sure that you have there is a license key suitable for the existing disk. It can usually be found on the surface of the disk, on the box, on the system unit (if you bought a computer with Windows installed) or in a text file called “serial.txt” or “s/n” in the disk itself.
In the latter case, the disk must be started before reinstalling the OS and the key must be copied onto a piece of paper. Another option is possible - the license key may be located where you downloaded the disk image.
Before you begin the installation, copy all data from the system drive “C:/” to another partition, for example, “D:/”, a portable hard drive, or a flash drive.
Preparation
Before starting the installation, you need to force the computer, after turning it on, to access not the hard drive, but the optical drive (into which you have already inserted the Windows XP installation disc).
This can be done in two ways: the first is to force the computer to access the optical disc drive once during installation, the second is to make the computer always check for the presence of a disk in the drive.
To implement the first method, you need to go to the “Boot menu” and select “ ” in it. To do this, after turning on the computer, PRESS the “F8” or “F12” button. You must not just press and hold the button, but repeat the presses.
To implement the second method, you need to go to the “BIOS” setting - “BIOS Setup”. To do this, when booting the computer, press the “F2”, “F10” or “Del” key.

In the BIOS you need to find a setting indicating the boot order of devices; it will be called something like this: “Boot device priority”.
This can be presented in the form of several items: the first boot device is “First boot device”, the second is “Second boot device”, the third is “Third boot device”, etc.

In order to find out which button you need to press to load the BIOS, you need to look carefully at the screen - there will be hints at the bottom. The button for the first method will be labeled “Boot menu”, and for the second “Setup”, “BIOS” or “BIOS Setup”.

The first method is more suitable for beginners, as it will not lead to anything bad. Unlike the second one, where the user can make a mistake when setting up the BIOS. In addition, after successful installation of the OS, the settings made in the second method must be returned to their original position, which is not required in the first method.
Launching and installing Windows XP
Once the steps described above have been completed, and after turning on the power, the computer boots from the disk and the installation disk is inserted into the drive, you can continue with the installation.
In principle, I have already talked about the nuances of how to install Windows XP on a computer from a disk. But in order for the article to be complete, so to speak, we will complete the Windows installation.
After you restart or turn on your computer, you will be asked to click " Press any key to boot from CD…", which means "Press any key to boot from disk." Accordingly, when we see the message, press any button. I usually press Spacebar (it's hard to miss).

If everything is done correctly, you will soon see the screen shown in the following figure, which indicates that the installation program has begun its preparation procedures.

If the installation is performed on a hard drive that already contains an installed version of Windows XP, you will be prompted to restore it using the Recovery Console. Since we have firmly decided to reinstall the system, press “Enter”.
The next step is to demonstrate the Windows XP License Agreement. Of course, we agree with him, so we press “F8”.

If your computer already has Windows installed, you will be prompted to restore the system, indicating where it should be installed. We refuse, press “Esc”.
 The next step is to select a location to install the new system. Here the installer will show a list of your hard drives and the partitions on them.
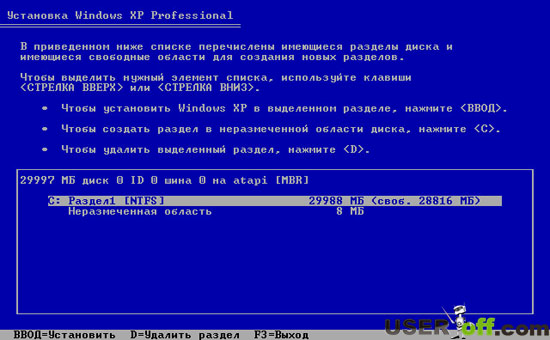
If you are reinstalling the OS, then you need to select the partition with the letter “C:” (it is assumed that this is where the old OS is installed) and press “Enter”.
If the installation takes place on a blank hard drive, then instead of a list of partitions it will be written “(some) MB”. In this case, you first need to create a partition for the system; to do this, press the “C” key.

On the screen that appears, you need to specify the size of the partition to be created in megabytes. By modern standards, for comfortable work, the system partition should be made 30-50 GB in size, that is, you need to specify a figure from 30,000 to 50,000 at your discretion. If you play modern games on your computer, then you need to create a partition from 50,000 to 100,000 MB.

Upon returning to the previous screen, the created partition will be assigned the letter “C:”. Select it and continue by pressing “Enter”.
If you are reinstalling, that is, you are installing the system on a partition with the OS installed, then the program, suspecting that you intend to install two copies of Windows on one partition, will warn you that this is not recommended. Press "C" to continue.

After this, we will be warned that during the formatting process all data on the selected partition will be lost. But we were ready for this, and before reinstalling, we copied all the valuable data from the “C:” drive (after all, we copied it, right?). Select “Format partition using NTFS (Quick)” and press “Enter”.

When asked by the system, press the “F” button.

Ahead of us are two screens that do not require user intervention. The first of them is the progress of the formatting procedure, the second is the process of copying files to the hard drive.

Copying data.
After completing these steps, the computer will restart. He will wait 15 seconds, you can hurry him up by pressing the “Enter” button.

Important point! After the reboot, you no longer need to boot from the disk; the further installation procedure will continue using the files copied to the hard drive. That is, you ignore the sentence “Press any key to boot from CD...” (if it appears). You just don't press anything. The disc remains in the drive.
Further, the appearance has a more pleasant and familiar graphical interface. Dialog boxes will appear from time to time. I will note right away that the time until the installation is completed, indicated at the bottom left, is very different from the truth and depends most of all on the performance of the computer; the speed of the hard drive is also important.

The first dialog box will be "Region and Language". There is no need to change anything in it, but if you want, you can click the first and second “Customize...” buttons and select the desired parameters at your discretion.
Select the country you are in and click “Next”.

In the next window you will be asked to introduce yourself. Feel free to write your name or nickname here.

The next step is to enter the license key. It needs to be prepared in advance, as mentioned above.

A clear name is necessary if the computer operates on a local network (even a home network of 2-3 PCs). Otherwise, you don’t have to bother. It is recommended that you set the administrator password and write it down in a safe place for security reasons. However, if you have any doubts due to forgetfulness, you can leave the field blank.

Select the current date, time and time zone.

In the next window, leave the default settings and click “Next”.

After this, the “Welcome” screen will appear, click “Next”.
When checking your Internet connection, click the “Skip” button.

Select “No, some other time”, click “Next”.

Afterwards you will be asked to specify the users who will work on this computer. A separate account will be created for each. If you will be the only one working, enter your name and click Next.
If all the steps described in the article were performed correctly and the process was successful, congratulations, now you know how to install Windows XP on a computer from a disk.
The next step is to install drivers for your devices. To find out how this is done, read the article: “”. And about the software that will be useful after reinstalling the OS, you can read in the article: “”.
See you soon!
P.S.: I recorded a video tutorial where you can clearly see how to install WIndows XP on your computer from a disk.
Despite its hopeless obsolescence, the Windows XP operating system still remains very popular among users, thanks to the ease of working with it and its fairly high stability. In some ratings, it is even ahead of the “seven”. Next up for consideration is the question of how to install Windows XP from a disk and perform the initial system setup. It is believed that the installation of this particular modification should not cause any particular difficulties, but in reality it is necessary to pay attention to some important nuances, without understanding of which the installation of the system may be unsuccessful.
Create a Windows XP installation disk
At the first stage, we will assume that the user does not have the original installation disk. Windows XP can be downloaded as an image from the official Microsoft website or from another (necessarily trusted) source.
In this case, you should immediately pay attention to the contents of the downloaded distribution. It is recommended to download only the one that initially contains the second and third service packs, so as not to have to install them manually later.
It is not difficult to record an image onto optical media. To do this, you can use many programs for working with images (for example, UltraISO or Nero Burning ROM). If you need to create a multiboot Windows XP disk, it is best to use a tiny utility called WindowsSetupFromUSB, but to write the distribution onto a flash drive.
BIOS Presets
So, we assume that the installation distribution is recorded. Now you need to make it so that you can boot from it. To do this, you must use the primary I/O system BIOS settings. Typically on desktop computers, login is accomplished by pressing the Del key, but different laptop models may use other keys (F1, F12) or combinations thereof.

To be recognized as bootable, you need to find a partition with a name like Boot, Boot Priority, Boot Sequence and install the optical drive (CD/DVD-ROM) first in the list of boot devices by pressing the PgUp/PgDown key.
Start installation
After completing all the preparatory steps, you can proceed to solving the problem of how to install Windows XP from a disk directly. After turning on the computer and starting from the removable device, a black screen will appear with a prompt asking you to press any key to boot from the disk. Keep in mind that you will only have five seconds to make a decision. Otherwise, it will boot from the next device (usually a hard drive), provided that it has a bootloader, an installed OS, or even a damaged OS.

Next, a screen will appear to preload the basic installation components and a line at the bottom prompting you to install additional SCSI and RAID drivers. In most cases, this is not necessary, however, if the computer has several hard drives combined into the same RAID array, the installation must be applied. But it will assume that the user has one hard drive.
Partition selection and formatting
At the next stage, a welcome screen will appear with options to choose from:
- immediate installation of the system;
- restoring a damaged system via the console;
- refusal to install.

Select the first item by pressing the enter key. Next, we agree to the license agreement and press F8 to continue the installation (hints will appear at each installation stage).
After this, previously installed copies will be scanned, after which you will need to make a choice in favor of installing a new system (Esc).
Now the most important thing begins with the question of how to install Windows XP from a disk. The first step is to decide on the system partition and its size. If installed on a new hard drive that did not have logical partitions, the unallocated area (full volume) will be shown.

It is undesirable to allocate all the space to the system partition (this can later play a cruel joke). It’s better to partition the disk right away by pressing the C key and specifying the required volume in MB (for the system you can allocate 40-60 GB, but not less than 20 GB). Please immediately pay attention to the fact that for the normal functioning of Windows XP, about 10-15% of its size must always remain free in the system partition both after installing the OS and after installing user programs. After returning to the partition creation screen, you can begin formatting (but more on that later).

If the hard drive has already been broken and has an old system, the user will be shown all available partitions. If necessary, all partitions can be deleted (press D when selecting a partition). If the user is satisfied with the disk structure, simply select the desired partition in which the system was installed previously and proceed to formatting.
In the case of new hard drives, you can immediately select quick formatting to NTFS. If the operation is applied to an existing partition, several options will be offered to choose from. It is best to perform a full format in NTFS. But to save data, you can leave the file system unchanged. Most likely, you will next receive a warning that the Windows system directory already exists, with a suggestion to overwrite the current copy or select a new folder. Here - optional (all the same, the Windows XP folders of the old version, if one was previously present, will be saved).
Now all that remains is to wait for the files to be copied, after which the reboot will occur and the installation of the system will begin in normal graphical mode.
Setting initial parameters
In the next steps in the question of how to install Windows XP from a disk, the user's actions are quite simple. When rebooting, be sure to remove the optical media from the drive, otherwise you will get the pre-start screen again.

After the installer starts, the language and region are selected (usually you don’t need to change anything if you have a Russian copy of the system), then, if required, enter the user name and organization name (optional), after which the product key is entered (without it, the installation will not continue ). Working keys, by and large, can be easily found on the Internet.
At the next stage, you need to enter the name of the computer and specify the administrator password (this can be done later). Next, the date and time are configured (usually nothing needs to be changed), and finally a screen may appear asking you to select network card settings. Feel free to select “Regular settings” and indicate that the computer is not participating in the network (it is better to select the group and domain after installation is complete).
Completing the installation
Only now will the device drivers begin. Upon completion, several additional windows may appear. For example, the system will ask for consent to set the optimal screen resolution. We must agree with this.
Then a welcome blue screen starts, in which most of the actions can be skipped (for example, deferring protection, checking the Internet connection and registering with Microsoft). Finally, all that remains is to enter the names of the accounts that will be registered in the system. You can enter only your data, after which a notification will appear informing you that the installation is complete.

Clicking the “Finish” button will cause the “Desktop” to appear with a familiar picture. At this point, the installation can be considered complete (if service packs were present in the distribution, they will be installed automatically, otherwise you need to install them yourself).
Typical errors when installing the system
Not often, of course, but you can also encounter Windows XP errors, moreover, precisely during the system installation process. The most common occurrence is BSoD (blue screen). The installation is impossible due to an incorrectly set mode for the hard drive.

If a message appears about a BIOS firmware mismatch, you must disable ACPI mode during installation.
It is possible that the disc itself is damaged or scratched. Just burn the distribution onto another medium and try installing the system again.
Initial setup of Windows XP
Initially, the system usually does not need any special settings. But to reduce the load on computer resources, it is advisable to disable some background services that are activated by default and start with the system.
In the Run console (Win + R), enter the msconfig system configuration access command, go to the startup tab and disable everything that is there, leaving only the ctfmon process, which is responsible for displaying the language in the tray and changing keyboard layouts.
Required additional software
Then be sure to install security software, since there is practically no protection in the “expert” itself. Antiviruses for Window XP are quite diverse and do not cause installation problems. However, based on the fact that this version of the system is usually used on relatively low-power machines, you should not install heavy packages like Kaspersky Lab software products. It is better to limit yourself to some lightweight versions (Avira, Panda Cloud, etc.).
However, if you look at antiviruses for Window XP from the point of view of providing maximum protection, you can use the NOD32 or Smart Security packages from ESET. True, they will have to be activated monthly using special keys that are freely distributed on the Internet.
Finally, all that remains is to install an archiver, a set of codecs, a flash player for the browser, an office suite and some other applications that the user may need while working.


