Installing Linux Ubuntu on a VirtualBox virtual machine. VirtualBox - how to use. Installation and instructions
10.06.2017
 We present one of the final works of a student of our course “Development of Technical Texts and Documentation” Alexandra Okunevskaya, dedicated to a fairly common action in the work of a technical writer - installing a virtual system for the subsequent installation in it of the object on which it is necessary to work.
We do not teach how to work with virtual machines and do not cooperate with their manufacturers. But with us you can learn how to write articles like this one and much more!
1. Introduction
Oracle VM VirtualBox is a free virtualization application designed to run on a variety of operating systems. Virtualization in this context means that a program allows you to install, run and use different operating systems on one physical device. So, for example, with Oracle VM VirtualBox you can run Linux and Mac on Windows. All virtual machines are isolated from each other, which opens up wide possibilities for using VirtualBox: familiarization with operating systems, testing software, using software that for one reason or another does not work in the main operating system, and much more.
This user guide walks you through the installation process for Oracle VM VirtualBox software and also walks through an example of how to deploy a virtual machine running Windows 7.
1.1. Terms
Host operating system (host OS) – This is the operating system of the physical computer on which VirtualBox was installed. There are versions of VirtualBox for Windows, Mac OS X, Linux and Solaris host systems. Cm. Section 1.3.
Everything described in this user guide applies in most cases to all operating systems; Differences due to the use of a particular platform will be indicated separately.
Guest operating system (guest OS) – it is an operating system running on a virtual machine. Theoretically, VirtualBox can run any operating system with x86 architecture (DOS, Windows, OS/2, FreeBSD, OpenBSD), however, in order to achieve performance indicators that are closest to the original ones, it is necessary to select the optimal parameters specific to a particular OS. See Section 1.3.
Virtual machine (VM) – This is a special environment that VirtualBox creates for the guest OS while it is running. In other words, you can run a guest OS in a VM. Typically, the VM takes the form of a dialog box on your computer's desktop, but may also be displayed in full screen or remotely on another computer, depending on which VirtualBox user interface is used.
A VM is a set of parameters that determine its operation and which can be seen in the settings dialog. This set includes hardware settings (how much memory the VM should have, which hard drives and through which file containers VirtualBox should virtualize, images of which CDs should be burned, etc.), as well as information about the state (running whether the VM is currently running, whether it has been saved, whether a snapshot of its state has been taken, etc.). These settings are duplicated in the VirtualBox Manager window and in the VBoxManage command line interface.
1.2. Hardware Requirements
Launching and correct operation of Oracle VM Virtual Box is possible on a computer that meets the following conditions:
CPU: Any Intel or AMD x86-compatible processor with or without VT-x/AMD-V hardware virtualization support. See Section 3.1.
Free RAM: minimum 1 GB + RAM required to launch and operate the corresponding guest OS. For example, for Windows 7 the recommended memory size is 1024-2048 MB.
Hard drive space: 200 MB for installing VirtualBox + 20 GB for installing VM.
These requirements are approximate and depend on the system requirements of the guest OS being installed.
1.3. Supported Host Operating Systems
VirtualBox runs on the following host operating systems:
- Windows:
- Windows Vista SP1 and later (32-bit and 64-bit)
- Windows Server 2008 (64-bit)
- Windows Server 2008 R2 (64-bit)
- Windows 7 (32-bit and 64-bit)
- Windows 8 (32-bit and 64-bit)
- Windows 8.1 (32-bit and 64-bit)
- Windows 10 RTM version build 10240 (32-bit and 64-bit)
- Windows Server 2012 (64-bit)
- Windows Server 2012 R2 (64-bit)
- Mac OS X(64-bit):
- 9 (Mavericks)
- 10 (Yosemite)
- 11 (El Capitan)
Requires Intel hardware. Oracle V.M. VirtualBox, Chapter 14 (in English).
- Linux(32-bit and 64-bit). This also includes:
- Ubuntu, versions 12.04 to 16.10
- Debian GNU/Linux 7 (“Wheezy”) and 8 (“Jessie”)
- Oracle Enterprise Linux 5, Oracle Linux 6 and 7
- Redhat Enterprise Linux 5, 6 and 7
- Fedora Core / Fedora, versions 6 to 25
- Gentoo Linux
- openSUSE, versions 11.4 to 13.2
VirtualBox can also be run on most systems based on the Linux kernel version 2.6 or 3.x, using the VirtualBox installation wizard or manual installation. See original user manual forOracle V.M. VirtualBox, Section 2.3 (in English). Officially tested and supported are those versions of Linux for which the corresponding VirtualBox installation package is provided.
Please note that as of VirtualBox 2.1, host systems based on Linux 2.4 are no longer supported.
- Solaris(64-bit) is supported with the limitations listed in Original user manual forOracle V.M. VirtualBox, Chapter 14 (in English).
- Solaris 11
- Solaris 10 (U10 and above)
Please note that the above list is unofficial. Oracle support for qualified contract customers is limited to the host systems listed. Any component marked as experimental, not supported. Feedback and suggestions regarding these components are welcome.
2. Installing Oracle VM VirtualBox on Windows
To install the VirtualBox program on your computer, download the installation file for the current version of the program by clicking on the following link: https://www.virtualbox.org/wiki/Downloads
Select software package Windows hosts(host OSWindows) .
Launch the installation wizard, in the dialog box that appears, click Next(Further) if you want to continue with the installation, and Cancel(Cancel), if you want to interrupt it.
In the next window, you can select the required components and specify the installation path. Besides the VirtualBox Application(applications) The following components are available:
VirtualBox USB Support(supportUSB) – This software package contains special drivers necessary for full support of USB devices in the VM.
VirtualBox Networking(Net) - This software package contains additional drivers for setting up the network, which are necessary for the program to support the Network Bridge mode (it is required so that the VM’s network adapter is also accessible from other machines on the real network).
VirtualBox Python 2.x Support (Python 2.x support) – This software package contains support files for developing Python scripts for the VirtualBox API.

Figure 1. VirtualBox components
Attention! To work, you must already have a working version of Windows Python installed on your system.
When you click on each of the elements, a context menu will appear where you can select the installation method for each of the components: Will be installed on local hard drive(Will be installed on local hard drive)Will be installed to run from network(Will be set to run from the network)Entire feature will be unavailable(The component will not be available).
To return to a previous step in the installation process, select Back(Back). To cancel the installation, click Cancel(Cancel).
By using Browse(Review) You can change the folder where the program will be installed. Button Disk Usage(Disk space usage) will translate to the window Disk Space Requirements(Disk space requirements), which will show how much free space on your computer's hard drive is required to install the selected component.
Next(Further).
In the next window, you can choose whether to add the program to the start menu, a shortcut to the desktop and to the quick launch bar, and whether to associate files (the checkbox next to this option will ensure that all files related to VirtualBox are opened only by this program). To continue with the standard installation without changing anything, click Next(Further).
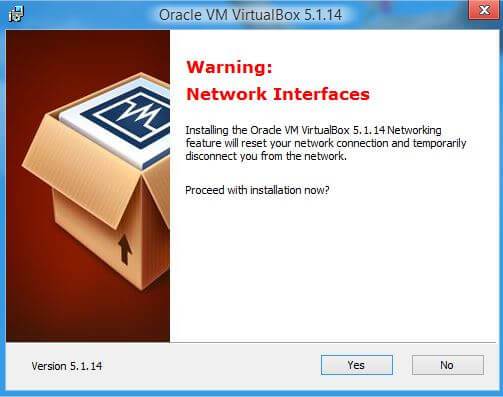
A new dialog box will warn you that the next installation step will disconnect your connection to the network (both local and Internet). Click Yes(Yes), and then - Install(Install).
Depending on your operating system settings, you may be prompted to confirm the installation of the software. To continue, select Install(Install).
When the process is complete, click Finish(Completion). If you do not intend to run the program immediately, then uncheck the Start Oracle V.M. VirtualBox after installation(RunOracle V.M. VirtualBoxafter installation).
The installation of Oracle VM VirtualBox is complete.
3. Installing a virtual machine with Windows 7 on Oracle VM VirtualBox
3.1. Checking the hardware virtualization support feature
Before starting the installation, it is recommended to make sure that your computer's processor supports the VT-x/AMD-V hardware virtualization feature, which is necessary for working with virtual machines, and that it is enabled (some laptop manufacturers, for example, disable it by default). Otherwise, some guest systems will not be able to start and operate.
To do this, you need to go to the BIOS settings: when booting the computer, press and hold the F2 key. The BIOS window may look different, but generally for Intel processors the hardware virtualization feature is located in the tabs Processor, Chipset, Advanced or sometimes Security Settings and is called Intel virtualization technology or Vvirtualization. To enable it, click on the function name and change the status from Disabled(Disabled) on Enabled(Included). If you have an AMD processor, then the hardware virtualization settings may be called Secure Virtual Machines. It turns on in the same way as in the previous case. To save the settings, click Exit(Exit) –> Save & Exit Setup(Save and exit settings) or Save Changes and Reset(Save changes and reboot).
In rare cases, hardware virtualization support cannot be found in the BIOS settings, and this may indicate that your process does not support it. To check, you can use free software products (CPU-Z, Securable) that will help determine whether your processor supports hardware virtualization or not. You can download them from the following links: http://www.cpuid.com/downloads/cpu-z/cpu-z_1.79-en.exe (CPU-Z), https://www.grc.com/securable. htm (Securable).
Attention! Some versions of Windows do not require this feature to run and run in VirtualBox. This applies in particular to Windows 7 and Windows XP. Please note that the lack of support for hardware virtualization on your computer's processor will most likely result in only the 32-bit version being available to you when choosing the bit size of the guest system you install.
The key combinations for entering the BIOS differ among different motherboard manufacturers, so it is recommended that you first read the user manual for your model.
3.2. Installing a virtual machine with Windows 7 on Oracle VM VirtualBox
To install a Windows 7 virtual machine on VirtualBox, first download the virtual machine itself to your physical computer. This can be done on the Microsoft website for developers by following the following link: https://developer.microsoft.com/en-us/microsoft-edge/tools/vms/ On this page you can download virtual machines with different versions of Windows for free. On the menu Virtual Machine(Virtual machine) on the website, select any of the proposed Windows 7 options (the difference between them lies in the versions of the Internet Explorer Internet browser installed on the OS). IN Select Platform(Select platform) find the VirtualBox option and click Download . zip(Download file.zip). In the window that opens, specify the address of the folder where you want to place the file, click Save. The file will begin downloading. Once the download is complete, extract the file from the archive.
Open the unzipped file: right-click on it and select the option in the context menu that opens To open with…–> Continue usingOracle V.M. VirtualBox Manager.
A window will open Importing configurations, where the parameters of the imported virtual machine and its devices will be listed.
Figure 2. Parameters of the imported virtual machine
To continue the standard installation, click Import. Copying of the configuration will begin, after which the virtual machine with Windows 7 will be installed on VirtualBox.
3.2. Setting up a virtual machine with Windows 7
In section 3.2. During the installation of the finished virtual machine on VirtualBox, its basic settings were also imported. Before starting the guest OS, they can be checked and changed if necessary.
To do this, open Oracle VM Virtual Machine Manager, select the guest system you are interested in in the list on the left side of the window, right-click on it and click Tune … A window will open Settings.

Figure 3. Windows 7 guest settings
Select a section System, tab Motherboard. For Main memory set 1024-2048 MB.
Attention! The memory for the virtual machine will be allocated from the physical memory installed on your computer. Leave a minimum of 512 MB, but no more than 50% of the size of the available physical memory.
IN Loading order uncheck the box floppy disk but leave it for Optical disk And Hard drive. As Cursor manipulator you are taking PS2/Mouse, V Additional features save the checkbox opposite Turn onI/ O APIC.
Tab CPU leave unchanged.
Tab Acceleration is inactive if your physical computer's processor does not support hardware virtualization. If support is available, check the boxes next to all items Hardware virtualization.
IN Display –> Screen you are taking Enable 3D-acceleration And Enable 2D-acceleration. For Video memory allocate 128 MB.
In chapter Net check the box Enable network adapter, and quality Connection type you are taking NAT.
In chapter USB check the box Enable USB Controller.
In chapter Shared folders Click on the add new folder icon and enter the full path to the shared folder. Be sure to check the box here Auto-connection– the shared folder will appear in the window Computer guest OS after it boots.
When you launch the guest OS for the first time, you will need to activate it by connecting to the Internet. In most cases, activation occurs automatically a few minutes after the system starts. If this does not happen, then you can do this using the command slmgr /ato, which should be entered into the Windows command line. Activation gives you the opportunity to use the virtual machine for free for 90 days.
The interface of the installed guest OS will be completely English. It can be Russified using Windows Update.
To do this, click on the menu Start (Start) and choose –> System and Security (System and Security) –>Windows Update. Among the types of updates, find Optional updatesare available(Optional updates available).

Figure 4. Important and optional Windows updates
In the list of language packs that appears, check the box next to RussianLanguagePack(Package for Russian language) and choose OK –> Install updates, after which Windows will automatically download and install the files for the selected language. Once the update download is complete, the VM will reboot. After that click Start (Start)–>Control Panel –> Change keyboards or other input methods. In point Choose a display language(Select display language) you are taking Russian–> OK. After this, a message will appear indicating that you must log out of your account for the changes to take effect. Click Log off now. To log into your account, enter your password Password!
Russification of Windows 7 has been successfully completed. The system is ready for use.
If you want to install one or more operating systems on your computer, and completely different ones, it would be a very mistaken attempt to install these operating systems on hard drive partitions. We encounter this error quite often. This approach promises nothing but loading problems and wasting hard disk space. How to get out of the situation? There is a great solution - a virtual machine! How to install and configure a virtual machine using Oracle VM VirtualBox as an example? Read in this article...
One of the reasons why we need this was named and it sounded like the need to get anonymous access to the Internet. What else might motivate you to create a VirlualBox virtual machine? For example, you have never seen the Linux operating system in use, but you want to try it, but you don’t want to “destroy” a working Windows system. Or you need to try a new software package, the stable operation of which you are not sure of or you doubt that you even need it. All this can be done without harm to the main operating system using a virtual machine.
A few terms for a proper understanding of the topic. The operating system (OS) on which the virtual machine (VM) runs is called the host operating system or simply the Host. The operating system we run is called a guest operating system. The Guest OS can be the same type as the Host. For example, we can run Windows 7 on top of Windows 7, this is the simplest option for virtualization systems. It is much more interesting to experiment with different types of OS, for example, running Linux on top of Windows, which is what we will do today as an example.
First, we need a VM distribution kit, or in common parlance an installation file. Finding it couldn't be easier, but so as not to bog you down with unnecessary training, I'll just provide a link to the download page:
All you have to do is select the link that corresponds to your OS, for the case of Windows; at the time of writing, it looks like this: VirtualBox 4.1.18 for Windows hosts x86/amd64. This means that the same distribution will be used for both 64-bit and 32-bit OS. Download the file from the link corresponding to your OS and start the installation. In the case of Windows 7, you will be asked to confirm the launch and allow changes to be made.

After the installation begins, click Next, which means “next” in Russian, and do not change the set of components offered by the installer.

For successful installation we will need approximately 140 MB of free space on the system disk. Yes, and to install the Guest OS, we will also need from 5 to 25 GB of free space on any partition of the hard drive to accommodate the Guest OS virtual disk.
We receive a warning about a possible short-term loss of network connection. This occurs due to the installation of additional VM network drivers.

Click Yes and wait a few minutes for the installation to complete.


Hooray! The first stage is almost finished. All that remains is to click Finish, leave the launch mark after installation selected, which after installation is complete should lead to the launch of the VirtualBox VM.
If no failures occurred during the installation phase, the following window will open as a result. There will be only one active button in it in the form of a blue sun with the caption – Create. To create a VM and further install the guest OS, we need it.

Now let's move on to creating a VM. Click Create, enter the name of our future system (it can, in principle, be arbitrary), select Linux as the OS type, and leave Ubuntu as the version.

After clicking Next, you will be prompted to install the required amount of memory available to the Guest OS. Make sure that the slider does not go beyond the green zone, but is sufficient. If your computer has 1GB of RAM installed, no more than 512MB will be available for the Guest OS. In general, you can allocate no more than half the amount of memory installed in your computer for the Guest OS.

Now it's time to allocate space for the Guest OS virtual disk. The proposed 8GB of space should be enough to install the system unless you plan to save all your data on the VM disk in the future.

We leave the disk type as VDI - this is the native format for VirtualBox. Next again, now we see the choice between dynamic and fixed disk type. Each type has its own advantages; dynamic will take up less space and grow as it fills, while fixed will immediately take up the full amount allocated to it, but will work faster. Personally, I prefer dynamic.

By default, the VM disk will be located in the c:\Users\Username\VirtualBox VM\ folder, where “Username” is the name of your account in Windows 7. In other OSes, everything will be a little different. We leave the proposed VM disk size unchanged or change it if it is necessary to shrink it or allocate additional space. Click Next again.

We read what we got in the end, if everything is as you planned, we confirm by clicking the Create button.
The machine is already ready; to start the VM, all that remains is to connect the boot disk image to the VM drive or specify that we will use a physical optical drive if you already have the installation disk on a separate optical media. To do this, click the Properties button that has become available and select the Media section on the left. In the Storage media form there is an IDE controller to which the virtual drive is attached, but now it is empty. On the right, under Attributes, you must either check the Live CD/DVD option if an optical disc is inserted into your CD/DVD drive, or by clicking the disk icon on the right, select the location of the Guest OS installation image.

Once selected, everything should look like this:

Now about where to get the image. It is available via the link from this page: http://xubuntu.org/getxubuntu/.
To download the image, we need a program that can download torrent links. This could be the Opera browser, which can do this, or, for example, utorrent for Windows. You can download it from here: http://www.utorrent.com/intl/ru/downloads/complete?os=win. One can argue for a long time about the dangers and benefits of downloading through torrent links, but in this case it is the simplest, most reliable and fastest way to get the necessary disk image.
Now you can start launching the created VM, and at the same time see what one of the varieties of Linux OS looks like. In the future, it will be possible to delve into the properties of the VM, change various parameters and see how this affects the operation of the VM, but we will leave all this for independent work by the curious.
After starting the VM, you need to wait for the graphic screen to appear with the choice of installation language, select Russian and click the “Install Xubuntu” button. The system will check the parameters of your VM, and if everything is OK, it will allow you to continue with the installation. You can also select the Install updates and Install third-party software items, this will eliminate the need to manually configure Flash and codecs for listening to MP3. Next, the installer will offer to erase the disk and install Xubuntu. We boldly agree, because... nothing other than the virtual partition is available in the Guest OS, and nothing will be lost or erased on the real OS. The installer will plan and format the disk independently, so choose to continue. All that remains is to choose a time zone, it is different for everyone, and I can’t even guess where you are reading this article. We select our location on the map with the mouse, and the system itself knows what zone it is. For my computer, the system returned the location of Zaporozhje. Next, select the keyboard layout, most likely it will be Russian, unless you prefer something else. All you have to do is enter your name and come up with a password; the system will check if the password matches the two input fields and evaluate its complexity. Choose a password that you can remember, but do not enter something like: 123, qwerty, password, test, user, god, etc. - such passwords can be calculated in a couple of minutes by a hardworking “breaker”. You shouldn’t be too clever; a password like G%4v$$q12&hB will be considered reliable, but it will probably get lost both in your head and on paper.
Now the system will install the necessary packages and upon completion will ask you to reboot the VM. During installation, it is advisable that the computer be connected to the Internet, this will allow you to immediately install some system updates. During the installation process, a slide show introduces the user to the main applications and interface features, so don’t be lazy, look and read everything on the slides. In the future, this will save time and effort for performing practical tasks in the system. After the reboot, the final step was to install guest OS additions. To do this, from the VM menu, select the Devices section and in it the item Install guest OS additions. A disk with additional drivers for the guest OS will be mounted in the virtual drive of the guest OS. In our case, we will need to run an application named VBoxLinuxAdditions.run, moreover, this must be done with administrator rights. Right-click on an empty space in the window with the contents of the virtual drive. Select the context menu item Open terminal. In the window that opens, type the command:
sudo ./VBoxLinuxAdditions.run
Press Enter, then you will need to enter the password, the one we entered at the beginning of the installation, I hope you have not forgotten it yet, press Enter again and wait for the installation to complete. Upon completion, reboot the guest OS system. In the upper right corner of the screen there is an inscription with the user name, left-click on it and select Restart.
This is the result that should await us in the finale, if everything went without errors. If something goes wrong, write to us and we’ll try to figure it out.

Once you've installed a virtual machine and realized how easy it is, you'll probably want to try installing something yourself. All you need is an ISO image of the installation disk and select the correct OS type. Explore first those systems that are in the list of VirtualBox, do not immediately jump to setting up Mac OS X 10.8 Lion. Over time, you will learn to do this, but only when you understand in detail all the intricacies of the VM’s operation. In the meantime, you can experiment with the installed Xubuntu system, as it seems to me, it deserves your attention.
We have successfully taken one of the steps that brings us closer to anonymity on the Internet. To complete the journey, we still have to install a package that allows us to hide the real IP address of our computer - Tor Project, but more on that next time. Good luck and thanks for reading our blog!
GD Star Rating
a WordPress rating system
Today I will talk about my experience installations, settings And configuring VirtualBox on Windows. Also, I’ll tell you why I chose it VirtualBox virtualization platform, why do I need this at all, etc. To save your time, I suggest you watch a video on the topic:
Why VirtualBox?
Before I talk about the reasons why I chose VirtualBox I would like to touch a little on the topic of virtualization and emulation in general. What is emulation?
Emulation is the ability of a program or device to imitate the operation of another program or device.
Who uses emulators and for what?
Software emulators are primarily designed to deploy multiple operating systems on one computer without affecting the main operating system. Emulators or virtualization systems are available to a wide range of people: from ordinary users to administrators and programmers.
Emulators for users- this is, first of all, the ability to launch applications under other OSes without rebooting the main one, testing new software and various experiments with settings.
Emulators for administrators- this is a testing ground for experiments! Now learning to administer has become much easier; anyone can create virtual networks from dozens of guest operating systems, configure them, and gain practical skills.
Emulators for programmers- these are those assistants who are already difficult to live without. They speed up debugging and testing of programs literally significantly. And if we talk about network application developers or low-level programming, then emulators simply have no price!
Emulators for hackers- well, everything is clear here, checking exploits, testing viruses, debugging and studying other people’s programs...
Therefore, the importance of emulation is difficult to overestimate. The only question is which emulator to choose?
The choice of a virtual machine depends on a number of reasons that the user determines for himself. I proceeded from the following requirements for the virtual machine:
- Must work on the platform Windows
- Should support all the most common operating systems in guest mode
Not all virtual machines meet these two, I would say, strict requirements. I was considered VirtualPC(did not work because only Windows guest systems are supported) and VMWare(didn’t work because this is paid software, the price of which is very high, and I don’t want to use hacked versions).
VirtualBox Features
- Cross-platform
- Modularity
- Live migration
- USB 2.0 support when host devices are made available to guest OSes (proprietary version only)
- Supports 64-bit guest systems (from version 2.0), even on 32-bit host systems (from version 2.1, this requires support for processor virtualization technology)
- SMP support on the guest system side (starting from version 3.0, this requires support for virtualization technology on the processor)
- Built-in RDP server, as well as support for USB client devices over RDP (proprietary version only)
- Experimental support for hardware 3D acceleration (OpenGL, DirectX 8/9 (using wine code) (32-bit Windows XP and Vista only)), for DOS/Windows 3.x/95/98/ME guests, hardware 3D support acceleration is not provided
- Support for VMDK (VMware) and VHD (Microsoft Virtual PC) hard disk images, including snapshots (starting from version 2.1)
- iSCSI support (proprietary version only)
- Audio device virtualization support (AC97 or SoundBlaster 16 emulation to choose from)
- Support for various types of network communication (NAT, Host Networking via Bridged, Internal)
- Support for a chain of saved virtual machine states (snapshots), which can be rolled back from any state of the guest system
- Shared Folders support for easy file sharing between host and guest systems (for Windows 2000 and later, Linux and Solaris guests)
- Support for desktop integration (seamless mode) of host and guest OS
- It is possible to select the interface language (Russian-language interface is also supported)
The list is impressive, in addition, version 3.2.12 was recently released and a large number of errors were corrected; they can be found on the VirtualBox developer website.
I hope that the purchase Sun company Oracle will not affect the development of this great project, otherwise they like to monetize everything.
Installing VirtualBox
Used as a host system Windows Vista Ultimate SP2. The VirtualBox installation process itself is quite trivial, everything is clear and without comments.
Next, you need to follow the installer's instructions. At one stage, when installing network adapters, the current connection to the local network may be interrupted. After installation, you can start adding a guest OS. After installing VirtualBox, I advise you to change some program settings, in particular, specify the default paths for new virtual OS files, etc. This can be done in the window called by the command File -> Settings.
Setting up VirtualBox
Creating a new guest OS
To create your first virtual OS, click the “Create” button. Launch the New Virtual Machine Wizard. Following his instructions, you will need to select the family of the future virtual operating system and its version, and also enter its name.


512 MB is already enough for most OSes, but I allocated 1 GB.
Next you will need to create a new hard drive, this is a fairly simple procedure, you just need to follow the instructions in the Create New Hard Drives Wizard. As a result, you should end up with something like this:

The final stage of creating a guest OS in VirtualBox
Setting up guest OS hardware in VirtualBox
You can determine the hardware of the created guest system in its “Properties”. To do this, select the desired guest OS and call the command Properties command panel. After this, the properties window appears. The settings sections will be indicated on the left side of this window, and their settings in the center of the window. All settings are intuitive and have prompts.

Tab General - Advanced
- Photo folder— path to the folder where the guest OS disk images will be stored. The snapshot requires a large amount of disk space, so here it is better to point to a disk where there is enough space for this
- Shared clipboard— setting up the use of the clipboard between the host system and the guest OS
- Mini toolbar— console for managing a virtual machine
Tab System - Motherboard
- Loading order— determines the boot order of the guest OS. After installation, I advise you to change this order and put the hard drive in first place (unless, of course, loading from other media is not so important for you)
- Disable IO APIC- advanced interrupt controller used in processors from Intel. Fully OS supported Windows.
- Enable EFI — EFI defines "boot services" which include support for text and graphical consoles on various devices, buses, block and file services, and runtime services such as date, time and non-volatile memory. Used by a number of OSes for booting.
Tab System - Processor
- Processor(s)— configure the number of processors used by the virtual machine. "Please note that this option will only be available if hardware virtualization is supported AMD-V or VT-x tab System - Acceleration, as well as the enabled option OI APIC on the tab System - Motherboard.
- Enable PAE/NX- mode of operation of the built-in memory management unit of x86-compatible processors, which uses 64-bit page table elements (of which only 36 bits are used for addressing), with which the processor can address 64 GB of physical memory (instead of 4 GB addressed when using 32-bit tables).
Tab System - Acceleration
- Enable VTx/AMD-V— use of hardware virtualization of the main processor (Your processor must support these modes or they must be enabled in BIOS)
- Enable Nested Paging — Nested Paging provides translation of physical memory addresses of the guest OS into physical addresses of the host OS memory
Tab Carriers
- In this tab you can configure the use of external media and CD/DVD drives. Please note that you can use virtual disks when installing a guest OS. It is very comfortable. You can add them via Virtual Media Manager in which you can store a large number of different images and switch between them during a session in the guest system. You can call this manager as follows:

Virtual Disk Manager in VirtualBox
Tab Net
- Network settings will be discussed in a separate article; IN Windows XP there are drivers only for Pcnet-Fast III (Am79C973), that's why you need to select it.
Tab COM ports
- On this tab you can configure the use of COM ports. They are rarely used now, so it is unlikely that anyone will need to configure them
Tab USB
- Here you need to add those to the list USB-controllers that will be used by virtual systems. Be careful when starting the virtual system specified USB-devices stop working in the main one (at least that was the case for me)
Tab Shared folders
- Shared folders are intended for exchanging files between the host and guest OS
Configuring an installed Windows XP guest OS in VirtualBox
We need to install drivers for all virtual hardware components of our virtual PC. This can be done by installing add-ons:

The add-on installation wizard will start if you have enabled support 3D, then you need to indicate this by checking the box. Answer all warnings from the system in the affirmative. After installing the add-ons in the virtual OS, the Internet should work.
Display Integration Mode
A very useful mode that allows you to manage a virtual system directly in the main one, without switching to the virtual machine window. Truly incredible functionality! Try it and you will understand everything. To switch to this mode, use keyboard shortcuts HOST+L, where “HOST” is the host key (right “Ctrl” by default).
Concepts and definitions used
Virtual machine(VM, from the English virtual machine) is a software and/or hardware system that emulates the hardware of a certain platform and executes programs for this platform ( target- target or guest platform) on another platform ( host- host platform, host platform)
Emulation(English emulation) - reproduction by software or hardware or a combination of them of the operation of other programs or devices.
Hypervisor(or Virtual Machine Monitor) - in computers, a program or hardware circuit that provides or allows the simultaneous, parallel execution of several or even many operating systems on the same host computer. The hypervisor also provides isolation of operating systems from each other, protection and security, resource sharing between different running OSes, and resource management.
Guest OS— operating system installed on the virtual machine.
Host system— the operating system in which the virtual machine runs.
Information sources
- VirtualBox.org - official page for the VirtualBox virtual machine
- Category:Virtualization on ru.wikipedia.org
- Installing and configuring the Oracle VM VirtualBox virtualization platform - article by Viktor Krasnukhin on OSzone.net
This article is devoted to the Oracle VM VirtualBox virtualization platform, its installation, configuration and preparation for work.
VirtualBox is a completely free program and entirely in Russian, which makes it very attractive for use on both home and work computers. The system was first made available in 2007 by InnoTek in two versions - open and closed source, both free for non-commercial use. In 2008, the platform was purchased by Sun Microsystems, which is currently developing it.
The platform is a virtualization system for host systems Windows, Linux and Mac OS and provides interaction with guest operating systems Windows (2000/XP/2003/Vista/Seven), Linux (Ubuntu/Debian/OpenSUSE/Mandriva, etc.), OpenBSD , FreeBSD, OS/2 Warp.
Key features of VirtualBox:
- x86 virtualization (in this case, support for hardware implementation of Intel VT and AMD-V is optional);
- support for multiprocessing and multi-core;
- support for audio device virtualization;
- support for virtualization of network devices;
- USB-host virtualization support;
- high performance and modest consumption of PC resources;
- support for various types of network interaction (NAT, Host Network, Bridge, Internal);
- the ability to save snapshots of the virtual machine, which can be rolled back from any state of the guest system;
- setting up and managing the VirtualBox application and virtual system from the command line.
To learn more about the Oracle VM VirtualBox platform, you can visit the manufacturer's website Welcome to VirtualBox.org!
Installing the Oracle VM VirtualBox Platform
You can download the platform suitable for your system using the link: http://www.virtualbox.org/wiki/Downloads
In this article, we will consider working with the VirualBox platform version 3.2.8 r64453 (download), the latest at the time of writing.
Once the installation package is on your hard drive, you can begin installing the program. This article discusses the installation and configuration of the VirtualBox platform in the Windows Vista Home Premium SP2 operating system environment.
After launching the installer, you will see a welcome window. Click the “Next” button and in the new window, agree to the terms of the license agreement by checking the “I accept the terms in the License Agreement” checkbox. In the next window (Fig. 1) you will be asked to select components to install and specify the location of the executable files. By default, all components are installed on the hard drive (and we need all of them), and the program itself is installed in the “Program Files” folder on the system drive. If you want to specify a different location, click the Browse button and select a new folder to install the application.

Note. When installing an application on the Windows XP operating system, a message may appear stating that the platform has not been tested for compatibility with this OS. You can ignore the warning and continue with the installation - you will not encounter any problems during operation. When installing an application on the Windows Vista/Seven operating system, you should enable compatibility mode after installation is complete. To do this, go to the folder with the installed program, find the file VirtualBox.exe, use the right mouse button to call up the context menu, select “Properties” and on the “Compatibility” tab check the box “Run the program in compatibility mode for”, as the operating system by selecting “Windows XP (Service Pack 2)”.
Creating and initial configuration of a virtual machine
Let's launch the Oracle VM VirtualBox application (when installing the platform, a shortcut is created on the desktop that you can use). A window will open in front of us, and in it (which is very pleasant) everything will be in Russian. To create your first virtual machine, click the “Create” button:
Fig.2: Main window
Note. In my virtualization platform, there are already created virtual machines, and therefore, when you first create yours, you will not see a list of virtual operating systems.
A new window will open in front of you, in which there will be a message about starting the virtual machine creation wizard. Click the “Next” button and see a new window asking you to select the name of the operating system, its family and version. In Fig. 3 shows my choice, but you can choose any of the available systems to your liking.

Fig.3: Initial parameters
After clicking the “Next” button, you will be asked to determine the size of RAM allocated to the virtual machine (Fig. 4). I choose 1024MB, but for stable work with the Windows XP virtual system, 512MB will be enough.

Fig.4: Memory allocated
Next you will need to create a virtual hard disk (Fig. 5). If you have already created virtual disks, you can use them, but we will look at the process of creating a new disk. Let’s confirm that the hard drive we are creating is bootable, check the “Create a new hard drive” checkbox and click the “Next” button.

Fig.5: Creating a hard drive
Next, a new window will appear, which will inform you that the running wizard will help you create a virtual disk; click the “Next” button to continue working. In a new window (Fig. 6) you will be asked to select the type of disk to be created - “dynamically expanding image” or “fixed size image”. The difference is explained in the help of this window, but I would like to note that it is more convenient to create a boot disk of a fixed size - this will allow you to automatically limit its size, simplify and speed up storage, recovery and creation of backup copies of the disk. In addition, you can create several hard drives for your system, and now those that will not be bootable, it is more convenient to create dynamically expanding ones.

Fig.6: Creating a hard drive - selecting the type
In the next window (Fig. 7), you will be required to select the location of the virtual hard disk to be created and its size. For a bootable hard drive with Windows XP, the default size (10 GB) is sufficient, but it is better to place it outside your system partition, because You should not overload your real boot disk and create files of this size on it.

Fig.7: Creating a virtual hard disk - selecting size and location
After this, the “Result” window will appear (Fig. 8), which will indicate the type, location and size of the hard drive you are creating. If you agree to create a disk with these parameters, click “Finish” and watch the process of creating a hard disk.

Fig. 8: Creating a hard drive - the creation process
Once the creation of the hard disk is complete, a new “Result” window will appear (Fig. 9), which will indicate the parameters of the virtual machine you are creating. If you have not changed your mind on any of the points described, click “Finish” and proceed to setting up the hardware of your virtual machine.

Fig.9: Creating a hard drive - Finish
Setting up virtual machine hardware
So, you have created a virtual hard disk, now it’s time to assemble our virtual computer completely. To do this, return to the main VirtualBox window (Fig. 10), in it you can already see the newly created WinXP-2 virtual machine, and in the field on the right side its description is presented, which does not yet resemble the description of a full-fledged PC.
Fig. 10: Hardware setup - start
In the column on the left, select our WinXP-2 and open its properties (Fig. 11), where the column on the left side resembles the device manager. On the first tab of the “General” section we see the main parameters of our virtual machine:
Fig. 11: Hardware setup - general, 1
Let's go to the advanced tab (Fig. 12) and see what system settings we can make:
- "Folder for pictures." If you placed your hard drive in your own location, then it is better to move this folder there too, because pictures have a lot of weight and, again, you should not overload your system disk. My recommendation is to create snapshots before each significant change you want to make in the virtual system, and even for one virtual machine you can create several snapshots containing different settings and installed applications;
- “Shared clipboard” is a definition of how the clipboard will work between your host system and the virtual machine. There are four options for buffer operation - “off”, “only from the guest OS to the main OS”, “only from the main OS to the guest OS”, “bidirectional”. We will choose the last option because... this will provide us with maximum convenience in our work;
- “Removable storage media remember changes during operation”, here we check the box as a sign of agreement, because This option will allow the system to remember the state of CD\DVD drives;
- “Mini toolbar” is a small console containing virtual machine controls. It is better to use it only in full screen mode, because... it is completely duplicated by the main menu of the virtual machine working window. It is really better to place it on top simply because you can accidentally click on some control element when trying, for example, to maximize a window from the taskbar of a virtual machine.
Fig. 12: Hardware setup - general, 2
Let's go to the system section and on the first tab, motherboard (Fig. 13), make the following settings:
- If necessary, we will adjust the size of the RAM of your virtual machine, although you will be able to finally be convinced of the correctness of the selected volume only after starting the virtual machine. You can choose the size based on the amount of available physical memory installed on your PC. For example, if you have 4GB of RAM, the optimal allocation would be 1GB, i.e. one fourth part, which will allow your virtual machine to work without the slightest freeze;
- let's adjust the boot order - the floppy drive ("floppy disk") can be completely disabled, and be sure to install the CD/DVD-ROM first to ensure the ability to install the OS from the boot disk. In this case, either a CD or an ISO image can act as a boot disk;
- all other settings are described in the dynamic help below, and their application depends on the hardware of your real PC, and if you set settings that are not applicable to your PC, the virtual machine system simply will not start;
Fig. 13: Hardware setup - motherboard
Let's move on to the “Processor” tab (Figure 14), here you can select the number of processors installed on your virtual motherboard. Please note that this option will only be available if AMD-V or VT-x hardware virtualization is supported (Fig. 15), and the OI APIC option is enabled on the previous tab.
Fig. 14: Hardware setup - processor
Here I will again draw your attention to the AMD-V or VT-x hardware rendering settings. Before enabling these settings, you need to find out whether your processor supports these features and whether they are enabled by default in the BIOS (they are often disabled).
Fig. 15: Hardware setup - acceleration
Let's move on to the “Display” section (Fig. 16). In this section, on the “Video” tab, you can set the memory size of the virtual video card, as well as enable 2D and 3D acceleration, and enabling 2D acceleration is desirable, but 3D is optional. On the “Remote Display” tab, you can enable the option in which your virtual machine will work as a remote desktop server (RDP).
Fig. 16: Hardware setup - display
Let's move on to the media section (Fig. 17). Here you can see the previously created virtual hard disk and the position labeled empty. We select this position and make adjustments (Fig. 18).
Fig. 17: Hardware setup - media, 1
There are two ways to configure a virtual CD drive:
- first option - in the “Drive” drop-down menu, select your real or virtual CD/DVD-ROM (existing in a real system) and load into it a physical disk with the Windows XP distribution kit or an ISO image if it is an emulator;
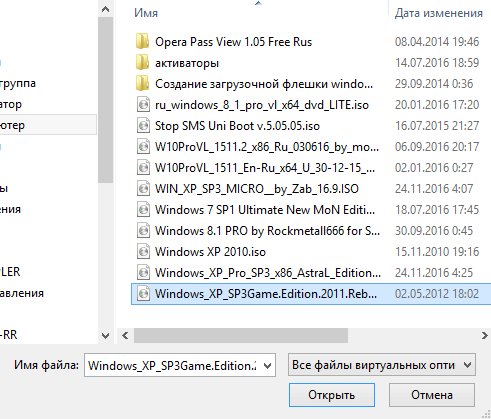
- the second option is to click the icon as shown in the figure below (Fig. 18) and in the window that opens (Fig. 19) add an ISO image of the Windows XP boot disk, this is the path we will take.
Note. At this point, you can no longer select a distribution kit of another operating system, because the OS version was already determined at the very beginning of the virtual machine setup process.
Fig. 18: Hardware setup - media, 2
The figure below shows the procedure for adding ISO images to the Virtual Media Manager. You can add any number of images for various purposes into it, for example, games, application distributions, databases, etc., which you can then quickly switch through the main menu of the VirtualBox virtualization window.
Fig. 19: Hardware setup - media, 3
Fig.20: Hardware setup - media, 4
Next (Fig. 21 and 22) you can configure the drive connection slots; to simplify the description, I provide screenshots from which you can perform the configuration steps. As is my habit, I set the CD drive as the "Primary IDE Master", the hard drive containing the boot partition as the "Secondary IDE Master", and the secondary virtual hard drive as the "Primary IDE Slave".
Fig.21: Hardware setup - media, 5
Fig.22: Hardware setup - media, 6
Setting up a network and network interaction is not covered within the scope of this article, so I will only note that the NAT type network adapter (Fig. 23) is enabled by default, and this is already enough to provide your virtual machine with access to the Internet. The type of adapter you select must be “Pcnet-Fast III (Am79C973)”, because Only for this adapter there are drivers in Windows XP.
Fig. 23: Hardware setup - network adapter
I do not describe the COM section in detail, because... There is nothing left to connect to ports of this type. If you still need to connect a device with an RS-232C interface, then the most convenient way would be to enable the COM port of the virtual machine in the “host device” mode, and use the name of the actual port of your PC as the “path to the port”, which you you can look in the device manager.
Let's go to the USB section (Fig. 24), here we check both available checkboxes, and then, using the button with the image of a USB “plug” and “plus”, we add all available controllers.
Fig. 24: Hardware setup - USB controller
Go to the “Shared Folders” section (Fig. 25) and select the folders that need to be made available to the virtual machine.
Fig.25: Hardware setup - Shared folders
Note. Pay attention to the dynamic help below - this is how, through the command line window, you can connect shared folders to your virtual machine.
This completes the configuration of the hardware of your virtual machine, and you can proceed to installing the operating system.
Setting up the virtual machine operating system
The description of installing the operating system is not described in the article, because The site provides enough information about the methods and intricacies of this operation, so I will indicate the first step - return to the main VirtualBox window and click the “Start” button.
Fig. 26: Setting up the operating system - the first step
After completing the action described above, you will see the following window:

Fig. 27: Setting up the operating system - installation process
This means that you have made all the settings correctly, and all that remains is to install and configure the operating system. This window is most likely familiar to you (if you have at least once installed a Windows operating system yourself), and the installation process is no different from installing the OS on your real computer. After the system is installed and loaded (Fig. 28), you can begin setting up the operating system of your virtual machine.

Fig. 28: Setting up the operating system - installed system
First, we need to install drivers for all virtual hardware components of our virtual PC. To do this, in the main menu (Fig. 29), select “Devices” - “Optical disk drives” - “VboxGuestAdditions.iso”. Subsequently, in the same way, you can connect a physical CD-ROM to your virtual machine or download an ISO image.
Fig. 29: Setting up the operating system - downloading “VboxGuestAdditions.iso”
After connecting the “VboxGuestAdditions.iso” image in the My Computer folder, you will see that this virtual disk is loaded into the CD drive - all you have to do is launch it by double-clicking the left mouse button.

Fig. 30: Setting up the operating system - installing VboxGuestAdditions.iso
The installation process itself occurs practically without your participation and only if you have previously enabled 3D acceleration, then you should select the appropriate component (Fig. 31) for additional installation.

Fig. 31: Setting up the operating system - selecting add-ons
During the installation, you will receive two warnings about the lack of test results for this software in the Windows XP operating system, and both times you can safely continue the installation - the installed drivers and additional software will work perfectly. In the last window of the installation process, you will be asked to reboot the virtual machine - agree, after the reboot you will see that the image has become clearer, the size of the virtual machine window changes dynamically, the mouse integration function is enabled and there is Internet access.
Let's now connect shared folders to be able to transfer the files needed for work and install applications to the created virtual machine. This can be done using the command line by following the VirtualBox help, but I will provide a method using Windows Explorer. To do this, open the My Computer folder, in the main menu select “Tools” - “Map network drive” and in the window that opens, in the folder field, enter \\vboxsrv\shared_folder_name, i.e. in our case:
\\vboxsrv\WinXP-2-Share
After these steps, your shared folder will appear in the “My Computer” folder, available as a network drive.
Let's now check if you have Internet access. To do this, open: menu “Start” - “Programs” - “Accessories” - “CMD command line” and in the window that opens (Fig. 32) enter the following command:
Ping ya.ru
If, as a result of executing the command, you see that the packets are sent and received, even partially, then everything worked out for you, and Internet access is provided to the virtual machine.

Fig.32: Setting up the operating system - checking the Internet connection
Quick access and comfortable work
Shortcut for quickly starting a virtual machine
To make it faster and more convenient to launch your virtual machine, we will create a shortcut specifically for it. You can do this as follows:
- By right-clicking on the desktop, call up the context menu and select “Create shortcut”;
- In the window that opens, in the “Specify object placement” field, enter
- In the next window, enter a name for the shortcut, for example, “WinXP” and click the “Finish” button;
- The created “WinXP” shortcut appears on your desktop, right-click on it;
- In the context menu that opens, select “Properties”;
- In the window that appears, select change icon and in the icon source file selection field, enter
- Click OK and then Apply.
After these operations, your shortcut will look like this:

Fig.33: Creating a shortcut for a virtual machine
Display Integration Mode
In display integration mode, you can easily organize access to the desktop and virtual machine controls from your desktop, i.e. all windows you open in the virtual machine will be displayed on your desktop, and not in a separate VirtualBox window. This function greatly simplifies access to the virtual machine, its controls and applications installed on it. To enable this mode, you need to select an item with the appropriate name in the main menu of the VirtualBox visualization window or press the key combination “HOST + L”, where the “HOST” key is the left “Ctrl” (by default).
Fig.34: Display integration mode
Conclusion
In this article, we reviewed the main points in installing and configuring the Oracle VM VirtualBox virtualization platform; I would like to additionally note the ease of setup and ease of use of the platform, as well as many additional functions, for example:
- built-in proxy module;
- custom launch;
- automatic collection of statistics;
- management and configuration using the command line;
- the ability to save and quickly apply various configuration options;
- various ways to organize network interfaces.
In addition to these advantages, I’ll add that the efficiency of using system resources by the VirtualBox application is beyond praise - on my home laptop (2.5 Hz 2-core CPU, 4GB of RAM) I can simultaneously run up to three virtual machines without any freezes (simply because they have different operating systems installed).
The material presented above will allow you to create your own virtual machine without any difficulties, but nevertheless, if you have questions or difficulties, do not forget to refer to the help of this software - it is quite complete and detailed. Moreover, you can always refer to the “online help” for this platform UserManual, located on the official VirtualBox website.
VirtualBox is a free program that allows you to run an operating system inside another, through virtualization. For example, by installing this program on Windows 10, you can run other versions of Windows, Linux, Android and others in it. It works like this:
The program reserves part of your PC's resources (Processor, RAM, video memory, OS storage space) for operating the operating system.
Installing VirtualBox
First you need where you can find the latest versions of programs for different OSes. I'll download the Windows version.
There are no difficulties in installation, everything is the same as in regular programs. It is not recommended to change the installed components.


If you wish, you can uncheck some of the checkboxes, but I recommend leaving the second and fourth ones. Next, you will receive a warning that the Internet network connection will be interrupted to install the virtual driver, we agree. Click “Yes”.
Then click “Install”.

The installation process will begin, where you will be presented with offers to install the driver; for all such offers, click “Install”.


This completes the VirtualBox installation process. Click “Finish”.
Creating a virtual machine on VirtualBox
There shouldn't be any difficulties in creating a virtual machine. Launch the program and click the “Create” button.

In the next window you will need to specify the name and type of OS you will install.

Next, we determine the size of RAM allocated to the virtual machine. For Windows XP I will allocate 512MB of RAM. It all depends on the amount of memory you have installed. If there is enough, then much more can be allocated.

In the next window you are asked to select the location and size where the OS will be installed. Since this is the first time we are setting up a virtual machine, we need to select “Create a new virtual hard disk”. Click “Create”.


In the next window you need to select the disk type, fixed or dynamic. It depends on your preferences, I will choose fixed.

Select how many GB of memory you want to allocate for installing the OS and its programs. I'll allocate 5GB. And also the place where the created disk will be stored, choose where there is free memory. Click “Create”.

The process of creating a virtual disk will begin.

This completes the creation, and you will see that you will have a virtual machine with the name that you gave it earlier, for me it is Windows XP.

Addition:
If you click on the “Customize” button, you will see sections in which you can configure the machine’s properties in more detail.

For example, how many cores do you want to give and their load limit. And in the “Display” section you can increase the amount of video memory for the video card.
Installing the operating system on VirtualBox
To start the installation, click on the green button (arrow) “Run”. A window will appear asking you to select the path to the installation disk image.

Specify the path to the pre-downloaded OS image.
Click “Open”. After this, click “Continue”. The usual OS installation will proceed as usual for everyone. You will also need to create one or more local disks. When the installation is complete, you will need to remove the installation image. To do this, click on the “Devices” tab,
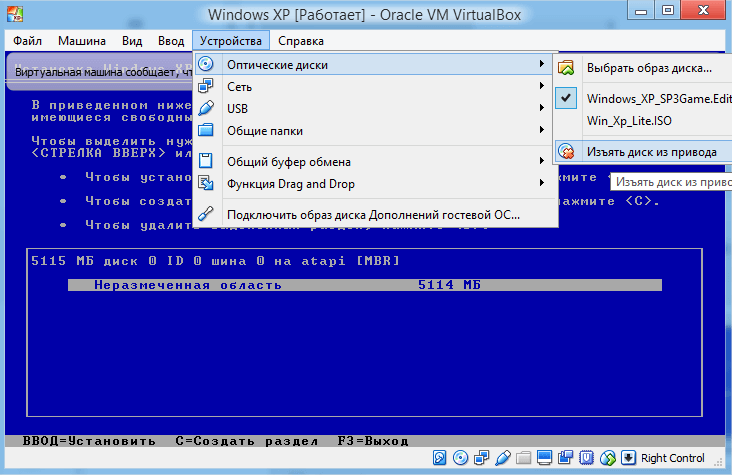
in it, select the “Optical disks” sub-item and click “Remove disk from drive” there, and reboot the newly created OS. That's all for now, good luck.


