Installing Linux on a flash drive. Installing Ubuntu Linux from a USB flash drive using Rufus
I advise many people to use the so-called Live CD and Live USB with an alternative operating system, Ubuntu. But oddly enough, there is no well-written manual for creating a bootable USB flash drive with Ubuntu even on the manufacturers’ website.
In principle, if you have average knowledge of the English language, this is not a problem, but with an entry level, such a simple action as creating a bootable USB flash drive with Ubuntu It's just going to be a nightmare.
Why do I use a flash drive as a basis? The answer is quite simple - I have three of them and almost never have blank CDs or DVDs on hand, but a flash drive - please! The second reason for this post was the breakdown of the hard drive on my netbook, which without such a flash drive is just a stand for a cup of tea at the moment.
This manual can be used not only to create Ubuntu Live Flash, but it will also work with other Linux distributions, except very specific ones.
Create a bootable USB flash drive with Ubuntu
1. The first thing we need for installation is the system distribution. It is better to download it in advance, since the installation program will download it much more slowly (apparently it is configured to download from the USA, and not the nearest server). 
At this stage, you need to be patient and download the ISO image of Ubuntu onto your PC. An important aspect for creating a bootable USB flash drive with Ubuntu is You can't change the name of the ISO image!Most likely this is an overlooked glitch in the installer, but I’m seriously telling you: “The installer will not see the ISO image if you change the file name.”
2. Step two involves downloading the utility to create the bootable flash drive itself. You can download it from me - or the latest version on the manufacturer’s website. There is no need to install it, we can say that this is a portable version :)
3. Step three. You have a disk image with Ubuntu and a utility, as well as a flash drive with two gigabytes of memory on board.
We do the following:
- format the flash drive (preferably Fat32, default cluster, fast). The utility also provides formatting, but I had difficulties loading from a flash drive, so I advise formatting using Windows tools
- we launch the utility, it is important that the flash drive is already connected to the PC, otherwise it will not see it.
- select the specified distribution in it - the names must match, remember? (usually this is ubuntu №№...iso)
- select the address of the flash card (if you suddenly connected 3 pieces) and click Create

Now all that remains is to wait for the miracle of completing the utility and the flash drive is ready for use.
Booting from USB Live Flash Stick
Now you can try our new flash drive in action, but to do this you need to make changes in the BIOS of your PC, laptop or netbook.
Typically, you can enter the BIOS using the DEL or F2 keys while the PC is booting. You need to find the item Boot or Boot Priority (there may be combinations with the word Setup) and put the flash drive as the first boot location, or better yet, the only one.
I’ll show you using an ill-fated netbook as an example:

What to do if Ubuntu does not boot from the flash drive?
Additional information provided by Arthur from St. Petersburg, the story can be seen in the comments. There were problems installing UbuntuStudio on a netbook.
So, if the flash drive is not detected as a boot device, you need to “deceive the system” and present it as a hard drive. To do this, we need another specific utility - RMprepUSB.
The screenshot below shows step-by-step configuration of the utility:

Now in more detail:
- We will need an ISO image file and a flash drive with 2 or more gigabytes of memory.
- Download the RMprepUSB utility (it is usually the first in the list Install_RMPrepUSB_2.1.628Full.zip, but the number may vary).
- Install the utility on your PC and run it.
- Configuring program parameters:
- select “Boot sector” - Syslinux
- file system FAT32 + Boot as HDD (or USB-Zip)
- check the box “Copy system files”
- We agree to unpack the ISO and indicate the path to our Ubuntu distribution or whatever you have.
Upon completion of the utility, you will have a ready-made bootable flash drive, which will be detected in the system as a hard drive.
What can you do with a bootable USB flash drive from Ubuntu?
First of all, this is a whole system that will allow you to view, erase or write files to your (or someone else’s) PC. At the same time, it is not necessary to know the Windows password (except for the system drive). The system boot speed will depend directly on the PC parameters and the speed of the flash card.
Also, your PC will be able to connect to the Internet and allow you to work online without any significant loss in speed. Wi-Fi also works and you can find my articles about it, and also try to solve your problems.
In addition, you can save your files on the system drive if Windows has died for a long time.
Using this program you can format or repartition a disk or other flash drive.
That's basically all I wanted to write on this issue. Clarifications - in the comments!
It is hardly worth explaining the advantages of an operating system located on a compact removable media. It is perfect for a variety of purposes, and can be indispensable for advanced technicians. Running Ubuntu from a flash drive without installation is more than possible - all Linux users know this very well. But such a system has a minimal software package. Although the command line is supported, the functionality of the solution may not be sufficient. But this is not difficult to fix.
Please note that USB drives are not designed for this role. The number of rewrite cycles for them is small, and they are not very resistant to breakdowns. This is the price to pay for cheapness and mobility. Therefore, it is not worth installing the OS on an external drive for permanent and serious work. The reason is simple - any operating system constantly stores temporary data on the media. The file system and changes are also logged. If you use a flash drive in a typical role, it will last for a long time.
IMPORTANT. It is better not to store important files on a flash drive with the OS. Having launched the OS, you can work with them in the cloud, or keep them on a separate drive.
You may ask - what about solid state drives? The fact is that they are much more reliable. SSD drives are designed to last billions of write cycles. Although they work using the same technology, they include useful “self-protection” functions against wear.
The variety of Linux capabilities is a reason for the “envy” of other operating systems. We don't have to use special tools to launch Ubuntu from a flash drive, but use standard tools.
IMPORTANT. Before installing the OS on external media, make sure that the system is not currently running from it.
After this, you can proceed with the installation as you would normally do it - from a “desktop” operating system. Settings will only be needed at the disk partitioning stage. Automatic marking must be disabled and the manual method selected instead. If the media is correctly identified, then in the disk selection window it should be visible as /dev/sdb (/dev/sda is your primary disk with the installed system). 

System improvement
Installing Ubuntu on a flash drive as a full-fledged OS turned out to be quite simple, right? But that is not all. You need to make sure that the speed will be acceptable and increase the service life of the drive. Now we will “conjure” the system already installed on the flash drive.
To begin, open the following configuration file:
Enter in the command line:
/dev/sdb1 / btrfs errors=remount-ro,noatime,nodiratime,compress=lzo,ssd,commit=60 0 1
This is the optimal set of instructions for working with SSD drives. We “look up to” them, because installing the OS on a USB flash drive is not initially provided.
You can also add settings for accessing RAM. They will help the system access the disk less often, using RAM more often for the same purposes:
$ sudo sysctl -w vm.laptop_mode=120
$ sudo sysctl -w vm.dirty_writeback_centisecs=12000
$ sudo sysctl -w vm.dirty_expire_centisecs=12000
ATTENTION. Don't forget to back up your personal data on a flash drive more often! It will not be able to warn you before the final wear and death of memory blocks.
Possible problems
If it is important for you to install Ubuntu on a flash drive as a full-fledged OS, let us remind you once again - yes, you will get the same OS as on your desktop computer. She will be stable and safe. may not suit you.
Also, beware of these problems:
- Do not use journaled file systems for portable storage devices. This will have a very bad effect on their survivability. Journaling greatly increases the number of accesses to the file system.
- It is advisable to abandon the swap partition. It also generates a huge number of memory accesses. The installer will ask you to create it again. Give a negative answer.
IMPORTANT. If you accept the default settings, the PC will not be able to boot without an external drive.
conclusions
As you can see, if Ubuntu is installed correctly on a flash drive, it is not difficult to use it as a full-fledged OS; all that matters is the desire and the availability of a free USB drive. Some precautions are important only at first - in the future you can use the portable distribution just like any other. Just don't forget to back up your data.
Do you want to learn more Linux tricks? Then read the materials on our site, communicate with users in the comments and come visit more often!
Many Linux users know that Ubuntu is a “livable” operating system. After trying several distributions, you will understand what we are talking about. Ubuntu also gained recognition due to its “live” boot. Live-CD is an opportunity to fully work in an operating system without a hard drive.
It is enough to boot from the Ubuntu CD - and the operating system with basic capabilities works without installation. What can I say - a proven and very useful “lifesaver” if your computer fails.
At the same time, installed programs, network settings and many other changes are stored next to the portable operating system. Here you will find a language menu on the left, access to the test version in the center and an option to install the system on the right. It not only offers conditions for the normal operation of the device, but also reduces the purchase price, since there is no need to pay a license for the installed system. The system interface is user-friendly and increasingly beautiful, minimizing the shock of first use.
By taking the time to download and test it, you won't spend anything on it, and you can find an attractive alternative that meets all your needs. But instead, you can install a portable operating system that lets you run virtually any computer you work on.
However, a disk is not the best medium for booting an operating system. The speed of reading from a CD does not allow you to work comfortably in the OC. In addition, the drive will be constantly busy. All records are made to RAM and are stored only until rebooted. The alternative is obvious - a flash keychain.
We have used it more than once to work with portable (“portable”) programs and even wrote about installing Windows on a flash drive. Well, it's time to talk about Linux. In general, what are the additional “advantages” of an OS on flash media? There are a lot of things. We get a full-fledged system with installed applications and basic settings. If you use Linux to solve specialized problems and occasionally, it is not necessary to install it on your hard drive, especially if you later delete the OS anyway. And due to the widespread use of netbooks Aspire One and Eee PC ubuntu installation with flash has its undoubted advantages.
After installing the operating system, he will explain where to find portable versions of your favorite programs and how to install them. Having this tool in the palm of your hand is very useful. It can be used especially if the host operating system on your desktop is hanging or when you are away from your computer.
After downloading, we open it and accept the license. Once the license is accepted, we will see the following. We choose the one that interests us. So far we see what we see in the picture above. You may appear with a different letter. Don't make mistakes, or you may lose something you didn't mean to erase. Having done all this we give "Create" and on the next screen that leaves us we give "Yes".
Few users know that with version 8.10 in Ubuntu, quite officially, a special installation wizard appeared on a USB drive.
Installing Linux on a flash drive: preparing tools
To install Ubuntu we need neither more nor less:
- Flash keychain. Volume, of course, matters. The more, the better, but it is advisable to start with 2 GB (this is the bare minimum) or more. The dependence of the price of a flash drive on the volume today is no longer so high, especially if you remember the prices two years ago... Theoretically, it is possible ubuntu installation with flash and 1 GB, but with a capacity of 4 GB, at least you can use the flash keychain for purposes other than storing the distribution. In addition, you must understand that the operating system tends to grow. In the future, it can and will need to be updated and software installed.
- Ubuntu distribution. We take into account the latest release - version 8.10. You can get it in a variety of ways, we offer the following:
- download ISO image (size - about 700 MB). True, you will have to wait two or more weeks for the parcel;
- order a free distribution kit with free delivery;
- borrow from friends/acquaintances;
- buy.
Method No. 1. Installing Ubuntu on a USB flash drive using OS tools
First of all, we will describe ubuntu installation with flash in the standard way. Starting from version 8.10, in Ubuntu this is possible without the help of various online guides and console commands. All actions are performed with just a few clicks in the Ubuntu menu. But before that, preparatory work needs to be done.
Now we just need to wait for the process to complete and we will get the following. If we only have one, the selection will be automatic, but that's not enough. . Many times we find the need to have a standalone operating system that we can use regardless of the machine we will be working on.
The interface of this application gives us five steps that we must follow to complete our installation. We observe that the traffic light in the lower right corner of the window is red because we have not completed the passage. We noticed that the first step traffic light is green. We can move on to the next stage.
Step 1. Burn the distribution to CD
If you downloaded the Ubuntu image from the Internet or local network, you will need to transfer it to a CD. To burn an image, the functionality of the package or any other burner that allows you to burn an ISO image is sufficient. The declared capacity of the “blank” should not be 650, but precisely 700 MB.
So, open Nero Express. The option you need to select from the list is Disk Image or Saved Project.
To develop this example, we will choose the first option. And once the check has been done, it indicates that we can continue to use this image. By default, the following options are checked. We click on the beam from step 5 and the installation begins.
Use the operating system when booting the computer
When you run the file, there are two windows of information about the ability of the virtual machine to capture the keyboard and changing the configuration parameters of the host machine. Select permanent mode and press enter. Installing it is how you can enjoy customizing it, personalizing it and customizing it into a powerful and high-performance tool.
No additional options need to be activated, except for one. Since the Ubuntu 8.10 image size is 730 MB, burning requires the Disk-at-once overburning option to be checked. Although in the end the recorded data contains slightly less - 715 MB of data.
Step 2: Run Live-CD
Insert the Ubuntu Live-CD into the drive and select Try Ubuntu without any change to your computer when booting. By clicking, you can set Russian as the interface language. We wait a few minutes - and we find ourselves in the operating system interface.
Changing the boot sequence
To do this you need to follow these steps. If you have followed the above steps, the first screen you will find is the following. The next dialog box will ask you if you want. My recommendation is to confirm both options. In the first case, because when you finish the installation, you will have completely upgraded the hardware. And in the second case, it will depend on the hardware that you have on your computer and your needs.
Depending on what you want on your computer, you can choose one type of installation or another. If you don't have one, have your installer pick one for you. If you know what you're doing, without a doubt, select Advanced Options. This will allow you to create partitions, resize them, or select multiple partitions.
Background
A “pocket distribution” is quite a convenient thing, because the vast majority of computers run Windows, and many people want to get a familiar working environment outside the home.
For a long time I used an SD card with SLAX. The distribution is convenient, customizable, can completely load into RAM and free up the port. However, the project has been frozen for 3 years and has outdated software. Lack of support for ext4 file systems and new hardware (especially video cards and WI-FI routers) forced me to abandon this system.
UPD: Slax has already been defrosted and a new version has been released. Details.
Next, I had the idea of installing the OS on a flash drive using the built-in tools of the Ubuntu system. But due to irrational preservation of changes, this system had to be abandoned. In the end, it was decided to use an installer called Ubiquity. It is this that is contained in the LiveCD and installs it onto the hard drive. Since this option requires much more space than the default CD image, I purchased a new 16 GB flash drive - Apacer AH325:

The distribution for installation was selected Linux Mint 12, about which already earlier. In general, you can use any Linux system, but it is better to opt for Ubuntu or ubuntu-based distributions.
Note: if you are going to make full use of the temporary partition (for example, watch large videos on YouTube), then it is better to increase the 100 megabyte limit. I don’t recommend removing the limit, because a frozen application can crash the entire system, filling up the temporary folder with its copies.
First boot
...as always, it lasts a long time. The main thing is to wait until the download is complete and do not interrupt it, otherwise the file system of the flash drive may be damaged.You should then be greeted by the LightDM menu. After entering the password you will receive a fully functional system. You can begin further configuration and downloading packages. However, the best thing to do first is to open Update Manager and bring the system up to date. Everything else depends on your needs and tastes. But that is another story...
Results
So, the end result is a bootable flash drive, which is a full-fledged Linux desktop capable of handling almost any task.I would advise you to always back up important data “to the cloud” (Ubuntu One,
Ubuntu is a fairly lightweight operating system whose installation is simple and quick. Each new version of LINUX is developed with the most simplified installation option.
The instructions provided describe this process in detail, from creating an image on a flash drive to fully loading the operating system.
The most difficulties can arise during disk partitioning or installation of Ubuntu Linux next to Windows. These and other problems that may arise during the download process are discussed at the end of the article.
Brief Definition
Ubuntu is a Debian-based Linux operating system. Its primary task is to provide a convenient, powerful, but at the same time simple interface for working with a computer.
The advantages include:
- accessibility, since it is completely free and does not require any activation;
- auto-update applications as needed;
- easy installation of programs;
- high protection against viruses.
Preparing for installation
Installing Linux Ubuntu from a flash drive has more advantages compared to the previously popular installation from a CD:
- modern laptops and netbooks often do not have disk drives;
- installation from a USB device is much faster than from a disk;
- The CD quickly fails due to scratches and other defects.
To begin the installation, you need to create a bootable USB flash drive. To do this, you will need a Linux disk image or a CD with it that you can copy.
The general Linux installation process is as follows:
- downloading/copying a system image;
- creating a bootable flash drive;
- changing BIOS settings;
- Linux installation.
It is best to download the system image from its official website, since the newest and most improved version is provided there. You should also take into account the parameters of your computer, as new versions of software may not work well with outdated equipment.
Video: Creating a bootable USB flash drive with OS
Burn image
The flash drive for recording must be at least 1 GB in size. The downloaded image can be recorded using the following programs:
- Pendrive;
- Unetbootin;
- Lili USB Creator;
- UltraIso;
- Universal USB Installer.
Creating an image in Windows
The Unetbootin program is suitable for creating a boot device in both the Windows and Ubuntu operating systems. It must be downloaded, installed and launched. After that, in the “Diskimage” item, select the desired system file. Among the disks in “Drive”, select the desired boot device and confirm the creation of the image:
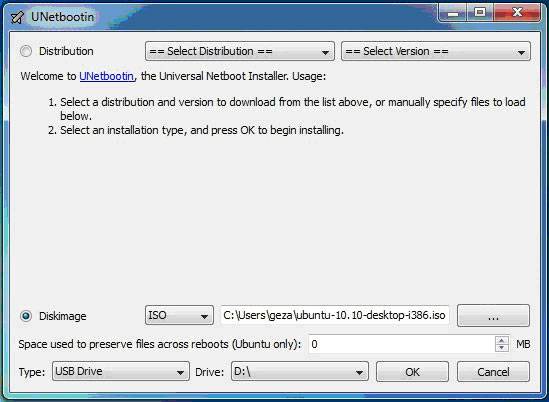
This program has the advantage that it does not require formatting the device, but creates its own files next to existing ones. After finishing recording, you can begin the installation itself.
Creating a bootable USB flash drive
If the flash drive is created from a computer running any version of Linux, you can also use the previous method, or you can do it differently. There is a special utility usb-creator-gtk. To launch it, you need to hold down ALT+F2 and enter “usb-creator-gtk” or in the application menu find “Create a boot disk”:

In the program itself, specify the location where the Linux ISO image file is located and select the USB device in the window just below:

After that, click “Create a boot disk” and the program will start working.
Bootloader in BIOS
The next step is to switch the device from which the boot starts in the BIOS. On some computers this is done automatically, just insert the USB flash drive, reboot the device and during boot go to the boot menu, which opens when you press Esc, Tab or F8:
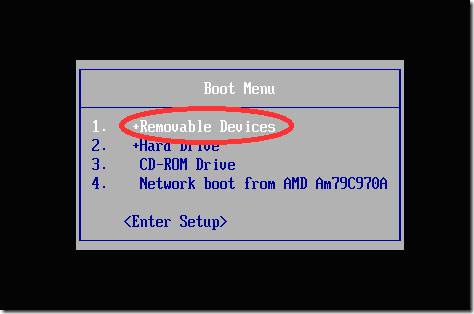
But it happens that there is no such option on the computer, so when booting you need to go into the BIOS. For different devices, the BIOS structure and input combinations may differ, but usually these are the Del / F2 / F12 keys:

In the window that opens, press the “right” key and go to the “Boot” item:

- in it select the item “Hard Disk Drives”;
- in the menu that appears, press Enter on “1st Drive”;
- a list will open in which you need to select the name of the bootable USB device;
- press Enter and Esc:

The computer will automatically reboot and start from the USB device.
How to install LINUX Ubuntu from a USB flash drive
As soon as the flash drive boots, the following window will open with a choice of language and the next action:

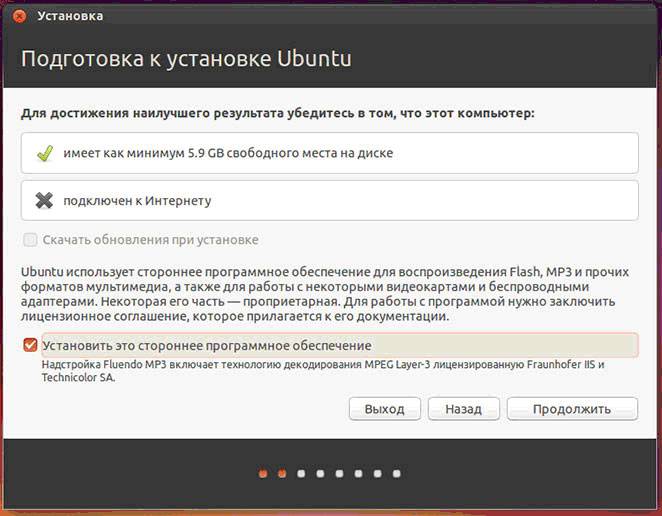
To install the operating system, click on the desired language and “Install Ubuntu”. Next, a window called “Preparing to install Ubuntu” will open, in which you need to make sure that your computer has enough free space on your hard drive and is connected to the Internet.
If the computer is not connected to the network via Wi-Fi, then at this stage there will be no Internet, but this is not so scary, since it is needed to download the latest updates, which can be done later.
It is better to check the bottom item “Install this third-party software”, then additional software will be installed.
The next step is the installation option:

Installation next to Windows
If you want to have two operating systems and select the one you need when starting, then click the first item. Next, you need to adjust the partition size of your hard drive. Advanced users can partition the disk themselves using the advanced partition editor, but this is not recommended for others.

After clicking “Install Now”, a warning will pop up about creating and changing partitions on the disk; this may take a long time. Continue installing the system, after a while you will need to select regional standards for Ubuntu Linux - time zone and keyboard layout. Then you will need to create a user and password to log into Linux. Fill out all forms and click “Continue”:

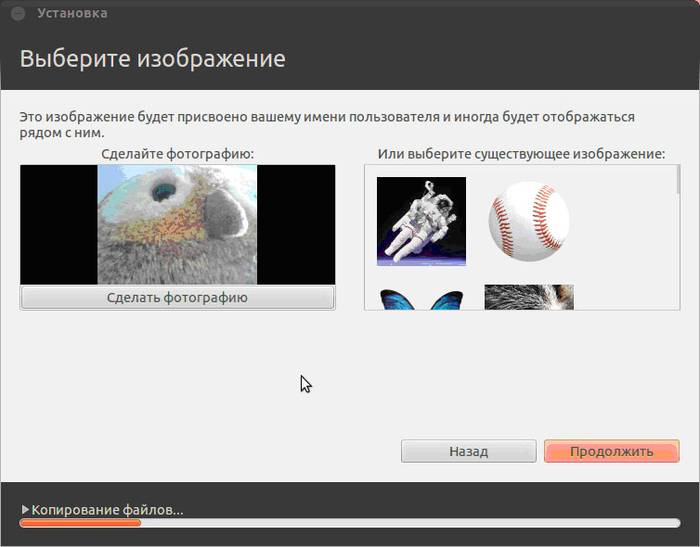
Next you should select an image for your user:
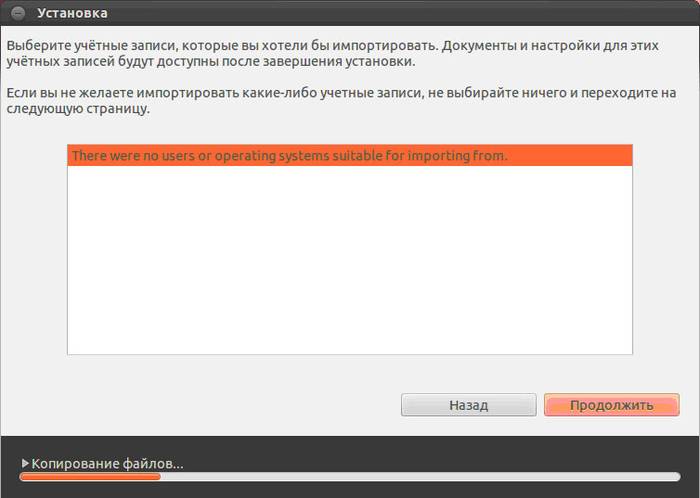
The installer will also offer to import accounts from other operating systems:
After the process is completed, you will need to restart your computer, remembering to remove the bootable USB flash drive.

Replacing the current OS with Linux
Prepare a blank hard drive or a drive with unnecessary information in advance. Then, when choosing the installation type, click “Erase disk and install Ubuntu”, and then the steps will proceed as in the instructions above.
Another installation option
When you select the last item, a window opens:
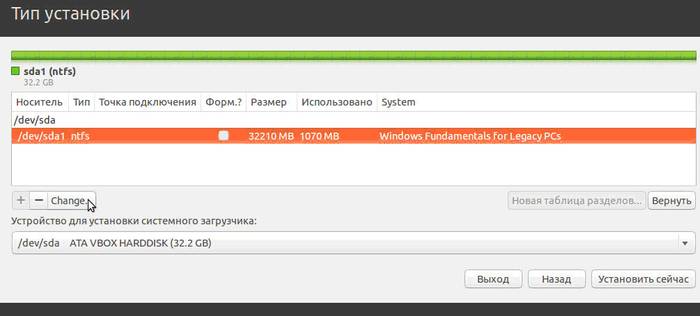
This is the structure of the existing hard drives and their partitions. The screenshot shows a computer with one hard drive /dev/sda, one partition /dev/sda1 and Windows installed on it. In other words – Disk C. The number of partitions and disks may vary. Ntfs – disk extension type. The task is to select from the available partitions the appropriate one in order to allocate 10 GB to the new system. Click the section and the “Change” button:
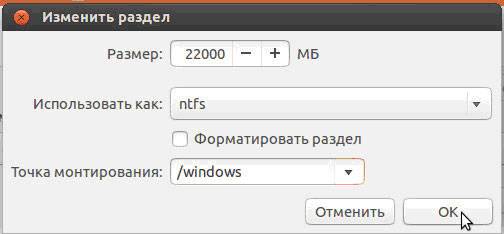
- in the “Size” item, indicate the desired disk size;
- in the “Use as” column, select the desired disk type, in this case “ntfs”;
- Don’t check the “Format” box if you don’t want to lose all your data;
- at the mount point, select “/windows” to have access to your files from the program;
- Click "OK".
Confirm your actions:

Now there is free space in the disk table:

Select a new item and click “+”, another window will open:

It is designed to create a swap partition, which is used in case of insufficient RAM. Place it as shown in the picture. Click "Ok".


The final view of the list of sections is this:

Place the Format checkbox only where you need to erase data.
Launching Linux
If Linux is the only operating system, it will boot immediately. If not, there will be four download options:
- Ubuntu system
- recovery mode, similar to safe mode in Windows
- running a RAM test
You can wait 10 seconds and Linux will boot automatically, or you can select the desired item yourself.
When starting, the computer will ask for a password to log in:
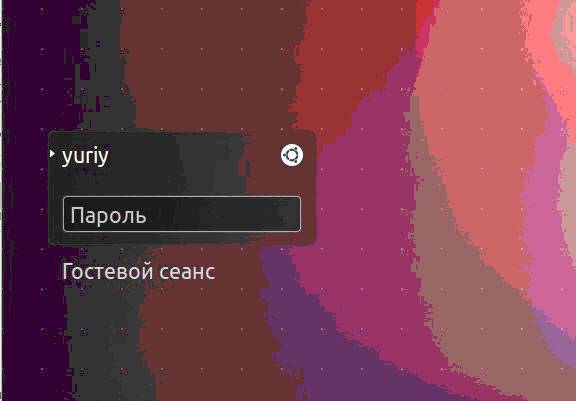
After this, the desktop will load.
Possible installation problems
If the program does not start when installing from a flash drive, the reason may be:
- bad flash drive;
- incorrectly recorded image;
- incorrectly loaded system image.
The reason can only be found experimentally. If you have another flash drive, write the image to it and try installing it. If the system continues to not start from the flash drive, check to see if the required image was downloaded for your computer at all. Still not working? There are times when the problem is in the image recording process itself. From the programs listed at the beginning of the article, try to record and run the image from a USB device one by one. In any case, the problem is one thing.
If, when you try to start Linux after installing the system, a black screen appears and nothing else happens, the problem may be with the driver of the installed video card.
To resolve this issue, hold down the left Shift key to display the GRUB menu before loading the OS. Move the cursor to the top point and press the "e" key. This is needed to edit boot parameters.
After “quiet splash” you need to add “nomodeset”:
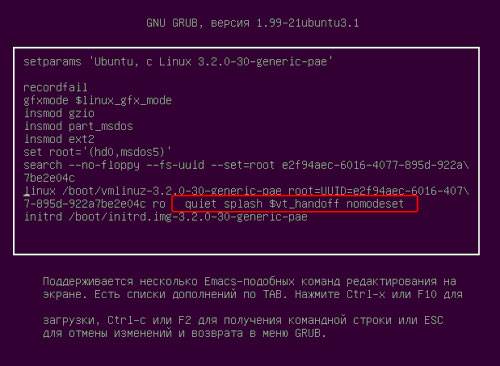
After that, press “F10” to load the OS with the entered parameters, this makes it possible to install proprietary video card drivers in the “System Settings” -> “Device Drivers” menu. Now you need to reboot the system. The Ubuntu LINUX operating system is simple and easy to use, and installing it from a flash drive is quite quick and easy. Minor problems may occur during and after installation, but they are easy to fix.
>


