Installing the 1s client 8.3. Platform installation, platform update. Creating a new database from a template
Below we will describe in detail the process of installing a standard configuration in the 1C:Enterprise 8.3 system, using the Enterprise Accounting solution as an example. Installation of a typical configuration occurs in two stages, first the configuration template is installed, and then a new database is created from the installed template.
Installing a template.
To add a new template, a special configuration installation program (distribution) is required. You can download the installation program on the ITS disk or on the 1C:Enterprise user support website.
Open the directory with the standard configuration installation program and run the setup.exe file.
The configuration installer will start. Click “Next” on the initial installation window.

Now select the directory where the template will be stored. Having selected the required directory, click “Next”.

We wait for the installation to complete and click “Finish” to complete the wizard.

Creating a new database from a template
Now let's create a new database from the installed template. But first, let’s point the launcher to the directory containing the configuration templates. To do this, launch the “1C:Enterprise” client, click “Settings” in the infobase selection window, in the launch dialog settings window that opens, add our directory of configuration templates (you can add several directories) and click “OK”, saving the entered values.


The Add Infobase/Group Wizard will open. If you are creating a new information base, select the appropriate switch (already selected by default) and click “Next”.

In the next window we will see a list of templates installed in the previously specified directory. For an installed template, there are 2 options for creating an information base - new (clean) database , And databases with demo data to demonstrate configuration options. (If you plan to create an infobase for subsequent loading of data into it from an upload file (*.dt) or to develop a new configuration, then you need to select the “Create an infobase without configuration...” item.) Select the option we need and click “Next”.

Enter the name of the database (as it will be displayed in the list) and select the type of infobase location - file (on the user’s computer or local network) or client-server (on the 1C:Enterprise server). In this example, select the file version of the work by checking the appropriate switch and click “Next”.

Specify the path to the location of the database files and click “Next” again.

On the last page we indicate the launch parameters for the database being added. If the configuration version differs from the 1C version (for example, the configuration is for version 8.2, but you need to run from a version 8.3 client), you should change this parameter. Having decided on the parameters, click “Finish” to complete the wizard, after which the process of creating a new database will begin, which may take some time.
Let's look at the procedure for installing the Basic version program. Installation involves 3 stages:
Platform installation
The procedure for installing the platform is described in detail in the instructions.
Note: for Basic versions, when installing the platform, you do not need to install the security key driver (checkbox “Install security key driver” not placed).
Configuration setup
After installing the platform, the configuration is installed, which means installing 1C configuration templates, from which information bases can then be created. To set the configuration, perform the following steps:

Press the button "Ready". Checkbox “Open delivery description” can be left or removed. When installing it, a file with a description of the delivery will open.
Creating a database and activating a license
Database creation
Let's launch the 1C:Enterprise shortcut that appears after installing the platform.
Initially, the list of infobases is empty. To add a new information base, perform the following steps:

License activation.
For Basic supplies, the following points must be kept in mind:
When purchasing the program, the package contains a PIN code for activating the license, which contains 16 characters;
PIN code activation is possible only 3 times;
After the third activation, the program is purchased again or the Basic version is replaced with the PRO version with an additional payment.
Re-activation may be required when installing the program on a new computer or changing key parameters of the current computer, for example, operating system, hard drive, motherboard, and others.
One of the most popular accounting programs, 1C: Accounting 8, requires constant updating due to the development of new platform capabilities. We offer detailed instructions for updating the 1C platform, which will help you easily switch to a newer version.
To work, you will need the Internet with access to the 1 C site and 20 minutes of free time. So let's begin.
Make sure the release is correct
Before upgrading the platform, you should ensure that the configuration you are using supports the new version of the platform.
How to find out the release number of the 1C platform and configuration? To do this, open the “Help” section in the main menu and select “About the program”.
A window will appear on the screen where the platform release number will be indicated in the first (top) block, and the configuration release number will be indicated in the “Configurations” section (in the main block).

You can also find out the release number by clicking on the yellow icon with the letter “i” inscribed in it - it is located in the upper right corner of the main program window.

Download the update from the official website
We will not consider updating the 1C platform in user mode, but will perform the installation manually. You need to download the update on the official website using the following link: https://releases.1c.ru/total (authorization required!)

Updating the program version is available only to registered users, so enter the login and password that were issued at the registration stage in the form provided. If you are not registered, do so now.


Attention! If, after downloading and checking the platform version, as described in the first paragraph, the old version is displayed, most likely an incorrect installer option was selected (for example, “thin client”).
Find and run the installer
The developers packaged the updates in a RAR archive, so you will need an archiver program that supports this format. Find the downloaded platform update, unpack it into a separate folder and run the setup.exe file.


Wait while the installation preparations complete. Then, in the installer welcome window, click Next to proceed to select your options.

Select the required components and interface language
Before you update the platform, you must select the components to work with. If you are not a system administrator, leave those that the system offers by default and click the “Next” button.

In the previous paragraph, the system will suggest a folder for installation - by default it is Program Files. If the main program files are located in a different directory, install it using the “Change” button. This is important for the program to work correctly.
On the next window, select the appropriate interface language (Russian is suggested by default) and click the “Next” button.

Start the update installation process
In the new window, click on the “Install” button - after this, the installation of the update files into the system will begin.

The procedure takes several minutes and directly depends on the performance of the computer and the operation of other applications running at that moment.
If the User Account Control window appears during the installation process, agree that you really want to install this software on your computer - click Yes.

After copying is completed and settings are made to the system, the program will prompt you to install the protection driver.

If you are using a USB dongle that provides protection at the hardware level, uncheck the box - the necessary driver is already on your system. Do the same if you have linked the 1C application to a specific computer at the software level - in this case there is also no need for a driver. Go to the next window by clicking the “Next” button.
Attention! If you missed the checkbox and the driver is installed again, this will not affect your further work in any way.
Complete the update installation
At the end of the installation, a window will appear on the screen with a “Finish” button - click it.

We have described in detail how to update the platform through the configurator - if the process was successful, the program will work stably on your computer. To verify this, use its capabilities for several days.
After this, remove previous versions of 1C:Enterprise 8.3 so that they do not take up space on your hard drive. To do this, go to the “Control Panel”, select the appropriate item in the list and click “Delete”.

If you continue to work with configurations created for the version 8.2 platform, do not delete it.
Leave two platforms of different versions on your computer (in our case, 8.2 and 8.3) - they will start automatically when you select the appropriate configuration.
1C users often have a question: where to get the 1C platform and install it on a computer, for example, after replacing a computer or when the platform needs to be reinstalled as required by the 1C configuration? The answer is obvious - you can download the 1C Enterprise 8 platform from the official website. In this publication, I propose to analyze this issue and update the 1C platform yourself.
It often happens that you don’t know how to do seemingly basic things. In my opinion, installing the 1C Enterprise platform is a question from this area. Despite its simplicity, this operation very often baffles users: there is a box, licenses with PIN codes, disks, books, but where is the new platform? The disk usually contains a distribution kit of an outdated version of the 1C platform, and it is unknown where to get a new one... There is only one way out - call 1C partners, they will solve everything, but, however, not for free.
This is exactly what an ordinary 1C user would think and do, but what can I hide - I would do it myself. It’s not for nothing that they say that knowledge is power. In our case, knowledge will help us save a little on the services of 1C franchisees and install the 1C platform ourselves.
We will divide the consideration of this issue into two stages:
How to download the 1C Enterprise 8 platform from the official website
1C updates can be downloaded through the 1C Portal, at https://portal.1c.ru/. Find the “1C: Software Update” service and click on the “Learn more” link.

On the page that opens you can find out a description of the service, terms of receipt and other useful information. Find the “Download software updates” item in the menu on the left.

 If you have not been authorized in the service up to this point, a login/password entry form will appear. This data should be given to you by 1C partners when installing 1C configurations. I know that this requirement is often ignored both by 1C partners (to avoid unnecessary questions and explanations) and by the users themselves (who do not understand where to use this data and why? - everything works, if it stops, then 1C partners will solve it).
After entering the registration data, a list of configurations available for updating 1C will open, from where you can download the 1C Enterprise 8.3 platform. Find the current version of the 1C Enterprise platform.
At the time of writing, the current platform has release 8.3.8.1964, platform 8.4 exists only in test mode. Accordingly, in the list of platforms we find “Technological platform 8.3” and click on the latest available platform version “8.3.8.1964”.

In the list of different types of platforms that opens, select the one we need for our work. The most popular installation option is installing the 1C platform on a Windows system. If this is your option, then select from the list "Technological platform 1C:Enterprise for Windows".

With this action you will download the archive of the 1C Enterprise 8.3 installation distribution - windows.rar.  Extracting the archive.
Installation of the 1C Enterprise 8 platform
After extracting the application archive, enter the created directory with program files and find and click on the installation file in the list setup.exe(file named setup and type “application”).

The 1C:Enterprise 8 installation wizard will greet you and warn you that the program is protected by copyright. Click “Next”.
At the next step, the Wizard will offer you to select components for installation:
I’ll tell you about the components offered for installation another time, but now we are only interested in the 1C:Enterprise platform. We check that it is not marked with a cross and click “Next”.
In the next step, select the installation language and click “Install platform”, after which the Wizard will begin the installation procedure.
After installation, a form will be displayed notifying you that the installation program is complete. Click “Finish”.

Platform 1C Enterprise 8.3 installed.
After installation, a shortcut to launch 1C Enterprise 8.3 will appear on your desktop.
As you can see, there is nothing difficult to download the 1C Enterprise 8 platform from the official website and install it on your computer yourself. Don't forget after installing the platform.
Enjoy your work with 1C Enterprise!
If you have any questions, you can ask them in the comments to the post or on.
Download the 1C Enterprise 8 platform from the official website and install
This article will discuss in detail the algorithm for installing the client part of the 1C:Enterprise system. 8.3 (for versions 8.2 , 8.1 And 8.0 The installation algorithm is similar to the one about installing the 1C:Enterprise system 7.7 I wrote) in operating systems of the . Typical options for the operation of 1C:Enterprise are considered, and a brief description of all components of the system will be provided.
0. Basic information about the 1C:Enterprise system
The 1C:Enterprise system is a set of software modules designed for the development and use of application solutions ( configurations) - on accounting and automation of economic activities of enterprises. The software modules of the 1C:Enterprise system are universal and can work with any configuration. R Working with information bases is possible as in file, and in client-server option.
In the case of working with a file information base, the database files are located either directly on the computer of the user working in the program “1C:Enterprise”, or on a network resource to which “1C:Enterprise” is connected to work with the information base. The figures below show the most common scenarios for the 1C:Enterprise system working with file databases.

This mode of operation is only suitable for information bases with which a small number of users work simultaneously.
If it is expected that a large number of users will work with the information base simultaneously, or a significant load on the information base is expected, you should use server cluster "1C:Enterprise". In this case, the database files will be located in a separately installed DBMS (database management system), and the server cluster will interact with this DBMS for the end user. In general, the operation scheme of the 1C:Enterprise system will then be as follows:

I wrote in detail about installing a 1C:Enterprise server cluster in the article. Next we will talk only about installation client application the 1C:Enterprise system, i.e., system modules necessary to work with file information databases or to connect to an existing 1C:Enterprise server cluster. For this we need:
- A computer capable of installing a client application of the 1C:Enterprise system running Windows OS.
- Local administrator rights on this computer.
- Distribution kit for installing modules of the 1C:Enterprise system. This example uses the version 8.3.4.389 . Installation of modules of the 1C:Enterprise system of earlier versions is similar.
- or , suitable for the required 1C:Enterprise operating mode.
1. Installation of 1C:Enterprise system components
Open the directory with the 1C:Enterprise installation files and run the filesetup.exe.

The 1C:Enterprise 8 installation assistant will start, click “ Further" on the first page.

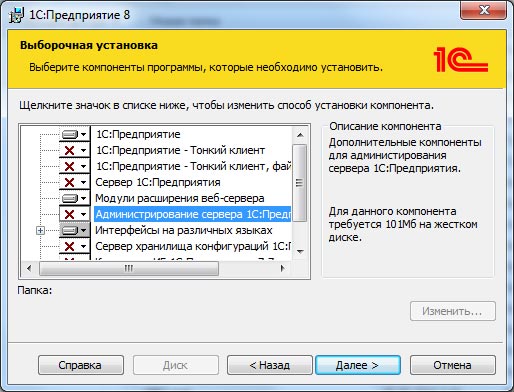
On the next page you can change the folder for installing 1C:Enterprise modules by clicking the button Change"and specifying a new path for installation, and you also need to select the components that will be installed. The list of components depends on what needs to be installed. Depending on the distribution type, not all components may be available for installation. If you need to install a component (or cancel the installation), you need to mark it by clicking the icon to the left of the component name (or the Space), in the menu that appears, select one of the options:
- This component will be installed on your local hard drive.
- This component will not be available.
Here is a brief description of the installed components:
- 1C:Enterprise— the main components of 1C:Enterprise, including components for administration, configuration, thick and thin clients.
- 1C:Enterprise - thin client— thin client components only for working in client-server mode.
- 1C:Enterprise - thin client, file version— thin client components, including components for working with the file version of the infobase.
- Server 1C:Enterprise— components of the 1C:Enterprise server (read more about installing the 1C:Enterprise server).
- Web server extension modules— web server extension modules required for the operation of the web client and Web services (read more about setting up web access to 1C:Enterprise databases).
- Administration of the 1C:Enterprise server— additional components for administering a cluster of 1C:Enterprise servers.
- Interfaces in different languages— user interfaces in various languages.
- 1C:Enterprise configuration storage server— components of the 1C:Enterprise configuration storage server.
- Converter IB 1C:Enterprise 7.7— information base converter.
Having selected the necessary components for installation, click “ Further».

At the next step, you need to select the interface language to be used in the future (the operating system language is the default). Having specified the interface language, click “ Further».

Click " Install" to start the installation of the 1C:Enterprise system.

Upon completion of the installation process, the assistant will offer to install the protection driver - HASP Device Driver. It is necessary to install the protection driver only if the USB port given a HASP4 NET hardware protection key will be installed on the computer (the driver installation can be performed later using the menu item " Start» — « Programs» — « 1C Enterprise 8» — « Installing HASP Device Driver"). Leave or remove the flag "Install protection driver" and click " Further».

If the installation is successful, the final page of the installation assistant appears. If you leave the flag " Open Readme file", then a file will be opened with information that seems to be recommended to be read before using this version of the system. Click " Ready» to complete the wizard.

2. Adding an infobase to the list of infobases
During installation, a shortcut to launch 1C:Enterprise will be created on the desktop. If you launch it, the 1C:Enterprise launcher will open with an empty list of infobases and a proposal to add a new infobase to the list.

The next steps depend on the specific situation:
- If you need to create a new database to start accounting, click " No"And first of all, we install a standard configuration template, and only then, based on the template, we create a new information base. Read more about this in the article
- If you need to connect to an existing information base, click “ Yes"and add this database to the list of information bases. Read the article on how to do this.
3. Installing a 1C:Enterprise license
Software products "1C:Enterprise" version 8can be protected from copying by hardware LPT or USB keys such as HASP4 Net from the company Aladdin , or using a software licensing system. It is also possible to use both types of protection simultaneously. After installing the system "1C:Enterprise" and creating information databases, all that remains is to install a license to operate "1C:Enterprise".
- I wrote about installing and configuring HASP protection keys in the article “”
- I wrote about the software licensing system in the article “”, as well as about the case of obtaining a license for the first time in the article “”.
Did this article help you?


