Create a system restore point manually. Creating and using restore points in Windows XP
In some cases, system recovery is the most “painless” way to make the Windows operating system function normally if, as a result of installing some program or driver, the system began to “crash”.
System Restore allows you to “roll back” to one of the previous states of the operating system. It affects system files, registry keys, installed programs, drivers, but does not in any way affect the user’s personal files. The previous state of the system is called system restore point.
The operating system itself creates system restore points, for example, after installing a program or the next system update. But sometimes it may be necessary create a system restore point yourself, for example, if you have concerns about a program or driver that you want to install and you need to save the current system configuration.
How to create a restore point in Windows XP
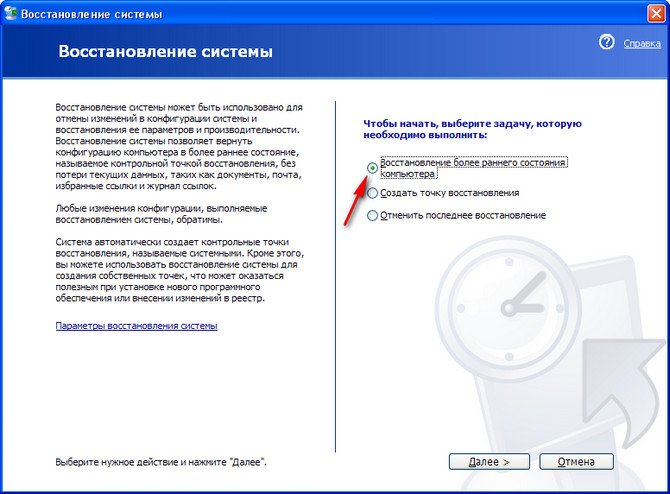
To create Windows XP restore point manually, you need to run System Restore. To do this, go to the menu Start, select option All programs, then Standard - System Tools - System Restore. The Recovery Wizard welcome window will open. Set the radio button to option Create a restore point and press the button Further.
The window for creating a control point will open. You will be prompted to enter a name for the new restore point. The name should be clear to you - if there are many restore points created, it is easy to get confused about them. Please note that once a restore point is created, it cannot be edited, so be careful. The time and date the restore point was created will be automatically added to the name. Then click the button Create- the restore point is ready!
How to create a restore point in Windows 7
Process of creation Windows 7 restore points differs from a similar process in Windows XP. If you tried to run the restore service on this version of the OS, you noticed that the wizard did not have the option to create a restore point. Therefore, we will have to take a different path.
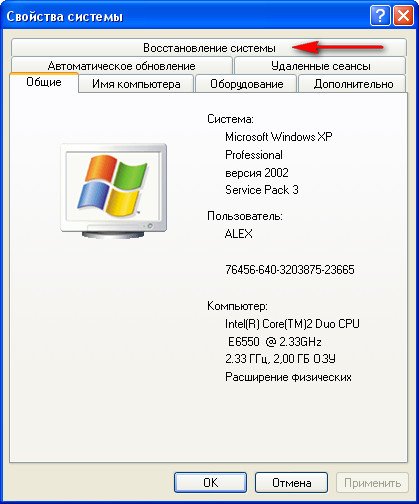
Right-click on the My Computer icon on your desktop. A context menu will appear in which you need to select an option Properties. In the menu on the left, click on the link System protection. The system properties window will open with the active tab System protection. You need the very bottom option - “Create a restore point for disks with system protection enabled.” Click the button Create.
Just like in Windows XP, you need to enter a name for the restore point. The rule is the same here - the main thing is that by this name you can then identify the recovery point you need. The date and time, again, will be added automatically. Then click the button Create. The time it takes to create a restore point will depend on the performance of your computer, the amount of data being saved, and some other factors.
Setting up System Restore
In addition to creating a restore point, you can enable or disable system restore for one or more hard drives, and also adjust the amount of disk space reserved for system recovery.
For this in Windows XP you need to right-click on the My Computer icon, select the option Properties and in the window that opens go to the tab System Restore. By checking or unchecking the box next to the option Disable System Restore on all drives, you enable or disable recovery accordingly.
To configure recovery options for each hard drive, select from the list Available drives desired section and press the button Options. You can disable System Restore on a per-drive basis (note that you cannot disable Restore on a system drive without first disabling it on all other drives), and you can also change the amount of space reserved for storing recovery points. The recovery service may require up to 12% of disk space to function properly.
To do a similar procedure in Windows 7, go to System protection(the same as when creating a restore point). Select the desired drive from the list Security settings, press the button Tune, and then setting the parameters in Windows 7 is similar to a similar procedure in Windows XP.

For experimenters who do various extreme things with their system, I will now tell you how to protect yourself and create a Windows XP restore point. Studying this material will take a few minutes of time, but it will save you from long hours of troubleshooting or reinstallation. Sometimes it is better to restore the system than to try to repair it or reinstall it.
If you know how to create a Windows XP restore point, then you can almost always “resurrect” your computer yourself without asking outsiders for help. It won’t be difficult to learn and remember this.
Creating a restore point
To create a Windows XP restore point, click the “Start” button, select “All Programs” there, then click “Accessories”, then “System Tools” and finally click on “System Restore”.
Creating a restore point
A window will open in which you need to click on the “Create a restore point” radio button.
Creating a restore point
Creating a restore point
After that, click “Create”. It won't be long before the Windows XP restore point is ready. You can click “Close”. If you use now, you will see the point that you just created in the rollback calendar.
Why do you need to create restore points?
Checkpoints are created automatically by the system at certain intervals or when installing/uninstalling certain programs and drivers. And this is built into the system for good reason. Every installation and uninstallation of any software is an intervention in the system, the same as implanting or removing an implant in a person through surgery. It would be nice if a person could be preserved before each surgical intervention, and then, if something happens, restored. However, unfortunately, this is not possible. But creating a Windows XP restore point is quite realistic and easy. Therefore, you should not neglect this function of the system every time you do something unfamiliar.
How can you configure restore points?
It is also not recommended to disable the Windows XP restore point creation feature. Sometimes this option is disabled in order to save hard disk space. This becomes justified if there is very little space. However, you should know that the amount of memory that will be allocated for backups can be adjusted.
To change the amount of memory that the system backup will take up, you need to right-click on “My Computer” and select “Properties”. In the window that opens, click the “System Restore” tab and then the “Options” button. Using the slider, you can adjust the maximum possible space that will be allocated for the created Windows XP restore points.
Setting up a restore point
However, you should know that when this space runs out, older backups will be deleted. And therefore, you can always create Windows XP restore points, without fear of running out of space.
Sometimes it happens that after installing a certain program, the computer begins to noticeably slow down or does not boot at all. Difficulties in starting the system can be caused by Windows updates that were not downloaded from the official website, viruses, or other reasons. In this case, Windows XP provides a standard solution that should be called extremely useful - this is a system restore point.
What is a system restore point?
The recovery point stores all data about programs, files, performance and state of your operating system. System recovery occurs by rolling back system files, installed programs and registry keys. Using a restore point, you can make a backup copy of the C drive and other hard drive partitions, in which case you can restore damaged programs, drivers, and even files that were deleted from the Recycle Bin.
How to set up a restore point in Windows XP
Unfortunately, in Windows XP, unlike Windows 7, where system recovery occurs automatically when new programs, drivers and updates are installed, the restore point must be configured manually. To do this, you will need to follow the steps below.
1. Click “Start” - right-click on “My Computer” and select “Properties” options. Then go to the System Restore tab (this operation can be done without using the “Start” menu if the “My Computer” icon is on your desktop. You just need to right-click on this icon and then follow the steps described above.

2. By default, System Restore is disabled (though this may vary depending on your build of Windows XP), so you will need to uncheck the "Disable System Restore on all drives" option. To disable the creation of a recovery point, this checkbox should be checked accordingly.

3. Then you need to configure system recovery for each hard drive partition individually. To do this, click on the disk partition you need from the list of available ones and click on “Options”.

Please note that you cannot deselect System Restore on the system partition without disabling it on other partitions of the hard drive. But any other drive can easily be included or excluded from the list.
In the “Options” menu, you can specify how much memory for a given partition of the hard drive should be allocated for recovery points. Note that they require up to 12% of free space.
Windows XP System Restore
You can enter this menu item in various ways:
- Start – All Programs – Accessories – System Tools – System Restore
- Control Panel – Backup and Restore – Restore System Parameters
- Control Panel - System - System Protection - System Restore
Then in the window that appears you will be given 3 options to choose from:
- Create a restore point
- Undo last restore
Restoring your computer to an earlier state
Here you can roll back to a specific restore point by selecting the date you need, but with the condition that the restore point was created on that day. There are three types of restore points: system, user and installation. The first ones are created automatically by the system, the second ones are created by the user independently using the “Create a restore point” item in the previous menu; installation ones are created when installing or uninstalling some programs.
On the left is a calendar and arrows, with which you can easily select the desired date. By default, today's date is selected. On the right, detailed information about the restore points for a specific day is displayed (you can create several per day). You can also click “Search for affected programs” to see which programs will be affected by this restore. Once you have decided on the date and restore point, click “Next”. After which a new window appears confirming the selection of the recovery point, in which its name, date and time will be displayed.
What else you should know about system recovery
- System Restore can be undone;
- After selecting System Restore, Windows will shut down and the computer will restart;
- After recovery, the system will boot with settings corresponding to the day at the selected recovery point;
- You should be sure to save all important data and close all processes before restoring the system;
Don't worry if system recovery takes a long time. On some weak computers, recovery can take up to 20 minutes, especially if you are restoring more than one hard drive partition.
Creating a windows xp restore point
To do this, you need to select the second option “Create a restore point” and click “Next”. In the window that opens, enter the name of the future recovery point, to which the date and time of creation of this point are automatically added. Then click the “Create” button and wait for some time.
Automatic restore points are created, as a rule, the first time you start your computer after an update, when installing an unsigned driver, before installing an update, if you use Windows Update, after installing certain programs, during a system restore, and according to a schedule.
You should not actively use the creation of restore points on a schedule, i.e. after a certain time. Since each file is quite large and takes up a lot of space on your hard drive. It would be wiser to create restore points only when it is really needed (before installing untrusted programs, drivers, or system optimization).
Cancel last restore - this item will be available if a system restore occurred previously, but you decided to cancel it. That's all and good luck to you, friends!
If you need inverters for solar panels, then you can purchase them at a good price on one-sun.ru. You will receive electricity without overpaying and preserving the environment.
The old Windows XP is so popular among many users because of its reliability, but even it sometimes crashes. Most often, of course, this happens due to the crookedness of users, but there are other reasons. Be that as it may, the best way to get your computer back to working is to restore the Windows XP system, that is, roll back the recently made changes.
Often, restoring the Windows XP system can solve the problem (if it is not physical in nature). And in this article I will tell you what needs to be done for this.
How to restore Windows XP system
Before you restored your Windows XP system, you most likely discovered that it wouldn't boot at all and went into a hysterical panic. Instead of panic, you need to download to .
When the system turns on in safe mode, you need to click “Start”, then select “All Programs”, in it the “Accessories” section, then “System Tools” and finally click on “System Restore”.
In the program that opens, check the first item “Restore the computer to an earlier state” and click “Next”.
Afterwards you will see a calendar where dates to which you can roll back will be marked in bold numbers. Having selected the one you need, click the “Next” button, and then “Next” again. The Windows XP rollback will begin, the computer will reboot, recover and boot into normal mode, and you will receive a success message.
Restoring a Windows XP system takes some time, and the more time there is between the rollback date and today, the longer it will take. During recovery, it may seem like nothing is happening. In fact, this is not true. You just need to be patient and wait for the operation to complete.
Since you need to restore your Windows XP system from a checkpoint, it is necessary that they be created automatically. To do this, you must enable this feature. You can check whether it is enabled as follows: on “My Computer”, right-click and click “Properties”, and go to the “System Restore” tab. There should be no checkmark next to “Disable system recovery on all disks”. You also need to look carefully at the table below with a list of hard drives. The “Status” column on all disks should say “Monitoring”.
Restore checkpoints on Window XP are created automatically when installing some programs, drivers, or by the system itself for no reason. You can also do it manually. Before you do something incomprehensible on your computer, it is recommended to create a restore point so that if something happens, you can roll back the changes.
Windows XP Restore Point it is created very simply, it is also easy to roll back with it, if you want to delete all restore points, to free up more space on your hard drive, you just need to disable system restore. In order to remove all points except the last one, you need to read our article to the end. I promise everything will be simple, clear and interesting.
Windows XP Restore Point
Our regular reader has been asking me for a long time to write an article about how a simple Windows XP system recovery works and what interesting aspects there may be that are unknown to beginners and others. We have a lot of articles about how to restore Windows XP in the most hopeless cases and with various little-known methods, for example, but here are articles about how to create a simple Windows XP restore point and there is no way to roll back with it, which means we are correcting ourselves.
When you work in an operating system, the function and the Windows XP restore point created with its help can be very useful to you. It works on the principle of a time machine and does not take up much computer resources, especially when it comes to modern powerful computers.
Let's look at the application XP restore points on a specific example. Let's say you installed some program or driver package, and then found out that your operating system is not stable, deleting everything you installed will most likely not solve the issue, this is where our restore point comes in handy. Before creating it, let's make sure that System Restore is enabled on our computer. Right-click on the icon My computer and select from the drop-down menu Properties->System Restore.
Please note that disk monitoring is enabled on my computer (C:),

this means that I have System Restore enabled for this disk and so-called restore points or system snapshots are created, and many also call them snapshots of the operating system, that is, everything that is done on your computer is remembered. Is it important when it is remembered?
- An XP restore point is created automatically every 24 hours.
- Before installing many programs and drivers without a digital signature.
- And you yourself, before any serious action, can create a restore point.
So we have System Restore enabled for the drive (C:), by default Windows XP reserves 12% of the disk space for recovery points. In the Settings window, you can use the slider to increase the space on your hard drive for storing recovery points, then even old system snapshots will be stored for a long time and you can roll back to them at any time.

You also need to know that system recovery mainly affects only important system files, but not your data; for example, it will not be possible to return an accidentally deleted file by using a restore point.
If you wish, you can enable monitoring of any other disk in the system. Click on the desired volume with the mouse, then the Options button and uncheck the Disable system recovery option.

Now let's imagine that we are installing an unfamiliar program on a computer. Naturally, before installation we will create a restore point Start->All Programs->Accessories->System Restore. In this dialog box, you can restore your computer to an earlier state, create a new restore point, or undo the last restore.
Create Windows XP restore point and onwards

The description of the recovery point should contain information about why exactly this point was created, today is the environment, well, let’s call it, for example, the Total Commander program installation environment, then Create and we can safely install our program.


Now imagine the situation that after installing our program, the computer began to behave unstable and we decided to roll back using the restore point we created. We launch system recovery. Start->All Programs->Accessories->System Tools->System Restore. Restoring your computer to an earlier state.
Select our recovery checkpoint.

The procedure is reversible and will not affect our current data. Next, the recovery process will begin with a reboot of the computer, then you can make sure that there are no traces of the program that caused your computer to behave unstable.


