Creating an online advertising brochure. How to make a booklet in Word step by step instructions
If you often need to print large documents on your printer, perhaps you would like to save at least a little paper and toner consumption. Learn how to print text as brochures and get 4x savings!
Do you like to read? Surely, your answer will be positive (at least, I hope that our site is visited by literate people or those who want to learn something useful). Today, for the reading population, it is not at all necessary to buy books or various periodicals. The Internet provides the widest possible freedom. You can read online directly on various sites, or download e-books and view them on your tablet or smartphone.
However, reading electronically does not always allow you to effectively absorb information. Sometimes it is much more convenient to have printed text at hand. Therefore, many people print e-books and various articles on a printer. It would seem that everything is fine: I printed it out and it’s in order! But, there are a couple of “buts”... Usually the printer prints on standard A4 sheets, which is sometimes excessive in terms of its size. It would be much better to print on A5 sheets in the form of small booklets or brochures.
This printing option, firstly, significantly saves paper (up to 4 pages can fit on 1 A4 sheet), secondly, it reduces toner consumption, and thirdly, it allows you to get a more compact “book” that you can always carry with you! Do you want to know how to print a brochure in Word or its free equivalent Writer from the OpenOffice and LibreOffice packages? Then I offer you a choice of several ways to do this.
General principle of creating brochures
The main condition for the correct printing of voluminous text in the form of a brochure is the correct arrangement of the pages. You need to calculate it so that the finished book can be folded in half and its pages are in the correct order, and on both sides of the printed sheet!
At first glance it is difficult and incomprehensible. However, simple mathematics will help us. The main “trick” when creating brochures is that the number of pages in it will always be a multiple of 4. Knowing this, you can easily calculate the correct sequence. For example, to print a 4-page brochure we need 1 A4 sheet. On the front side we will place pages 4 and 1, and on the back - 2 and 3. To print an 8-page booklet you will need 2 sheets of paper and placing pages 8, 1, 6 and 3 on the front sides, and 2, 7 on the back. 4 and 5.
That is, in fact, on the front side we print all the even pages on the right, starting from the end, and on the left, all the odd pages from the beginning. Similarly, on the reverse side we will print on the left all even pages from the beginning and odd pages from the end. To avoid confusion, I suggest visualizing the task in the form of a table:
I think everything is more or less clear now. You can continue the sequence for more sheets, however, the more there are, the worse they will bend. As a result, our book will simply “spread away.” For this reason, the USSR State Standards approved the maximum volume of a brochure of 48 pages (12 sheets).
If the number of pages is a multiple of 4, then you can successfully use the above scheme. However, in practice we usually deal with an arbitrary number of them. In this case, you just need to add 1 to 3 blank pages to the end of your document to be printed, so that their number becomes a multiple of four!
For example, your document contains 21 pages. You have two options:
- Condense text so that it fits on 20 pages (for example, reduce the font) and print the brochure on 5 sheets.
- Leave the text unchanged and simply add three blank pages at the end. Then you will get a brochure on 6 sheets.
Actually, that's the whole theory. Knowing it, you yourself can manually arrange the pages of your future brochure in the desired sequence and in two passes (first all the front sides, and then all the backs) print it on almost any printer that can print two pages per sheet. However, doing everything manually is time consuming and not very convenient, so let’s look at existing automation methods.
Standard function for printing brochures in Word and Writer
It would be strange if such powerful word processors as Microsoft Office Word and OpenOffice Writer were not able to print text in the form of a brochure. But at first glance it seems that this is exactly the case. There is a standard function for creating brochures in both editors, but it is hidden quite deeply and, alas, does not always work correctly...
Print brochures in Word
The main drawback of this standard Word function is that it reformats the entire document from portrait to landscape orientation with the pages not always placed correctly (especially if they contain tables or pictures). This method is also not suitable if the file contains page breaks and/or mixed orientation (some pages in portrait and some in landscape).
However, for simple books, the option is sometimes the simplest. To use it in Word you need to open a window "Page settings". For Word up to version 2003 inclusive, its option is located in the "File" menu, and, starting from 2007, on the "Page Layout" tab - the "Margins" drop-down list - the "Custom Fields" item or a small button in the lower right corner of the "Page Options" section ":

In the window that opens, go to the tab "Fields" select from the dropdown list "A few pages" meaning "Brochure". The result of this action will be that the document will automatically be reformatted into landscape view and each page in it will become smaller (in fact, it will turn into A5 format). This will cause the text to move or be cut off (if large fonts, table frames or images are used).

If maintaining the original formatting is not particularly critical for you, then to save paper you can slightly reduce the text (for example, from standard 14 to 12 or even 10) and print the document. In the print settings you need to select double-sided printing, taking into account the properties of your printer (I recommend that you first print a 4-page brochure and remember how to turn the sheet over to print from the reverse side).

So far, the document has not changed visually (unless you count page reduction as a change, that is, the brochure itself is not displayed anywhere). But, if you activate the option in the printer settings preview before printing, we will finally see what it all started for - the correct breakdown of the document into pages:

Printing brochures in OpenOffice Writer
OpenOffice Writer handles brochures much better than Word. There is no pre-formatting of the document here, and all tasks for creating a brochure are performed by the print manager. This avoids disruption to the appearance of document pages, and also eliminates problems with mixed orientations and breaks (the content of all pages is proportionally reduced and automatically switches to landscape view with a layout of two pages per sheet).
OpenOffice Writer prints “native” text document formats as brochures with a bang. However, problems may arise when opening Word documents, which do not always contain Writer-compatible layout...
To use the brochure printing function in Writer (and indeed in OpenOffice or LibreOffice), you need to go to the menu "File" and call the item "Seal". In the window that opens, go to the tab "Page Layout", activate the option "Brochure" and set the printing sequence (for a printer with a two-sided printing function, “All”, and for regular ones, first “Front sides”, and then “Back”):

As you can see, Writer is significantly ahead of the popular Word when it comes to printing brochures! If you use this particular editor, then in this regard you are lucky. However, the formatting of Word documents may be affected when opened in Writer, so let's look at alternative ways to print brochures.
Brochure Print Queue Generators
Modern printers, even the simplest ones, are very “smart” devices. If you take a closer look at the functions of their driver, you will find a whole bunch of various settings and options that allow you to flexibly control printing. Among these settings, you may also find the ability to print booklets.
Most often, this function is located either in the section that is responsible for page settings, or even directly in the print dialogs. For example, in my Canon printer this is on the second tab “Page Setup” in the “Page Layout” - “Booklet Printing” list:
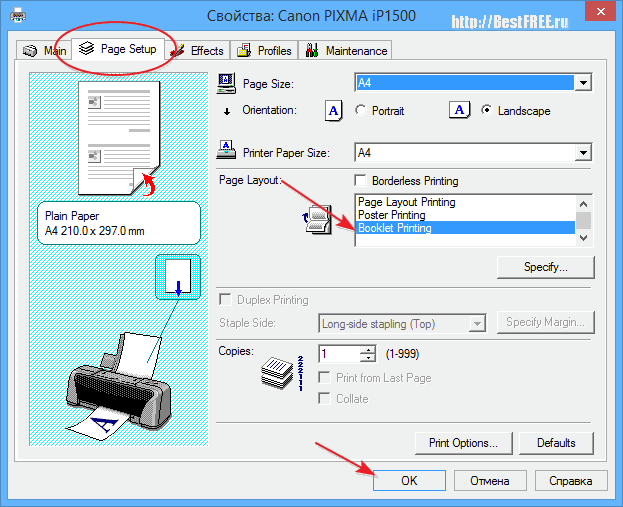
You could say I was lucky. My printer itself correctly breaks the pages of a document in the correct sequence, without disturbing the formatting, adding blank pages if necessary and correctly changing the sheet orientation where necessary. However, unfortunately, not all printers can do this. But most printers (and even in the settings of Word itself) have a print function two pages per sheet:

Having this opportunity and knowing the required sequence of pages in the booklet, we can easily print any document as a booklet without losing formatting. The only drawback of this method is that landscape-oriented pages will remain in the brochure in a horizontal position (see screenshot above).
If this is not so critical for you, then all that remains is to create the desired sequence of pages for printing. There are quite a few different solutions for this. I offer you one of the best, in my opinion, - an online generator, which for some reason is located on the website of the Berdyansk Department of the Ministry of Emergency Situations :)

There are many different options and a fairly extensive article on brochure printing in general that would be worth reading. As for our task, to generate the correct print queue sequence we only need two or three actions:
- We indicate the number of pages in our brochure (I deliberately put the number not a multiple of 4).
- If the number of pages in our brochure is not a multiple of 4, then we should add to our document at the end an extra blank page with a non-printing character (for example, several spaces, or even better, invisible characters that are entered from the numeric keypad with the number 255 while holding down the ALT key). After this, check the “Blank page added” checkbox so that it is taken into account when calculating the print queue.
- Click the "Calculate" button and get the result.
The result is displayed as a list of copied rows of numbers separated by commas for the front (obverse) and back (reverse) sides. At the same time, for the reverse side there are two rows at once for printers that support or do not support the reverse order of sheets when printing.
If you do not have access to the Internet or the desire to tinker with the online service, you can install a stationary print queue generator on your computer called (install on behalf of the Administrator):

This program is quite old and has not been updated for a long time, but, nevertheless, it works even on new systems. Using it is very simple: indicate the number of pages in our brochure and click the “Get” button. In the “Line 1” field we get a series of front pages, and in “Line 2” - back pages. In this case, the program calculates only sequences that are divisible by 4.
The program has a small number of options that can be accessed by clicking the "Setup" button. Here you can activate the reverse order of string generation, as well as set the insertion of delimiters or combine both strings into one sequence of numbers.
The advantage of brochure print queue generators is that we can use the calculation results not only for printing in Word, but also for printing booklets from PDF or DJVU files! In short, from any program that supports the function of directly specifying the print queue.
Programs for printing brochures
As we can see, OpenOffice Writer has very good standard functions for printing brochures, while Word lags far behind in this regard... In order to level out this annoying oversight of the developers, a number of programs have been created that allow you to print brochures and booklets from ready-made documents on your own.
The most popular programs are ClickBook and FinePrint. However, their main drawback is that they are both paid and quite expensive! What’s even sadder is that these programs do not have free analogues for Windows (for Linux there is the Boomaga virtual printer with similar functionality).
What should lovers of free software on Windows do? who don't want to become pirates? There are two options to solve the problem. The first is to save the document as a PDF file and print the booklet using a viewer program.
I recommend doing this in STDU Viewer. We save the document as a PDF (in new versions of Word this can be done directly, but for older versions (before 2003) you will need to use a virtual printer) and open it in the viewer. Now let's go to the menu "File" and click on the item "Advanced Printing". In the window that opens, in the printer properties, set to print two pages on one sheet, then specify the desired print queue and be sure to activate the option "Automatically rotate pages". Let's get the right brochure!

The second way to print booklets programmatically from Word is to use various macros. Macros are mini-programs that run in the Microsoft Office environment and significantly expand its functionality. Unfortunately, macros can execute malicious code, so they are blocked by default both by Word itself and by most antiviruses.
Unfortunately, the only effective free way in this case is to use the standard functionality of the printer driver. However, not all printers “can” print booklets. If you have no luck with this, you can try printing the booklet from the PDF. This will allow you to preserve the original formatting 100%, but will require additional movements and the installation of additional software.
Unfortunately, there is no universal method for all occasions, but for each task it is possible to choose the optimal course of action that will allow you to create a brochure from any document. Happy printing!
P.S. Permission is granted to freely copy and quote this article, provided that an open active link to the source is indicated and the authorship of Ruslan Tertyshny is preserved.
Publisher is a product for working with printed products (postcards, newsletters, booklets) from Microsoft. Microsoft is known not only for its popular Windows operating system, but also for a number of programs for working with documents. Word, Excel - almost everyone who has ever worked on a computer knows these names. Microsoft Office Publisher is not inferior in quality to these products from a well-known company.
The publisher will allow you to quickly create the required document - no matter whether it is a simple page of printed text or a colorful booklet. The application has an interface that is understandable for any user. Therefore, working with printed materials at Publisher is a pleasure.

Creating a booklet in Publisher is a very simple task. Simply select one of the ready-made templates and place the desired text and images on it. If you wish, you can design the booklet yourself to make it look interesting and original.

For standard templates, you can change the color and font schemes.
Add pictures
Like other Microsoft document products, Publisher allows you to add images to a piece of paper. Simply drag the image onto the workspace with your mouse and it will be added.

The added image can be edited: changed size, adjusted brightness and contrast, cropped, set text wrapping, etc.
Add a table and other elements
You'll be able to add a table just like you do in Word. The table is highly customizable – you can customize its appearance in detail.

You can also add various shapes to the sheet: ovals, lines, arrows, rectangles, etc.
Seal
Well, the final step when working with printed products, accordingly, is printing them. You will be able to print the prepared booklet, brochure, etc.

Pros of Microsoft Office Publisher
1. The program is easy to work with;
2. There is a Russian translation;
3. A large number of functions.
Disadvantages of Microsoft Office Publisher
1. The program is paid. The free period is limited to 1 month of use.
The publisher is an excellent representative of the Microsoft product line. With this program you can easily create a booklet and other paper products.
Of course, simple text can be typed in any editor that is installed on your computer. However, books, and brochures even more so, are met by their covers. Therefore, there is a need to format them correctly and preserve the formatting when printing. To do this, you should use special software, which we will discuss below.
CaptureXT Screen Capture helps you create an eye-catching brochure, manual, or presentation by creating a collage of photos and screenshots of information. You can add text blocks and even handwritten text to them if you have a pen and tablet for input. CaptureXT Screen is controlled via hotkeys, making the work process much faster and easier. Directly from the program, the finished product can be easily sent to email addresses or placed on a website page. Download from the Belltech developer website.- eBooksWriter is a unique software thanks to which any user can not only write, but also prepare their own book for printing or publication. The program comes in several versions, such as Gold or Pro, which will be of interest to professional writers and advanced users. The developer of Visual Vision provides the opportunity to use the Lite edition of the program for free. eBooksWriter can:
- package the book into an executable .exe file;
- open it in a browser, saving the markup;
- search the text;
- close the possibility of copying;
- set a trial period for accessible reading;
- protect data with a password or create personal keys for readers;
- request contact information for mailing and communication;
- demonstrate multimedia fragments, embed and open links, pop-up windows;
- connect to an electronic store for purchases;
- contain active three-dimensional elements;

- Hyper Publish PRO – for publishing materials on the website and in catalogues, including the creation of electronic brochures with multimedia support;
- PaperKillerRoboauthor – for working on instructions, manuals, documentation, manuals, personalities cash CDs and other similar things.


Any business cards: cheap, beautiful, prompt!
- Standard business card 90*50 mm (9 by 5 cm)
- Euro business card 85*55 mm (8.5 by 5.5 cm)
The capital's business world is the apotheosis of speed, competition and opportunities for growth: it attracts active and agile people not only from all over Russia, but also from other countries. If you live and work in Moscow, then you know how difficult it can be to stay on the wave of success or rise from an ordinary position to a managerial one. All business processes in the capital are based on the exchange of useful information and its dissemination. Winston Churchill's favorite saying, “Own the information, you own the world,” is more relevant than ever for the Moscow business community. That is why one of the most popular printing services is the printing of business cards: literally everyone needs them, from ordinary managers, sales representatives and individual entrepreneurs to senior executives, politicians and officials.
The operational printing house "A-Tsifra" will urgently print any business cards for you cheaply: stylish and laconic business cards, original personal or numerous corporate ones (as a rule, the latter are produced in large quantities, which we are also ready to print as quickly as possible, literally in an hour, on any day of the week ).
| Circulation: | Dates: |
| 96 pieces | 20 minutes |
| 300 pieces | from 30 minutes |
| 1000 pieces | 1-2 hours |
| up to 3000 pieces | 4-6 hours |
Where do they print business cards in 1 hour? It's cheap here, for 450 rubles.
What types of business cards are there?
Conventionally, business cards can be divided into several types.
Business cards with lamination:
- matte
- glossy
The first type is personal. Such cards are most often used in informal, non-business communication, during friendly acquaintances (the information block of a personal business card contains a minimum of information - only the owner’s full name and his contacts); it is not necessary to indicate the position and place of work on personal cards. You can order personal business cards from our printing house in any quantity: its cost will be minimal, and the production time will be record-breaking (you don’t even have to come to us twice, you’ll just need to wait a little in the cozy reception printing house; as a rule, we make business cards in an hour and faster). The design style of a personal card can be absolutely anything, reflecting the tastes and preferences of the business card bearer.
ABSOLUTELY FREE:
The second type is business cards: they are actively used in business - when establishing dialogue with potential partners or clients. A large number of business cards are used at official meetings, exhibitions, forums and other events that abound in Moscow. Such cards must indicate (along with full name and contact information) the person’s position, as well as the name of the company in which he works.works. Such a card is designed in the corporate style of the company, with the obligatory use of its logo and corporate colors.
Business card paper:
- 280 g/m2 Xerox Colotech Silk (silk)
- 300 g/m2 Xerox Colotech
- 300 g/m2 Touch Cover "White"
- 300 g/m2 Touch Cover "Ivory"
- 280 g/m2 Linen diamond
- 280 g/m2 Linen Ivory
- 280 g/m2 Majestic "White marble"
- 280 g/m2 "Magic candle"
- 280 g/m2 "Milky Way"
- 280 g/m2 "Sky Damasco"
- 280 g/m2 Skin beige
*g/m2 is paper density
Cheap business card printing from 96 pieces
- 4+0 - full color printing on one side
- 4+4 - full color printing on both sides
- 1+0 - black and white printing on one side
- 4+1 - one side is color, the other is black and white
- 1+1 - black and white printing on both sides
Third type- corporate or advertising business card.
Usually it does not contain surnames, positions and names, because does not carry the function of personal acquaintance with one or another representative of the company. The content of such a business card (often double-sided) is the most complete information about the company: with a list of goods and services, multi-channel contact numbers, the address of the corporate website and Skype operators, with directions. The production of a corporate business card layout is carried out in strict accordance with the corporate style of the customer company.
The third type also includes presentation cards (we can print these business cards in an hour, regardless of the circulation). Presentation or advertising cards are used for mass dissemination among the target audience of information about taxi services and fast food delivery, clothing stores and fitness clubs, hairdressing salons and paid medical services, etc. Typically, their manufacturing cost rarely exceeds 50 kopecks per piece. As the statistics of orders from the capital's printing house "A-Tsifra" show, corporate or advertising business cards are ordered more often and more often.
Creating a business card layout
Cheap business cards are the credo of our operational digital printing house: we not only print a variety of printing materials as economically as possible (even runs on elegant touch cover paper are inexpensive), but we also create layouts almost instantly. You can come to us with just one vague idea: within a matter of minutes, the experienced, creative designers of the A-Tsifra printing house can make a sketch of a layout that meets all your requirements. From development of a sketch to approval of the finished layout, as a rule, it takes no more than half an hour (and sometimes less).
Prompt digital printing of your circulation is a task that we perform even faster. Having modern equipment that provides excellent printing quality, we create not only business cards in an hour, but also any other printing: leaflets and calendars of various types and sizes, flyers, booklets, original postcards, as well as forms for all kinds of business documentation and much more.
Prices are for printing on Xerox Colotech 300 g/m2 paper.
4+0 color printing on one side |
4+4 color printing on both sides |
|
The main feature of the booklet is the brevity of the advertising text contained in it.
These types of booklets can be easily ordered from any company that deals with advertising or printing. However, you can do it yourself using the Microsoft Office Word typing program.
Now you will learn how to make a booklet in Word.
Launch Microsoft Office Word and a blank page will appear in front of you. Now we need to change its orientation. To do this, select the “Page Layout” menu item, and in it click on “Orientation” and set it to “landscape”. The sheet will turn to the side (become landscape).

Now you need to configure the settings for the top, bottom and side margins. Set these parameters one centimeter in width.
To do this, in the same tab of the “Page Layout” menu, click on the “Fields” item and click on it, a window with ready-made field templates will open. Select “Custom Fields” at the very bottom.

The field settings window will open, in which you set four parameters, one centimeter at a time, and click “Ok”. The figure below shows everything clearly.

In the same menu, click on the “Columns” item and divide the sheet into three columns.

The sheet will be divided into three parts, but you won’t see this right away until you start entering text. Don't forget that the booklet will need to be folded several times. For ease of folding the sheet, place markings in the form of lines between the columns of the document.
To do this, in the same menu item (“Page Layout”), click on the inscription “Columns” and select “Other Columns”.

In the window that opens, check the box next to “Separator” and click “Ok.”

After completing the steps, when filling out the column, you will see a vertical dividing line on the sheet.

Now fill the finished template with text and photos, then print it. Fold it and use it for advertising purposes.
How to make a booklet in Word using a template?
Open the "File" menu and select "New".

On the right you will see the “Create Document” menu that opens. Select "On my computer".

The “Templates” window opens. In it, go to the “Publications” menu item at the top, select the “Brochure” template and click “Ok”.

A new sheet will appear with ready-made markings and entered information.


What does your nose shape say about your personality?

Benefits of Drinking Coffee

What do people regret most at the end of their lives?
Now all you have to do is edit the content, changing the proposed text and photographs to your own version, and as a result you will have a finished booklet. Below are some examples.


As you can see, the booklet must be double-sided, so it is better to create these sheets separately from each other. If desired, the booklet can be given any background color.
To do this, select the “Drawing” menu item and click on the “Rectangle” button.

Using the mouse, expand the frame across the entire sheet, and the text will disappear, but don’t be alarmed, everything is fine.


You'll see your typed text and pictures again, but now the content will be surrounded by a border. After that, in the same menu, select the color of the desired fill.

Booklet in Word 2013
Making a booklet in Word 2013 is very easy, there are several ways. Let's start with the most common one.
Each Word document is displayed in the program with a ruler located on the left side. Left-click on the ruler and the page parameters window will open. Go to the “Fields” tab and set the parameters you need.
Select the “Brochure” page view, and the document will automatically become landscape orientation. Here you can set how many pages there will be in the booklet and the width of the document fields. After that, click “Ok” and fill out the sheet with information.

You can make a large number of options for booklets, it all depends on your imagination, but we will describe one of the methods.
To create the first page of a booklet, use a title page. To do this, go to the “Insert” menu item in the top control panel of the program and select the “title page” item there.
A window will appear giving you cover sheet options to choose from (in this example we chose Whisp). If you do not like any of the proposed options, you can download other themes from the official website of the program Office.com.
To change the background color of the sheet, use the "Design" menu and select "Page Color" from it. A color palette will appear in which you choose the color that suits you best and see what happens.

Write text in those sheet fields that are active. You can experiment with text placement, font type and size.
Now you can design the next pages of the document. In this example, the text area is decorated with interesting text fields. To do this, click on the active “text field” window, and various design options will open. Select the Whisp option in the side panel, and the sheet will acquire the same design as on the main page. If you click on the inner area of the block, you can change the background color, font type, margin size, placement of text information, and so on.

To decorate the page, add photos using the “Tab” - “Pictures” menu. Select the desired image from your computer’s hard drive and add it to the document. After that, when you click on the picture, the “Format” menu will open, with which you can process the picture - change its position, add effects, set borders, set styles, and so on. Try it, it's a very exciting activity.
Prepare all other sheets in the same way.
The second option is to use ready-made layouts already included in the program.
Click on the “File” tab and select “Create Booklet” from the drop-down menu. If there are few options, you can automatically look at other types of design that are on the official Word website directly from the program and download it.
Now all that’s left to do is replace the text and images. All is ready!


