Creating a collage in paint net. Abstract and presentation: Creating a photo collage in the Paint graphic editor. Creating a collage in different ways in the Gimp graphics editor
Municipal budgetary educational institution of additional education
House of children's creativity in Kholmsk
Municipal formation "Kholmsky urban district" of the Sakhalin region

First year of study
Pupils age 8 – 10 years
PDO: Kolosovskaya Lyubov Fedorovna

Open lesson summary
association "Infoznaika"
Topic: Graphic editor Paint. "Creating a photo collage"
Lesson objectives:
1. Educational. Continued work on exploring the capabilities of the Paint graphic editor; improving skills in the graphic editor Paint;
2. Developmental. Development of activity and independence; development of creative abilities; development of skills in the use of computer technologies.
3. Educational. Fostering a culture of working in a graphical environment; education of an aesthetic attitude to reality; nurturing love for the native land.
Lesson type: practical work.
Lesson plan:
Org. moment (2 min).
Opening remarks (10 min)
View the presentation “Sakhalin is my native land” (3 min)
Explanation of new material (13 min).
Independent work (15 min).
Physical education minute (5 min)
Independent work (20) min.
Gymnastics for the eyes (2 min)
Independent work (25 min)
Summing up, turning off the PC (5 min).
During the classes
1 . Organizing time.
- greetings;
2 . Teacher's opening speech.
For several lessons now we have been working with the Paint graphic editor. Let's remember what we have already learned to do with its help.
(Supposed student answers: draw, copy the image, rotate the elements of the drawing, color. Save them in your folder, edit).
Right. We studied all the basic features of Paint and learned how to use them when working with drawings. We drew, painted, and edited images a lot. And it seems to me that you have become real masters of computer graphics. And today you will have the opportunity not only to demonstrate your skills, but also to show creativity and imagination.
Remember the topic of the last lessons. (creating collages)
What is "collage"? " Collage " comes from a French word literally meaning "pasting".
Collage is the creation of a single image from parts of several separate images.
What collages have you already learned to create? (flower collage)
What tools did you use to create your works?
(select, copy, free cut, flip/rotate, sign work, save as...)
Let's look at the collages you created. You have created very good works. Where can you apply your collage-making skills? (create a greeting card for your mother, friend, grandmother)
Tell me, do any of you know the name of our small Motherland? (Sakhalin)
Tell me, what is so special about our Sakhalin? (beautiful nature, many forests, clean air, deep rivers into which pink salmon come to spawn; many birds and animals) Do you love your small homeland?
Let's now look at the presentation “Sakhalin is my native land!
3 .View the presentation “Sakhalin is my native land.” There's a song playing“Well, what can I tell you about Sakhalin”
Yes, we are lucky: we all live here, on the marvelous, extraordinarily beautiful land of Sakhalin. We all want our wonderful Sakhalin to delight not only us, its inhabitants, but also residents of other regions and countries with its amazing nature. I would like the memories of our amazing corner of Russia to live in the soul of every person. But how to do that? How can you show your friends or relatives living on the mainland the beauty of our island region? (you can send photos of Sakhalin nature)
Do you already know what a collage is, and what is a photo collage?
A photo collage is a combination of several photocells in one picture.
4 .Explanation of new material
The topic of our lesson: creating a photo collage from photographs of Sakhalin.
Think about what you would like to display in your work: nature, wildlife, city views.
Let's repeat how to insert an image from a file:
Edit menu - paste from file
Open the folder “Nature of Sakhalin”, select “Sketch drawing” (to preview drawings, photographs); select photo - open.
What should be done:
What if the photo or picture was inserted in a very large size? (without removing the selection, grab the corner with the arrow and pull it down and to the right until the photo gets smaller);
What if the inserted photos are of different sizes? (without deselecting, align)
You can send this photo collage to your friends or give it to relatives.
Your task:
Insert 6 photos, edit the size of each.
Insert the inscription “Sakhalin is my native land”
Decorate with a single frame
Now you can start creating your collages.
5 . Independent work of students at the computer.
In front of each of you is a card - a hint with an algorithm for completing a photo collage.
6 . Physical education lesson: perform rhythmic movements to the music.
Now you can continue working.
7. Independent work
8 . After 20 minutes of work, I do eye exercises.
9 . Creative work at the computer.
Summarizing.
So, tell me, what did you learn in today's lesson?
Who remembers what collage is?
Where can I use the knowledge gained in class?
Let's look at your work.
Has the task been completed?
All requirements have been met, right?
Any comments?
Would your friends be interested in receiving such a gift?
What do you want to tell your friends about in your collage?
Fine! Well done. You did a great job.
Your friends will learn from the collage how much you love your small Motherland, how much beauty there is in Sakhalin.
2019-04-11
MS Paint is great for creating simple collages.
If you need to do something more complicated, it is wiser to use Photoshop. It contains more options and your creation will look more professional.
Although, here is an example of creating a collage in Paint from pictures rotated by several degrees, located on a colored background.
The choice of colors is limited by the program's capabilities, but you can enter your own color.
Collage in Paint
Prepare pictures in advance using MS Paint. How to process images is written.
The white background will need a slightly larger size than we learned how to make. You will then crop the final image to the desired size.
Create a background, insert the first picture EDIT - INSERT FROM FILE - SELECT IMAGE - OPEN. She will stand in the upper left corner.

The picture is selected with the RECTANGULAR SELECTION tool, so you can MOVE it to the desired location by holding down the left mouse button and ROTATE it. Try to place it in the upper right corner, and the following pictures below and to the right.

To rotate the picture, in the top menu, click FIGURE - STRETCH AND TILT.
Tilt it horizontally by -5 degrees, vertically by 5 degrees. The picture will rotate, maintaining its proportions. 
This will cause small jagged edges to appear on the edges of the image. I consider such uneven edges of a photograph to be a disadvantage when making a collage in Paint. Their height will vary depending on the angle of rotation. You can simply experiment by choosing the desired rotation angle. 
For the bottom image of Winter, I tilted it horizontally at 10 degrees and vertically at -10 degrees. Insert the rest of the photos.
The images are concentrated in the upper left corner and most of the background appears empty. Let's remove the extra background. 
There are small blue dots in the middle and corners of the background. Hover the cursor over one of them, an arrow will appear, with which you can reduce the background one at a time (and for a corner point - along both sides of the background at once). CUT the background to the required size. 
To make the background colored, select a suitable color from the lower palette, click on the FILL button (paint can) in the side menu and click on the white background.
If the desired color is not found, change the palette (top menu), add your own color, specifying it in numerical terms.
P.S. This is only a schematic description of the process. Take good pictures or photographs, think about the composition and create.
Where to apply these skills? Make collages:
- as a gift to relatives, friends;
- use when designing a blog, VKontakte group or Odnoklassniki, where bright pictures attract attention well;
- in traffic arbitrage by adding advertising inscriptions to the collage.
P.S. For professional work, Photoshop is better. Here's the one.
Trushina Svetlana Yurievna
Music teacher of the highest qualification category
Municipal budgetary educational institution
"Secondary comprehensive Cossack school"
Znamenka village, Nerchinsky district, Transbaikal region
Topic: "Creating collages in Paint"
Making collages is all about putting one large image together. There are online programs on the Internet for creating collages; you can download a special program to your computer.
This master class will show how you can create a collage in the Paint program, which is included in all Windows operating systems, starting with the first versions.
Goal: to teach the technology of creating collages in the Paint program.
Tasks:
Introduce the step-by-step steps of creating collages in the Paint program.
Introduce the different features of the Paint program.
Share your personal experience on the proposed topic.
Intended product of activity
Step 1
Preparing photos to create a collage. It is recommended to reduce the photographs beforehand, i.e. "compress".
Open the first photo.
.JPG)
Step 2
Launch the Paint program. In the example, through the function - Open with.
.png)
Step 3
At the top of the panel that opens, select the “Resize” tool.
.png)
Step 4
Choose: percentage or pixels. In the example, in percentage. Default - 100%, reduced to 70%. Be sure to check the “Maintain proportions” checkbox. Then you just need to set one size to change, the other will automatically change and the proportions will be preserved - the photo will not be distorted.
.png)
.png)
Step 6
You can change the size of the created “field” for the collage as you insert the photo.
.png)
Step 7
Adding photos. Open the “Insert” icon, the “Insert from” menu immediately appears, click.
.png)
Step 8
The prepared photographs appear. To create a collage, decide in advance on the order in which you will load the photos, because when you add a second photo, you will no longer be able to move the first one. Photos can only be moved or deleted when they are selected. Add a second photo - Open.
.png)
Step 9
Use the left mouse button to set the photo, then also change the size. In the example-
70 X 70
.png)
Step 10
We drag the downloaded photo to the desired location and change the size.
.png)
Step 11
The photo is installed, we perform the same actions with loading the remaining photos.
.png)
Step 12
If, after you have combined all the photos, there is still empty space, you need to save all the design of the future collage and find a photo, picture, emoticon to add and decorate.
.png)
Step 13
In the example, pictures from the Internet inserted into a collage
.png)

In the same Paint program, you can make a frame for the created collage.
Step 14
Using the master class: "Possibilities for editing images in a Word document" -
You can design the created collage in different ways.
.png)
.png)
A huge number of users sincerely believe that it is possible to make an interesting collage only in such a graphic giant as Photoshop? Now we will dispel this myth and create a real collage in the free, small but multifunctional Paint.net editor. In one of the previous materials we already looked at this program. Today I want to go beyond a simple review and create something unique and unique.
(mosloadposition debug)
At the end of today's lesson, we should have a masterpiece like this:
First, let's open the file with the main character in the program File - Open... (Ctrl + O) We see that the file is in Jpeg format and there is a white background around the object that we need to remove.

To do this, we will use the Magic Wand Tool (S), since this tool allows you to select similar areas of color.

To select, simply click on the background. If there are other objects in the selection area besides the white background, deselect (Ctrl+D), reduce the sensitivity of the tool and click on the background again.
![]()
When you manage to select only the background, click Edit - Clear selection or just delete. Now the object we need is on a transparent background.

Open the background of our collage, where you need to move the newly selected object. To do this, go to File - Open... (Ctrl + O), return to our object by clicking on its icon in the upper right corner. And press Ctrl+A (select all).
We return to the file with the background. Create a new layer: Layers - Add a new layer (Ctrl + Shift + N). Insert our object: Edit - Paste (Ctrl + V).
The program will offer you the following:

We choose to change the canvas size and get approximately the following picture, since the size of the background was much smaller than our object.
There is no need to panic right away. Our objects are on different layers, which means we can change their sizes and remove the extra empty background.
Everyone knows that zooming in is bad for sharpness, so we'll be zooming out on a large object.
Make active the layer with the object that needs to be changed. This is our wizard. Next, go to: Layers - Rotation/Scale... (Ctrl + Shift + Z)

In the dialog box that opens, you can change not only the size of the object, but also its location. At the same time, we see all the changes immediately on the screen.
To reduce the size, grab the scale slider and pull down. To change the position of layers relative to each other, change the position of the cross in the Navigation window. And to rotate an object clockwise or counterclockwise, you need to turn the Tilt/Rotate wheel.
These are the settings I made.
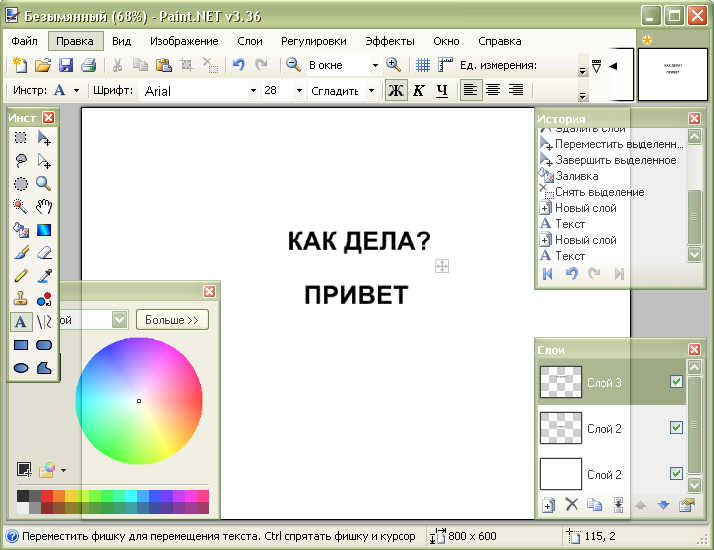
Collage is gluing. That is, the word itself can mean gluing various shapes and figures in a certain area on the workspace. This is an unusual phenomenon, when a person looks at a collage work, he sees an unusual picture in art.

This is what the picture looks like when collaged. Very unusual. But many beginners who have just purchased a computer are interested in the question - how to make a collage in Paint? Let's take text for example.
Based on the example, a newer version of the software included with the Windows 7 operating system – Paint Net – will be used. The fact is that to create a collage you need to work with several layers so as not to confuse the image. After all, if you write an inscription, it will be impossible to edit it. And in the old version, Paint, there is no way to create multiple layers. That is, you have written the text, and you can no longer change it. And if you wrote in the wrong place, then you can completely ruin the picture and have to do it all over again.
So, first, let's create a new layer that will be used to write text, and write something on this layer.

So, if you did this and wrote the text, then you did everything correctly. The fact is that by selecting a layer, you will only edit the image that exists on this layer and nothing more. Now, in order to make the sticky effect, you need to create a layer again and write something else on it using a special tool that allows you to write inscriptions.
It should turn out as shown in the picture. So, having received two layers with inscriptions, now you can try to glue the images or overlay them on top of each other as you like. To do this, you need to select the desired layer that you will move, and select a special tool that will help you move the image of the selected layer.

You should end up with something like this. But to get a full-fledged collage, you need to use many such layers with different inscriptions. But if you want to use pictures, the point is still simple. You will need to add your own image to each layer and edit it so that it merges with the image behind it or add various effects. If you want to create a more impressive collage, it is better to use a more professional application - Adobe Photoshop.


