A program for constantly turning on the fan on a laptop. Adjusting the cooler rotation speed
This material is relevant for both laptops and regular computers. To adjust the speed, we use 2 programs, and at the end there will be a small list of the main problems that may interfere with speed control. The solutions found are attached.
CPU cooling control
We use Speedfan (Download).After launching the program, in a few seconds it will collect information about all found coolers in the system and display it in a list. We are interested in 2 blocks:
In the first, we are shown the number of revolutions per minute, in the second - the available regulators for them. The program automatically quite accurately determines where the fan is, so it can find and sign some (CPU - processor, and GPU - graphics) itself.
But this is the best option. The picture may be the same as in the screenshot below. In this case, 3 unknowns and a GPU are available for control. If you know which cooler you have the most noise, then you can simply change the values of each Pwm until you hear a difference in noise.
In my case, the CPU allegedly does not have a cooler, but there is some unknown Fan2 (by the way, identical to CHASSIS, i.e. motherboard). This is due to the fact that I have a fan that does not support software speed control. Why this is so and what to do is at the end of the article.

Please note: the percentage value you set will be constant both when idle and under any load.
If you want these options to take effect immediately after Windows starts, check the corresponding box in the Configure → Options section:

Adjusting video card coolers (MSI Afterburner)
The utility is “tailored” only for video cards, so there is only one slider responsible for fan speed. By default it works in automatic mode and to start working it must be disabled:
When the desired value is set, click “Apply”. In the right window there is a monitor that displays changes on a graph, so you can see changes in , rotation speed as a percentage and revolutions.
If desired, the settings in this program can also be enabled when Windows starts. To do this, check the box:

But these are only the main functions of the program. There is an option here with which you can specify at what speed and at what temperature the video card cooler should run. Yes, the previous program also has it, but Afterburner is easier to understand.
- Go to Settings → Cooler
- Click "Enable Auto Mode"

In the graph that appears, the vertical indicates the rotation speed as a percentage, and the horizontal indicates the temperature. Left-click on any part of the green line to create additional refraction points. You can drag them and thereby set the desired values. By clicking “OK”, the changes take effect and now the regulator is highlighted green in the main window.
If you want to disable these settings, just click the “User Define” button.

Why don't the methods work and what can be done?
In the case of a desktop PC, most often the CPU cooler setting may not work.Coolers have different connectors for connection: 3-Pin and 4-Pin (PWM). It is the latter that allow you to control the speed through programs, but the three-pin ones do not. Personally, I found out about this when I replaced my old cooler (4-pin PWM) with a new one (3-pin) and discovered that for some reason it could not be configured through the same Speedfan, although before everything was fine. Therefore, take this point into account when choosing a cooling system for your processor.

If we are talking about a laptop, then there are 2 options:
- The manufacturer himself could block the opportunity - there is nothing to be done about it.
- Laptops not intended for gaming have one cooler common to the processor and video card. The same applies to the graphics built into processors (the same Intel HD Graphics). In such cases it is useless to use
Owners of desktop PCs are in the best position: if the processor cooler is not adjustable, replacement will be cheap. There are even fewer problems with video cards. Among laptops, gaming ones have the best chance, average-priced “office” graphics are a lottery, but owners of integrated graphics will most likely be disappointed.
Almost every person nowadays has a computer. And many people sometimes get tired of the annoying noise of coolers. Noise interferes with work and sometimes causes a deterioration in a person’s emotional state. And we need to fight this. But the question is “how?” I will be happy to answer this question.
Computer cooler management program
Now there are many different programs that can control the operation of coolers. One of the more popular programs is SpeedFan.
Download the program for controlling coolers - http://www.almico.com/speedfan.php
So let's talk about it in more detail. This program is quite multifunctional and, most importantly, it is completely free. At first, I can disappoint you a little because this utility does not work with all laptops. But this is rather the exception than the rule, because I have not yet met a laptop on which it would not work. An important point is the fact that the program can control coolers if they can be controlled by your computer's BIOS. There are times when it will be possible to enable the SmartFan cooler control option in the BIOS only for the central processor.
Now I’ll tell you about a very important point. Before installing this program, be sure to disable fan control in the BIOS! This is all because the following situation may arise. At the first moment of loading, the SmartFan program reads the rotation speed of the cooler and takes it as the maximum. And if your cooler was not overclocked to maximum values at this moment, the program itself will also not be able to do this.
I once had such a slightly sad experience. The processor cooler was spinning at low speeds, and when its load increased, the program was unable to overclock the cooler, which is why the processor became very hot. To avoid repeating this, keep this point in mind.
When you start the program, you will see an initial window that will display the values of many sensors and a list with the speed values of your coolers.
Go to the “Options” tab and switch the language to Russian.

Now I’ll tell you what the main window of the program is. In the left corner there is a block of RPM values of our coolers, and on the right are indicators of temperature sensors (GPU, HDD, CPU). Below you can set their rotation speed as a percentage of the maximum frequency.

To manage coolers, you need to go to the temperature tab. There you can automatically set the temperature, upon reaching which the cooler will operate at minimum speed. It also sets the danger temperature, upon reaching which the program will accelerate the cooler to the maximum possible rotation speed under certain circumstances.

But do not forget that the system is capable of controlling only those coolers that provide this control. On the “Speeds” tab we can set the minimum and maximum rotation threshold.
The SpeedFan program also has the ability to receive a detailed report on its work, in which we can see all the work statistics for a certain period. It has the ability to view all data on the cooler (frequency, voltage) and disable viewing of coolers that we do not need.
To summarize all of the above, I will say that this program has many different functions with which a person can control the operation of the cooler, as well as make their computer work longer.
How to increase the speed of the cooler on a laptop if over time it starts to work a little slower, more noisy and sometimes even overheats. Overheating is one of the most inconvenient and harmful incidents for a computer because it causes additional wear and tear on the hardware and increases the chances of failure.
To eliminate this situation, you can replace the thermal paste and increase the cooling. If replacing thermal paste is not a very difficult matter, then in order to strengthen the cooling system (CO), you need to either buy a cooling pad or increase the speed of the cooler. The cooling pad is quite noisy, costs extra money, and takes up space, but you can speed up the standard cooling system absolutely free.
There are two options for how to speed up the cooler speed on a laptop:
- Using the software
- Using BIOS\UEFI
Before overclocking
First, let's determine what the speed of the cooler will affect:
- The higher it is, the more noise the laptop makes when operating, the faster it discharges (slightly), but at the same time the temperature of the CPU and the system as a whole is lower, which means there are fewer freezes and slowdowns due to throttling (lowering the processor frequency to reduce the thermal load). The power supply design is High Performance.
- The lower, the quieter the laptop runs, the slower the battery discharges, but under high loads there is a possibility of the device overheating. The power supply scheme is Energy Saving.
In most cases, cleaning the cooling system and replacing the thermal interface solves the problems of overheating and throttling. But if these manipulations are difficult to perform due to the complexity of disassembling or the warranty of the laptop (which prohibits disassembling the device), then to obtain the desired cooling it is better to speed up the cooler.
Overclocking a cooler via software
One of the most popular programs for monitoring and tracking system temperature - Speedfan - will answer the question of how to increase the speed of the cooler on a laptop. You can download the program on the website or via a direct download link.
Please note that not all laptops are supported by this program. It is likely that very old devices, or, conversely, new generation devices, may not display information on temperature and cooler speed. You can view the list of supported buses or axles (BUS) on the utility website.
Install and open the SpeedFan application. The main window will display main information on the temperature and rotation speed of the coolers. Click on Configure, which will open the configuration window. Select the required tracking component - for example, this is the CPU (CPU) and set the desired temperature, the cooling system will work with priority at this parameter.
The next parameter in the Speeds tab determines the speed of the coolers.
- Minimum value – minimum value (%)
- Maximum value – maximum value (%)
- Automatically varied – automatic selection based on temperature

After using the utility, check the temperature readings; if they have not changed within a few minutes\hours, try changing them through the BIOS.
How to increase the fan speed on a laptop via BIOS
BIOS allows you to configure various device parameters - from boot parameters to login password and regulation of processor or memory frequency. Not all laptops have the ability to overclock CO, so you need to check this option on your laptop.
To enter the BIOS\UEFI of your computer when rebooting, press the corresponding key:
| Manufacturer | Key | Manufacturer | Key |
|---|---|---|---|
| Acer | DEL, F2 | Lenovo | F1, F2 |
| Asus | F9, DEL, F2 | Lenovo | DEL |
| Dell | F2 | Samsung | F2, F10 |
| Fujitsu | F2 | Sony | F1, F2, F3 |
| HP | ESC, F10, F1 | Toshiba | F1, F2, F12 |
If you have a classic BIOS, open the Power tab and select Hardware Monitor

Then, if you have the ability to control the minimum cooler speed or set a target temperature value, set the necessary settings.
- For temperature - the lower the better – 40-55 C°
- For speed - it is better to test on your device - select from 100% to 35% in steps of 5-10% to determine the acceptable noise level and temperature.

For owners of laptops with UEFI, the interface is slightly different, but the functionality is much richer.

The desired settings will be in the Monitor, Hardware or Advanced tabs. Settings may vary depending on manufacturer and UEFI version.
Additionally
How else can you increase the speed of the cooler on a laptop:
- For older devices, special utilities AMD OverDrive or Riva Tuner may be suitable. The list of supported devices is extremely small and mostly consists of outdated laptops based on Windows XP, Vista or sometimes version 7.
- There have been cases where dust interfered with the cooling system so much that the bearings needed to be lubricated
- Don't rule out the possibility of replacing the cooler if the speed is very different from the advertised speed.
Have a great day!
The problem of strong fan noise when the laptop is running is sometimes not related to overheating and is observed even on new devices. You can get rid of the unpleasant sound of a cooler not only by radically replacing an element of the cooling system, but also programmatically, using simple free utilities. They can also increase the speed if you feel that your mobile computer is overheating. Next, we’ll tell you how to control a fan on a laptop using the device’s built-in tools and specialized programs.
Changing the operating mode of the blades in the BIOS
Some manufacturers have made it possible to control the laptop cooler directly from the BIOS. This does not require installation of special applications; everything necessary is already available in the system:
- Enter the laptop's BIOS, which usually requires pressing Del at the very beginning of boot.
- Find the POWER section, and in it the line HW Monitor Configuration. There is an option here that allows you to configure the fan on your laptop. You should look for a line with the word “Fun” - the exact name of the command may vary between different device models.
- Here you can select one of the cooler operating modes, for example, “Turbo”, which will control it in aggressive cooling mode, which can be useful, for example, when overclocking the system.
After the setting has been changed, you must save the new system operating parameters and reboot the device.
If the BIOS does not allow you to control laptop coolers, then the same task can be successfully solved by using simple and often free third-party applications. With their help, the speed can be adjusted within any limits, up to the complete stop of the fan. Moreover, the utilities can work with all laptop coolers installed in the system at once.
Working with the SpeedFan program
This utility is one of the most popular today. Its wide distribution is facilitated by its free nature, a simple interface that allows you to adjust the rotation speed of the cooler on a laptop, as well as the ability to monitor in real time the operating parameters of system hardware components.
An important feature of the application is that it can run on a laptop whose fan speed is controlled from the BIOS. Often, this standard method allows you to change the cooler speed of only the central processor, ignoring the graphics one. We will describe below how to configure the cooler on a laptop with the SpeedFan utility:
- If the laptop fan rotation is changed in the BIOS, this option must be disabled. Otherwise, at the first moment of operation, the program may obtain underestimated results for determining the maximum rotation speed of the cooler, as a result of which the utility will not be able to control the speed of the laptop fan at full speed.
- Install and launch the application. In the “Readings” or “Indicators” tab you can see the temperatures of the components and the speed of the selected fan.
- How to change the cooler speed on a laptop can be determined experimentally by changing the switch parameters for each element of the cooling system. You can adjust fan rotation settings to cool not only the CPU, but also the hard drive and GPU.
In the “Speeds” tab, it is also possible to change the parameters within which the rotation will change. There are only two switches here, which set the lower and upper limits of the blade rotation range for each cooler.
Other applications for changing the rotation speed of laptop blades
The method describing how to set up a fan on a laptop using SpeedFan may not be suitable for some users for various reasons. In this case, you can use other utilities:
- AMD OverDrive, the main purpose of which is to overclock systems controlled by AMD processors. Here, one of the options is to control the cooler on the laptop.
- Riva Tuner for working with Intel chips, the operating principle of which is also intuitive.
The main thing you shouldn’t forget about when independently controlling a laptop fan is temperature control. To do this, you can use additional utilities, for example, CPU-Z and the like. Remember that by lowering the speed, you risk overheating the processor. On the contrary, increasing the speed increases the noise of the cooling system and energy consumption, as a result of which the operating time of the device without recharging will decrease slightly.
Sometimes the hum from the system unit does not allow you to enjoy the silence or concentrate. In this article I will tell you how to regulate cooler speed using a special program for Windows XP/7/8/10, and at the end I will show the whole process in more detail on a video.
Why are fans noisy and what are the ways to fix it?
With the exception of special fanless modifications, each computer has: in the power supply, on the processor, video card, in the case, and others. And everyone makes noise in their own way, and that's bad news. Many people are simply accustomed to the noise of their system unit and believe that this is how it should be. Maybe it should, but it doesn't have to! In 99% of cases, computer noise can be reduced by 10%-90%, which is good news.
As you already understand, quietness is achieved by reducing the noise from coolers. This is possible by using coolers that are quieter by nature, or by reducing the speed of existing ones. Naturally, you can reduce the speed to non-threatening levels! This article will discuss exactly this method. Programs for will help reduce noise even further.
So, to reduce the cooler rotation speed, you can use one of the options:
- Program for controlling the rotation speed of coolers
- “Intelligent” speed control system built into the BIOS
- Utilities from the manufacturer of the motherboard, laptop or video card
- Use a special device - reobass
- Artificially lower the fan supply voltage
Those who have normal control from the BIOS may not read further. But often the BIOS only superficially regulates the speed, without lowering it to silent, and at the same time still acceptable, values. Utilities from the manufacturer are sometimes the only way to influence the fans because third-party programs often do not work on unusual motherboards and laptops. Let's look at the most optimal - the first method.
SpeedFan cooler management software
This is a multifunctional and completely free program. I’ll probably upset you a little right away by saying that this program does not work on all laptops, but you can try, and it will not regulate the speed of those fans that the motherboard cannot control from the BIOS. For example, from my BIOS I can enable the SmartFan cooler control feature for the CPU only. Although you can look at the current revolutions for two more.
Attention: before using the program, disable cooler management from the BIOS!
Otherwise, the following situation may occur. When the SpeedFan program is loaded, the current speed is read and taken as the maximum. Accordingly, if by this time the BIOS does not spin the fan to maximum speed, then the program will not be able to do this.
It happened to me once that when the program was loading, the cooler on the processor was spinning at a speed of 1100 rpm, and SpeedFan could not set a higher value. As a result, the processor heated up to 86 degrees! I noticed this by accident when, at a moment of heavy load, I did not hear any noise from the fan. Fortunately, nothing burned, but the computer could
Launch and appearance of the program
Download and install the application from the official website.
When you first start it, a regular window will appear offering help on the program’s functions. You can check the box so that it does not appear again and close it. Next, SpeedFan reads the parameters of the microcircuits on the motherboard and the values of the sensors. A sign of successful completion will be a list with the current values of fan speeds and component temperatures. If the fans are not detected, then the program cannot help you. Immediately go to “Configure -> Options” and change the language to “Russian”.

As you can see, the processor load and information from voltage sensors are also shown here.
Block “1” contains a list of detected cooler rotation speed sensors with names Fan1, Fan2..., and their number may be greater than it actually is (as in the picture). Pay attention to the values, for example, Fan2 and the second Fan1 have real indicators of 2837 and 3358 RPM (revolutions per minute), and the rest are zero or with garbage (in the picture 12 RPM is garbage). We'll remove the extra ones later.
Block “2” shows detected temperature sensors. GPU- this is a graphics chipset, HD0- HDD, CPU– the central processor (instead of the CPU in the Temp3 picture), and the rest is garbage (cannot be 17 or 127 degrees). This is the drawback of the program, that you need to guess where everything is (but then we ourselves will rename the sensors as needed). True, you can download well-known configurations on the site, but the procedure is not simple and is complicated by the English language.
If it is not clear which parameter is responsible for what, then you can look at the values in some other program to determine the parameters of the computer and sensors, for example, and compare with those determined by the SpeedFan program in order to know exactly where what speed and temperature readings are (in the video under the article everything I'll show you).
And in block “3” we have speed adjustments Speed01, Speed02..., with which you can set the rotation speed as a percentage (can be shown as Pwm1, Pwm2..., see the video for more details). For now, we need to determine which Speed01-06 affects which FanX. To do this, change the values of each from 100% to 80-50% and see if the speed of any Fan has changed. We remember which Speed influenced which Fan.
I repeat that not all fans will be regulated, but only those that the motherboard can control from the BIOS.
Setting up SpeedFan
Now we get to the settings. Click the “Configuration” button and first of all, let’s name all the sensors with clear names. Using my example, I will programmatically control the processor cooler.
On the “Temperatures” tab, we find the processor temperature sensor defined in the previous step (I have Temp3) and click on it first once, and then a second later again - now you can enter any name, for example “CPU Temp”. In the settings below, enter the desired temperature that the program will maintain with the minimum possible cooler rotation speed, and the alarm temperature at which the maximum speed is activated.
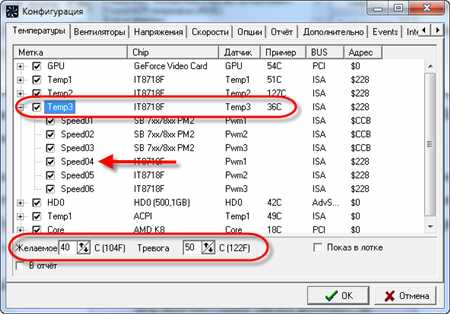
I set it to 55 and 65 degrees respectively, but this is different for everyone, experiment. At a very low set temperature, the fans will always spin at maximum speed.
Next, expand the branch and uncheck all the boxes except Speed0X, which regulates the FanX of the processor (we have already defined this earlier). In my example it is Speed04. And we also uncheck all other temperatures that we do not want to see in the main program window.
On the fans tab, we simply find the fans we need, name them as we want, and turn off the unnecessary ones.

- Minimum – the minimum percentage of the maximum speed that the program can set
- Maximum – respectively, the maximum percentage.
For me the minimum is 55%, and the maximum is 80%. It’s okay that the program will not be able to set the value to 100%, because on the “Temperature” tab, we set an alarm threshold value at which the speed will be forced to 100%. Also, for automatic adjustment, do not forget to check the “Auto change” box.

In principle, that's all. Now go to the main SpeedFan window and check the box “Auto fan speed” and enjoy the automatic adjustment of the rotation speed. You won’t be able to optimally configure it for yourself the first time, experiment and leave the appropriate parameters, it’s worth it!
Extra options
The SpeedFan program has a bunch of other functions and parameters, but I won’t delve into them, because... This is the topic of a separate article. Let's check a few more necessary boxes on the “Configuration -> Options” tab
- Launch minimized– so that SpeedFan starts immediately in minimized form. If you do not install it, then when Windows starts, the main program window will hang on the desktop. If the program does not start with Windows, then simply add its shortcut to startup.
- Static icon– I prefer to set the system tray to display just the program icon instead of numbers
- Collapse when closing– set so that when you click on the “cross” the program does not close, but is minimized to the system tray (near the clock)
- Full fan speed at exit– if not set, then after exiting the program the cooler speed will remain in the state it was in at the time of closing. And since there will be no one else to manage them, the computer may overheat.
And now a video with detailed setup of SpeedFan. Note: There was a slight glitch in the video. After manually adjusting the CPU fan Fan1, its value did not return to 3400 RPM, but for some reason remained at 2200 RPM. After restarting the program everything returned to normal. This did not happen in the latest versions of SpeedFan on my computer.


