Reinstalling mac os via the internet. How to reinstall the system on a Mac without knowing the password
It refused to boot. CMD+R Does not help. What should I do?
The start of the working day did not foretell anything bad. A cup of coffee, a good mood, the Power key and the MacBook displays the following sad picture:

A restless thought immediately flashed through my head about the safety of the data, the current version of the backup copy TimeMachine(which was not at hand) and possible loss of information.
Attempt No. 1. Booting into recovery mode
Being an interested user and an avid Mac user, I immediately tried to start the MacBook in recovery mode by holding down the keys CMD+R. Instead of the usual disk utility, the system greeted me with a window with an attempt network recovery.

Having chosen my home Wi-Fi network, I began to wait for further developments. After a few minutes, OS X's recovery progress was interrupted error -4403F.

Attempts to start the process again led to exactly the same result. Rebooting the router confirmed that everything was fine with the network connection.
Trying to diagnose the Mac, fix possible hard drive errors, or simply reinstall the system was now out of the question. Section with Recovery HD, in which the tools for restoration are stored, ordered to live long.
Attempt No. 2. Resetting PRAM and NVRAM
Mac computers were created by highly qualified engineers, so the correct organization of the entire system and the presence of “hidden hardware reserves” allows you to avoid a number of interruptions in its operation. One of these reserves is memory sections PRAM And NVRAM. It stores settings data that is not reset even after the computer is disconnected from power. To revive the fallen system, a decision was made reset PRAM and NVRAM settings.
1. Turn on the Mac.
2. After the white screen appears, quickly press the key combination CMD + Option + P + R.
3. Hold until the Mac reboots again and the Mac greets the sound.

PRAM and NVRAM reset completed.
Although they say that hope dies last, it, lifeless and barely alive, continued to lurk in my mind. Resetting PRAM and NVRAM did not affect the error when booting the system. The MacBook continued to test my nerves.
Attempt No. 3. Reset SMS
Having become accustomed to storing all the necessary data “in the cloud” or on removable media, the simplest solution to global problems has always been to reinstall the system “from scratch.” This case was special. I needed data stored in memory and I needed a working Mac today.
In the Mac environment there is something called system management controller SMC. The stability of the entire system depends on the reliability of its operation. Resetting SMC settings can cure a number of problems like:
- – constantly high rotation speed of the cooler even at minimal load;
– freezes while the system is leaving Sleep mode;
– errors related to the operation of additional peripherals or external monitors, as well as correcting system boot problems.
To reset the SMC, follow these steps:
- Laptops with built-in batteries
1. Turn off your MacBook and plug in the power adapter.
2. Press and hold the keys at the same time Shit + Control + Option + Power and hold until the MagSafe adapter indicator changes color.
3. Release all keys and press the key again Power.
- Laptops with removable batteries (older models)
1. Turn off your MacBook and unplug the power adapter.
2. Remove the battery from the laptop.
3. Hold down the key Power And hold for at least 5 seconds.
4. Release Power, insert the battery and connect the power adapter. Turn on your laptop.
- Desktops (iMac, Mac mini, Mac Pro)
1. Completely disconnect the computer from the mains power.
2. Wait at least 30 seconds.
3. Connect the power and wait another 5-10 seconds and then turn on the computer.
The above actions can become really effective and the system will start. In my case, a miracle did not happen.
Attempt No. 4. Recovery using a bootable USB flash drive
An attempt to revive the system using the above actions was unsuccessful. The only option left was to reinstall OS X using a bootable USB flash drive. For this step you will need:
- another computer running the OS X operating system;
- Flash drive with a size of at least 8 GB.
Preparing a flash drive
1. You will need to download the OS X Yosemite distribution from the Mac App Store.
2. To create a bootable USB flash drive, download the DiskMaker X utility (distributed for free). You will need it to deploy the distribution.
3. Format the flash drive using Disk Utility V Mac OS Extended (Journaled).

4. After the distribution has finished downloading, cancel the proposed installation and run the utility DiskMaker X.
5. Choose a system Yosemite (10.10). The utility will detect the distribution in the folder Applications. Click Use this copy(use this copy).

6. Select the drive installed in the USB port and agree to the warning about completely deleting all data present on the flash drive.

7. The process of mounting the distribution kit with OS X Yosemite to the drive will begin.

The copying process takes about 10-20 minutes and depends on the writing speed of the USB flash drive. During mounting, dialog boxes and folders may occasionally open on the screen. Do not pay attention.
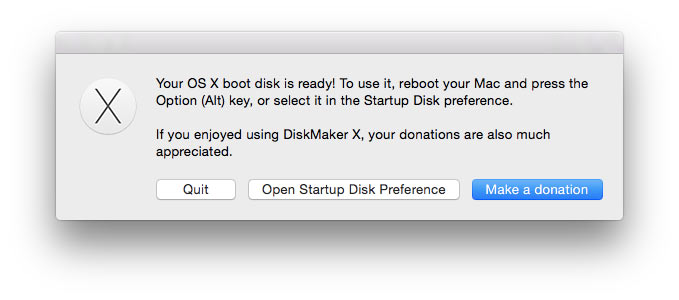
Once the OS X Yosemite image has successfully deployed, remove the drive.
System installation
1. Insert the flash drive into the USB port of the “problem Mac”, press the key Power and hold down the key Alt.
2. In the list of available partitions for downloading, select OS X Base System. Please note that there is no section Recovery.
.

3. The Mac will boot into recovery mode. After selecting the main system language, the installation menu will open. In the top menu you will find a standard list of utilities.
Use disk utility and first try to check the access rights to the system partition and correct any errors. If after rebooting the system still refuses to boot, you will need to separate a partition of at least 20 GB in size in order to install a new system. You will find detailed instructions on how to partition a disk.
From the same menu, you can either begin the process of installing the system on a newly created partition, or restore the system using a TimeMachine backup (see).

CAREFULLY! Be careful when choosing the installation partition. The installation must be carried out not on top of the old partition, but on a newly created one.
After the installation is complete, you will have access to all the data located on the “damaged” partition with the old version of the system.
Most users traditionally switch to a new version of OS X by simply clicking the “update” button in the App Store. Undoubtedly, this is the easiest method, but at the same time it is not always the most effective, since over time many Mac users notice that their system is no longer as fast as it was at the beginning of operation, and updating does not solve the problem.
Users who constantly change and reinstall software on their Mac are especially susceptible to this problem. The reason for the decrease in performance is precisely various system garbage and “residues” from deleted programs that safely remain in place during the update. That is why many people prefer to install a “clean system”.
Things to remember before installing from scratch
First of all, be sure to back up your system. To do this, the standard set of OS X programs includes a wonderful Time Machine utility.
Also be sure to make sure that all your contacts, calendars, mail, etc. synced with iCloud (settings>iCloud)
Clean installation of OS X El Capitan step by step
2. Reboot the Mac while holding down the key option(aka alt).
3. Select a USB flash drive as boot media.
4. After the Mac boots Recovery from the USB flash drive, visually it will happen like this:
open Disk Utility and format the Mac hard drive.
5. To do this, select the hard drive partition in the panel on the left, then in the top panel click erase(do not change the format and name) then click again erase(at the bottom).
6. After formatting is complete, close Disk Utility and select reinstall OS X.
7. In the next window, select only the formatted hard drive and after completing the installation process you will receive a crystal clear OS X El Capitan.
By the way, you can reinstall the system from scratch without bothering with a flash drive. True, you need to have Capitan installed on your Mac before, also from scratch, otherwise the version of the system that came “in the box” will be installed.
So, if such a need arises, then restart your Mac while holding cmd+R, open Disk Utility and format the hard drive as shown above. Then you also choose Reinstall OS X and wait for the installation to complete.
Quite often, Mac users are faced with the following problem - how to return the computer to factory settings, resetting all user information, and reinstall the operating system completely. Instructions for this process are presented below.
The Mac, like most other Apple devices, is intended for personal use. This means that usually computer owners fine-tune the system for themselves and another user will not be entirely comfortable working with it. If there is a need to completely get rid of existing data and settings, then you need to follow the simple steps described below.
Clean installation of macOS: preliminary steps
IMPORTANT: Before a clean installation (reinstallation, flashing, factory reset) of a Mac, be sure to check:
- Is your Mac tied to your Apple ID and not some other one?
- Do you remember the credentials (username and password) of your Apple ID. You can check, for example, by logging in (from your computer).
The fact is that if the Find Mac function was activated on the Mac (located along the path: System Preferences → iCloud → Find Mac), then after reinstalling the system (resetting to factory settings), the system will ask you to enter the Apple ID to which the device is linked .

- How to find out (see) which iPhone, iPad, Mac are linked to Apple ID.
- How to recover (reset) a forgotten Apple ID password for iCloud, iTunes and App Store.
- What will be deleted if you sign out of iCloud on iPhone, iPad and Mac?
How to reset Macbook, iMac, Mac mini, Mac Pro to factory settings (how to reinstall macOS)
1. Make sure you have an Internet connection (for later installation of macOS), as well as an electrical connection in the case of a MacBook.
Attention! Further actions will lead to the complete deletion of ALL data on the Mac - save the necessary information on external media in advance;
2. Restart your computer (or turn it on if it was turned off) using the menu → Reboot;
3. During the reboot process, press and hold the key combination that suits you best:
⌘Cmd + R– installing the version of macOS that was running on the computer before problems arose. Those. your Mac will install exactly the same version as before.
⌥Option (Alt) + ⌘Cmd + R– Update to the latest version of macOS that your Mac is compatible with. For example, if the Mac was running High Sierra, and the breakdown occurred after the final build of macOS Mojave was released, the system will download Mojave from the Internet and install it.
⇧Shift + ⌥Option (Alt) + ⌘Cmd + R– installation of the version of macOS that was originally installed on the computer (or the closest available version to it).
Note: Requires macOS Sierra 10.12.4 or newer OS version.
4 . Then the window “ macOS Utilities"(on versions lower than macOS High Sierra may be called "macOS Utilities"). Here you need to select " Disk Utility" and click " Continue";

Checking and fixing boot disk errors (recommended)
1 . In Disk Utility, select your drive from the menu on the left (usually a Macintosh HD, it's at the very top).
2 . Click on First Aid.
3 . Click Launch. The application will check the boot disk for “health status”, i.e. functionality and correct existing errors. This process may take some time.

4 . Once the scan is complete, click Finish.

Erasing the boot disk
1. In the Disk Utility application, select a verified startup disk, go to the “Erase” section (at the top of the screen);

2. On the menu "Format" select APFS (for computers with macOS Sierra installed and an older version of the OS, select Mac OS Extended) and press " Erase";


3. Once the disk formatting process is complete, click " Complete" to exit Disk Utility.
Reinstalling the macOS operating system (factory reset)
Reinstall macOS using the appropriate item (screenshot below) and follow the instructions. The latest version of macOS will be downloaded from the Internet and the macOS reinstallation process will begin. During this time, the computer may restart.
Note: If you're installing from scratch, you'll have to configure your Mac and program settings all over again.


Based on materials from yablyk
And its update. Before you begin, it is important to decide what exactly you need to do. That is, it will be necessary to understand whether a complete reinstallation of the operating system or a simple update is required. You will also need to prepare the device for reinstallation (for example, if you are going to sell your device).
Additionally, you can restore from a TimeMachine backup if you have configured this. So, first things first:
- If you want to update your Mac OS, you can create a backup copy just in case, so that in case of unforeseen circumstances, you can restore the system.
- If you are going to restore the operating system, then no action is required. However, you can check for backups if you want to install one of them.
- For a complete reinstallation, you will need to create a copy, just as in the first point. Then be sure to deauthorize your computer or laptop from iTunes. To do this, launch the program, open the “Account” tab, select the authorization item, and then open the deauthorization item. Please note that your Apple ID password may be required. Next, sign out of iCloud after disabling Find My Mac if it was previously enabled. Also log out of your iMessage and FaceTime account. At this point, your preparation ends. Let's move on, friends.
Reinstallation
- First of all, please note that the following instructions provide for reinstallation with the installation of the version of the operating system that was installed when you purchased the device. That is, if you purchased a Macbook with OSX Mavericks, and then upgraded it to ElCaptain, then after reinstallation the laptop will have Mavericks again. It is also worth remembering that all your data will be deleted from your computer. This method is suitable for those who want to sell their device, give it to someone, or simply receive the device “out of the box.” If this method does not suit you, then go to the “Recovery” paragraph.
- So, let's get started: immediately after turning on the computer, hold down the key combination Option+Command+R.

- Once you see the Apple logo, you can release the buttons.
- If you did everything correctly, Disk Utility will launch, with which you will need to clean up the built-in hard drive. Please note that Extended journal format must be used. After this you can close the window.
- Now click on “Reinstall mac OS”. Follow the prompts on your computer or laptop screen to complete the steps indicated.
- When your device restarts, you'll see the Setup Assistant that opens when you turn on macOS computers for the first time. If you don't want to configure it (for example, as mentioned above, when selling the device), then use the Command+Q combination to turn off the Mac. This way, you will give the opportunity to configure the settings to another user, your future buyer. Ready! This completes the reinstallation.
Update
Updating macOS is much easier than any other operating system on your computer. This process is accompanied by fewer problems and questions. This will be especially noticeable by those people who have updated Windows at least once. In order to update your Mac computer or laptop, you only need an Internet connection and a little time.
- Launch the Mac AppStore.
- In shopping or in other sections of the store, find the new version of the operating system. Most often it is in the first places of the “Top Chart” or in the “Selection”.
- Click the “Download” button or “Install” if the system has already been downloaded previously. Wait for the operation to complete and continue using the now updated mac OS.
Recovery

Recovering with Time Machine
If you have a Time Machine backup, you will need to boot the device from the recovery partition using Command+R when you turn on the computer. In the mac OS utilities window, select the item of the same name. Please note that all data from the disk will be cleared and replaced with the information and files from your backup. The recovery itself is easy to do using the instructions on the computer screen.
Any user may need to update the system on their Mac. However, hardly 25% of the population can boast of the ability to do this. But there are many ways that won’t be difficult to learn. This method is very simple and fast. The OS can be “refreshed” in just three steps. The first step is to make sure that this system will fit your Mac model. To do this, at the top of the screen on the left side, click on the “Apple” icon, select “About this Mac”, and then “More details”. Next, personal information must be indicated. Models that are suitable for OS X Mavericks - iMac (from 2007), MacBook (2008-2009 or later), MacBook Pro (from 2007), MacBook Air (2008 onwards), Mac mini (from 2009), Mac Pro (from 2008), Xserve (from 2009).
Step two - in the “About this Mac” item you can also find out what version of the OS is installed. Mavericks will only replace Snow Leopard (10.6.8), Lion (10.7) or Mountain Lion (10.8), however, if you have an older version, updating to the latest will allow you to use this service. The third step is to open the Mac App Store and “Download” the desired OS. Next, installation will be very simple using the built-in instructions. If for some reason you can’t handle it yourself, don’t take your device to dubious technicians. Contact consultants from stores or user support centers.
Updating MacBook OS

The second step mentioned updating the operating system to a newer version. How to do this? The Mac App Store provides notifications about programs and the system itself when they are ready to be updated. On the notification, click “Details”, after which, if the “Update/Install” buttons are available, download the program or OS. The “Reboot” button may also be active; this usually happens when installed software/OS requires a reboot to be “assimilated” by the computer.
Reinstalling OS X
Sometimes it becomes necessary to reinstall the operating system on a MacBook. An important reinstallation factor is Internet access. Restart your Mac by holding down the (⌘) and R keys. Make sure the Internet is connected. Select the reinstallation option, and then “Continue”. Detailed instructions will fully describe further steps; when selecting a disk, select the current Mac OS X disk. Next, click on the “Install” button.
Mac OS X Lion has a built-in recovery disc that can be used to either reinstall the OS or recover hard drive or Time Machine data. In order to call this disk, you need to restart the Mac by holding down the keys (⌘) + R, as before. You also have the opportunity to create an external recovery disk, but this will be discussed in detail in another article.
This article examined in detail the simplest ways to reinstall an operating system. But it is worth remembering that if you do not follow simple rules, you can harm your MacBook. If you are not confident in your abilities, it is better to entrust the matter to professionals.


