Consolidation of enterprise offices based on VPN technologies. VPN networks based on MPLS technology
Republican scale for the needs of a medium-sized enterprise. Don't look here for a guide to VPN technologies - there isn't one here, there are specialized manuals for that, available in electronic and printed form. I’ll just try to give an idea, using a practical example, of what kind of “beast” this VPN is, and point out the features of building such an infrastructure in our conditions, simultaneously summarizing my experience in this field. Everything I said does not claim to be the ultimate truth, and reflects only my own point of view.
Why is this needed?
So, the initial conditions are as follows: your organization has several branches located at a great distance from each other within the same city or even in different cities of the country. You have been given, at first glance, an absolutely fantastic task: to unite local branch networks into one global network; so that each computer can access another computer on this network, regardless of where it is located - in the next room or a thousand kilometers away. Sometimes the task condition looks different: to provide access to a certain resource of one branch from computers in a network of other branches (but the essence of the matter does not change).
And how to do this?
This is done using VPN technology. Simply put, a logical network is “thrown” on top of your individual networks, the individual components (that is, branches) of which can be connected to each other in various ways: via public channels (Internet), via leased lines, via a wireless network. The result is a homogeneous network consisting of heterogeneous components.
It is clear that the option of laying channels yourself cannot be considered due to the conditions set; no one will let you run a cable across the entire city, and this is a thankless job. Therefore, there is nothing else to do but contact the telecommunications service provider, or, more simply, the provider. Choosing a provider is a separate topic for discussion that is beyond the scope of this article. One has only to note that everything will depend on several factors, the most important of which are the volume of services provided and the quality of communication. Prices for data transfer will be of no small importance, and here you need to choose the middle ground between price and quality. Since everyone sets this bar for themselves individually (for some, a whole hour without communication is not a problem, but for others, five minutes of downtime will seem like a tragedy), it is impossible to advise anything here.
At this stage, you need to sit down and carefully consider which branches of your organization will be included in the network. If there are more than two or three, for clarity, you can even draw a diagram with a sign indicating the addresses and contacts of each branch. If you need to organize a distributed network within one city, you usually have a choice of several connection options from different providers. In my case, it was necessary to combine several networks located in different cities in the region; here, as they say, there are no options - you have to turn to the monopoly company Kazakhtelecom, the only global supplier of this type of communication throughout the Republic of Kazakhstan. Later in the article I will consider connecting specifically through Kazakhtelecom as the most universal way; adapting recommendations for a specific provider will not be difficult.
As of March 2017, the share of vacancies for work with remote access posted on hh.ru was 1.5% or 13,339 vacancies. During the year their number doubled. In 2014, the number of remote workers was estimated at 600 thousand people or 1% of the economically active population (15–69 years old). J"son & Partners Consulting predicts that by 2018, about 20% of all employed Russians will work remotely. For example, by the end of 2017, Beeline plans to transfer from 50% to 70% of its staff to remote collaboration.
Why companies transfer employees to remote work:
- Reducing the company's costs for renting and maintaining workplaces.
- Not being tied to one location makes it possible to assemble a team
project, which could never be collected within one city. An additional advantage is the possibility of using cheaper labor. - Meeting the needs of employees in connection with their family circumstances.
We discovered the need for a VPN more than 10 years ago. For us, the motivator for providing VPN access to employees was the ability to quickly access the corporate network from anywhere in the world and at any time of the day or night.
The path to choosing the ideal VPN solution
There are quite a lot of possible solutions. Often the decision should be made based on what equipment and software is already used in the company, and what software the system administrator has the skill to configure. I’ll start with what we rejected right away, and then I’ll tell you what we tried and what we ultimately settled on.
VPN in routers
There are many so-called “Chinese solutions” on the market. Almost any router has the functionality of a built-in VPN server. Usually this is a simple on/off functionality and adding logins and passwords for users, sometimes integration with the Radius server. Why didn't we consider such a solution? We first of all think about our safety and continuity of service. Similar pieces of hardware cannot boast of reliable protection (firmware updates are usually released very rarely, or are not released at all), and the reliability of their operation leaves much to be desired.
VPN Enterprise class
If you look at the Gartner square, the leading positions in the VPN market have long been occupied by companies that produce network equipment. Juniper, Cisco, Check Point: they all have comprehensive solutions that include a VPN service.

There are perhaps two downsides to such solutions. The first and main thing is the high cost. Secondly, the speed of closing vulnerabilities leaves much to be desired, and if you don’t pay annual support fees, then you shouldn’t expect security updates. Not so long ago, a third point appeared - bookmarks built into the software of large network vendors.
Microsoft VPN
10 years ago we were a Windows-first company. Microsoft offers a free solution for those who have their entire infrastructure built on their base. In simple cases, setup is not difficult even for a novice system administrator. In our case, we wanted to get the most out of the VPN in terms of security, so the use of passwords was excluded. We naturally wanted to use certificates instead of passwords and use our product Rutoken EDS to store the key pair. To implement the project, we needed: a domain controller, a radius server, and a properly installed and configured PKI infrastructure. I won’t dwell on the setup in detail; there is a lot of information on these issues on the Internet, and the correct setup of PKI can generally take a dozen articles. The first protocol we used at home was the PPTP protocol. For a long time, this VPN option suited us, but in the end we had to abandon it for two reasons: PPTP did not work everywhere and we began to use not only Windows, but also other operating systems. Therefore, we began to look for alternatives. Please note that PPTP support was recently discontinued by Apple. To begin with, we decided to see what other protocols Microsoft has to offer. SSTP/L2TP. SSTP was fine with us, except that it only worked on Windows. L2TP did not have this drawback, but setting it up and maintaining it in operation seemed quite expensive to us and we decided to try alternatives. I wanted a simpler solution for both users and administrators.
OpenVPN
We at Aktiv sincerely love open source. When choosing a replacement for Microsoft VPN, we could not ignore the OpenVPN solution. The main advantage for us was that the solution works out of the box on all platforms. Raising a server in a simple case is quite simple. Now, using docker and, for example, a ready-made image, this can be done in a few minutes. But we wanted more. We wanted to add integration with Microsoft CA to the project in order to use previously issued certificates. We wanted to add support for the tokens we use. How to set up a combination of OpenVPN and tokens is described, for example, in this article. It was more difficult to set up the integration of Microsoft CA and OpenVPN, but in general it was also quite feasible. We used the resulting solution for about three years, but all this time we continued to look for more convenient options. The main feature we got by switching to OpenVPN was access from any OS. But two more complaints remained: company employees had to go through 7 circles of Microsoft CA hell to issue a certificate, and administrators still had to maintain a rather complex VPN infrastructure.
Rutoken VPN
We have the knowledge of how to use tokens on any operating system, we have an understanding of how to properly prepare a PKI infrastructure, we know how to configure different versions of OpenVPN, and we have the technologies that allow us to manage all this in a user-friendly manner from a browser window. This is how the idea for a new product arose.

Setting up Rutoken VPN
We really tried to make the setup simple and straightforward. The entire setup takes just a few minutes and is implemented as an initial setup wizard. The first step is to configure the device’s network settings; I think comments here will be superfluous.

In the second step, you need to enter the company name and wait a few minutes while the device configures the built-in certificate authority.


The third step is to configure the VPN service itself. Specify the external IP to which the connection will occur. Select the encryption type and network addressing.

The fourth configuration step is to create local users, or add them from AD

Employee's personal account

Depending on the operating system and browser of the employee, you will need to install a plugin and browser extension that are necessary to work with tokens.

After installing the plugin/extension, all we have to do is generate a certificate for our Rutoken EDS.


And install the client for the desired operating system:

How does it all work?
A little about the hardware. Initially, we thought for a long time about what “base” to use for our solution, since it was necessary to maintain a balance between cost, convenience, and performance. After researching what is offered on the market, we settled on two options for the implementation and further distribution of the solution:
- x86 (Enterprise) is a software solution that is provided to the end user in the form of a virtual machine image that can be deployed within its IT infrastructure.
- Raspberry Pi is already a fairly well-known microcomputer that has quite good performance at a not very high cost and which can be used as a VPN server within 10 minutes after it was literally taken out of the box.
So, now let's look at how our solution works. First of all, I would like to remind you that we have implemented two-factor authentication. Tokens of our own production, as well as software for working with them, are used as carriers of client private keys and certificates.
But initially, we still need to configure the services that are required for the product to work correctly. Services are currently configured by our company’s specialists in a semi-automatic mode. This means that the process of software deployment and initial settings is automated, but initialization of this process still remains a human privilege. During the initial setup, system packages, python, django, OpenVPN, supervisor, OpenSSL, etc. are installed.
What's next? Next, you need to configure the entire infrastructure, which is actually responsible for security in general. Namely: CA (certificate authority), PKI (public key infrastructure), write out the necessary keys and certificates.
The creation of PKI and CA, as well as the formation of the OpenVPN server configuration file, key generation and certificate issuance are carried out after the product is transferred to the client. But this does not mean that for this you need to have some specific knowledge and direct access to the operating system. Everything is implemented in the business logic of the backend of the administration system, access to which is provided through the Web interface. The client is only required to enter a minimum set of attributes (described above), after which the process of PKI initialization and CA creation begins. There is no particular point in describing specific calls to system commands, since everything has long been described and chewed before us. The main thing we did was to automate this process, eliminating the need for the user to have specific knowledge in administration.
To work with keys and certificates, we decided not to reinvent the wheel (although we really wanted and are still toying with the idea of reinventing it based on our future product development plans) and use easy-rsa.
The longest process when setting up infrastructure is generating the Diffie-Hellman file. We experimented with the parameters for a long time and came to a balance of “quality and performance”. Although there were thoughts to get rid of this step altogether, generate such files in advance using our server power and simply “distribute” them during initial initialization. Moreover, the data contained in this file is not private. But for now we left these thoughts for further “research”.
Next, it is necessary to provide the end user with a mechanism for independently creating key pairs, generating requests to issue a certificate to the CA, and actually receiving this certificate with a record on the token. You also need a client that allows you to establish a VPN connection with pre-authentication using a token.
We solved the first problem thanks to our plugin, which implements the functionality of electronic signature, encryption and two-factor authentication for Web and SaaS services. In order to issue a certificate and write it to the token, the user must install this plugin, follow the link to get to the personal account of the RutokenVPN service, after connecting the token to the computer (you can read more about the plugin on our resource)
When initializing the process of issuing a certificate, a request is made for a token to generate a key pair, as well as a request to issue a certificate to the CA. The private key is written to the token, and a request to issue a certificate is sent to the CA, which in turn issues it and returns it in a response. After which the certificate is also written to the token.
Almost everything is ready to establish a VPN connection. What is missing is a client who “knows” how to work with the server and our tokens.

Our client is implemented in Electron. For those who don’t know what kind of beast this is, then to put it very briefly – the ability to implement a desktop application using js, css and html. Without going into details, the client is a kind of “wrapper” over the OpenVPN client, allowing it to be called with the necessary parameters. Why is this so? In fact, it was more convenient for us, although the chosen solution imposes certain restrictions.
Since we use the token as a carrier of key information necessary for authentication when establishing a VPN session, we need to configure the OpenVPN client to work with it. The PKCS#11 provider is a self-developed library for working with our tokens, the path to which is specified in the OpenVPN client settings. You can read more about it.
When a request is made to establish a VPN connection, the key PIN code is requested, if entered correctly, a certificate is retrieved to authenticate the client, a handshake is performed between the client and the server, and a VPN connection is established. Knowledgeable people may argue that not everything is so simple, but the purpose of this description is not to tell all the intricacies of OpenVPN, but only to highlight the main points of our implementation.
A little about our plans. The main thing we are working on now is the implementation of GOST encryption. We have already covered quite a long path of research, which has allowed us to get as close as possible to its implementation. In the near future we will be able to satisfy the interest of potential clients in this functionality.
Tags: Add tags
building a VPN channel
Hello everyone, today in this article we will look in detail at how to set up a VPN channel between offices using OpenVPN with the possibility of additional password protection. It's no secret that OpenVPN has recently become very popular in many organizations, and the point here is not that it is completely free, but the point is the efficiency with which you can connect remote offices with VPN channels. We will set up a VPN tunnel between offices with additional password protection on the Windows platform.
Task: Set up a VPN channel between two branches of your company. The network in the first branch is called N_B1) and the network in the second branch is called N_B2. OpenVPN installation in both offices will be on Windows 7 OS. Let's get started with the task at hand.
Network N_B1 contains:
The computer or server where the OpenVPN server is installed has 2 network interfaces, one, as you can understand, for the wan ip address, and the second for the internal network..
It also has a proxy server installed that distributes the Internet to the local network, thereby serving as the main gateway for all machines on the local network (192.168.2.100)
192.168.2.100 looks into the local network
192.168.2.3 this interface looks to the Internet through a router that has a static IP, say 123.123.123.123. Forwarding is done on it, or as it is also called forwarding port 1190 (for example, port 1190 is forwarded on the network interface with IP address 192.168.2.3)
User on the network has 192.168.2.100
Network N_B2 contains:
The computer or server where the OpenVPN client is installed also has 2 network interfaces.
It also has a proxy server installed that distributes the Internet to the local network, thereby serving as the main gateway for all machines on the local network (172.17.10.10)
172.17.10.10 looks into the local network
192.168.2.3 looks out to the world through the router.
Online user: 172.17.10.50
Task: A person from an office with network N_B1 (192.168.2.100) should see shared resources on the computer of a person from network N_B2 (172.17.10.50) and in the opposite direction.
In other words, everyone should see everyone and have the opportunity to visit, in case someone shares the new photos with their colleague from another branch.

Please note that the task here is not to explain everything thoroughly and technically correctly, the task is to explain it “on the fingers” so that even novice users can understand. I hope it worked out. If you have questions, ask them in the comments.
The essence of how a VPN server works is as follows:. For example, you want to go to the website yandex.ru. More precisely, connect to a server with IP 77.88.21.11 (residents of the eastern regions of Russia may be sent to a server with a different IP, but that’s not the point). When working without a VPN, your computer sends a packet (you could say a request) directly to the server with the address 77.88.21.11 and receives a response from it. When working via a VPN, your computer sends a packet to the VPN server, the VPN server sends the exact same packet to 77.88.21.11, 77.88.21.11 sends a response to the VPN server (because it was the VPN server that originally sent the request), and the VPN server sends this packet to your computer.
What do we have? Requests to the address 77.88.21.11 are sent not by your computer, but by the VPN; accordingly, the server 77.88.21.11 records the IP address of the VPN server, and not your computer.
One possible reason to use a VPN is need to hide your IP address.
Other uses – need to change traffic route. Let's take an example from life. The author of this article lives in the city of Orel (Central Russia) and wants to connect to the yunpan.360.cn server located in Beijing. The author uses (or rather, used at that time) the services of the Beeline Internet provider. As the tracert yunpan.360.cn command entered into the Windows command line showed, outgoing Internet traffic to this Chinese server goes through the United States. The trace does not show how the traffic goes back, but judging by the ping, it follows approximately the same route. Below is a screenshot from VisualRoute 2010.
This routing is due to the fact that Beeline did not pay backbone Internet providers for a more direct channel to China.
With this route, large packet losses occur, the speed is low, and the ping is huge.
What to do? Use a VPN. This is a VPN server to which we have a direct route, and from which there is a direct route to yunpan.360.cn. I (the author of the article) searched for an acceptable solution for a very long time and eventually found it. A virtual server was rented (what this is will be discussed later) in Krasnoyarsk (immediately imagine where the city of Krasnoyarsk is located) from a hosting provider. Tracing to the server showed that the traffic was traveling across Russia, the ping was 95 ms (I had a mobile LTE (4G) Internet, on a wired Internet the ping would be 5-10 ms lower).
Ping– this is the delay of the Internet signal. The delay for the passage of Internet traffic in both directions (round trip) is measured. It is impossible to measure the delay in only one direction using standard means, since your computer sends a request to the pinged server and records the time it takes for the response to arrive.
In traces, the ping to each point (to each point of the route, otherwise called a hop-hop) is also shown for traffic in both directions.
It often happens that the route is different in different directions.
Next, a trace was made from the Krasnoyarsk server to yunpan.360.cn. Ping is around 150 ms. The tracing showed that traffic from the Krasnoyarsk server to the Chinese one goes through direct peering (internetwork interaction) between the Transtelecom and China Telecom providers.
Here is this very trace (made from Linux):
tracepath yunpan.360.cn
1?: pmtu 1500
1: srx.optibit.ru 0.361ms
1: srx.optibit.ru 0.381ms
2: border-r4.g-service.ru 0.392ms
3: kyk02.transtelecom.net 0.855ms asymm 5
4: 10.25.27.5 112.987ms asymm 8
5: ChinaTelecom-gw.transtelecom.net 125.707ms asymm 7
6: 202.97.58.113 119.092ms asymm 7
7: 202.97.53.161 120.842ms asymm 8
8: no reply
9: 220.181.70.138 122.342ms asymm 10
10: 223.202.72.53 116.530ms asymm 11
11: 223.202.73.86 134.029ms asymm 12
12: no reply
What do we see? The Krasnoyarsk server is hosted by optibit.ru (hosting is a service for placing and renting server capacity) and is connected to the Internet provider “Igra-Service” (g-service.ru). Igra-Service, in turn, sends traffic to yunpan.360.cn through the large Russian backbone provider Transtelecom (for which it pays him money). TTK directs traffic through its direct connection to the network of the Chinese backbone provider China Telecom, the ChinaTelecom-gw.transtelecom.net hop domain tells us this.
Let's remember what our problem was. Our traffic to that Chinese server went through the USA, the speed was low. What I've done? I installed a VPN on this Krasnoyarsk server. And configured my computer to work through this VPN server. What happened? Now the traffic to yunpan.360.cn did not go along the old Orel-Moscow-USA-China route, but like this:
first to the VPN server – Orel-Krasnoyarsk,
then from the VPN server to Beijing - Krasnoyarsk-Beijing.
Did you get the point? We have changed our route. What did it give? The speed of the outgoing connection from me to yunpan.360.cn has increased. Ping has been reduced. The result was achieved.
How to determine your route? For beginners, the easiest way to do this is to use the VisualRoute program, which can be found on the Internet in both licensed and hacked forms.
You need to run this program and set the following settings:

It will turn out like this:
Using this table you will see which countries the traffic passes through. Once again, I draw your attention to the fact that the trace shows the route of outgoing traffic only (that is, traffic from your computer to the server). The route in the opposite direction can only be shown by a trace made from the server to your computer. VisualRoute has a small glitch: it often shows Australia (?) as a country when it cannot determine the real geoposition of the node.
VPN– Virtual private network – a virtual private network is, one might say, your own network on top of the Internet, all traffic within which is encrypted. You can study this technology in detail. To explain it very simply, then:
- your computer and VPN server connect over the Internet
- all traffic between you and the VPN server is encrypted
- The VPN server sends it to the destination
- your IP is hidden and the IP address of the VPN server is visible instead
It is recommended to use a VPN when working through free (or simply someone else's) WiFi, since it is possible to intercept all traffic passing through the WiFi router. And when using a VPN, all traffic will be encrypted. Moreover, if you go to yandex.ru, vk.com and google.ru without a VPN, then connections to yandex.ru, vk.com and google.ru will be recorded at the level of the router and your Internet provider. When using a VPN, all connections go to the VPN server address.
There are many paid VPN services available. Their advantages include only ease of use. Disadvantages include high cost and lack of 100% confidentiality (you can write a lot, but what actually happens on the VPN server, whether traffic is intercepted, cannot be guaranteed). The inability to change the IP address in a couple of clicks should also be considered a disadvantage of paid services.
Let's compare the cost of our self-configured solution and paid VPN services. The latter cost around 300 rubles. per month. Our solution will cost $0.007 per hour. If we don’t use VPN right now, we don’t pay. If used for 2 hours every day for 30 days, this pleasure will cost us 30-50 rubles.
We will do the following:
- We rent a server for VPN.
- Let's set up a VPN on it.
- We will use them and pay only for each hour of actual VPN use.
Step #1. Server rental.
No, we will not rent a full-fledged server. We rent virtual server – VPS(virtual private server). In many cases, hosting websites on the Internet or for other purposes (including organizing a VPN) does not require large server capacities, but you need to customize the server operating system. Several operating systems cannot run simultaneously on one computer (including a server, because it is the same computer, only usually more powerful). What should I do? Virtual machines come to the rescue. This technology allows you to run an operating system within an operating system, which is called virtualization. In the case of servers, analogues of virtual machines are also created - virtual servers.
There are several common virtualization technologies. The most common are OpenVZ, KVM, Xen. Roughly speaking, Xen and KVM create their own “hardware imitation”, their own OS, etc. for each virtual machine. In the case of OpenVZ, a common OS kernel is used, as a result of which some functions (for example, making changes to the OS kernel) become unavailable, or they can be enabled or disabled only for all VPS at once. VPS on Xen and KVM are, as a rule, more stable in operation, but the difference is significant only for large projects for which server fault tolerance is critical.
VPS on OpenVZ is always cheaper, since one virtual server requires fewer resources. Due to the lower price, we will turn our attention to VPS based on OpenVZ.
Attention! Some hosting companies (companies that provide server rental services) deliberately block VPN operation on OpenVZ-based servers! Therefore, before renting such a server, you need to check with the support service (with a good hosting they should respond within 15 minutes, maximum an hour) whether the VPN will work.
To work on a personal VPN server, a minimum configuration is enough - 256 MB of RAM and a 0.5-1 GHz processor. However, not all hosting providers provide VPS with 256 MB of RAM: many have a minimum tariff of 512 MB of RAM. Such a VPS will be more than enough for us.
What other criteria for choosing a VPS exist? As you already understand, Internet traffic will constantly “walk” from you to the VPS and back. Therefore, the main canals must have sufficient capacity in both directions. In other words, the speed of the Internet connection between your computer and the VPS must be sufficient to perform the tasks you require. For everyday comfortable work, 15 Mbit/s is enough, and if you are going to download torrents via VPN, then you may need all 100 Mbit/s. But! If you and the VPS are on the networks of different Internet providers (especially in different cities), it is unlikely that the backbone networks will “stretch” more than 70 Mbit/s within Russia (or your country) and more than 50 Mbit/s with servers in Europe.
Most hosting services require monthly payment. It is worth noting right away that the price range is very large with approximately the same quality. We will use services with an hourly rate: $0.007 per hour of our server’s work. Thus, if we use VPN for 2 hours every day, then we will pay about 30 rubles per month. Agree, this is not 350 rubles/month for a paid VPN service!
First of all, you need to go to the website and register:


Next, a page will open on which you need to enter your bank card details. Without this, the system will not work and will not allow you to take advantage of the bonus 10 dollars (more on that later). You can specify any data, the system will “eat” fake ones.
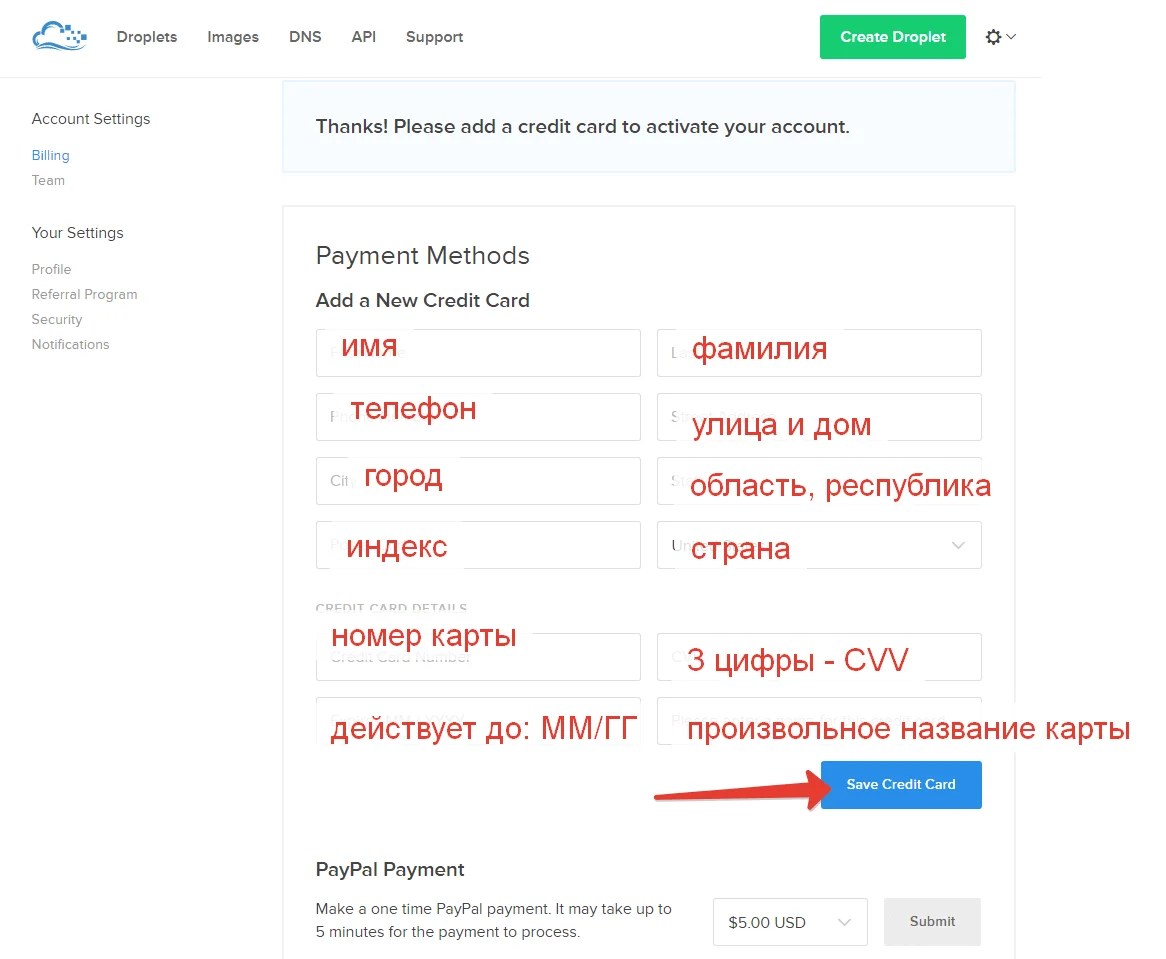
In this case, an amount of several rubles may be blocked on your card, which will then be returned. Charges from your card will only be based on the fact of using the servers.
What to do if you don’t have a bank card? Get yourself one, it automatically gives you a virtual card, the balance of which is equal to the balance of your wallet. You can top up your wallet almost anywhere, see.

However, if you enter your Qiwi card details into DigitalOcean, the system will spit it out, citing the fact that DigitalOcean does not work with prepaid and virtual cards. In this case, you need to top up your balance by $5 via PayPal by paying with a Qiwi card.

After all this, on the same page in your DigitalOcean personal account, enter the promo code DROPLET10, which credits us with 10 dollars, which we can fully use on the servers without fear of additional charges from our card.

Ready! Now let's move on to creating a VPS. Watch the video tutorial:
When creating a server, choose Ubuntu OS version 14.04, and not any newer one, incl. do not select 16.04.
|
Server location |
Domain for ping |
|
|
Frankfurt, Germany |
http://speedtest-fra1.digitalocean.com/ |
speedtest-fra1.digitalocean.com |
|
Amsterdam 1, Netherlands |
http://speedtest-ams1.digitalocean.com/ |
speedtest-ams1.digitalocean.com |
|
Amsterdam-2 |
http://speedtest-ams2.digitalocean.com/ |
speedtest-ams2.digitalocean.com |
|
New York-1, USA |
http://speedtest-ny1.digitalocean.com/ |
speedtest-ny1.digitalocean.com |
|
New York-2 |
http://speedtest-ny2.digitalocean.com/ |
speedtest-ny2.digitalocean.com |
|
New York-3 |
http://speedtest-ny3.digitalocean.com/ |
speedtest-ny3.digitalocean.com |
|
San Francisco, USA |
http://speedtest-sfo1.digitalocean.com/ |
speedtest-sfo1.digitalocean.com |
|
London, Great Britain |
http://speedtest-lon1.digitalocean.com/ |
speedtest-lon1.digitalocean.com |
|
Singapore |
http://speedtest-sgp1.digitalocean.com/ |
Speedtest-sgp1.digitalocean.com |
Note. For most residents of Russia and the CIS countries, Amsterdam or Frankfurt will be suitable (ping to Frankfurt in most cases will be slightly less than to Amsterdam). I recommend that residents of the Russian Far East test Singapore and compare the performance with European servers.
The location of servers abroad will allow you to use a VPN to bypass government bans on visiting certain sites (if this is relevant to you).
DigitalOcean includes 1 terabyte (1024 GB) of traffic in the price (see). For most, this will be enough. Other hosting providers have formally unlimited traffic, but it becomes unprofitable for them when the threshold of 1-2 TB/month is reached.
That's it, we ordered VPS. Congratulations. Now it's time to move on to setting it up.
Step #2. Setting up a VPN.
Don't be intimidated, the process of setting up your own VPN is as easy as 2-2!
In the video tutorial above, we connected to our server using Putty. Now let's continue.
Copy and paste (by right-clicking the mouse, as we did in the video tutorial) the command:
Now copy and paste the following into the file editing window that opens:
Press Ctrl+O, then Enter.
Press Ctrl+X.
Copy and paste the command:
Enter 1 and press Enter. We wait. According to the system requests, enter the desired login and press Enter. Same with the password. For the questions “[Y]/[N]”, enter Y and press Enter. After completing the setup, our login and password and server IP address will be shown.
Ready! VPN is configured!
Now open the Windows Network and Sharing Center:
Select the settings for a new connection:
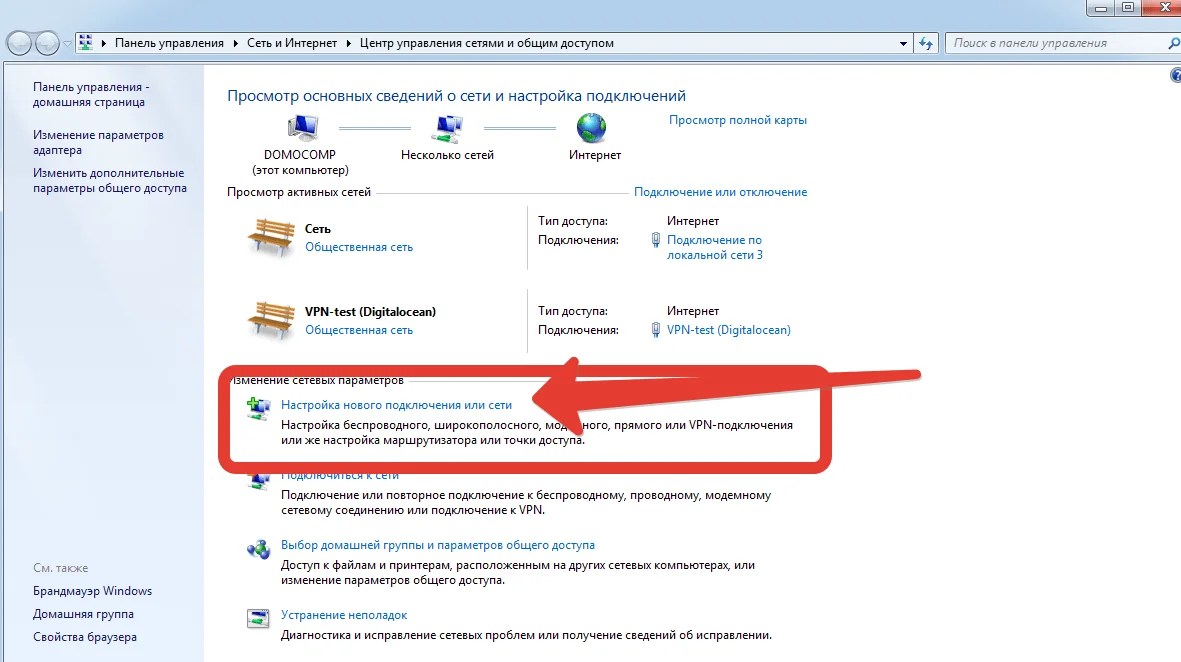
Select “Connect to a workplace”:


We're waiting a little. We now work via VPN! To make sure of this, go to and make sure that our IP address shown to us matches the IP address of our VPS.

Now attention! Through our DigitalOcean personal account, we can turn off our VPS (droplet in DigitalOcean terminology), however, even for a server in the off state, funds are written off at the standard rate. So we'll backup our server, delete it, and when we need the VPN again, we'll restore it from the backup!
Let's move on to server management (the DigitalOcean control panel is located at cloud.digitalocean.com, you can enter it through the Sign In button on the main page of digitalocean.com in the upper right corner).

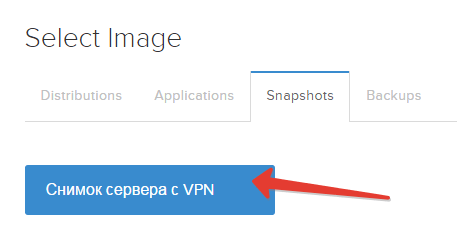
We need to create a backup (snapshot) of our VPS. But to do this, you first need to turn it off.

We wait about a minute until the server turns off. Then go to the Snapshots section, enter a custom name for the snapshot and create it:
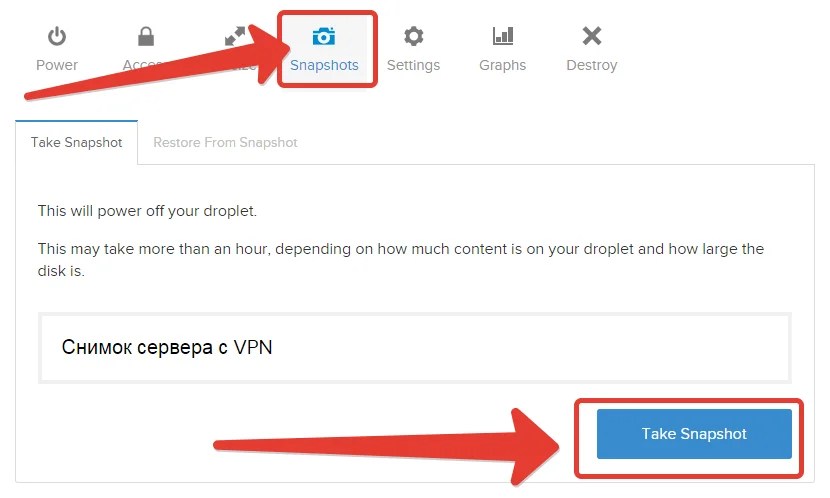
For each gigabyte of “weight” of our VPS, 2 cents will be charged when creating a snapshot. Creating a backup (snapshot) will take a few minutes.
Now we delete the server:
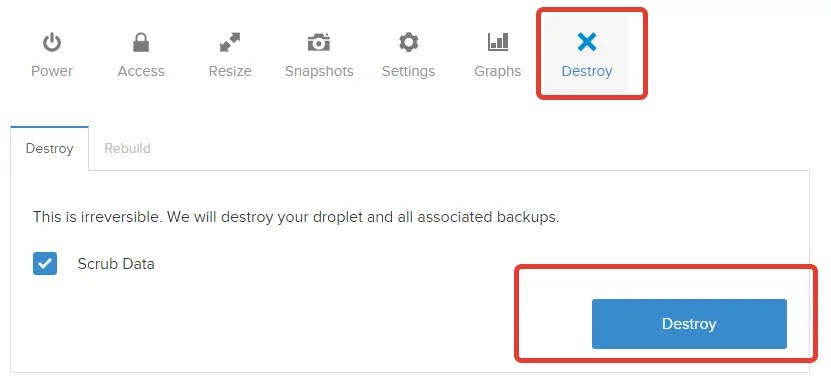
All! No more money will be debited from us.
What to do when you need a VPN again
We need to create a new VPS from the backup we made before.
Click “create droplet”:
Now, as before, enter any server name in Latin letters without spaces, select the first minimum tariff, region must be the same, the same as the one in which we previously had a server.
Just below, click on the name of the photo we took (it was gray, but should turn blue):
...and click the big green “Create droplet” button.
We wait about a minute.
Let's see if the IP address of our server matches the previous one. If yes, then in Windows we simply resume the previously created connection:

If not, then right-click on the name of our connection and change the IP address to a new one:

Enter the new IP and click “OK”:

Attention! Now, to turn off the VPN, we don’t need to make a backup copy, we just delete the server right away, and next time we’ll restore everything from the old snapshot. It is not necessary to shut down the server before deleting. Just in case, this is the procedure in the screenshots:
We removed the VPS while not using the VPN. Now let’s restore it from the old snapshot:
Again we check whether the old IP is still there and continue working.
On the same server (or one more) you can raise your personal proxy, for example, to the 3proxy software base, but this is not the topic of this article.
Found a typo? Press Ctrl + Enter
Organizing channels between remote networks via a VPN connection is one of the most popular topics on our website. At the same time, as the reader's response shows, the greatest difficulties are caused by the correct configuration of routing, although we specifically paid attention to this point. After analyzing the most frequently asked questions, we decided to devote a separate article to the topic of routing. Have questions? We hope that after reading this material there will be fewer of them.
First of all, let's figure out what it is routing. Routing is the process of determining the route for information to follow in communication networks. Let's be honest, this topic is very deep and requires a solid amount of theoretical knowledge, therefore, within the framework of this article, we will deliberately simplify the picture and touch on the theory exactly to the extent that will be sufficient to understand the processes taking place and obtain practical results.
Let's take an arbitrary workstation connected to the network, how does it determine where to send this or that packet? For this purpose it is intended routing table, which contains a list of rules for all possible destinations. Based on this table, the host (or router) decides which interface and destination address to send a packet addressed to a specific recipient.
Route print
As a result, we will see the following table:
 Everything is very simple, we are interested in the section IPv4 route table, the first two columns contain the destination address and netmask, followed by the gateway - the node to which packets should be forwarded for the specified destination, interface and metric. If in the column Gateway indicated On-link, this means that the destination address is on the same network as the host and is accessible without routing. Metrics determines the priority of routing rules; if the destination address has several rules in the route table, then the one with the lower metric is used.

Our workstation belongs to the network 192.168.31.0 and, according to the route table, all requests to this network are sent to interface 192.168.31.175, which corresponds to the network address of this station. If the destination address is on the same network as the source address, then information is delivered without using IP routing (L3 network layer of the OSI model), at the data link layer (L2). Otherwise, the packet is sent to the host specified in the corresponding destination network routing table rule.
If there is no such rule, then the packet is sent via zero route, which contains the address of the network's default gateway. In our case, this is the router address 192.168.31.100. This route is called zero because the destination address for it is 0.0.0.0. This point is very important for further understanding of the routing process: all packets not belonging to this network and not having separate routes, Always are sent main gateway networks.
What will the router do when it receives such a packet? First of all, let's figure out how a router differs from a regular network station. In extremely simplified terms, a router is a network device that is configured to transmit packets between network interfaces. On Windows this is achieved by enabling the service Routing and remote access, in Linux by setting the option ip_forward.
The decision to transmit packets in this case is also made based on the routing table. Let's see what this table contains on the most common router, for example, the one we described in the article:. On Linux systems, you can get the route table with the command:
Route -n
As you can see, our router contains routes to the known networks 192.168.31.0 and 192.168.3.0, as well as a null route to the upstream gateway 192.168.3.1.
 The address 0.0.0.0 in the Gateway column indicates that the destination address is reachable without routing. Thus, all packets with destination addresses in networks 192.168.31.0 and 192.168.3.0 will be sent to the corresponding interface, and all other packets will be forwarded along the null route.
The next important point is the addresses of private (private) networks, they are also “gray”; these include three ranges:
- 10.0.0.0/8
- 172.16.0.0/12
- 192.168.0.0/16
These addresses can be freely used by anyone and therefore they not routed. What does it mean? Any packet with a destination address belonging to one of these networks will be discarded by the router unless it has a separate entry in the routing table. Simply put, the router does not use the default (null) route for such packets. It should also be understood that this rule applies only when routing, i.e. When transmitting packets between interfaces, an outgoing packet with a "gray" address will be sent along the null route, even if this node is itself a router.
For example, if our router receives an incoming packet with a destination, say, 10.8.0.1, it will be discarded, since such a network is unknown to it and addresses in this range are not routed. But if we access the same node directly from the router, the packet will be sent along the zero route to gateway 192.168.3.1 and will be discarded by it.
It's time to check how it all works. Let's try from our node 192.168.31.175 to ping node 192.168.3.106, which is located on the network behind the router. As you can see, we succeeded, although the host’s route table does not contain any information about the 192.168.3.0 network.
 How did this become possible? Since the source node does not know anything about the destination network, it will send the packet to the gateway address. The gateway will check its route table, find an entry for network 192.168.3.0 there and send the packet to the appropriate interface. You can easily verify this by running the trace command, which will show the entire path of our packet:
Tracert 192.168.3.106
 Now let's try to ping node 192.168.31.175 from node 192.168.3.106, i.e. in the opposite direction. It didn't work out for us. Why?
 Let's take a closer look at the routing table. It does not contain any entries for the network 192.168.31.0, so the packet will be sent to router 192.168.3.1, as the main gateway of the network, which will discard this packet, since it does not have any data about the destination network. What should I do? Obviously, the packet should be sent to the node that contains the necessary information and can forward the packet to its destination, in our case this is the router 192.168.31.100, which in this network has the address 192.168.3.108.
In order for packets for the 192.168.31.0 network to be sent specifically to it, we need to create a separate route.
192.168.31.0 mask 255.255.255.0 192.168.3.108
In the future we will stick to this notation of routes, what does it mean? It's simple, packets for network 192.168.31.0 with mask 255.255.255.0 should be sent to node 192.168.3.108. On Windows, you can add a route with the command:
Route add 192.168.31.0 mask 255.255.255.0 192.168.3.108
Route add -net 192.168.31.0 netmask 255.255.255.0 gw 192.168.3.108
Let's try.
 Let's analyze the result, a route has appeared in the routing table and all packets to network 192.168.31.0 are now sent to the router of this network, as can be seen from the response of the ping command, but do not reach their destination. What's the matter? It's time to remember that one of the main tasks of a router is not only routing, but also the firewall function, which clearly prohibits access from the external network to the inside. If we temporarily replace this rule with a permissive one, then everything will work.
 The routes added by the above commands are saved until the node is rebooted, this is convenient, even if you messed up a lot, you just need to reboot to cancel the changes made. To add a permanent route in Windows, run the command:
Route add 192.168.31.0 mask 255.255.255.0 192.168.3.108 -p
In Linux /etc/network/interfaces, after the interface description, you should add:
Post-up route add -net 192.168.31.0 netmask 255.255.255.0 gw 192.168.3.108
By the way, this is not the only way to configure access from network 192.168.3.0 to network 192.168.31.0; instead of adding a route for each node, you can “teach” the router to send packets correctly.
 In this case, the source node has no records about the destination network and will send the packet to the gateway. Last time the gateway discarded such a packet, but now we have added the desired route to its routing table, and it will send the packet to node 192.168.3.108, which will deliver it to its destination.
We strongly recommend that you practice using similar examples yourself, so that routing ceases to be a black box for you, and routes cease to be a Chinese script. Once understanding arises, you can move on to the second part of this article.
Now let's look at real examples of combining office networks via a VPN connection. Despite the fact that OpenVPN is most often used for these purposes and in our examples we also mean solutions based on it, everything said will be true for any type of VPN connection.
The simplest case is when the VPN server (client) and the network router are located on the same host. Consider the diagram below:
 Since, we hope, you have learned the theory and consolidated it in practice, let’s analyze the route of packets from the office network 192.168.31.0 to the branch network 192.168.44.0, such a packet will be sent to the default gateway, which is also a VPN server. However, this node does not know anything about the destination network and will have to discard this packet. At the same time, we can already contact the branch router at its address in the VPN network 10.8.0.2, since this network is accessible from the office router.
To gain access to a branch network, we need to deliver packets for that network to a node that is part of that network or has a route to it. In our case, this is the branch router. Therefore, on the office router we add the route:
Now the office gateway, having received the packet for the branch network, will send it through the VPN channel to the branch router, which, being a network node 192.168.44.0, will deliver the packet to its destination. To access from the branch network to the office network, you need to register a similar route on the branch router.
Let's take a more complicated scheme, when the router and VPN server (client) are different network nodes. There are two options here: transfer the required packet directly to the VPN server (client) or force the gateway to do it.
Let's look at the first option first.
 In order for packets for the branch network to reach the VPN network, we must add a route to the VPN server (client) to each network client, otherwise they will be sent to the gateway, which will discard them:
However, the VPN server does not know anything about the branch network, but can send packets within the VPN network where the branch network node we are interested in is located, so we will send the packet there by adding a route on the VPN server (client):
192.168.44.0 mask 255.255.255.0 10.8.0.2
The disadvantage of this scheme is the need to register routes on each network node, which is not always convenient. It can be used if there are few devices on the network or selective access is required. In other cases, it would be more appropriate to delegate the routing task to the main router of the network.
 In this case, the office network devices know nothing about the branch network and will send packets for it via the null route, the network gateway. Now the gateway’s task is to redirect this packet to the VPN server (client); this can be easily done by adding the desired route to its routing table:
192.168.44.0 mask 255.255.255.0 192.168.31.101
We mentioned the task of the VPN server (client) above; it must deliver packets to the VPN network node that is part of the destination network or has a route to it.
192.168.44.0 mask 255.255.255.0 10.8.0.2
To access from the branch network to the office network, you will need to add appropriate routes to the branch network nodes. This can be done in any convenient way, not necessarily in the same way as it is done in the office. A simple real-life example: all computers in a branch office must have access to the office network, but not all computers in the office must have access to the branch office. In this case, in the branch we add a route to the VPN server (client) on the router, and in the office we add it only to the necessary computers.
In general, if you understand how routing works and how packet forwarding decisions are made, and you know how to read a routing table, then setting up the correct routes should not be difficult. We hope that after reading this article you won’t have them either.
Tags:


