Low-level formatting of a hard drive and flash drive: what programs to use? Utilities for low-level formatting of flash drives
Seagate Instant Secure Erase technology protects the data on the drive by instantly restoring it to its original factory settings and changing the encryption key, resulting in any data remaining on the drive being destroyed by cryptographic erasure. This means that, if necessary, all data on the disk can be instantly rendered unreadable. Learn more about Seagate Instant Secure Erase technology deployment options.
ISE technology requires a self-encrypting drive (with or without FIPS certification). SED drives allow you to secure the active reader through passwords, fingerprints, and other authentication methods, as well as cryptographically erase the drives using ISE technology when they are removed from service or repurposed.
Components needed to instantly securely erase disk data
- Seagate self-encrypting drive, uncertified or FIPS certified.
- A computer with Windows XP, Vista, Windows 7 or Windows 8 installed on it.
- A copy of SeaTools™ software for Windows (1.2.0.6 or later) can be downloaded here: .
- Go to the tab Downloads.
- On the Utilities tab of the SeaTools Software for Windows window, select Select OS, and then select the desired OS from the drop-down menu.
- Click the button Downloads.
- An adapter cable with a SATA connector and a USB plug for a laptop or a double SATA connector when connecting to a desktop computer motherboard.
Performing an instant secure erase
- Disconnect the drive you want to clean from the system and connect it to the computer using an adapter cable with a SATA connector and a USB plug. Note. The SeaTools app cannot perform an instant secure erase on your boot drive.
- Install and launch the application SeaTools for Windows. You may be prompted to install the Microsoft.NET 4.0 package if it is not already installed on your computer. You can download the platform installation package on the official Microsoft website. While downloading it, agree to make changes to your computer and accept the terms of the license agreement.
For more information about the SeaTools application, as well as preliminary steps to install it, see the SeaTools () page under the Downloads tab.
- Once you open SeaTools, you'll see the hard drives available for formatting, including their serial numbers and model numbers. Select the desired drive.
ATTENTION! Make sure you select the correct drive as all data on it will become unreadable and will be permanently deleted. By default, SeaTools does not allow you to erase data on your primary or boot drive. - Go to the tab Basic checks(Basic Tests) and scroll down to Advanced checks(Advanced Tests). A warning message will appear on the screen asking you to confirm your selection by pressing F8.
ATTENTION! Advanced Tests is a mode that removes all data from the disk. Seagate Technology LLC is not responsible for any loss of data. If the drive is selected correctly, press F8. - Go to the Advanced Tests menu and then select SED Crypto Erase. If there is no such item, make sure you have a SED disk. Note. If you don't have a SED drive, select Overwrite Erase and SeaTools will fill the entire drive with zeroes, thereby destroying the data. This procedure may take several hours depending on the size of the disc.
- The SED Crypto Erase dialog box will appear on your screen. Enter the 32-character PSID found at the top of the disc label. You can enter the number on the keyboard or use a 2D barcode scanner.
- Press F8 to begin the cryptographic erasure process. The dialog box will disappear. If the ID was entered incorrectly, the process will be stopped with a FAIL status. Note. The PSID may contain zeros. It is important not to confuse them with the letters "O". If the ID was entered correctly, within a few seconds the disk status will change to “SED Crypto Erase - Pass”.
If the ID is entered correctly, within a minute the disk status will change to SED Crypto Erase - Pass(Cryptographic erasure of SED data - Passed).
The disk will be restored to its original factory settings, and all data stored on it will become unreadable and will be permanently deleted. The drive can then be taken out of service, reused, or returned for warranty repairs or due to the end of the lease period.
It’s no secret that you can format a USB drive or hard drive using the tools built into Windows - just right-click on the corresponding drive and select “Format” in the context menu. But what can this system utility actually do, and what is it capable of? If a bad sector is detected on the disk, the format procedure will not show you any notification about this, leaving the cluster available for writing along with good areas.
So that you have maximum formatting options, we will tell you which alternative low level formatting program hard drive and USB devices currently available in the market is the best in its class and what features are built into it.
Important: before using any of these applications, copy all data from a flash drive or corresponding logical drive to a safe place, since when working with utilities, all information can be destroyed and irretrievably lost.
JetFlash Recovery Tool
A proprietary utility from Transcend. An excellent choice for owners of USB devices from this brand, as well as devices from ADATA. Using JetFlash Recovery Tool, you can not only format flash drives, but also recover data on them. It will be especially useful if your flash drive contains unreadable sectors, it takes a long time for the computer to detect it, or information cannot be written to it. The utility is incredibly easy to use, and even a child can master it. There are only two buttons available on the start screen: to start the recovery procedure and to exit.
The interface is absolutely intuitive and clear. The disadvantages include the lack of a Russian-language interface and support for USB drives of other brands. Not long ago, Transcend recently posted an alternative software product on its official website JetFlash Online Recovery, running on a cloud service. We recommend you try it too.
HP Drive Key Boot Utility
A convenient and functional program for cleaning a flash drive with bad sectors. Allows you to format flash drives from SanDisk, Transcend and Kingston. Three file systems are supported: FAT32, NTFS and FAT. It is worth noting that using the first of the file systems mentioned, it is possible to wipe a device larger than 32 GB, which, in fact, exceeds the FAT32 threshold. The main advantage of HP Drive Key Boot is its interface. All program options are concentrated in one window, and all operations can be performed without literally leaving it.

It is possible to create bootable flash drives based on the OS distribution using only the included tools. The application is portable, so you can use it on any PC without installation (simply by copying the folder with the executable file and libraries). The disadvantages of the utility include the lack of HDD/SSD support and the ability to correct system errors. In addition to this, on Windows Vista/7/8.1/10 the presented data formatting program is available to work only in compatibility mode. For modern operating systems, the development company has created an alternative product called HP USB Disk Storage Format Tool. All HP Drive Key Boot functionality has been successfully transferred here.
USB Disk Storage Format Tool
Official page USB Disk Storage Format Tool
A powerful, fully functional and free program for formatting flash drives from any manufacturer, as well as resuscitating them in case of broken clusters. There is support for all modern operating systems from Microsoft (Win 8/10). Using the program is incredibly convenient: insert a flash drive, select it in the list of devices at the top, indicate the desired file system and enter the drive label just below. What's especially convenient is that error correction and formatting functions are clearly separated. So, you can scan a USB device for bad or unreadable sectors and fix them by simply checking the corresponding additional options and clicking the Check Disk button. A separate button includes the process of clearing a USB drive from its contents without the possibility of recovery (quick and low-level formatting is available).

Another distinctive feature of the USB Disk Storage Format Tool is the maintenance of a detailed log of all operations, which will give you complete information about the actions performed by the utility. What’s especially impressive is that you can format any memory card (SD, Compact Flash, SDXC, SDHC, etc.) using the tools built into the application. Among the minor shortcomings are the inability to create bootable disks and the lack of Russian localization, but given the functionality built into the application, these disadvantages are practically leveled out.
HDD Low Level Format Tool
Official page HDD Low Level Format Tool
Basic program for low-level formatting of HDD/SSD and flash media. The design is very unpretentious and simple. To start the format procedure, you should choose what exactly you will work with: a flash drive or a hard drive. After this, by switching between tabs, you can perform a quick (deleting information about the drive in the corresponding partition and clearing the MBR record) or full formatting.

What distinguishes the application from all others is that the presented software solution has the option to obtain SMART, but this is only relevant for screws. By the way, you can work with HDD, SSD and other devices connected via any interface (FIREWIRE, IDE, SAS, SCSI, SATA). You can clear data not only on flash drives, but also on memory cards of any format from MemoryStick to MMC. There is support for the latest OS. In fact, the only limitation of the software product is the limited data processing speed (50 Mb/sec), but in essence, the advantages and functionality of the application more than cover this shortcoming.
MiniTool Partition Wizard Free is the best program for low-level formatting HDD/SSD, and more
Official page MiniTool Partition Wizard Free
Perhaps this is the most expanded and developed project, both in terms of functionality and usability. As for the available functions, their variety and number are simply beyond expectations. In addition to basic operations with individual HDD and flash partitions (full disk partitioning, checking for errors, setting a label, changing the letter of the name, converting from one file system to another), there are also unique capabilities unique to this product. This includes migrating the installed OS to another HDD/SSD, copying the contents of disks/individual partitions to another drive, a data recovery wizard, and a host of other functions. As in most commercial paid applications, all operations can be performed both through a graphical menu and using a visual panel, which contains the lion's share of functionality.

You can work with both single screws and RAID arrays. Among other programs for low-level formatting of a hard drive, MiniTool Partition Wizard stands out due to its high speed, high-quality design and active support from developers, thanks to which the utility runs without problems in . An excellent candidate for the must-have category, both for ordinary users and administrators.
In this collection, we tried to find out which program for low-level formatting of a hard drive, as well as removable USB drives, is the most relevant at the moment. All products presented are absolutely free and do not require the purchase of a license. We hope that, depending on your tasks, you will be able to choose the best product for you as an alternative to the software tools available in Windows by default.
Low-level formatting of a flash drive- this is the layout of a flash device into sectors for recording service information necessary for its operation. This process completely erases information from the drive and subsequently cannot be restored. Therefore, it is advisable to carry out this action in cases where it is necessary to prevent confidential information from reaching third parties or to block damaged areas of the flash drive so that they cannot be written to (and the flash drive does not become dull).
Important: It is highly not advisable to resort to these actions unless absolutely necessary!
How to low-level format a flash drive?
It will help us to format our flash drive using a low level.
Download and install the program. Launch it and select “Continue for free” (1):
This will allow you to use the program for free.
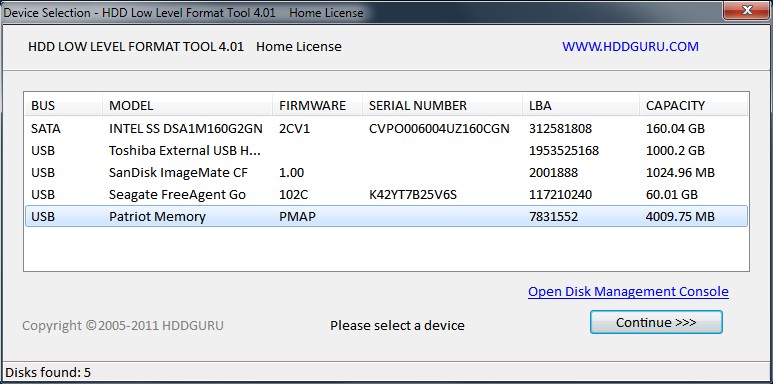
In the window that appears, you will see a list of storage devices connected to your computer and available for formatting. Select your flash drive (1.10) from the list provided and double-click on it.
A new window will open with information about the flash drive. You will need the “Low-level format” tab (2), click on it. The actions performed by our utility during formatting will be displayed here.
To start formatting, click the “Format this device” button (3):
You will see a warning about the destruction of all information on the selected media, click “Yes”:
Formatting will begin, the ongoing process of which you can observe by the indicator (4) (filling bar). You can also see detailed formatting information (5) below the indicator.
You will know that formatting is complete by the indicator (6) - it will be completely filled, and by the inscription “100% complete” (7) below the bar:
Now you can close the program.
Low-level formatting deleted all data on the media, including the media's file system. So you won’t be able to log into such a device. Therefore, to resume normal operation of the flash drive, it is necessary to perform high-level formatting after low-level formatting. Before this, you need to decide on.
Have you found out which fs is right for you? Onward to formatting! I have already written how this is done, read below:
I think you figured it out and successfully performed low-level formatting of the flash drive.
Flash drives are a very popular accessory for storing important information or for transferring data between several computers when it is not possible to transfer it in other ways. Despite the high reliability and the possibility of repeated recording, under the influence of various factors, wear of microcircuits and memory sections occurs, as a result of which various failures and malfunctions can occur, and information can be read and written with errors. As a result, the system may require you to format the flash drive and not open it. You can try to check the disk for errors or restore the data and continue using it.
An extreme measure to restore the functionality of a flash drive is low-level formatting.
But when everything is so bad that neither recovery nor regular formatting helps, only low-level formatting will help. It will help to fully restore the functionality of the flash drive, as well as get rid of errors and failures. In this article, we will take a closer look at what low-level formatting of a flash drive is, as well as software that can help with this.
It’s worth starting with how the file system is organized. The entire file system is divided into tracks and sectors (so-called clusters) of a certain size, which, in turn, are combined into sections or directories. Depending on the file system used, their organization and location may vary. All service information is recorded in the memory of the controller, which manages requests for access to the desired location in memory. When you transfer data to storage media, the file is split into cluster-sized pieces and written to a specific sector of the disk. When reading, the controller accesses the desired sector, and you gain access to the data.
If for some reason the location of the sectors is lost, for example, when writing or reading a large amount of data, you pulled the flash drive out of the connector, the controller cannot correctly access the required sector, since that section is damaged. Low-level formatting allows you to delete memory sectors located on the disk and clear the controller's control information. In other words, you do a complete reset of the firmware of a flash drive or memory card and erase the file system. To continue using the flash drive, you will need to format it in the usual way.
What else is low-level formatting used for?
- Complete cleaning of various malicious files found on a flash drive, especially if they cannot be removed in the usual way using an antivirus or recovery.
- The most reliable and complete removal of secret and important data to eliminate the possibility of restoring them using special software.
- Prevention of errors in the presence of bad sectors and junk files that interfere with normal functioning.
- To restore the boot sector, that is, if the flash drive is physically intact, but the system cannot access the files.
In order to perform this procedure, you will need special software. Let's look at some of the best utilities that can help you with this. Usually they all support all major drive models, but since some of them may have their own characteristics, in such cases you will have to limit yourself to a utility tailored for use with devices from a specific manufacturer.
Review of the best utilities
A very powerful and advanced utility for low-level formatting of flash drives and other storage media. The program is capable of resuscitating them from almost any, even the most hopeless, state (well, except perhaps for unrecoverable physical damage to microcircuits and controllers), as well as completely erasing absolutely any information without the possibility of recovery. The program erases the disk partition table without leaving a trace, and then re-partitions it.
Program features:
- Full support for almost any model of flash drive or disk from popular manufacturers.
- Compatible with all possible connection interfaces.
- Detailed report on the work done.
- Limited features of the free version and no restrictions in the paid version.
How to use the utility correctly?
- Download the installation file from the site and run it.
- When you launch it for the first time, click the Continue for free button.
- Find your flash drive in the list of displayed media and double-click on its name with the mouse.
- Select from the list of possible operations Low-Level Format - Format This Device - Yes.
- After the procedure is completed, open Windows Explorer, right-click on the flash drive and select “Format.”
- After this, you can use your flash drive.
An excellent utility for performing low-level formatting with a Russian-language interface and minimal requirements for computer resources. The program does not even need installation, as it works in portable mode. How to use it?
- Download and run the program installation file.
- In the main window, place the cursor on the disk that you want to format, click the “Recover media” button.
- Wait for the process to complete, click the “Finish” button.
- Format the media as usual using Windows Explorer.

The utility is designed for use with JetFlash, Transcend, A-Data media. Maybe you'll be lucky and be able to recover another flash drive. What are the features of the application?
- Complete portability.
- The minimum number of buttons is only two - “Start” and “Exit”.
- Work in the cloud, so the load on the computer is minimal.

You need to download the installation file, run it and click the “Start” button. Very simple and fast.
SP USB Flash Drive Recovery Software
A proprietary utility from the well-known manufacturer of portable storage devices, Silicon Power. However, even if your flash drive from another manufacturer uses standard device identifiers, you can safely use it. To do this you need:
- Download the installation file and run it.
- Select your flash drive from the list.
- Click the start recovery button.
In a couple of seconds everything will work as expected.
Since Kingston has a significant share of the portable media market, it also offers its customers a utility for restoring USB drives. It is also not overloaded with functions, has the most necessary functions and practically does not load the system. To format a flash drive using this utility, you need:
- Download it and save it in a folder on your hard drive.
- Open the archive, click the Unzip button in the automatic unpacker that opens and select the folder where you want to save the unzipped files.
- Go to the folder where you unpacked the utility and run the program file.
- Select your flash drive from the list of drives and folders and click Format.
- Wait until the program finishes its work to start using your flash drive.

A universal application for formatting flash drives from different manufacturers. It is completely free and is very effective in the fight against damaged partitions and sectors. In addition to formatting, the program is equipped with the following functions:
- Supports almost all existing manufacturers and models.
- Works on all the latest versions of the Windows operating system.
- Checking and correcting errors.
- Quick formatting.
- Deep and traceless deletion of all recorded data.
- A detailed log of work operations.

To use the program:
- Download the program and run it.
- Select the flash drive and file system format from the list.
- Come up with a name for the disc.
- Click Format disk.
- Wait until the procedure is completed.
Conclusion
Low-level formatting, despite the abundance of software, must be carried out with caution, as there is a risk of irreversible damage. Then you'll have to go and buy a new media. In the comments, please write what program you used to format your USB drive.
Usually, if it is necessary to format a flash drive, we use the standard procedure provided in the Windows operating system. But this method has a number of disadvantages. For example, even after cleaning the storage media, special programs can restore deleted information. In addition, the process itself is completely standard and does not provide for fine-tuning the flash drive.
Low-level formatting is used to solve this problem. In some cases this is the most ideal option.
The most common reasons for needing low-level formatting are as follows:
- The flash drive is planned to be transferred to another person, and personal data was stored on it. In order to protect yourself from information leakage, it is best to perform a complete erasure. This procedure is often used by services that work with confidential information.
- I can’t open the contents on the flash drive; it is not detected by the operating system. Therefore, it should be returned to the default state.
- When accessing a USB drive, it freezes and does not respond to actions. Most likely, it contains broken areas. Low-level formatting will help restore information on them or mark them as bad blocks.
- When a flash drive is infected with viruses, sometimes it is not possible to completely remove the infected applications.
- If the flash drive served as an installation distribution for the Linux operating system, but is planned for future use, it is also better to erase it.
- For preventive purposes, to ensure the reliability and performance of the flash drive.
To perform this process at home, you need special software. Among the existing programs, 3 cope best with this task.
Method 1: HDD Low Level Format Tool
Method 2: ChipEasy and iFlash
This utility is very helpful when the flash drive fails, for example, it is not detected by the operating system or freezes when accessing it. It’s worth saying right away that it does not format the flash drive, but only helps you find a program for its low-level cleaning. The process of using it is as follows:

You can read more about using the iFlash website in the article on restoring Kingston drives (method 5).
If there is no utility for your flash drive in the list, then you need to choose another method.


