Setting up linux mint 17 cinnamon after installation. Linux Mint MATE after installation
We looked at installing the Linux Mint 18.3 distribution. Now let's touch on the main points. In this we will install codecs and drivers.
We will look at installation using the driver manager, console, and also add a repository with the latest Nvidia drivers. I will not touch on installing the proprietary amdgpu-pro driver, since I believe that the free AMD driver is much better and more stable.
Installing codecs
If you did not check the box when installing the distribution itself, but decided to install codecs after installation, these instructions are for you.
There are two ways to run the installer:
- Through the welcome screen;
- Through the main menu.
If you have not disabled the welcome screen, then after loading, click “ Media codecs“:

Or open the main menu, enter “codecs” in the search bar and run “ Installing multimedia codecs“:

After this, a window will appear in front of you asking if you really want to install the codec pack. To continue, click “ Install“:


Now just wait for the installation to finish. Once completed, the window will close automatically:

To install codecs through the terminal, launch it by clicking “ Ctrl+Alt+T“. And enter the following command:
$ sudo apt-get update & sudo apt-get install mint-meta-codecs
Press “Enter” and enter the password (the characters you enter will not be displayed):

You will be shown a list of all packages that will be downloaded. To continue, enter “ y" or " d" or " Yes” and press “Enter”:

Now just wait for the download and installation to finish:

After installing codecs, the item from the menu and welcome screen will disappear automatically.
Installing drivers
Again, we have the opportunity to install drivers both through the terminal and through the GUI.
Method 1: Via GUI
As before, the installer can be done in two ways:
- Through the welcome screen;
- Through the main menu.
After starting the OS, select “Drivers”:
Or open the main menu, enter “drivers” in the search bar and launch “Driver Manager”:

Before starting you need to enter a password: 


After this, the manager itself will open. Here, select the drivers you need by marking them with a dot. Then click “ Apply changes“. I also advise you to install the microcode package you need (in my case for an intel processor):

For now, just wait while the program makes the necessary changes:

Once completed, you will be warned that a reboot is required. Do this by clicking “ Restart…”

Method 2: Through a terminal emulator
I will consider installation via the terminal using Nvidia as an example.
First, let's add a ppa repository with the latest driver versions. To do this, enter the command:
$ sudo add-apt-repository ppa:graphics-drivers/ ppa
You will be required to enter a password. To continue and add the repository, press “Enter”:
Once the repository is added, you need to update the package indexes:
$ sudo apt-get update
Now you need to go to and specify the parameters of your system to find out the required driver version. Click “Search” to continue:

You will be shown some information, but from all this we only need the “Version” item. In my case it is 390:

Go to the terminal. To see a list of available versions, enter
$ apt-cache search nvidia-[ 0 –9 ] | grep 'binary driver'
To install the desired version, enter:
$ sudo apt-get install nvidia-***
Where *** is the version of the driver you need:
By the way, after adding the repository, new versions of drivers will also be available in the driver manager.
$ sudo apt-get install nvidia-settings
With this program you can change the screen resolution, view information about the video card and monitor, as well as some other parameters.
After completing all operations, you need to restart your computer. You can do this from the terminal by running:
$ sudo reboot
Or from the main menu
Installation process video
conclusions
In this article, we examined in detail the process of installing various drivers and codecs. If you have any questions, ask in the comments!
Also on the site:
Setting up Linux Mint 18.3, part 1: drivers and codecs updated: February 11, 2018 by: linok9757
Linux Mint is an excellent distribution developed and supported by a community of users based on Ubuntu. Compared to Ubuntu, it contains more default programs, such as many proprietary drivers, as well as its own software that makes working with the system easier, such as a backup or update program.
Cinnamon is based on Gnome, but aims to be simpler for users, with a familiar look and feel and widget support. The latest version of Linux Mint 18.1 came out a few weeks ago. This release updates the Cinnamon version, software stack, updates Xeader, Xviewer, Xplayer and fixes several bugs. This article will cover setting up Linux Mint 18 Cinnamon after installation.
I have nothing against the Linux Mint logo and dark background, but it is more pleasant to work on the system when the desktop background is set to a beautiful image. So first of all, let's change the background. Open Menu -> Options -> Wallpapers:
Then go to the Serena tab and select the picture you like. On the images tab you can upload your own:

2. Theme
Mint 18 also added the Mint-Y theme. It is made in a modern flat style and looks quite beautiful. You can activate it in the settings. To do this, open Menu -> Options -> Themes and select values for all parameters Mint-Y:

Looks quite nice.

3. Add widgets
Cinnamon supports widgets, which are called desktops here. Return to the main menu of the Settings utility and select Desclets:

Here you can add the desired widget to your desktop using the button Add to desktop:

Or install additional widgets from the network:

4. Update your system
It is important to keep your system up to date. Linux Mint has a special update tool, run it from the main menu:

When you first start it, the system will prompt you to choose which updates to install; it is recommended to leave it as is to get the new software:

You can then select the updates you want and click Install updates:

Most likely, you will need to do the procedure twice, since you may first need to update the update manager itself.

5. Installing codecs
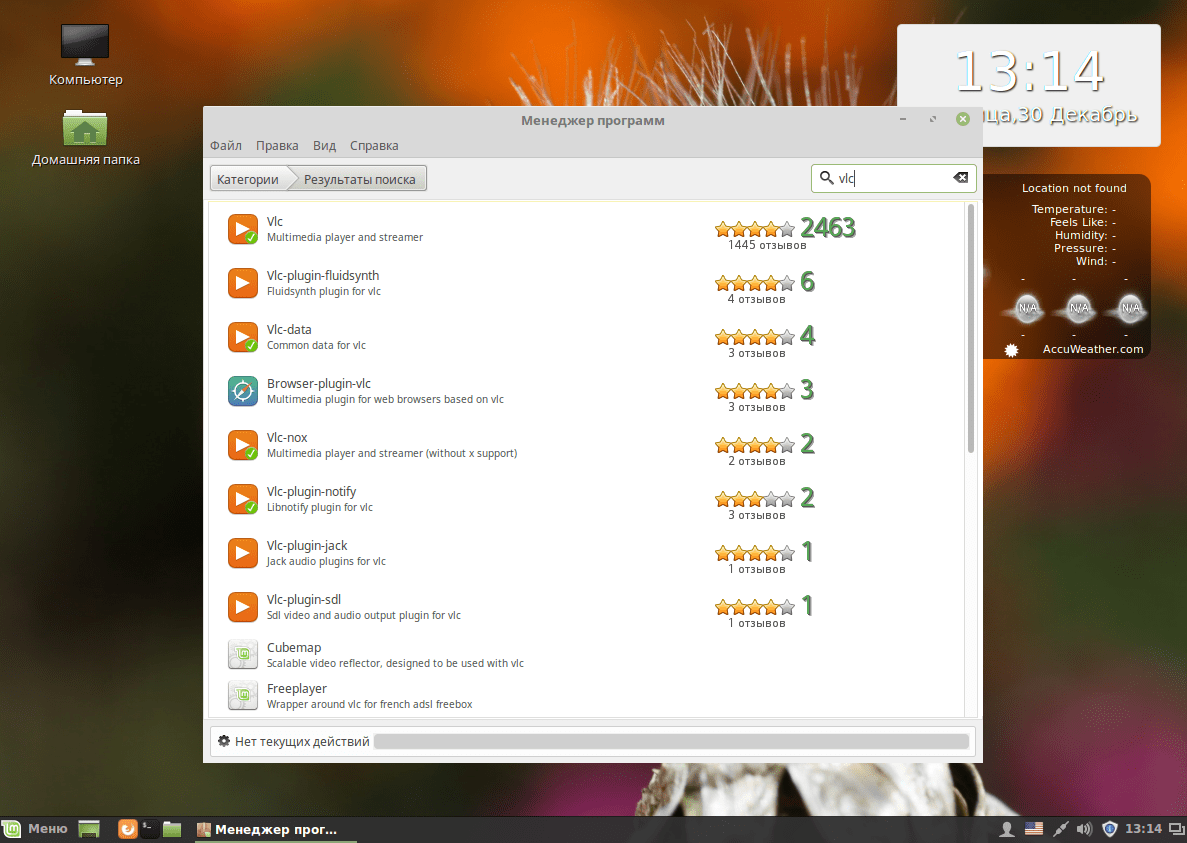
Previously, codecs were supplied with the distribution and there were no problems with this. But then the developers decided to remove them. But we can install linux mint codecs from official repositories. For this we have an application center:

In the search, type mint-meta-codecs or just codecs, you will immediately see the package found, as well as its rating:

To open the package description window, double-click on it and then click Install for installation.
To install all available codecs, open a terminal and run the command:
sudo apt-get install gstreamer1.0-libav gstreamer1.0-plugins-ugly-amr gstreamer1.0-plugins-ugly libgstreamer-plugins-bad1.0-0 gstreamer1.0-plugins-bad-videoparsers gstreamer1.0-plugins- bad-faad gstreamer1.0-plugins-bad libdvdnav4 libdvdread4
6. Install drivers
The system already contains drivers for many peripherals, even if they are closed source, but not all. For example, drivers for a video card must be installed separately. Open the driver manager through the main menu:

When the program loads, select the drivers you want to install and click Apply changes. After installing the driver, you will need to restart your computer.

7. Installing programs
Despite the fact that the system already contains many of the programs you need, not everything is there. Everything you need can be installed through the application center. Skype communication program:

VLC media player:
Audio player Clementine:

Graphic editor Inkscape:

Torrent client qBittorrent:

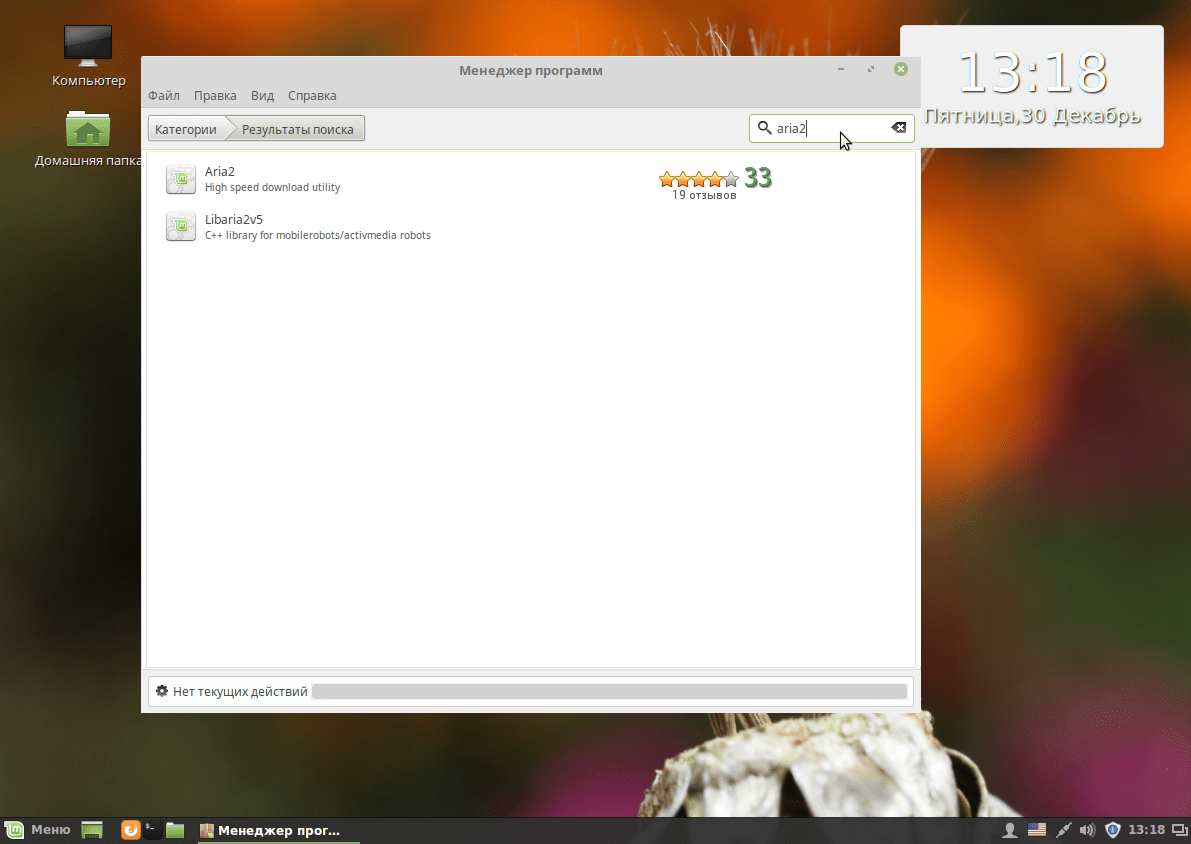
Aria2 Download Manager:
Mozilla Thunderbird email client:

Chromium browser:

BleachBit system cleaning program:

You can find and install other popular programs in the section Favorites:

8. Install Adobe Flash
Flash technologies are used less and less on websites, and are being replaced by HTML5, but many users still need a Flash player. To install it, use the following commands in the terminal:
sudo apt-get install pepperflashplugin-nonfree
$ sudo dpkg-reconfigure pepperflashplugin-nonfree
9. Install Java
Many programs require a Java machine to run. You can install it from the PPA repository. First add the repository:
sudo add-apt-repository ppa:webupd8team/java
$ sudo apt-get update
Then install the package:
sudo apt-get install oracle-java8-installer
10. System backup
Setting up Linux Mint 18 cinnamon after installation should include backup. While the system is still clean, you can create a backup copy so that you can restore it very quickly. To do this, you can use the TimeShift utility. First install it from the PPA:
sudo apt-add-repository -y ppa:teejee2008/ppa
$ sudo apt-get update
$ sudo apt-get install timeshift
Then launch the program from the main menu, then configure the backup frequency and create your first copy using the button Create:

Now you can restore the system if necessary.
conclusions
Even though Linux Mint contains more improvements compared to Ubuntu, it also requires customization of linux mint 18 after installation. We have looked at everything in sufficient detail so that even a beginner can figure out how to prepare their system for everyday use. If you have any questions, ask in the comments!
In this article, for novice users of the Linux OS, the process of installing and initially configuring the latest version of the distribution will be described and illustrated step by step. Linux Mint 18 (Sarah) based on package base Ubuntu 16.04. The development team announced support for this release until 2021.
Brief list of changes: MATE
1. Desktop environments Cinnamon 3.0 and MATE 1.14.
2. Support for cross-desktop applications - xapps, an analogue of snap and flatpak packages. — a universal, non-distribution method for software distribution.
3. New theme - Mint-Y. An excellent theme that is not yet enabled by default. I really like it and, as for me, its dark version does not strain the eyesight at all.
4. Support for HiDPI - screens with a high pixel density or simply a very high resolution.
5. Changing the utility apt, which makes it even easier to use, updating many system utilities and versions of pre-installed applications.
To begin installation, insert the disk or USB drive with the distribution kit into the DVD drive. You can download the system from the developer's website. When booting the computer, using the Boot-menu (called by pressing the F8\F10\F12\esc keys, depending on the Bios version of your PC), select the desired drive to boot. The Live CD will start Linux Mint 18 (Sarah). Clicking on the icon on the desktop will launch the installation wizard.
In the screenshots above, the first steps are choosing the installation language, a window with a question about installing proprietary software - codecs and players. The next step is setting up the disk. I have one disk, empty, and I left the default partition. If there are other Linux partitions on the computer, partitions with Windows installed, then the dialog will ask you to leave the existing file system, install Mint on free space and select parameters for the bootloader. The next steps are to select the time zone, default keyboard layout, user login and password. This is not the root superuser password; it is not set when installing the system in Mint\Ubuntu. Below we will describe how to set it.
For now, everything should be extremely simple and clear. The following steps are completely automatic. The installer will copy, install and configure the system with all software. The duration of the process depends on the performance of your PC (for me it takes about 10 minutes on average hardware). At the end, you need to remove the distribution media and reboot.
First launch - login window and appearance of the Cinnamone 3.0 desktop:
The first thing I wanted to do was change the design of my desktop to the highly praised one. Mint-Y. Themes can be changed in “Menu-Options-Themes”. Traditionally, I chose the dark option - it strains my eyesight less:
sudo apt-get update sudo apt-get upgrade
The first updates the local repository cache - the list of packages available for installation and/or updating, the second updates the system and all applications.
The appearance of the graphical update utility, which has become a little similar to Windows:
The next step is completely optional. In Mint\Ubuntu it is assumed that there is no need for a root password, everything can be done the same way. This is convenient in some places, not so much in others. I prefer to set a password for the superuser:
su - passwd root
the first command - you log into the system as root in its root folder, the second - change (create) the password for it.
The last thing for today is adding a Russian keyboard layout and changing the switching combination.
Actually, that's all. I note that installing Windows 10 on this PC takes about half an hour - without drivers, office and other applications. Mint installed in 10 minutes with a rather large set of software.
Have a nice day.
In this article, for novice users of the Linux OS, the process of installing and initially configuring the latest version of the distribution will be described and illustrated step by step. Linux Mint 18 (Sarah) based on package base Ubuntu 16.04. The development team announced support for this release until 2021.
Brief list of changes:
1. Desktop environments Cinnamon 3.0 and MATE 1.14.
2. Support for cross-desktop applications - xapps, analog and packages. — a universal, non-distribution method for software distribution.
3. New theme - Mint-Y. An excellent theme that is not yet enabled by default. I really like it and, as for me, its dark version does not strain the eyesight at all.
4. Support for HiDPI - screens with a high pixel density or simply a very high resolution.
5. Changing the utility apt, which makes it even easier to use, updating many system utilities and versions of pre-installed applications.
To begin installation, insert the disk or USB drive with the distribution kit into the DVD drive. You can download the system from the developer's website. When booting the computer, using the Boot-menu (called by pressing the F8\F10\F12\esc keys, depending on the Bios version of your PC), select the desired drive to boot. The Live CD will start Linux Mint 18 (Sarah). Clicking on the icon on the desktop will launch the installation wizard.


In the screenshots above, the first steps are choosing the installation language, a window with a question about installing proprietary software - codecs and players. The next step is setting up the disk. I have one disk, empty, and I left the default partition. If there are other Linux partitions on the computer, partitions with Windows installed, then the dialog will ask you to leave the existing file system, install Mint on free space and select parameters for the bootloader. The next steps are to select the time zone, default keyboard layout, user login and password. This is not the root superuser password; it is not set when installing the system in Mint\Ubuntu. Below we will describe how to set it.
 ,
, 

For now, everything should be extremely simple and clear. The following steps are completely automatic. The installer will copy, install and configure the system with all software. The duration of the process depends on the performance of your PC (for me it takes about 10 minutes on average hardware). At the end, you need to remove the distribution media and reboot.


First launch - login window and appearance of the Cinnamone 3.0 desktop:


The first thing I wanted to do was change the design of my desktop to the highly praised one. Mint-Y. Themes can be changed in “Menu-Options-Themes”. Traditionally, I chose the dark option - it strains my eyesight less:


Sudo apt-get update sudo apt-get upgrade
The first updates the local repository cache - the list of packages available for installation and/or updating, the second updates the system and all applications.

The appearance of the graphical update utility, which has become a little similar to Windows:


The next step is completely optional. In Mint\Ubuntu it is assumed that there is no need for a root password, everything can be done the same way. This is convenient in some places, not so much in others. I prefer to set a password for the superuser:
Su - passwd root
the first command - you log into the system as root in its root folder, the second - change (create) the password for it.

The last thing for today is adding a Russian keyboard layout and changing the switching combination.


The content of the publication is not a reposting of materials published year after year by various sites about setting up Linux Mint and Ubuntu after installation. The information presented here relates to the system settings made, based on the needs of personal use and experience gained. Linux Mint 19 was installed on real hardware, and not on a virtual machine in VirtualBox.
Issues covered:
Disable reminders in the update manager about creating system snapshots;
Overriding the paging file;
Removing software I don’t use and installing the software I need;
Setting up startup applications;
Disabling unnecessary system services;
Removing unnecessary languages and fonts;
Subjective opinion about the Mint-Y design theme;
Is it worth upgrading to Linux Mint 19?
Disable the system snapshot reminder
After installation, when updating the system, a banner is present in the update manager:
TimeShift is new in Linux Mint 19, the purpose of which is clear from the explanation (click on the picture).
However, over 5 years of using Linux Mint, my system updates included levels 4 and 5, that is, all components were installed. During this time, I never noticed any unstable operation of the system after installing these updates. I agree with the opinion that the most “terrible” phenomenon for Linux is the user himself.
The second “cons” is the need to take into account the consumption of disk space for the needs of TimeShift. What is it and how much disk space will be consumed by Alexey Fedorchuk. Since I will not be using TimeShift in the future, I disable this banner by unchecking the “Show warning if system snapshot creation is not configured” field:

A new setting is available in the update manager that allows you to update the system automatically (background task as root):

By default, there is no checkmark in the "Install updates automatically" field. If you install it, the system will create a mintupdate file in the /etc/cron.daily directory with the following content:
/usr/bin/mintupdate-cli upgrade --refresh-cache --yes > /var/log/mintupdate.log 2>&1
What time is the daily start in this case?
In the /etc/crontab file we read:
25 6 * * * root test -x /usr/sbin/anacron || (cd / && run-parts --report /etc/cron.daily)
Given the crontab syntax, daily jobs are launched at 6:25 am. Will your computer work at this time?
If you check the box and then decide not to automatically update, the mintupdate file will be deleted by the system.
If you still want to demonstrate “coolness” and update the system automatically, then think about what time of day your computer will definitely work and, in accordance with this consideration, run the command sudo xed /etc/crontab in the terminal and instead of 25 6 indicate your time (minutes hour). For example, to run daily cron.daily jobs as root at 8:30 p.m., the line would look like:
30 20 * * * root test -x /usr/sbin/anacron || (cd / && run-parts --report /etc/cron.daily)
Overriding the swap file
In new editions of Ubuntu and Linux Mint, when creating partitions only / (root) or / and /home (root and partition for home directories), a swap file is automatically created during system installation. In different conditions its size will be different. For example, when installing the system from flash media on a computer with 4 GB of RAM, with various options for specifying it in the BIOS, swap files were created:
UEFI: USB DISK 2.0 PMAP – 903 MB
USB: USB DISK 2.0 PMAP – 2.1 GB.
Since I installed a system with the xfce graphical environment, such sizes of the paging file seem too “fat” to me. Based on three years of experience using xfce, even when running very “heavy” applications and services, the 254 MB page file was never used even by a fifth. Therefore, to redefine the 254 MB paging file, the following steps will be performed:
– disabling the paging file;
– deleting the existing swap file;
– creating a new 254 MB swap file;
– connecting the created paging file to a session in the system.
The above actions are performed by the command in the terminal (in one line):
Sudo swapoff -a && sudo rm /swapfile && sudo dd if=/dev/zero of=/swapfile bs=1M count=254 && sudo mkswap /swapfile && sudo swapon /swapfile
If you need a different paging file size, then instead of 254, specify your value in Megabytes.
After this, it is advisable to carry out the settings, the essence of which is outlined. The numbers indicated there should not be taken as a ready-made “recipe”, but as an example of setting up a specific system. These settings must be approached thoughtfully, taking into account the specifics of using your system.
Removing software I don't use and installing what I need
Software I don't use on my computer includes:
– simple scanning (simple-scan) due to the lack of a scanner;
– Tomboy note service (tomboy);
– multimedia player Rhythmbox (rhythmbox), instead of which I use the latest version of Audiocious, installed through the webupd8 repository;
– HexChat messaging program (hexchat);
– automatic adjustment of the “warmth” of the Redshift monitor glow (redshift);
– on-screen keyboard Onboard (onboard);
– Software for creating images of the TimeShift system (timeshift);
– LVM logical array manager (lvm2) – ;
– creating connections via ppp();
The software I use that is not included in the standard Linux Mint package includes the Audiocious player, the Midnight Commander file manager, and the htop process monitor, which I find more convenient than the Task Manager for assessing CPU load and RAM consumption:

In order to completely remove the software from the system, the command will be used:
Sudo apt purge -y (-y means no questions will be asked).
The command will be used to install: sudo apt install -y
Considering the above, the command is executed in the terminal (in one line):
Sudo apt purge -y rhythmbox hexchat onboard redshift timeshift simple-scan tomboy dmraid lvm2 ppp openvpn && sudo add-apt-repository -y ppa:nilarimogard/webupd8 && sudo apt update && sudo apt install -y audacious htop mc
Setting up startup applications
Everything is simple here. Refer to the settings that depend on the graphical environment you have installed: Cinnamon, MATE, xfce. For example, for xfce: "Settings - Sessions and startup - Autostart".
For example, I don’t use the above:
If you have configured automatic updating as root (see above), then you can add to this:
Disabling unnecessary system services
For a previously installed Linux Mint 18.2 xfce system, an analysis was carried out, which resulted in the writing. A similar analysis was carried out in Linux Mint 19.
The commands were executed:
Sudo systemctl list-units --type service
Systemd-analyze plot > graph.svf
Running sudo systemctl list-units --type service produced the following result: 53 loaded units listed.
There were some differences as well. For example, in the new system the geoclue.service service was not found, but apport.service was found
Apport to Ubuntu–This is a classic crash reporter that allows you to find out the reason why the program crashed and fix it in the next version. Apport–This is a bridge between the program developer and the user whose computer program does not behave as intended.
After analyzing the graph.svf file (read through the browser), the question arose: what is networkd-dispatcher.service.
NetworkManager Dispatcher Service is a service that, when the NM state changes, pulls scripts from the /etc/NetworkManager/dispatcher.d directory and passes to them as command line parameters the name of the network interface whose state has changed and the new value of this very state - up or down (vpn-up and vpn-down for VPN connections).
Based on their description found on the Internet, at first there was a desire to disable the service. But when accessing the dispatcher.d directory, the presence of the ntp file and files responsible for configuring dhcp IP versions 4 6 were noticed.
In addition, we have already forgotten what apparmor is. AppArmor is a proactive security software tool based on security policies (also known as profiles) that determine which system resources an application can access and with what privileges. AppArmor includes a set of standard profiles, as well as static analysis and learning-based tools to make building new profiles faster and easier. AppArmor runs in the background, so you may not know what it is or what AppArmor does.
Therefore, after some period of “thoughtfulness”, it was decided to deactivate: apport.service, avahi-daemon.service, cups-browsed.service, ModemManager.service, speech-dispatcher.service.
This action was performed with the command in the terminal:
sudo systemctl disable apport.service && sudo systemctl disable avahi-daemon.service && sudo systemctl disable cups-browsed.service && sudo systemctl disable ModemManager.service && sudo systemctl disable speech-dispatcher.service
Removing unnecessary languages and fonts
The basis was taken from material devoted to Linux Mint 18.3. Despite the great degree of similarity, features have been identified: some “unnecessary” fonts are missing initially, and some, on the contrary, have appeared.
Actions to be taken.
1. Remove unnecessary languages by running "System Settings" - "Languages". Only Russian and USA are left for their needs.
2. Download the archive and unpack it to a convenient place. The archive contains the missing Microsoft fonts that are missing in ttf-mscorefonts-installer, as well as noto fonts (taken from a freshly installed Linux Mint 19). When you remove fonts, the noto set is completely removed, since the individual components of the font set are not removed. And since the most acceptable display of labels for icons and window titles is determined by the noto font, its presence in the system is necessary. From the noto set, exactly those components that relate to languages that are not used in the future have been removed.

3. Remove fonts and install the ttf-mscorefonts-installer package.
4. Add fonts from the downloaded archive to the font catalog.
Why not remove fonts through the program manager? Unfortunately, when contacting the program manager, the listing of fonts ended with an indication of

And installed fonts starting with fonts-lo... are no longer displayed, the same fonts-noto.
The figures below show the fonts in the system before and after the above activities.


Removing "unnecessary" fonts and installing the ttf-mscorefonts-installer package is done in the terminal with a one-line command. The command is written in such a way that no questions will be asked. While executing the command, you can see the output information that 93 packages are marked for removal, and after this operation, the amount of occupied disk space will decrease by 201 MB.
For Cinnamon users
Previously, when I was using Linux Mint Cinnamon, when I commanded to remove the fonts-wqy-microhei package, the system issued a “threatening” warning that Cinnamon components would be removed along with it. But on Linux Mint 19 Cinnamon installed after this publication, the removal of the fonts-wqy-microhei package occurred without consequences.
Run the command in the terminal:
Sudo apt purge -y fonts-nanum fonts-gujr-extra fonts-guru-extra fonts-telu-extra fonts-knda fonts-beng-extra fonts-deva-extra fonts-guru fonts-orya fonts-telu fonts-beng fonts- mlym fonts-taml fonts-gujr fonts-lohit-taml-classical fonts-deva fonts-takao-pgothic fonts-khmeros-core fonts-indic fonts-navilu fonts-kalapi fonts-lao fonts-gubbi fonts-sahadeva fonts-pagul fonts- tlwg-garuda fonts-tlwg-garuda-ttf fonts-tlwg-kinnari fonts-tlwg-kinnari-ttf fonts-tlwg-laksaman fonts-tlwg-laksaman-ttf fonts-tlwg-loma fonts-tlwg-loma-ttf fonts-tlwg- mono fonts-tlwg-mono-ttf fonts-tlwg-norasi fonts-tlwg-norasi-ttf fonts-tlwg-purisa fonts-tlwg-purisa-ttf fonts-tlwg-sawasdee fonts-tlwg-sawasdee-ttf fonts-tlwg-typewriter fonts -tlwg-typewriter-ttf fonts-tlwg-typist fonts-tlwg-typist-ttf fonts-kacst fonts-orya-extra fonts-noto fonts-nakula fonts-tlwg-typo fonts-tlwg-typo-ttf fonts-tlwg-umpush fonts -tlwg-umpush-ttf fonts-tlwg-waree fonts-tlwg-waree-ttf fonts-lohit-deva fonts-lohit-gujr fonts-lohit-guru fonts-lohit-knda fonts-lohit-mlym fonts-lohit-orya fonts- lohit-taml fonts-lohit-telu fonts-samyak-deva fonts-samyak-gujr fonts-samyak-mlym fonts-samyak-taml fonts-kacst-one fonts-lohit-beng-assamese fonts-lohit-beng-bengali fonts-sil -padauk fonts-lklug-sinhala fonts-noto-cjk fonts-tibetan-machine fonts-wqy-microhei fonts-noto-color-emoji fonts-noto-hinted fonts-noto-mono fonts-noto-unhinted fonts-sil-abyssinica fonts -thai-tlwg fonts-smc fonts-smc-anjalioldlipi fonts-smc-chilanka fonts-smc-dyuthi fonts-smc-karumbi fonts-smc-keraleeyam fonts-smc-manjari fonts-smc-meera fonts-smc-rachana fonts-smc -raghumalayalamsans fonts-smc-suruma fonts-smc-uroob && sudo apt install -y ttf-mscorefonts-installer
After this, run your preferred file manager with superuser rights. Examples: sudo mc, sudo nemo, sudo caja, sudo thunar.
Catalog noto from the archive place in /usr/share/fonts/truetype
Catalog Contents msttcorefonts- V /usr/share/fonts/truetype/msttcorefonts
Subjective opinion about the Mint-Y design theme
In Linux Mint 19, the Mint-Y theme is the default. A quick glance at her personally gave me conflicting impressions.
On the one hand, “indescribable beauty.” On the other hand, some icons intended to be displayed on the panel are light-colored images and when trying to switch to the old Mint-X theme, it is very difficult to see them. In the images below, the first two are the Mint-Y theme and the second two are Mint-X.


