How to recover Google account after resetting settings. How to bypass Google account after factory reset on Android Oreo? (2019)
Typically, logging into your Google account occurs when you initially set up your Android smartphone. But, if you skipped this step when you first turned on the device, then you need to log into your account manually. Make it enough. In this article we will simply describe several ways how this can be done.
So, if you don’t know how to log into your Google account on Android, then you need to go to the settings and open the section called “Accounts”. Please note that the “Users” section may also be available in the settings. But, you need to open “Accounts”, since “Users” are local accounts on your smartphone.
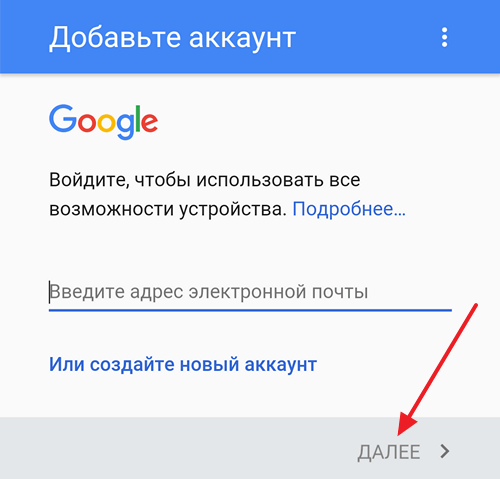
After this, you need to click on the “Add account” button.


After this, a menu for logging into your Google account will appear. Here you need to enter your email address on Google and click on the “Next” button. If you do not already have a registered Google account, then at this stage you can click on the “Create a new account” link and register.
After clicking on the “Next” button, you will be asked to enter your account password and if the password is correct, you will be logged in. Now all Google applications (for example, Play Market, Youtube and others) will use this account.
If you want to log out of one Google account and log into another, then first you need to delete the old account from your Android phone. To do this, go to the Android settings and open the “Accounts” settings section. After that, select your existing Google account.

After this, you need to click on the button with three dots.
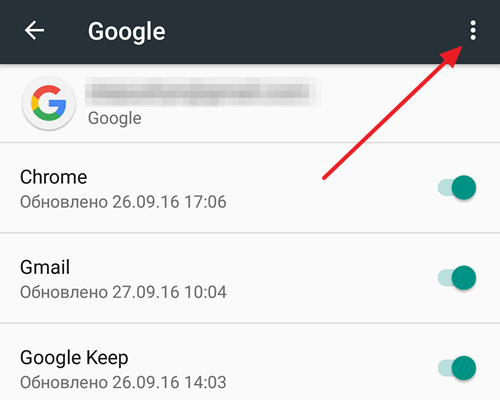
And in the menu that opens, select “Delete account”.

After this, the Android operating system will ask you to confirm deleting your Google account. Click on the “Delete account” button to confirm this action.

After deleting this account, you will be able to sign in to another Google account. This can be done as described above.
Can't sign in to Google account
If you are unable to log into your Google account as described above, then try these tips:
- Check your internet connection. Open your web browser and see if the pages load. If the pages do not open, then you first need to solve problems with the Internet.
- Make sure you enter the correct Google email address and password. If necessary, you can try to restore access to your Google account.
- Perhaps something has frozen on your Android device and is preventing you from logging into your account. Try rebooting your device to resolve this issue.
- If all else fails, then you can do it. But remember that resetting will delete all user data from the device.
There are several ways to properly delete a Google account on Android. Removal methods depend on the firmware version and whether you have superuser rights.
Let's take a closer look at the simplest and fastest ways to reset your account.
Google account is a universal account that is used to link all your devices with video hosting, search engines, online documents and other useful services.
Registering and linking an account is a mandatory step for the first setup of the device.
In the future, users can “unlink” or completely delete existing accounts.
Contents:
Method 1 – Using OS Settings
The first removal method is the easiest and safest. It is recommended to be used by Google support. Use this option if:
- You are deleting your profile to troubleshoot problems and then re-login into the system with the same account;
- You are giving your smartphone or tablet to a loved one for use, without fear that he may have access to your contacts and files;
- You want to log out of your existing account and re-login with a new account.
After deleting your account using this method, all files, phone numbers, the settings will remain unchanged:
- Open the application menu and click on “Settings”;
- In the window that opens, find the field "Accounts…" and click on it. Select the profile you are using that you want to delete;
- In the new window, click on the additional options button - it is located in the upper right corner. In the drop-down list, click on "Delete entry".
Uninstall error
Sometimes, while performing a standard uninstall, an error may occur or the device may freeze. As a result, the old profile remains in place and nothing happens.
You can solve the problem by adding another account to the application. If several accounts are registered in the system, one of them will be deleted without problems.
Follow the instructions:
1 Open your Gmail email application. It comes pre-installed on all Android devices;
2 In the main program window, click on the menu key and select from the list of options "Add another account";

3 In the list of suggested services, select Google and click on "Continue";

4 A new window prompts you to choose one of two options for adding a profile– creating a new account or logging into an existing account that is not yet linked to. Choose the option that suits you;

5 After authorization, open Gmail again. The newly added address will appear in its settings window. One mail is loaded as the main one, the rest are additional services. To make a new account your primary account, simply click on the icon with the user's photo.

Now that you have selected another account as your primary mail storage, log in again and repeat the first method of deleting your account. It should be deleted without any problems, since there is already another user profile on the smartphone.
Method 2 – Forced removal
This type of account reset involves a "hard" deletion of all associated user accounts, data, and files.
Creating a Backup


The resulting file will be saved to the application root folder, which you can open using .
Move the backup copy to another device and only then start deleting your Google account.
"Rough" account deletion
Important! Before performing the settings described below, we recommend that you create a backup copy of your data and upload it to your computer or cloud storage. This way you will save all your files and phone book contacts.
It is the most effective way to completely delete an account for devices without superuser rights.
As a result of the reset, you will receive a completely new phone software shell with the version that was preinstalled at the time of purchase.
To start using the gadget, you must add or register - data about the old account is not saved.
Follow the instructions:
1 Open the settings window and select the field "Restore and reset";

2 In the new window, click on "Reset";

3 Next, a window will open with a system message indicating what data will be deleted. Confirm the action by clicking on "Erase everything". Next, wait until the phone reboots and add a new Google account during the activation process.

Method 3 – Forced stop of the serviceGoogle Accounts
Google preinstalls a set of its web services and applications on all smartphones and tablets. This allows you to simplify the setup of your smartphone and speed up its operation.
The Google Accounts service is responsible for managing user accounts.
With this service, you can install the latest security updates and easily manage connected accounts.
In the system settings, you can forcefully stop Google Accounts and delete all utility data.
So all linked accounts will be automatically erased from the gadget.
Follow the instructions:
- Open settings;
- Select the "Applications" tab;
- Find the “Google Accounts” utility and select it;
- In the new window, click on "Forced stop" And "Erase data".

If your smartphone does not have a separate Accounts application, select the Google Services utility and erase all its data.
For some reason, we often reset our phone to factory settings without thinking about further consequences (common reasons: the system is slow, we forgot the unlock password). However, on smartphones of the latest versions of the Android platform, the phone is linked to a Google account, similar to iCloud of Apple devices. Without unlinking it, you will not be able to log in to your Android account not only with the new account, but also with your own one. After reinstalling the new system, you will be asked to enter data, but unfortunately, it will not allow it, citing the fact that you are entering the wrong account or entering it incorrectly.
In this article I will tell you how to log into your Google account on Android after reinstalling the system. This option was put into practice from personal experience and had a positive end result. I didn't find any other answers on the Internet. And so, after unsuccessful manipulations to log in to the Google Account, the android constantly redirects us to a page with the inscription:
Account confirmations. The device has been restored to its default settings. To continue, sign in to the Google account that was synced with it.
And no matter how much you enter your account data correctly, the result remains disastrous. Go to the website https://myaccount.google.com/ enter [email protected]/password. If you don’t remember your account email, click on the link “ Find an account" You will be prompted to enter your phone number or backup email to search for your account. An SMS will be sent to your phone number and a message with a confirmation code will be sent to your email. After which you will be shown your @gmail.com email to log into your Google account. Enter your login/password.
You are now logged into your Google account. We find the section “ ", press.
Select your device.

Click " Find».

You'll have the buttons that I pressed" Locate device», « Call», « Block», « Clear" After these manipulations, my smartphone missed my account. In practice, sometimes the reset occurs immediately, but my data (login/password) did not go through at all and I decided to try again only after 12 hours. The result is positive.

As for the “Clear” button!!!
After this, no one will be able to see your content. If you decide to delete all data from your device, remember:
- Some files may remain on the memory card.
- The ringing, searching and blocking functions of the device will stop working.
- Any data not backed up will be lost.
The device will only be cleared the next time you connect to the Internet.
Now you know how to log into your Google account on Android. I hope the article was useful. This is the small thank you you could give for a useful post. Leave comments and share your results.
I would be grateful for a repost .sp-force-hide ( display: none;).sp-form ( display: block; background: #ffffff; padding: 15px; width: 560px; max-width: 100%; border-radius: 8px; -moz- border-radius: 8px; -webkit-border-radius: 8px; border-color: #289dcc; border-width: 2px; font-family: "Helvetica Neue", sans-serif; -repeat: no-repeat; background-position: center; background-size: auto;).sp-form input ( display: inline-block; opacity: 1; visibility: visible;).sp-form .sp-form- fields-wrapper ( margin: 0 auto; width: 530px;).sp-form .sp-form-control ( background: #ffffff; border-color: #cccccc; border-style: solid; border-width: 1px; font -size: 15px; padding-right: 8.75px; -moz-border-radius: 4px; %;).sp-form .sp-field label ( color: #444444; font-size: 13px; font-style: normal; font-weight: bold;).sp-form .sp-button ( border-radius: 4px; -moz-border-radius: 4px; -webkit-border-radius: 4px; background-color: #0089bf; color: #ffffff; width: auto; font-weight: bold;).sp-form .sp-button-container ( text-align: left;)When registering a new mailbox, be sure to fill in the fields that are responsible for restoring control over your mail. This determines how long it will take you to get your mail back.
If you lose your password, the question of how to recover your Google account is quite simple to solve. There are two options for the development of events.
Option #1: You have all the information you need to recover
Read also: Search by image on Google (Google): How to use the service correctly? +Reviews

2 Select the first item “I don’t remember my password” in the window that opens.

3 Then, enter the email address that is indicated as a backup.

4 A page with a window will appear on the screen where you need to write the old password. You don’t remember it, so you need to select the “Difficult to answer” option.
5 Then, there is a redirect to the page to restore access.

7 If the phone number is not specified, you need to use the e-mail that was specified in the settings as a backup. Further instructions will be sent to you, with the help of which you can easily gain control over your account.
Option number 2: I have neither email nor phone number
Read also: TOP 15 plugins for Google Chrome (Google Chrome) + Installation instructions
In situations where neither an email nor a phone number is provided, it is still possible to regain control of the account. To do this, you need to write answers to questions from Google.

It’s very good if you remember the answer to the secret question, then there will be no problems. After the system is convinced that the real owner is trying to gain access, a page will open where you need to specify a new password.
Option number 3: How to recover a google account by phone number
The method to recover a forgotten Google account is quite simple.

Select “Unable to log into account” A window will open with a form for recovering your login and password. Then, select the item - “I don’t remember my username” in this case.

And click on the “Continue” button.
Now you need to provide some information about your mailbox.

Enter the code from the picture and submit your request.
It's good if you have an additional email address. Then the recovery method is much simpler.
In the window that opens, check the box “Other problems occur when logging in” and then follow the account recovery path offered by Google.

Enter your username and password on the login page.
If you cannot remember your login and password, use the data recovery method.
In this case, Google will offer to restore your mailbox using your phone number. It must be specified in the advanced mail security settings.

If it is not possible to use the linked phone number or additional mail, you need to answer the questions asked by the system.
You will need to provide information about the last time you logged in; indicate contacts recorded in the address book, etc. If all the answers are correct, Google will understand that the box is going to be restored by its true owner.
As a result, a decision will be made to restore the account. The user will be advised to change the password or a letter with instructions will be sent within 24 hours.
In the second case, you will need to follow the instructions described in the letter.

In case of incorrect answers to the system questions, personal authentication will not be performed and the page will not be unlocked. This situation can only be resolved by registering a new account.
Generally, Android users don't notice that their phones are protected by Factory Reset Protection (FRP) until they are required to verify their Google account after a factory reset. If for some reason you encounter a problem linking your device to your account or have difficulty logging in due to recovery, read our guide, where we describe methods for bypassing a Google account during the first setup.
How does Google Verification (Factory Reset Protection) work?
Factory Reset Protection (FRP), also known as Google Account Verification, is a feature added in Android Lollipop (5.1). Now the vast majority of models are equipped with this mechanism. FRP triggers protection, and when you or another person tries to set up the phone after performing a Hard Reset, the phone will ask you to confirm the profile it was locked to before the reset. That is, you will have to enter your login (email address) and password.
Attention! If you decide to restore to factory settings, this will destroy all data on your phone. Before doing this, create backup copies of important files.
FRP is designed so that, for example, no one can erase your data and use the device if you lose it. A person will find it, reset it, but will come across a check. Often, this is enough for the kidnapper to give up.
The system makes Android devices less attractive to thieves. However, FRP can sometimes become a headache for a smartphone owner.
If you just purchased the device, there will be no problems. However, occasionally, in other cases, they occur. For example, after a purchase on the secondary market, the previous owner might have forgotten to unlink his account, and when a new user tries to register, a request will pop up to enter the details of the previous account. You can also simply forget the password for your profile, and then reset it to factory settings, where you will need to go through verification by entering the login and password for the account that was previously linked to your mobile phone.
Although the protection seems reliable, there are several ways to bypass account verification. Below we present the working ones at the moment.
How to enable and disable protection?
FRP is automatically enabled after linking your Google account.
To Activate FRP, do the following (if your account is not yet connected):
- From your phone, go to “Settings” - “Accounts”;
- tap on “Add account”;
- select "Google";
- Enter your profile username and password to register it for this device.

To deactivate FRP, follow the reverse steps, namely:
- On Android, open “Settings” - “Accounts”;
- click on “Google”;
- select the added Google account;
- Tap on the “Delete account” menu.

Note: Before selling the phone to the next user, you must first log out of your Google profile to disable FRP. Then erase all data on the gadget. This way, the buyer will be able to configure it without verification problems.
Attention! To avoid FRP issues, do not perform a Hard Reset within 24 hours after you have changed the Google Account password associated with this device. Due to security reasons, Android may not allow you to set up your device and confirm login using a Google password that has been reset within 24 hours.
How to bypass Google account verification on any smartphone?
Hackers have figured out ways to bypass FRP without PC, APK or OTG. Here are simple tricks that may work for you. Note that you can bypass blocking and verification on Samsung, LG, Xiaomi, Meizu, Huawei, Alcatel, Nexus and other smartphones.
Attention! As Google continues to patch security holes in Android, these methods may not work with new updates. And since firmware is configured differently by manufacturers, it may happen that workaround methods will no longer be relevant on some smartphone models.
Method No. 1. Through OEM unlocking
A very easy method that is still relevant.

The profile with which the phone is synchronized has been deleted. All you have to do is enter new data and you will be logged into the system.
Method 2. Bypassing the scan by resetting parameters
You will need this trick if you didn't like the first one or for some reason it didn't work.

Once restored, your Google account will be removed from your phone.
Method number 3. Using the QuickShortcutMaker app
If none of the methods worked for you, use the QuickShortcutMaker app to remove the Google verification prompt. There are many tools designed to bypass the Google account with which the phone from Samsung, LG, Nexus, Huawei, etc. is synchronized, but this one is one of the most reliable at the moment.

This is how you can remove your Google account from your phone and assign a new account to your device. As a result, after the system starts, you will not need confirmation; you just click on a few required items and you will be taken to the main screen.


