How to make a backup of the Android system. How to make a backup on Android - effective methods and the best programs
Modern smartphones store a huge amount of necessary and important information, and each user customizes the phone individually. And so, when switching to a new device, the Android owner is faced with a situation where the operating system needs to be configured again. The ideal solution here is a deep or partial backup. But not everyone knows how to make a full Android backup quickly and safely using a tablet or phone without losing important data.
How to backup individual applications on Android
It is not always necessary to copy the entire system, and the process is quite painstaking. If you need to save only specific programs, we recommend using this method. And here the ideal option is the Helium application.
This tool can be freely downloaded from . It works on two “bases”: either the provision and all frauds are carried out only on the smartphone, or access to the PC if you do not have the “Superuser” mode.
The application allows you to save copies to and in cloud storage, namely Drobox, Google Drive and Box, which is very convenient.
She can:
- Back up the history of incoming and outgoing calls;
- Backup of applications and their settings;
- Backup SMS and contacts.
The paid premium version has more advanced functionality, but if you only need to save, for example, games, the free version will be enough.
The application works perfectly on the latest versions of the operating system, mainly Android 7.0, 7.1 and 8.0. Now let’s look at what actions we will perform in it:
- Download and install the application on your phone. If there is no root rights, repeat this procedure on the computer. Versions are available for both Windows and Mac. Drivers are also required for the PC. You can find them on the official website of the manufacturer of the connected smartphone.
- Now let's proceed directly to the backup operation itself. To do this, open the application on the device. If necessary, we connect via a wire to the computer. We are offered several options: a full backup of the phone or only specific applications. Please note that you can copy the entire program with data, or just the data.
- After all the checkboxes are checked, click "Backup". Choose where to save. If to the Cloud, then indicate the address; if to a computer, open the service with the IP address and transfer it to the search bar of the browser. There we allow copying. Ready. The copies were created successfully.
 But here things are a little more complicated, since we need a complete saved copy of Android. Of course, it will take up more space, and there are several different ways to create it.
Backup via system option (No Root)

The easiest and most comfortable option, suitable for beginners and simply users who did not want to waste their time. Opening "Settings", go to point "System" – "Backup", in the location we select Google Drive. Made. The following information will be saved:
- Standard settings (language, time and date);
- Wi-Fi hotspots and passwords, if activated;
- Screen settings (wallpaper, themes, brightness);
- Applications (in most cases just a list, but not internal settings and achievements in games);
- Content located in Google Calendar;
- Materials stored in Gmail, individual mail settings.
Root rights are not required; their presence does not affect the quality of the backup in any way.
Unfortunately, failures during the backup process are possible, which is why many users complain about the insufficient amount of stored information. And on some devices, such a system function refuses to work at all; this may affect phones with an operating system lower than Android 6.0.
Backup Android using FlashTool (No Root)

This is a more serious and difficult procedure that allows you to back up the entire firmware. There will be many stages, and For users who are not confident in their abilities and technical knowledge, we do not recommend this option! But if you are an experienced Android expert, then you can safely get started.
To begin with, we prepare all the necessary materials so that during the backup process we do not have to be distracted by them.
- Download the program itself directly from the official website of the developer ( flashtool.net);
- We find original firmware, made specifically for your smartphone;
- If there are no MTK drivers on your computer, download them.
- We gain access to the PC, since without it backup is impossible here, we check the functionality of the USB cable and the serviceability of the connectors.
- Next, extract two files from the firmware, namely the name of the number with permission txt And weg_l.bin. We move these materials to a separate, empty folder.
- We also place the folder where the software is stored there.
- Launch the previously downloaded FlashTool program on behalf of the administrator, this is a prerequisite.
- A page opens where you need specify the path to scatter.txt using a built-in conventional conductor.
- A new screen should appear where the memory blocks are located. It is necessary to make a backup with them. For this go to the “Memory Test” tab. We check the boxes next to the first five points.
- Turn off the phone, click on the computer "Start".
- Now we connect the smartphone using USB.
- The information begins to be read and displayed on the screen. Once the process is completed, disconnect the device from the personal computer.
- Opening "Notebook" and transfer the received data there. Please note that empty sectors do not need to be copied. Save and close the notepad.
- We return to the FlashTool main page again, uncheck the checkbox next to the first item.
- Open the section “Readback” – “Add”. A new line appears, which we double-click on.
- We indicate where exactly to save the backup and come up with a name.
- A small menu appears asking you to specify settings for each sector. Yes, yes, a separate memory block needs separate configuration. We change only the “Length” column, to which we add block data from a saved notebook.
- Click "OK" and press the top button "Read Back"
- And the last final step: reconnect the phone and watch the copying process. At the end, a green icon should appear indicating that the operation is complete. Made! Now we repeat similar actions with the remaining sectors.
After the backup is completed, the files can be moved to any cloud storage, because if some major trouble happens to your computer or hard drive, the saved information will be lost, don’t risk it!
So we made a backup on Android via FlashTool using a computer, now we are trying the following method.
Backup via Titanium Backup (Root)

Quite light and comfortable option using special Titanium Backup program. You can download it without any problems from Google Play and install it in the standard way.
Now we launch the application and give it access to root rights. Yes, “Superuser” mode is required here, and this, in principle, is the main disadvantage of this utility. Click on the checkmark image in the upper right corner to go to the page "Batch Actions" and choose what data we want to save. Click next to what you want "Start".

Another worthy option that works on all devices, but from experience I will say that it is much easier than the FlashTool method. For this we need recovery mode. Of course, the most popular and most functional is TWRP, allowing you to install custom firmware, different kernels, but for backup is quite suitable and stock. Begin:
- Make sure your smartphone has more than 60% charge.
- Turn off the phone, after about 30 seconds press the power button and the volume rocker down or up, differently on different models.
- Next, an image of an Android robot with an exclamation mark may appear. If this happened - press the same key combination, but do not hold it. Did you immediately go to recovery? Then we skip this point.
- Now we find ourselves in the recovery menu itself, only here touch input no longer works. We will switch with keys: the volume rocker, accordingly, is a command "up", volume down rocker – "down", on/off button – "OK".
- We go down to the point "backup/restore» , click "backup". The copying procedure begins, which takes on average up to 10 minutes. During this period of time, we don’t press anything, we don’t turn on the smartphone, we just wait.
- When the operation ends, we reboot the smartphone. That's all, ready, the backup of the Android firmware is done.

IMEI, as we know, is the unique identification number of a smartphone. And quite often there are situations when this number needs to be saved, that is, backed up. For this we will use special program Root Explorer. Root rights are also required for it to work.
We open the application, through it we go to the root of the device, where the one we need is located efs folder We carry out a long press, after which an additional mini-menu appears, where we select "Create archive"(Archive permission is at your discretion).
Backing up instant messengers
Messengers for the modern user are simply a necessary thing, helping to communicate with friends and, for example, to send a photo of completed work to the boss. Let's look at the example of WhatsApp. It stores a huge amount of necessary information: important messages, images, phone numbers. And the ideal way not to lose such materials is to make a backup. How to do it on WhatsApp?
Built-in backup option
All popular instant messengers have their own backup function, which allows you to save the necessary materials directly from the application itself. WhatsApp is no exception.
Begin:
- Find the application, open the menu;
- Click "Settings", now go to the tab "Chats" and click "Backup copy".
- Choose saving to Google Drive and setting the frequency of saving.
- If you have several Google accounts, select the desired one in the window that appears. Haven't registered or logged in to your account yet? Then click "Add account".
- And in the last column we select the network under which the copying will take place. Don't forget that using mobile Internet may result in additional charges for the megabytes used. “Applications”, check the box next to it “WhatsApp” – “Save”. The backup made, or rather the path to save it, can be found in the section "Archived".
Backup using Restore Transfer
Another decent app created by the developer Trustlool Apps. Fully translated into Russian, the interface is simple and clear. Besides, There is a huge advantage for beginners and inexperienced users - root rights are not needed.
Immediately after launching the utility, we see a list of programs and games installed on the device. We look for our messenger, put a tick next to it and click on the big gray button located below - "Backup"
To do this, go to the application, open the section there "Archive", find the necessary materials, and after checking the box, click "Restore".
Is Super Backup free? I heard that you have to pay for it.
There are two versions of this tool: basic, that is, having small but useful functionality, and extended premium. In the first option, no payment is required, but for the second you will have to pay. Both versions are freely available on Google Play.
As you can see, on Android it’s quite easy to make a backup; you can save firmware, instant messengers, applications, and always have the necessary information at hand. The most important thing is to be attentive and strictly follow the instructions. Good luck!
There are situations when resetting the data stored on your device and rolling back to the manufacturer's settings is simply necessary for Android to work. The reasons may be anything, but the result is always the same - the irretrievable loss of all existing data that has been lovingly accumulated for a long time. Therefore, the need for backup (backup of Android firmware) of photographs, contacts, installed applications and other things is absolutely obvious. So that you can avoid long and exhausting searches for the necessary information, we want to offer you detailed material on how to make a system backup and its further restoration.
Surprisingly, not many people know about the ability of the system itself to do backup android, and, if necessary, save all your existing content. It is absolutely clear that a failure in the operation of any system is possible, which can occur due to clutter, for example, and as a result - the inevitable deletion of data. Or after purchasing a new phone, you will need to transfer information to a new smartphone. Now you can cope using standard tools without resorting to installing special applications.
How to Backup and Restore Using a Google Account
It is well known that Android and Google are one and the same. This integration makes it possible to save backup copies in the cloud and easy access to them when system recovery is required. What we must do for this:
1st step. To synchronize with a Google account, find “personal” in the settings, then “accounts”, and then Google.
2nd step. Select your account and check all the fields.
3rd step. Go to settings, then “personal”, then “backup”, and finally “reset settings”. Check the “data archiving” and “auto-recovery” fields. We first check the account with which we worked (see step 1). It is important that it is registered in the backup account field. In the synchronization section, click the “Synchronize” button. To restore saved data, log into your Google account from your phone (by “data” we mean all passwords, wireless network settings, as well as previously installed applications).
Immediately after the settings have been reset to factory settings, or when connecting an old account on a new device, the system should load all the data from your account; make sure that an Internet connection is provided in advance.
It's worth noting that this kind of storage refers to something related to Google services. That is, if, at the cost of enormous effort, you have reached the last level of a game, then you may not be able to return to it. During recovery, from a list of applications that is too long, we remove those that you no longer need.
If you have applications that are not connected to the Google server, then backup and restoration are performed in other ways.
Using standard ADB tools
Step by step:
- Enable USB debugging on Adnroid;
- Download the proprietary program from the ADB RUN website (version 3.21.35 and higher);
- Install the driver on the PC (if it has not been installed previously);
- USB cable
Let's create a backup:
- Launch Adb Run, select the Backup menu;
- Select the first item “Adb Backup”;
- Take your Android smartphone (tablet) and click the “create a backup copy” button (password not required).
Restoring from a backup:
- Select the item “Adb Restore”;
- On your Android device, click “recover data.”
Using custom Recovery (root)
To use this method, you need to understand that Recovery must already be installed, because the creation of a backup itself cannot be called a backup copy, it is rather the creation of a solid image of the current state of the firmware.
- After installing Recovery, log into it;
- Select “Backup and Restore” from the menu
- Next comes the “Backup” menu item (to create a backup)
- To restore, select “Restore”.
Online Nandroid Backup (root required)

Despite the name, unfortunately, nothing is saved in the cloud. The program does not have a graphical interface, so we will operate from the terminal. This type of backup was created specifically for those who are already tired of rebooting into Recovery to perform Backup, as well as to create a snapshot of the current state of the entire system and what is already installed in it.
Using DataSync (root)

This program will be useful for backing up existing applications and quickly transferring them to another device. However, if your goal is to create backup copies of the applications themselves, and not just existing data and settings, then this application is not worth using.
OBackup (root) features

Backups are created similarly to ONB (third method), only in this case we see a graphical and intuitive interface, and a means of sending the backup to a cloud drive.
Titanum Backup (root)

Perhaps the most convenient and flexible option for high-quality backup. And although in this case a snapshot of the current state of the system is not performed, all user and system applications, as well as their data, are backed up. If your plans are to switch to another firmware and then restore everything you need, then we highly recommend this method.
Helium (root/root)

An effective means to perform android backup. The operating principle is based on ADB, but with the ability to select the application for which a copy is created
(The application does not work on Motorola). In this case, it is possible to work without root rights; in this case, you need to connect the android to the PC. So, step by step:
Download free Helium from the official Google Play app store
If you do not have Root rights, download and install the add-on on your PC. It is possible to install drivers on your computer (for non-Root devices) available on the download page.
Creating a backup in Helium on rooted devices
- Launch the application;
- We refuse the offer to log into Google Disk, because this function does not work correctly (copies, but restores only in the paid version);
- We save backups using internal or external memory. To create them, select the necessary applications in the “backup” section, press the button to start the process, select where we will save the data.
The recovery process is also extremely simple.
Creating a backup in Helium on non-rooted devices
- Everything basically looks the same as in the previous case, only with some reservations: After downloading and installing the add-on on your computer, launch it;
- Enable USB debugging on Android;
- Let's launch
- We perform the remaining actions in the same way as for root.
We hope that our material will be useful to you, good luck!
Android includes a built-in feature to create a full backup of your Android phone without root, as well as a tool to restore it. All you need is a computer and a device running Android 4.0 (Ice Cream Sandwich).
You can also create and restore a backup of your Android device using the Titanium Backup utility. Titanium Backup is perhaps one of the best backup solutions, but it requires root access.
Installing the Android SDK
To create and restore a backup, we will use ADB (Android Debug Bridge) commands. This utility is included in the Google Android SDK, which you can download for free.
First, you need to install the Java Development Kit (if not installed), since the Android SDK requires it. Download and install the 32-bit version of the Java Development Kit (Android SDK requires the 32-bit version, even if you have a 64-bit version of Windows).
Next, download and install the Android SDK. If the SDK says it can't find Java, then you may have installed a 64-bit version, in which case install the 32-bit version.
After you have successfully installed the SDK, launch Android SDK Manager from the Start menu. Check the box next to Android SDK Platform-tools and click the install button to install the platform tools package that contains ADB. If you see an error, run SDK Manager as Administrator (click on the SDK Manager icon in the Start menu and select “Run as Administrator”).

Preparing the device
You must enable USB debugging on your device. You can do this from the developer tools in Android settings.

Now connect your PC and your device using a USB cable. You must have drivers installed for your smartphone; usually they can be downloaded from the manufacturer’s website. Install Google USB Driver via Android SDK Manager (Extras subfolder), it might work.
ADB check
Remember the path where Android SDK is installed. It appears at the very top of the Android SDK Manager window next to SDK Path.
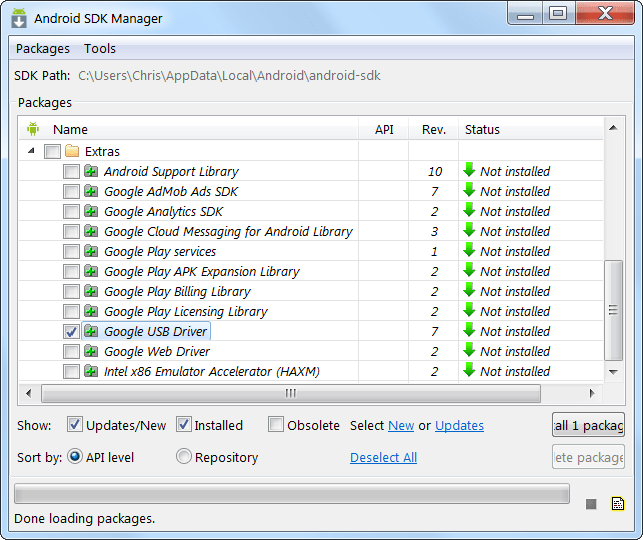
You need to find the adb.exe file in the platform-tools folder. It is usually located at C:\Users\NAME\AppData\Local\Android\Android-sdk\platform-tools.
Go to this folder and, holding down the Shift button, right-click on an empty space, select “Open command window” in the context menu that opens. To check the adb connection to your device, run the adb devices command.

Your device should appear in the list. If it is not there, then the driver is installed incorrectly.
Now you can use adb commands to create a backup copy of your device files. For a full backup, run the following command:
adb backup -apk -shared -all -f C:\Users\NAME\backup.ab
The command will create a backup copy of all installed applications (apk files) and data on the SD card to the C:\Users\NAME\backup.ab file on your computer. Replace NAME in the command with your computer's username or specify a different location.

When you run the command on your phone, you must confirm the creation of the backup. You can also protect your backup with a password.

Depending on the amount of data, the process may take some time.
Restoring a backup
To restore a backup, you need to run the following command:
adb restore C:\Users\NAME\backup.ab
A confirmation message appears indicating that the backup will replace all data on the device. If a password is set for the backup, you will need to enter it.

To create a full backup of an Android phone without root rights, you need to be an average user who understands the peculiarities of Android, but with the help of our instructions, even a beginner can do this. We hope this feature will be available in the Android interface in the future.
With the release of Android 6.0 Marshmallow, a truly necessary feature became available to users - automatic backup of user application data to the Google Drive service. But even though Google took care of users by adding this feature, not all developers are in a particular hurry to update their products and add a similar function to them. So after changing the device or resetting to factory settings, you have to play through the games again, change program settings to your taste, etc. Of course, having root rights on the device can help you out of such a situation. But what if it is not possible to get them? In addition, to do this you will often need to unlock the bootloader, which automatically leads to the loss of all information on the device. In this case, ADB comes to the rescue.
Few Android device users know that it is possible to make a backup copy of all installed applications and their data without additional manipulations with their device. And in today’s article we will tell you how to make a backup of the entire system, without unlocking the bootloader and obtaining superuser rights.
How to backup all information on your device
In order not to bother yourself and save all the accumulated photos, music, videos yourself, this method will be an excellent choice. And here's what you need:
- Create a folder named Android in the root of the C:\ drive.
- Install USB drivers for your device (you can find links to universal drivers for some devices).
- In some cases, installing drivers will require you to disable authentication.
- For Windows 7:
When you turn on the computer, after loading the BIOS, you must press the F8 key. In the “Advanced boot options” menu that appears, select “Disable mandatory driver signing.” This method may not work the first time, so you should repeat the action or open a command prompt as an administrator and enter two commands:
"bcdedit.exe /set loadoptions DDISABLE_INTEGRITY_CHECKS";
"bcdedit.exe /set TESTSIGNING ON." - For Windows 8:
You need to press the Win+I key combination, hold down the Shift key and select “Shutdown” > “Restart”. When you turn on your computer, select Diagnostics > Advanced Options > Boot Options > Restart. When loading, select the “Disable mandatory driver signature verification” mode by pressing the F7 key. - For Windows 10:
You must hold down the Shift key and select the Start menu > Shutdown > Restart. After booting, select Troubleshooting > Advanced Options > Boot Options > Restart. Then select “Disable mandatory driver signature verification” by pressing F7.
- For Windows 7:
- Download the archive and unpack the files into the Android folder.
- Activate the “USB Debugging” item on your smartphone.
This can be done in the “For Developers” section. If this section is hidden, instructions will help you open it. - Change the duration of the standby mode.
To do this, in the screen settings you need to select the “Sleep mode” item and set the switch to the maximum possible time. - Connect your phone to your computer via a USB cable.
It is recommended to use an original or good quality cable, as well as the USB 2.0 port located on the motherboard (for PC). - Change the connection type from “Charging only” to “File transfer (MTP)”.
This is not required on every device, but many manufacturers require it as a security measure before allowing ADB to work. - Open a command line and go to the created Android folder with the command “cd c:\Android\” (commands are written without quotes).
- Make sure that the computer finds the device via ADB.
To do this, you need to enter “adb devices” into the command line. When a request appears on your phone for permission to debug via ADB on this computer, you must click “Ok” and select “Always allow from this computer.” If the device is visible, the text “List of devices attached” and a list of all devices (for example, xxxxxxx device) will be displayed. If instead of “device” it says “offline” or the list is empty, then you need to update ADB, check the drivers/cord, change the USB port/computer. - At the command line, enter “adb backup -apk -shared -all -f path/to/backup.ab”, where path/to/backup.ab is the path to the directory and the name of the backup file.
The operation may take quite a long time, everything will depend on the amount of information on the smartphone.
How to Backup Only App Data
Unfortunately, like everything in this life, the previous method is not ideal. Not all data can always be saved correctly. It is recommended to manually save media files and documents to your PC or to the cloud, and then start backing up user application data. To do this, you will need to follow steps 1 to 10 and then enter “adb backup -apk -all -f path/to/backup.ab” in the command line, where path/to/backup.ab is the path to the directory and backup file name. After that, on your smartphone, enter a password to protect the backup copy and click the “Back up data” button in the lower right corner.
How to back up some apps
If you do not need to back up all programs installed on the device and it is enough to save the data of some applications, then you will need the following:
- Follow steps 1 to 10 from the first method.
- Install the App Inspector application on your smartphone.
- Launch the App Inspector utility and select App List (Ordered by name). Find and select the application that you want to restrict from running in the background. The package name and version will be displayed below the program name.
- Enter the command “adb backup -f path/to/backup.ab -apk name.of.package”, where path/to/backup.ab is the path to the directory and the name of the backup file, and name.of.package is the name of the package , which was previously recognized in the App Inspector.
- A window will appear on your smartphone asking you to enter a password to further protect your backup. After entering it, you need to click the “Back up data” button in the lower right corner.
How to restore data from a backup
To restore data, you only need to enter “adb restore path/to/backup.ab” on the command line, where path/to/backup.ab is the path to the backup file and press Enter. On your smartphone, enter the password in the window that appears and click the “Recover data” button. After a certain time, depending on the file size, the phone will display “Recovery complete” in a pop-up window.
Additional Information
In addition to the above, I would like to supplement the article with several more commands and parameters that can help in certain situations.
Command format for creating a backup:
Adb backup [-f The simplest command to create a backup is: adb backup -all After entering this command, a backup copy of only the data of all applications (without APK files) will be created in the current directory with the name backup.ab. If after running this command an error occurs (something like “adb: cannot open file ./backup.ab”) you need to enter the following: Adb backup -all -f C:\backup.ab In this case, the backup file will be created in the root directory of the C:\ drive. Instead of C:\backup.ab, you can specify any necessary address and file name. Here is a description of some of the options you can use when creating a backup: F This parameter is used to indicate the path and name of the backup file. For example, "-f C:\Backup\mybackup.ab" points to the Backup folder located on drive C. The backup name is mybackup.ab. Apk | -noapk This flag indicates whether the application's APK files should be included in the backup or only the corresponding data. It is recommended to use "-apk" when the application is not available on Google Play or is using an older version than the one on the Market. The default is "-noapk". Shared | -noshared This flag is used to enable/disable backup of the contents of the device's internal memory/SD card. The default is "noshared". It is recommended not to back up the internal memory in this way, but to manually save all necessary files, since not all data can be saved/restored. This flag is the easiest way to backup your entire system. System | -nosystem This setting determines whether system applications will be included in the backup. The default is "-system". It is recommended not to include system applications in the backup to avoid possible errors during recovery in the future. Here you can specify the names of the packages (for example, com.google.android.apps.plus) that you want to save. Only used if you need to back up a specific application. That's all. Write in the comments whether these instructions helped you and whether all the information was saved correctly. A full backup of Android prevents the loss of important information for the user in the event of software and hardware failures, a virus attack, as well as when the device fails, that is, it turns into “”. Backup is recommended to be used on all mobile devices, especially since there is nothing complicated about it. Let's look at how to create a backup copy of the Android operating system. Today, owners of smartphones and tablets are endowed with fairly broad capabilities for saving personal information in the event of various failures and other unforeseen situations. Like Windows, Android also has certain tools for backing up the system, that is, for creating a restore point. Possibly on a smartphone. Backing up data located on Android can be done using: Considering what a backup is, it should be noted that to backup Android along with the firmware on the device, you need to activate root access. If you do not have Superuser rights, you will only be able to save personal data (SMS, contacts, photos, music, etc.), as well as the settings of some applications. All gadgets running Android OS have the ability to connect to Google and enjoy many of the benefits of this service absolutely free (synchronize with a PC, write personal data to a cloud drive, etc.). One of the very useful Google tools is the android backup service. It allows you to create Android backups and backup data from your phone to virtual storage automatically. Before you make an Android backup using the android backup service, you need to create your Google account and assign your mobile device to it. This is done as follows: After Google is connected, we make a backup of the system: To return data to Android via the Android backup service (for example, after a hard reboot), just re-link to your Google account, enter the “Restore and reset” section and start the recovery procedure. Every mobile device running Android OS is equipped with . However, the standard program has somewhat limited capabilities that do not allow you to make a full backup of the firmware. Therefore, many owners of smartphones and tablets install a custom version of it instead of regular Recovery. Let's look at how to make an Android backup via: It may take some time to create a copy of the firmware. When making a backup, it is prohibited to do any actions with the device (for example, install/remove a micro sd card), as this may negatively affect the final result.
When considering the Recovery area, you should also know how to restore the system from a previously created backup. To do this, in the backup and restore section you need to select the restore item. After the smartphone reboots, all your data, along with the firmware, will return to its place. A backup copy of data can also be recorded using special programs installed on a computer or mobile device. There is a lot of similar software on the Internet, but the most effective applications in this area are considered to be: Let's figure out how to make an Android backup of each of these programs. This utility backs up the Android system to a computer. Therefore, before starting work, you need to prepare a USB cable to connect your PC to your phone. The sequence of work will be as follows: This backup program is installed directly on your mobile device. However, before you make a full backup, you need to unlock Superuser rights.Methods for backing up data for Android
Creating a backup using built-in Android capabilities

System backup through the Recovery environment

Creating a backup using additional software


TWRP Recovery


