What is the easiest way to configure a TP Link router (using the tl wr740n as an example). Connecting and setting up the TP-Link TL-WR740N router
Before we start setting up the router, let's check the local network connection settings. For this:
Windows 7
Click on " Start", "Control Panel".
Then click on " View network status and tasks".

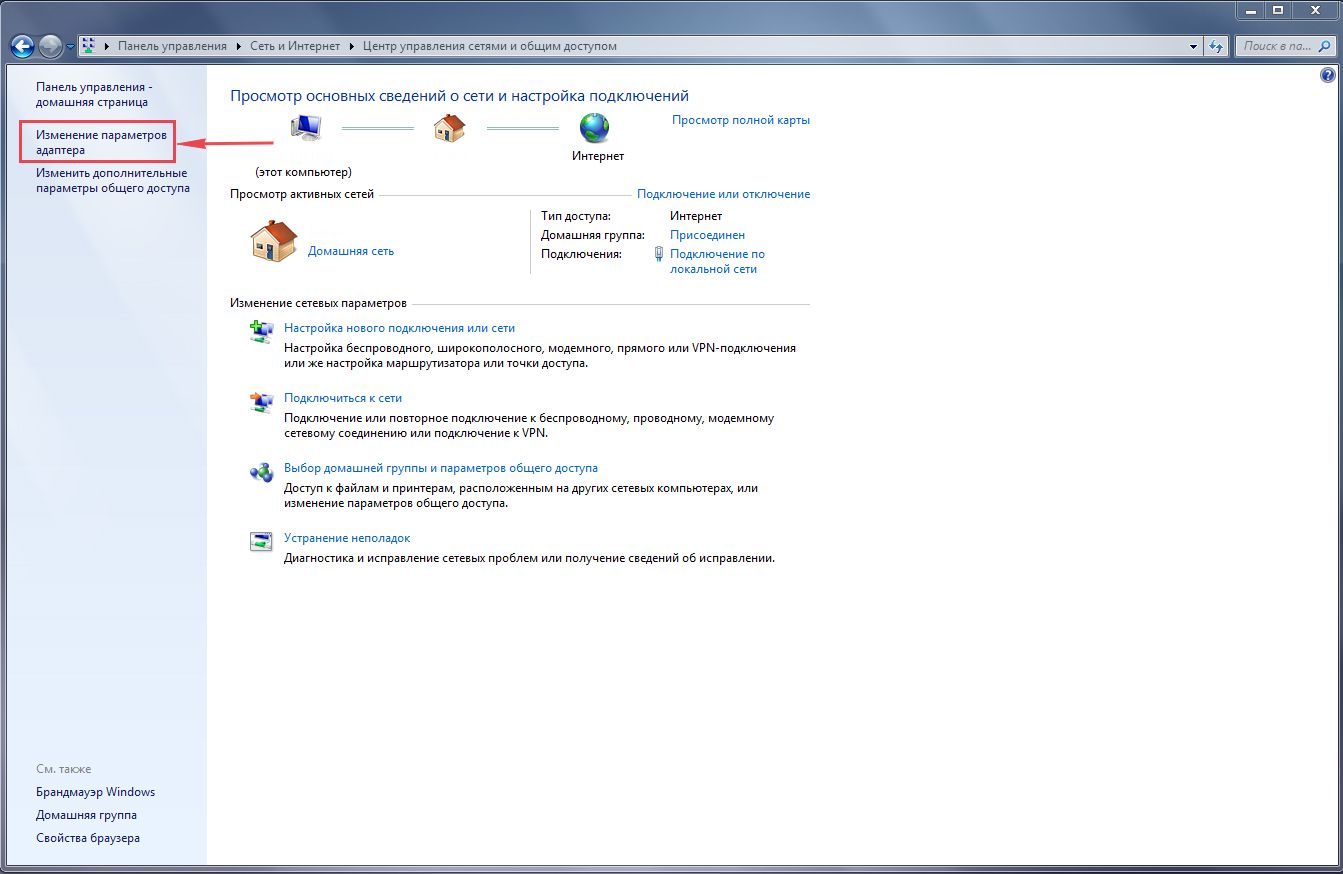
LAN connectionProperty".

Then select from the list " Internet Protocol Version 4 (TCP/IPv4)" and press " Property".

" and "", then press the " button Ok".

Windows 10
Click on " Start", "Options".

Then click on " Network and Internet".


In the window that opens we see " Ethernet". Right-click on it and select " Property".

Then select from the list " IP version 4 (TCP/IPv4)" and press " Property".

In the window that opens, you need to check the box " Obtain an IP address automatically" And " Obtain DNS server address automatically", then press the button " Ok".

Connecting the TP-Link TL-WR740N router to a computer
The next step is to connect the router TP-Link TL-WR740N to your Laptop or Personal Computer (PC). To do this, you need to connect the cable that your provider provided to you to the blue port of the router (that is, this is the cable that goes to your apartment, house, office, etc. from outside), and the cable that came with router, one end into one of the four ports, which are marked in yellow on the router, and connect the other end to your laptop or PC. And yes, don't forget to connect the power cable.

Authorization of the TP-Link TL-WR740N router
So, we have connected the router, now you need to access its web interface through any browser (be it Google Chrome, Mozilla Firefox, Internet Explorer, etc.). To do this, open the browser and enter the router address in the address bar: 192.168.0.1 and press the button " Enter" on your keyboard (in older models of this router this address may be: 192.168.1.1 ).
- Username - admin
- Password - admin
So, enter the data and press " Login"


Setting up the Tp-Link TL-WR740N router
And finally we got to the router’s Web interface and now you need to configure the equipment. First of all, let's secure the wireless network by setting a password for wi-fi. Then you will need to find out what type of connection is used to access the Internet, is it PPTP, L2TP or PPPOE. You can find out by calling your provider (this is the organization with which you entered into an agreement to provide Internet services). So, let's start setting up the router.
Setting a password for wi-fi
I bring to your attention Video instructions for setting a password for wi-fi on a router Tp-Link TL-WR740N
Let's also take a written and illustrative look at setting up a Wi-Fi password on a router Tp-Link TL-WR740N.
On the Web interface, select the "tab" in the menu Wireless"and we get into" Wireless Settings" - setting up a wireless network. Here it is necessary in the column " Wireless Network Name:"Come up with and indicate a name for your wireless network; this name will then light up when you connect to the network. Then select " Region" - Russia. After that, click " Save".

Next, go to the menu in the "tab" Wireless Security". Here we will set up a password for the wireless network invented above, for this we select the encryption type " WPA-PSK/WPA2-PSK" and then below in the field " PSK Password:"we come up with and enter a password. Then click " Save".

After we pressed " Save"A message will appear above this button indicating that the settings have been saved and now we need to reboot the router. This is what we do by clicking on the button" click here"by sending the router to reboot. After the reboot, the name of your wireless network will appear in the network settings of your computer.
Setting up PPTP
PPTP on the router Tp-Link TL-WR740N using the Tp-Link TL-WR1043ND router as an example.
Let's also write and illustrate PPTP on the router Tp-Link TL-WR740N.
Network", then " WAN".
IN " WAN Connection Type:"choose" PPTP/Russia PPTPUser Name:"), password (in line " Password:Confirm Password:Server IP Address/Name:
Connect Automatically NOT Connect on Demand
Save".

Setting up PPTP with a static IP address
Let's look at the connection setup PPTP with static IP address on the router Tp-Link TL-WR740N.
So go to the menu in the tab " Network", then " WAN".
IN " WAN Connection Type:"choose" PPTP/Russia PPTP", below you will be asked to indicate your username (in the line " User Name:"), password (in line " Password:") and password confirmation (in the line " Confirm Password:").
Static IPServer IP Address/Name:"), IP address (in the line " IP Address:"), subnet mask (in line " Subnet Mask:"), default gateway (in line " Gateway:") and DNS (in the line " DNS:"). All of the above data is provided to you by the provider (the organization that provided you with the Internet).
All this data is usually specified in the contract with the provider. If for some reason you could not find them, you need to call your provider's hotline and find out how you can get them.
After you have entered all the necessary data, check the box next to " Connect Automatically" (This setting will keep your Internet connection permanently, so if you have NOT For an unlimited tariff, I recommend checking the box next to " Connect on Demand", which means connection on demand, that is, the Internet is connected only when you start using it).
After all manipulations with the settings, press the button " Save".

L2TP setup
Let's look at the connection setup L2TP on the router Tp-Link TL-WR740N.
So go to the menu in the tab " Network", then " WAN".
IN " WAN Connection Type:"choose" L2T/Russia L2T", below you will be asked to indicate your username (in the line " User Name:"), password (in line " Password:") and password confirmation (in the line " Confirm Password:"). You will also need to specify the server IP address (in the line " Server IP Address/Name:"). All of the above data is provided to you by the provider (the organization that provided you with the Internet).
All this data is usually specified in the contract with the provider. If for some reason you could not find them, you need to call your provider's hotline and find out how you can get them.
After you have entered all the necessary data, check the box next to " Connect Automatically" (This setting will keep your Internet connection permanently, so if you have NOT For an unlimited tariff, I recommend checking the box next to " Connect on Demand", which means connection on demand, that is, the Internet is connected only when you start using it).
After all manipulations with the settings, press the button " Save".

Setting up L2TP with a static IP address
Let's look at the connection setup L2TP with static IP address on the router Tp-Link TL-WR740N.
Typically, a static IP address is provided to legal entities, or as an additional service to the basic tariff to individuals.
So go to the menu in the tab " Network", then " WAN".
IN " WAN Connection Type:"choose" L2TP/Russia L2TP", below you will be asked to indicate your username (in the line " User Name:"), password (in line " Password:") and password confirmation (in the line " Confirm Password:").
Since the connection uses a static IP address, you check the box next to " Static IP", then indicate the server IP address (in the line " Server IP Address/Name:"), IP address (in the line " IP Address:"), subnet mask (in line " Subnet Mask:"), default gateway (in line " Gateway:") and DNS (in the line " DNS:"). All of the above data is provided to you by the provider (the organization that provided you with the Internet).
All this data is usually specified in the contract with the provider. If for some reason you could not find them, you need to call your provider's hotline and find out how you can get them.
After you have entered all the necessary data, check the box next to " Connect Automatically" (This setting will keep your Internet connection permanently, so if you have NOT For an unlimited tariff, I recommend checking the box next to " Connect on Demand", which means connection on demand, that is, the Internet is connected only when you start using it).
After all manipulations with the settings, press the button " Save".

Setting up PPPOE
I bring to your attention Video instructions for setting up the connection type PPPOE on the router Tp-Link TL-WR740N using the Tp-Link TL-WR1043ND router as an example.
PPPOE on the router Tp-Link TL-WR740N.
So go to the menu in the tab " Network", then " WAN".
IN " WAN Connection Type:"choose" PPPOE/Russia PPPOE", below you will be asked to indicate your username (in the line " User Name:"), password (in line " Password:") and password confirmation (in the line " Confirm Password:"). All of the above data is provided to you by the provider (the organization that provided you with the Internet).
All this data is usually specified in the contract with the provider. If for some reason you could not find them, you need to call your provider's hotline and find out how you can get them.
After you have entered all the necessary data, check the box next to " Dynamic IP" And " Connect Automatically" (This setting will keep your Internet connection permanently, so if you have NOT For an unlimited tariff, I recommend checking the box next to " Connect on DemandTime-based Connecting
After all manipulations with the settings, press the button " Save".

Setting up PPPOE with a static IP address
Let's look at the connection setup PPPOE with static IP address on the router Tp-Link TL-WR740N.
Typically, a static IP address is provided to legal entities, or as an additional service to the basic tariff to individuals.
So go to the menu in the tab " Network", then " WAN".
IN " WAN Connection Type:"choose" PPPOE/Russia PPPOE", below you will be asked to indicate your username (in the line " User Name:"), password (in line " Password:") and password confirmation (in the line " Confirm Password:"). Since the connection uses a static IP address, you check the box next to " Static IP", then indicate the IP address (in the line " IP Address:"), subnet mask (in line " Subnet Mask:").
All of the above data is provided to you by the provider (the organization that provided you with the Internet).
All this data is usually specified in the contract with the provider. If for some reason you could not find them, you need to call your provider's hotline and find out how you can get them.
After you have entered all the necessary data, check the box next to " Connect Automatically" (This setting will keep your Internet connection permanently, so if you have NOT For an unlimited tariff, I recommend checking the box next to " Connect on Demand", which means connection on demand, that is, the Internet is connected only when you start using it, or " Time-based Connecting", which means a timed connection, that is, the Internet works at a certain time specified by you).
After all manipulations with the settings, press the button " Save".

Changing the web interface password
I bring to your attention Video instructions for changing the password on the router web interface Tp-Link TL-WR740N using the Tp-Link TL-WR1043ND router as an example.
Resetting the web interface password
If you set a password for the web interface of the router and forgot it, I invite you to watch the Video instructions for resetting the web interface password on the router Tp-Link TL-WR740N using the Tp-Link TL-WR1043ND router as an example.
Firmware update
I bring to your attention Video instructions for updating the firmware on the router Tp-Link TL-WR740N using the Tp-Link TL-WR1043ND router as an example.
Connecting a computer to wi-fi
After connecting and setting up the router, you need to connect the computer to a wireless network (wi-fi), let's consider connecting to wi-fi in two operating systems, these are Windows 7 and Windows 10:
Windows 7
Video instruction

Sultan

Connect automatically" and press
"Connection".


Windows 10
Video instruction
In the lower right corner of the desktop, find the wireless network (wi-fi) icon and click on it with the left mouse button.

A window pops up with a list of available wireless networks. Select a wireless network, in my case it is the network " Sultanova"(You select the network whose name was given at ).

After selecting the network, check the box next to " Connect automatically" and press " Connect".


We wait perhaps a couple of seconds and you are connected to your wireless network.

The tp link tl wr740n router is a universal network device capable of creating a wired or wireless local network, protected from the outside from hacker attacks using a built-in firewall. The 802.11n wireless Wi-Fi module provides data transfer speeds of up to 150 Mbit/s. At the same time, the router is fully compatible with previous IEEE 802.11g and IEEE 802.11b standards. The letter “n” at the end of the model indicates that the router is equipped with a non-removable Wi-Fi antenna.
Router equipment
The packaging in which the router is supplied for sale is traditional white and green in color.

Factory packaging of the router
The front side of the box shows the tl wr740n router itself, and especially emphasizes support for the 802.11n wireless network standard and an antenna gain of 5 dB, which guarantees high speed information transfer over fairly long distances.
Inside the box there are all the necessary accessories for full use of the device - a power supply, an Ethernet network cable, a CD with a setup wizard, and documentation.

Router equipment
In the case of the TP-Link TL-WR741ND model, the kit would also include a removable antenna.
Router appearance
Externally, the router has a nice round shape, the body is made of white plastic with a black insert with indicator LEDs and an impressively sized black antenna. The top cover bears the company name TP-LINK.

Router appearance
The stylish pressed rings around the top cover, unfortunately, have nothing to do with cooling the device - they are only decorative. The router is cooled only due to the lattice bottom.

Bottom of the router
By the way, on the bottom there is a sticker on which is printed the version of the hardware platform, mac address, username and password to enter the settings menu, and other useful information.
Front panel of the router
The front panel contains illuminated router status indicators.

Front panel of the router
Although the icons are not labeled, it is not difficult to guess their purpose from their appearance:
- Router power indicator;
- Indicator of the router's built-in self-test. If the indicator blinks, no errors were detected, the device is operating normally. If the indicator is off, a system error has been detected;
- Wi-Fi wireless module activity indicator;
- Four LAN port indicators. If the icon is lit, a device is connected to the port; if it blinks, data is passing through this port;
- If the indicator is on, a wireless device is connected to the router;
- The QSS function is activated.
Back panel
Connection ports and connectors are located on the rear panel:

Rear panel of the router
The blue color indicates the WAN port, intended for connecting the network cable from the provider. Four orange ports are used to connect wired local network devices (LAN ports). To the left of the WAN port there are two small buttons - the outermost one is for activating the Wi-Fi module, the one to the right is for resetting the router settings to factory settings. To the right of the LAN ports there is a button to turn on the router, followed by a connector for connecting a power supply.
Setting up the router
Method one, using the settings wizard
Configuring the tp link wr740n router can be done either in semi-automatic mode, which is preferable for less experienced users, or in fine-tuning mode for more experienced ones. For the first option, the manufacturer has written a program - a setup wizard, which will require from the user only the data provided by the provider when concluding the contract. He sets up the rest himself. Let's take a closer look at the process:
Connect the router to the computer with a network cable - one end to any LAN port, the other to the computer’s network card, and turn on the router. Insert the supplied CD into your computer's CD drive. The installation wizard will automatically start. The menu is entirely in Russian.

Initial menu of the installation wizard
The installation wizard is universal, for many models, so select the icon of our router and select the “Quick installation assistant” item.

Starting to install the router using the assistant
In all subsequent steps, click the “Next” button. The data issued by the provider will need to be entered in the third step (Setting up the router). For further settings, see the video tutorial at the end of the article.
Method two, using a web browser
More subtle and controlled configuration of the tl wr740n router, designed for experienced users, can be done in any web browser. To enter the settings menu, make sure the router is turned on and connected to the computer. Open any web browser and enter the router’s IP address in the address bar – 192.168.0.1. A window will open in which you must enter the username and password, which were set by default by the manufacturer as “admin” and “admin”.
Please note that capital letters are not permitted. Enter them in the appropriate fields and click “OK”. (For models WR740N and WR741ND the settings are identical).

Entering the settings menu
If after pressing the “OK” button an error is displayed, then you need to reset the settings to factory settings by pressing the button on the rear panel for 5-10 seconds.
Main settings menu

Main router settings menu
The first window to open is the router status window. On the left side of the window there are settings items, in the center of the window there is a field for entering settings, on the right side of the window there are tips for the selected item. The menu is Russified.
Wi-Fi setup
Let's look at how to configure the tl wr740n router as a wireless router.

Selecting a Wi-Fi setup item
A window with Wi-Fi settings will open:

Wi-Fi setup
In the “Network name” field, you must enter a custom name for the wireless network. In the “Region” list, select your country of residence; it is better to leave the remaining values as default. Next, you need to protect your wireless network by setting a password for connecting to the network. Go to the sub-item “Wireless protection”.

Setting a Wi-Fi password
We select the encryption type WPA/WPA2, leave the “Version” and “Encryption” fields as is, in the “Password” field we come up with and enter a password of at least eight characters, consisting of the English alphabet and numbers. After making any changes to the settings, be sure to confirm with the “Save” button.
Firmware update
It is recommended to periodically check the manufacturer's website for new firmware. If there is one, download it to your computer, then go to the “System Tools” menu item, then to the “Firmware Update” sub-item.

Item "System tools"
In the window that opens, click the “Browse” button and indicate the path to the downloaded firmware. Click the “Update” button. After the update, the router will automatically reboot.

Firmware update
For all other settings, see the instructions:
– no longer available =(
Video tutorial of the setup wizard:
In order to get to the router’s web interface, you need to open your Internet browser and type 192. 168.1.1 in the address bar, Username - admin, Password – admin(provided that the router has factory settings and its IP has not changed).
Changing the factory password
To ensure that no one but you can enter the router settings, you need to change the password to enter the settings.
To do this, select from the menu on the left System Tools(System Tools) – Password(Password) and enter the settings:
- Previous username: old username, enter admin
- Previous password: old password, enter admin
- New username: enter a new username, you can leave admin
- New Password: enter a new password
- Confirm new password: confirm the new password

Setting up an Internet connection
In the router interface, you need to go to the tab Net(Network), menu WAN(Here you can add, edit and delete connections).
Setting up a PPPoE connection
- In field WAN connection type: select PPPoE/Russia PPPoE
- Username: your login according to the contract
- Password And Password confirmation: your password according to the agreement
- Auxiliary connection: Disabled
- WAN connection mode: Automatic connection
- Save. The Internet is configured.

Setting up an L2TP connection
- Type WAN connections: select L2TP/Russia L2TP
- Username: your login according to the contract
- Password And Password confirmation: your password according to the agreement
- We put a point on Dynamic IP
- IP address/Server name
- MTU deployment
- WAN connection mode- Connect automatically
- After entering the above settings, click Save. The Internet is configured.

Configuring PPtP (VPN) while automatically obtaining a local IP address (DHCP)
- Type WAN connections: select L2TP/Russia L2TP
- Username: your login according to the contract
- Password And Password confirmation: your password according to the agreement
- We put a point on Dynamic IP
- IP address/Server name- server address or name (specified in the contract)
- MTU deployment- change the value to 1450 or less
- WAN connection mode- Connect automatically
- After entering the above settings, click Save. The Internet is configured.

Setting up PPtP (VPN) with a static local IP address
- Type WAN connections: select L2TP/Russia L2TP
- Username: your login according to the contract
- Password And Password confirmation: your password according to the agreement
- We put a point on Static IP
- IP address/Server name, IP Address, Subnet Mask, Default Gateway, DNS- check this data with your provider
- MTU deployment- change the value to 1450 or less
- WAN connection mode- Connect automatically
- After entering the above settings, click Save. The Internet is configured.

NAT when automatically obtaining an IP address (DHCP)
- In field WAN connection type: select Dynamic IP
- Click Save. The Internet is configured.

Setting up Wi-Fi on the router
Setting up a Wi-Fi connection. From the side menu, go to Wireless. In the window that opens, enter the following settings:
- Network name - the name of your wireless network
- Region- You can choose Russia, or you can choose nothing. It's not critical.

Setting up Wi-Fi encryption. In the side menu go to Wireless Security:
- Selecting the encryption type WPA-PSK/WPA2-PSK
- PSK Password: enter the password for the Wi-Fi network. The password must not be less than 8 characters
- Click the Save button at the bottom. After saving the settings, you will be prompted to reboot the router; ignore this requirement (red inscription below).

Accessing the World Wide Web through wireless routers is gaining popularity. Every third user at home has their own wifi installed. The router is purchased in a store, but some providers offer it to new subscribers upon connection and provide assistance in setting it up.
Web interface TP-Link TL-WR740N - everything is simple and clear
However, situations occur, be it a failure in equipment, or a change in service provider, when it is necessary to make adjustments to the device, but there is no desire to wait for help from technical support, or the user does not have sufficient knowledge for this procedure. But we spend our whole lives learning something new; having studied the presented material to the end, the user will be able to independently configure the Rostelecom router.
In most cases, you can set up a tp link router in 30 minutes, but without step-by-step instructions, this process may become impossible. Considering that the presented equipment is popular at home, even a housewife can perform the steps below, and the result will be an organized wireless home network.
Picture 1Nuances of connecting equipment
First, we need to make a reservation that setting up a tp link router is easier when using a wired connection than over a wireless network. If you turn the equipment back to you, you can find 5 outputs. One is colored blue - this is the WAN port, the rest are yellow - LAN ports. Connecting to the Rostelecom Internet is carried out by connecting the blue port with an Internet cable, and the equipment is connected to the computer through the yellow port with another wire (look in the box with the router):
Figure 2That's the whole connection procedure. Further work depends on the settings.
How to configure the Rostelecom TL-WR740N router
The market is rich, and everyone has their own ways of setting up equipment. When concluding a service agreement between the provider and the user, the first provides him with the necessary information, namely: login parameters, IP address, etc. And now more about how to set up Rostelecom Internet in the correct sequence.
Attention users! Before making adjustments and configuring the equipment, carefully study the points below, this will save you from possible connection problems.
- If the user configured the Rostelecom Internet on a PC to access the network or installed a high-speed connection, it must first be disabled and not used again. When the router is connected to a computer, the equipment will independently perform this function;
- If you previously used a connection to your provider via an ADSL modem, and there were no other connections, then you do not need to perform the above steps.
Further actions are performed in the browser. To do this, the user launches the browser and goes to the equipment supplier’s authorization page through the entered address: tplinklogin.net or via IP. Next, press the enter key. The Rostelecom Wifi router is activated by entering your login and password. If you do not know this data, then carefully inspect the box, there is a sticker where ADMIN is indicated. We enter the same words in both columns and press the enter button and get to the manufacturer’s main page:
Figure 3This is where the Rostelecom modem with wifi is configured. There may be a problem with displaying the page when connecting (it is not accessible), which means that the user has configured the local connection incorrectly. It is recommended to specify automatic retrieval of DNS and IP settings.
If everything works properly, then you can describe in more detail how to connect the tp link wifi router.
The user selects the “Network” column located on the left side of the window and determines the WAN connection, then enter the following parameters as in the screenshot:
Figure 4Everything that remains cannot be changed. After that, click on the save button and select the “Connect” option. After a couple of seconds, we update and see that the connection status has changed to active.
That's it, the setup is complete, next you need to make security adjustments.
Hello.
Setting up a router is quite simple and quick, but sometimes this procedure turns into real “ordeals”...
The TP-Link TL-WR740N router is a fairly popular model, especially for home use. Allows you to organize a home local network with Internet access for all mobile and non-mobile devices (phone, tablet, laptop, desktop PC).
In this article, I wanted to provide short step-by-step instructions for setting up such a router (in particular, we’ll touch on setting up the Internet, Wi-Fi and local network).
Connecting the TP-Link TL-WR740N router to a computer
Connecting the router to the computer is standard. The scheme is something like this:
- disconnect the Internet provider cable from the computer’s network card and connect this cable to the Internet router socket (it is usually marked in blue, see Fig. 1);
- then connect with cable (which comes with the router) network card of a computer/laptop with a router - with a yellow socket (there are four of them on the device body);
- connect the power supply to the router and turn it on to a 220V network;
- in fact, the router should start working (the LEDs on the case will light up and start blinking);
- then turn on the computer. When the OS is loaded, you can move on to the next setup step...
Rice. 1. Rear view/front view
Login to router settings
To do this, you can use any modern browser: Internet Explorer, Chrome, Firefox. Opera, etc.
Login options:
- Settings page address (default): 192.168.1.1
- Login for access: admin
- Password: admin
Important! If you cannot enter the settings (the browser gives an error that the password is incorrect), the factory settings may have been reset (for example, in a store). There is a reset button on the back of the device - press it for 20-30 seconds. As a rule, after this operation you can easily go to the settings page.
Setting up Internet access
Almost all of the settings you need to make on your router will depend on your ISP. Typically, all the necessary parameters (logins, passwords, IP addresses, etc.) are contained in your agreement drawn up when connecting to the Internet.
Many Internet providers (for example: Megaline, ID-Net, TTK, MTS, etc.) use a PPPoE connection (I would call it the most popular).
Without going into details, when connecting PPPoE you need to know the password and login for access. In some cases (for example, MTS) PPPoE+Static Local is used: i.e. You will get access to the Internet when you enter your login and password, but the local network needs to be configured separately - you will need an IP address, mask, and gateway.
In Fig. Figure 3 shows the Internet access configuration page (section: Network - WAN):
- Wan connection type: specify the connection type (for example PPPoE, by the way, further settings depend on the connection type);
- User name: enter your login to access the Internet;
- Password : password -//-;
- if you have a “PPPoE+Static Local” scheme, then specify Static IP and enter the local network IP addresses (in other cases, just select dynamic IP or Disabled);
- then save the settings and reboot the router. In most cases, the Internet will already be working (if you entered the password and login correctly). Most of the “problems” occur with setting up access to the provider’s local network.
Rice. 3. Setting up a PPOE connection (used by providers (for example): TTK, MTS, etc.)
By the way, pay attention to the Advanced button (Fig. 3, “advanced”) - in this section you can set DNS (in cases where they are required to access the provider’s network).
Rice. 4. Advanced PPOE settings (needed in rare cases)
If your Internet provider binds to MAC addresses, then you need to clone your MAC address of the old network card (through which you previously accessed the Internet). This is done in the section Network/MAC Clone .
Rice. 5. MAC address cloning is necessary in some cases (for example, the MTS provider at one time linked to MAC addresses, I don’t know how they do it now..)
By the way, as an example, I took a small screenshot of the Internet settings from Billine - see fig. 6.
The settings are as follows:
- connection type (WAN connection type) - L2TP;
- password and login: take from the contract;
- Server IP address (server IP address): tp/internet.beeline.ru
- after that, save the settings and reboot the router.
Rice. 6. Setting up the Internet from Billine in the TP-Link TL-WR740N router
Setting up a Wi-Fi network
To set up Wi-Fi, go to the following section:
- - Wireless/setup wi-fi… (if the interface is English);
- - Wireless mode/Setting up wireless mode (if the interface is Russian).
Next you need to set the network name: for example, “ Auto"(see Fig. 7). Then save the settings and go to the " Wireless Security » (to set a password, otherwise all your neighbors will be able to use your Internet via Wi-Fi...).
Rice. 8. Wireless connection protection - password setting
Connect to a Wi-Fi network and access the Internet
The connection is actually quite simple (I’ll show you using a tablet as an example).
By going to the Wi-FI settings, the tablet finds several networks. Select your network (in my example Autoto) and try to connect with her. If a password is set, you must enter it to gain access.
Actually, that’s all: if the router is configured correctly and the tablet was able to connect to the Wi-Fi network, then the tablet will also have access to the Internet (see Fig. 10).


