How to connect a laptop to a TV via Wi-Fi: we use different methods. How to connect a TV to a computer as a monitor
The question “how to transfer video from a computer to a TV” is relevant for all those who like to watch movies in good quality from the “big screen”. In one of the previous articles we talked in detail, here we will look at connecting a TV to a computer via wifi.
However, before you synchronize your TV with your computer wirelessly, you should make sure that:
- 1. Your TV is equipped with a “wifi module” or supports wireless data transmission/reception via a third-party connection.
- 2. Connectable to TV.
How to connect a computer to a TV via wifi?
Now about the connection itself.
- Communication between a computer and a TV via wifi can be carried out using Miracast and WiDi technologies.
Accordingly, it is necessary that both devices support this technology.
Synchronizing a computer with a TV is not particularly difficult:
- - In the network settings, enable “Miracast” or “WiDi” support (depending on the TV model), and the “wifi module” must be activated.
- - Go to the computer.
1. When using "WiDi"
Open the "Intel Wireless Display" program - you will be asked to connect to the found monitors - mark your TV and click "Connect". After this, a digital code will appear on the TV, which will need to be entered into the program on the computer.
2. When using "Miracast"
Most relevant for Windows 8/8.1/10 operating systems.
Click on the “Device” button in the lower right corner of the screen, then “Projector” - “Add wireless display” and add your TV in the same way as the previous method.

For Windows 10, the procedure is slightly different. Open "Settings" - "Devices" - "Connected devices" and click "Add device".

A few words about the advantages and disadvantages of these technologies:
Broadcasting from a computer to a TV using WiDi:
- - support for high resolution - up to “4-K”;
- - ability to use screen extension (second monitor).
- - a relatively small number of devices support this technology;
- - slight playback delays are possible.
Connecting a TV to a computer via Miracast:
- - multiplatform standard;
- - connection is made directly.
- - frequent unstable work;
- - support (mostly) only new devices.
How to connect a computer to a TV via wifi using a “DLNA” server and the “Home Media Server” program?
Like the previous connection option, this connection of a TV to a computer via wifi is not particularly difficult: the program is intuitive and understanding it will not be difficult.
The main condition for synchronization is technology support from the TV and computer.
How to display a movie from a computer to a TV: setup steps
- Download and install the Home Media Server program: it is free, but it is best to download it from the official website.
After starting the program, you will be asked to make initial settings:
At the first stage, you select the “Device Type”, “File Support” and “Color Palette” of the program.
In the next step, choose which folders will be available for viewing: check only what you need and click “Finish”.

- - Carry out the proposed “Backup” of data;
- - In “Settings” in the “Network” section, specify the name of your server to make it easier to find on the TV (by default it is “HMS Comp”);

To turn on the “Media Server”, click “Launch” - your TV will appear in the “DMR Playback Device” section - click “Play”.

- Now on the TV, open “Sources” (usually the “Source” button on the remote control) and select the server created using the program from the list.
- Next, you will be asked to select the desired file to play from the folder directory.
How to display video from a computer to a TV using Chromecast from Google?

It should be noted right away that this device is worth the money spent, and setting up the connection between the computer and the TV is done as follows:
- - connect “Chromecast” to the “HDMI” connector on the TV, and the power cord to the network (or to a free “USB” port);
- - on your computer in the Google Chrome browser, go to “chromecast.com/setup” and click on “Set up a Chromecast device on this computer”;
- - the setup program will automatically detect the device - select it and click “Configure”: all you have to do is open the video of interest in the browser and click on the “Broadcast” button.
Here, in principle, are all the most current options for connecting a computer to a TV via wireless data transfer.
It’s not uncommon that after purchasing a TV with SmartTV, users are interested in how to connect the TV to a computer via WiFi. If you also have a similar problem, then this article should help you.
Step No. 1. Open the TV settings.
Typically, connecting your TV to the Internet via WiFi is done through the settings. Therefore, click on the “Settings” button on your remote control and go to the “Network Connection” settings section. It should be noted that in different TV models, this settings section may be called differently. For example, “Connect via Wi-Fi” or simply “Wi-Fi”.
Step No. 2. Connect to the WiFi network.
The next step is to connect to your home WiFi network. This process is not much different from connecting to a WiFi network on a computer or smartphone. In my case, connecting the TV to WiFi begins by clicking on the “Set up connection” button.

After this, a list of available Wi-Fi networks appears on the screen. Here you just need to select the Wi-Fi network of your router. In most cases it will be first on the list.

The next stage is the most important. You need to enter the password for the WiFi network. Try to enter your password as carefully as possible. Because it is very easy to make a mistake when entering a password using the remote control.
If you entered the correct password, the TV will connect to WiFi and you will see a message indicating that the network is connected.

To check that your WiFi connection is working as it should, go to your SmartTV and open your browser. Check if the pages are loading. If desired, you can measure the speed of your Internet connection.
Step No. 3. Set up a DLNA server on your computer.
In order to watch video from your computer on your TV, you need to use a DLNA server. DLNA is a technology designed to transfer media content from one device to another using a local network. Now almost all modern TVs support this technology.
First, you need to select and launch a DLNA server on your computer. To do this, you can use the free program “Home Media Server” (). Install this program on your computer, launch it and go to settings. Here, in the “Media Resources” section, you need to click on the “Add” button and select the folder that you want to access on the TV.

Next you need to set up parental controls. To do this, select the folder that you just added to the program and click on the “Change” button. In the window that appears, in the “Parental Control” block, you need to select green for the desired content type.
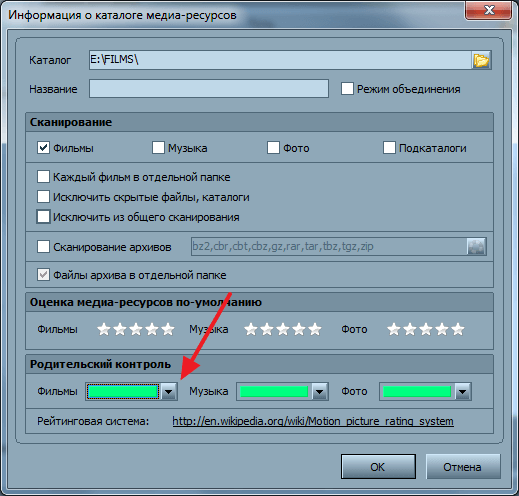
After that, close all windows by clicking on the “OK” button to save the settings.
Step No. 4. Connect the TV to the DLNA server.
The final step of connecting the TV to the computer via WiFi is connecting the TV to the DLNA server. To find out how to do this for your TV model, read the instructions.
As an example, we will demonstrate how this is done on LG TVs. First you need to press the “SmartTV” button on the remote control and go to the “SmartShare” section.

After this, you need to go to the “Connected device” tab and select the DLNA server that is running on the computer.
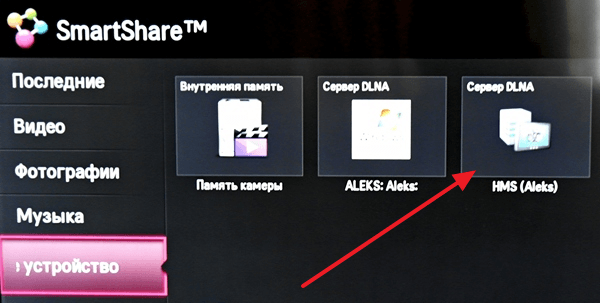
After this, files from the folder you need on your computer will appear in the “Recent”, “Video”, “Photos” and “Music” folders. At this point, connecting the TV to the computer via Wi-Fi can be considered complete.
Smart TVs come with many useful features. They allow you to watch videos, movies and other multimedia. You can add a few more items to this list if you use the additional capabilities of your device. Now we will talk about how to connect a TV to a computer.
The Wifi network assumes a data exchange function. First, let's make sure that the TV device and PC support this feature.
Most Smart TVs already have a built-in Wi-Fi adapter. There are also models that will require the purchase of additional equipment. So, if the TV does not have built-in wifi, we purchase a special adapter. It can be built-in or external. The best option for a TV is the built-in type. Its price depends on the availability of antennas and network coverage area. Don't chase professional equipment; choose an option at an average price.
Important: the receiver should be purchased from the manufacturer of your TV. Otherwise, connecting your computer to the TV will not work, and you will lose time and money.
Let's move on to the second equipment. If you are going to connect TV to a laptop, then there will be no problems. Modern laptops are equipped with a wifi receiver.
If you are the owner of a desktop computer, then you need a wifi receiver. Unlike the case with a TV, it is recommended to choose a built-in adapter. It is not as convenient as the external one, but it provides a larger signal coverage area.
Please note that a wifi router can be used instead of a receiver.
You don’t have to purchase these devices if they are already built into your TV and PC.
Methods for connecting TV to a computer via wi-fi
We continue to consider the topic of how to connect a computer to a TV via wifi. If your devices have the necessary functions, then let's move on to choosing a connection method:
- DlNA technology. Produced using a LAN network. Includes the use of a router.
- Via WIDI or Miracast function.
The first method allows you to view multimedia files that are stored on your PC. You will not be able to perform any additional actions.
The second method is more extensive in use: the TV device is used as a monitor and allows you to view what is happening on the computer. Please note that old PCs are not suitable for this method. Requires significant system resources and an operating system of at least Windows 8.1.
Let's move on to a more detailed consideration of each method.
We connect the TV to the computer via DLNA. First, read the documentation for your device. If it supports DLNA functions, then we perform further configuration.
We check the functionality of Wi-Fi receivers on both devices. If no errors occur, then the TV is connected to the computer via a local network. Use a router for this.
Let's describe it in more detail:
- You need to connect and start the Wi-Fi router. Switch its operating mode to DHCP. Specify the local network key and remember it.
- Open the TV settings, where we find the “wireless connection” item. Select the desired network to connect to. If it is not found, then update the list. Next, enter your password.
- Let's return to the PC. Download a program designed for storing multimedia. The best option is SmartShare or another similar program. Download, launch and configure it. After this, folders with files will appear on the TV.
If you do everything correctly, you will be able to view any multimedia using TV over wifi.
We use the WIDI or Miracast function
Let's move on to the next method. It allows you to use your TV as a monitor. You can watch videos that are broadcast in your PC browser.
Note that this method requires significant computer resources. Older models will not be able to use it.
The TV must also have widi or miracast functionality. If it is not there, then purchase an adapter that connects to the HDMI port.
This method does not require connecting the TV device to the local network.
To start using TV as a screen, you need to install the “Intel Wireless Display” application. Set it up and start broadcasting. Don't forget to activate the WIDi or Miracast function on the TV itself.
This completes the connection between the TV and the computer via wifi.
Let's sum it up
TV is a convenient platform for viewing multimedia stored on a PC. To do this you need to connect these devices. This is done using two different methods given above. We hope you understand how to connect your TV to your computer via wifi.
Smart TV technology has taken over the markets. Advertising is replete with a variety of devices and promises to simplify our lives. Many users bought smart TVs, but no one was taught how to use the strange device. If you are the happy owner of a smart TV with a built-in Wi-Fi module, read this article. Here you will learn how to connect a TV to a computer via wi-fi in two ways. This will allow you to watch movies from the Internet or computer memory on a big screen. And who hasn’t thought about replacing the monitor with a huge TV set?
Briefly about Wi-Fi and Smart TV
To understand how to connect a computer to a TV via wi-fi, we need to understand the hardware.
Wi-Fi is not the foundation of the modern Internet, as amateurs believe. It's just a standard for wireless data exchange. Simply put, Wi-Fi replaced the wires. Thanks to this, we no longer swear, once again getting tangled in a heap of cables. And although we have not yet completely rid ourselves of plastic ropes, any consumer feels the convenience of progress.
Smart TV is an operating system for a television, similar to that used in smartphones. It contains a set of programs for connecting to the World Wide Web. The advantages of such an evolution are obvious. From a dull “box” with annoying advertising and a meager choice of programs, the TV has turned into a window with access to all the information in the world. Watch what you want, whenever you want - isn’t this what a worker dreamed of if his favorite film was shown at the wrong time?
So, the Wi-Fi router connects the computer and the TV as if they were two identical computers.
What you need to connect
To transfer an image from a computer to a TV via Wi-Fi, you will need three things:

Now let's move on directly to the connection.
Method number 1. DLNA technology
Technology DLNA is a collection of global standards for exchanging multimedia files. In simple terms, this connection helps the TV and computer understand each other and play the same thing without any delay.
To connect your TV as a monitor via Wi-Fi using DLNA technology, you only need to do three steps:

Ready. Now go to your TV's settings and find the public files for that network. If you did everything correctly, among them there will only be files to which you yourself allowed access.
Method No. 2. WiDi/Miracast technology
 WiDi/Miracast technology is essentially duplicating a computer screen. The image received from the PC is compressed using a complex algorithm and transmitted via Wi-Fi to the LCD TV screen. As with duplication using an HDMI cable, you can not only view files shared on the network, but also freely surf the Internet from a browser.
The main advantage of WiDi/Miracast compared to previous technology is for such a connection no router needed. It is replaced by a virtual network connected to the television receiver.
Don't rush to flatter yourself. The WiDi/Miracast connection requires a computer or laptop with powerful hardware based on an Intel processor. Also, not all television sets support this connection by default - sometimes you need to purchase an additional module of the same name. It attaches to the HDMI connector and works similarly to the built-in one.
To connect a computer to the “TV box”, you need:
- Install app Intel Wireless Display. Follow the installer's instructions and then start broadcast.
- IN network settings TV select item Miracast/Intel WiDi and enable this feature.
- On the menu Input TV, switch the reception from TV to WiDi/Miracast.
The broadcast has started. Now you can watch any movie online or use your LCD TV remotely as a second monitor.
Conclusion
We have discussed two main ways to wirelessly connect Smart TV to a computer. With minimal cost and knowledge, you can set up a connection and rediscover television. Watch a good movie, control your technology and don't let technology control you.
Today we have difficulty keeping up with the development of digital technology. Take TVs, for example. How easy it was before - I connected it via cable to a satellite dish and that’s it. Digital television has made it possible to appreciate your favorite films in a new way: excellent quality, no interference, as was the case with old TV. In addition, there is finally an opportunity to tear yourself away from the computer monitor and enjoy video materials from the Internet on TV. The question arises how to do this. Of course, in the instructions for the TV, manufacturers explain how it is connected to the home and global Internet, however, not everyone clearly understands how to connect the router to the TV.
First, a little theory needed to connect your TV to the Internet via a router.
LAN connectors, built-in Wi-Fi adapters, and new multimedia capabilities have made it possible to create a local network at home and transfer files and streaming video without downloading. However, it is obvious that no matter how “smart” the TV is, it cannot connect to the Internet on its own, since it does not have built-in L2TP or PPPoE clients to receive the corresponding network protocols.
A router is a router through which the home network data packet is redirected, which allows you to combine all existing devices and provide access to external packets, that is, to the Internet. In other words, it helps to competently manage your home network. It can also become a Wi-Fi point.

Connecting cables to the router (Back view).
A TV, unlike a router, does not have such functions. It can only act as a separate device within a home network and to connect to it you need an internal or external Wi-Fi module or a connection cable.
Thus, there are two options for connecting the router to the TV to access the Internet:
- via TV router via cable;
- via Wi-Fi.
Let's figure out step by step how to connect a TV via a router to the Internet in each of these cases. Let's start with the first one - via cable. When connecting via cable, the following scheme is used:

TV connection diagram via cable.
To connect the TV to the Internet via a router, it must have a free LAN port, since the TV is connected to the router via a UTP modification cable. As a network connector, you can buy a simple Cat 5 patch cord:

Cat 5 patchcord.
One end of it is inserted into the LAN port on the router, the other into the corresponding Ethernet port on the TV.
This method has a certain disadvantage, since sometimes you have to pull the cable throughout the room. An excellent way out of this situation would be two PowerLine adapters (PLC), then the signals will be transmitted via the electrical network. Another option is to give preference to television via a wifi router.
Setting up a connection to a TV
Let us immediately note that connecting popular TV models to the network, for example, Samsung, Panasonic or others, is carried out according to the same scheme:

The system may display an “Error” message, then the configuration is performed manually. To do this, find the “Network Status” item in the menu, then select “IP Settings” and enter the login information received from the provider or technical support.
You can close the settings and check for Internet access, for example, launch a YouTube widget or open any browser.
Connecting TV via WiFi

A router with WiFi support must comply with the protocols of the Internet connection provided by the provider. For example, in the case of dynamic IP, the router must support the DHCP protocol. Only in this case will the TV be automatically assigned an IP address, DNS, etc. Can you imagine what it will be like to enter them manually every time you change IP.
Today, the most popular routers are from manufacturers such as D-Link or Asus, etc.
In this case, in addition to the wifi router, you need an additional device - a wifi adapter. New TV models already have it. But even if your TV model does not have a built-in adapter, there is no need to make a problem out of it - everything is solved very simply: you can buy it separately. An external access point will serve as well as a built-in device. Such a device can be bought at any store that sells computer equipment, and for a very reasonable amount.
Adapter selection
A prerequisite when purchasing a WiFi adapter is that it must be original. In other words, it must be produced by the same manufacturer as the TV, say, Samsung produces WiFi adapters for its TVs. The instructions for the TV, as a rule, contain all its specifications. For example, an external Wi-Fi adapter is suitable for Samsung LED TVs, which supports the EEE communication protocol with data exchange via Wi-Fi I802.11a/b/g/n. It is connected to a USB port located on the TV panel.

Example: Samsung USB wifi adapter.
Settings
Setting up WiFi connection
Setup begins by selecting TV settings. Perform the chain of actions: “Menu” → “Network” and then “Network settings”. Then, from the drop-down menu, select the wireless connection type and then from the list that opens your Wi-Fi network, click “Continue”.
Typically, the connection to the network occurs automatically, so you need to wait a little.

If, however, a message does not appear on the screen that the connection settings have been completed, it means that automatic retrieval of network parameters failed. The setup will have to be done manually through “IP Settings”, but by selecting manual mode. Enter the network data in the appropriate fields and wait for the connection to be checked.
If your devices support WPS technology, the connection is even simplified: both on the router and in the TV Network Settings Wizard menu, select the “WPS” item.
There are router models that support other technologies, for example, One Foot Connection or Plug&Access. For them, the connection procedure becomes trivially simple:
- One Foot Connection. Select this particular type of connection and, clicking “Continue,” install the router near the TV, no further than 25 cm, and wait until the connection is established.
- Plug&Access. The formatted flash drive is inserted into the router. When the indicator stops blinking, it is removed and inserted into the TV.
As you can see, connecting the router to the TV yourself is not difficult at all.
And now, for greater clarity, we present to your attention a short instruction on how to connect a TV to a router via wifi using the example of Samsung Smart TV.
Connecting a Samsung TV
First of all, you need to choose and connect the wifi router correctly.
Samsung has begun producing special routers that have automatic bandwidth settings. Such routers are able to independently select the widest possible channel for the streaming video signal that comes from the Internet. If you decide to purchase just this one, pay special attention to the technical specifications. The router only works with those TV models that are included in the range of the specified series.
A sample diagram for connecting a TV through a Wi-Fi device - a router with an adapter inserted into the USB port is shown below.

Sample diagram for connecting a TV via Wi-Fi - a router with an adapter inserted into a USB port.
Setting up the router
Setting up a wifi router for Smart TV is no more difficult than setting up a regular router.
- To begin with, connect the router to the computer using a patch cord and set IP receiving to automatic in the home network connection settings.
- The patch cord from the computer is connected to one of the Ethernet inputs, and the Internet cable, accordingly, is connected to the Internet.
- Type the address 192.168.0.1 in the browser, go to it and configure the router to work in the home local network and with an external Internet network.
Connecting a TV
- A remote control is required to set up the connection. The “Menu” button is activated on it;
- Next, go to the “Network” item, select “Network Settings”, then press “Enter”;
- Go to the “Wireless” item.

- All detected networks are displayed in a list on the screen, from which you select yours and click on “Next”.

Selecting an access point on TV
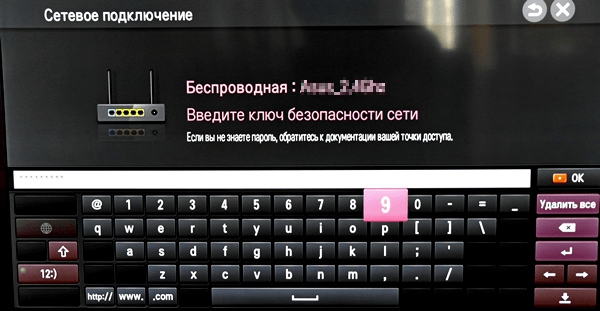
- If the wireless local network is password protected, an empty window with a keyboard for entering data should open.

The cursor is controlled using the arrows on the remote control. You can also connect a keyboard or just a computer mouse via USB. Undoubtedly, it will be much more convenient.
- The connection should then begin to be established. If the connection is still not established, you need to go to the IP settings, then reconfirm the request to obtain an address automatically.

- If, in order to maintain the security of the local network, it is configured to assign an IP address manually or in the case where the router does not have a DCHP server function, the TV is assigned its own address in the router, and then it is configured on the TV itself, as already described higher.
There is a “WP” item in the TV’s network settings menu. With its help, connection setup is performed automatically if such a function is supported by the router. This is easy to check: the same button should be on the router.
If there is one, select the corresponding item on the TV, press the “WP” button on the router and hold it for literally 10, at most 15 seconds. This is enough to automatically configure the connection.
If you are using a Samsung router, you can use the One Foot Connection option.
You need to go to the appropriate menu item and wait for the connection.
Video
Found a typo? Select the text and press Ctrl + Enter


