How to set up a local network connection. Connection via local network or Ethernet – “Connected”, but the Internet does not work (red cross). Logging into your local home network
Good day, dear readers.
If two computers are used nearby, it is logical to make a connection between them via the Windows 7 local network. This is convenient for exchanging files, information, playing games together or using the same equipment. This tool provides additional comfort, since there is no need to constantly use portable memory or exchange data via the Internet, although the speed of the latter today allows you to do this quickly. I will try to tell you everything I know about this technology.
So, first, it’s worth talking a little about what a local network connection is. It represents a connection between two or more computers. This is done via cable or wireless technologies. As mentioned at the beginning, technology allows for the exchange of information, and generally helps to speed up the work process.
Creation( )
We will not dwell on exactly what components are necessary for physical communication. Before directly establishing a connection, you must specify a single workgroup on all devices. To do this, we make a few simple movements:
As was said at first, the value should be the same on all devices that will be in the same bundle. In this case, the line “ Full name» each equipment is unique.
Afterwards you need to go to “ Network Sharing Center" This can be done via " Control Panel"or find the connection icon in the tray, and then right-click on it.

increase
On the left side of the window we find the item “”. Now we need to enable network discovery and configuration in automatic mode everywhere. In addition, you should definitely open public access.

increase
Then we go to " All networks" We find the last point " Password protected sharing", where we need to turn it off.
In addition, you need to enable detection of individual folders on the computers you need.
As a result, directories from different users should appear in the network environment.
If this does not happen, go to the main menu “ Network Sharing Center" and press "". Then we do everything according to the prompts.

increase
There is no icon near the clock( )
Don't worry right away. Perhaps the corresponding function was simply disabled for some reason.
So, if you have lost the icon near the clock, do the following:
Network not working( )
Every user who has been interacting with other devices in this way for a long time has at least once in their life encountered a problem when the connection simply disappears. This can happen for several reasons. The most common are problems with network equipment. In most cases, simply rebooting it helps.
Sometimes it is necessary to re-enter all the parameters. How to configure a switch or router? To resolve this issue, it is better to contact a specialist, since this often depends on the specifics of use.
Installing a Network Printer( )
Separately, it is worth mentioning about connecting the printer via a network. Believe me, when more than one computer is used in a room, sooner or later there will be a need to print from each of them. Do not constantly transfer documents from one to another. To do this you need to make some movements:
How to turn on the device we need on other PCs or laptops? You just need to install it. For this:
At first glance, setting up a network seems like a complicated process. But actually it is not. Of course, there are connections that require special knowledge from a specialist. In fact, if you are not sure of your actions, it is better to contact a specialist.
I hope the information I provided above helped you. Subscribe to updates and you will be the first to know the most interesting data regarding the operation of Windows and computer technology in general.
Setting up a local home network can be divided into several steps:
1 We register network settings on all computers/laptops/TVs of the home network (this step is used if there is no router on your local network).
2 Checking the name of computers and workgroup specified in the properties of computers.
3 Enable Windows Firewall.
4 Checking the network operation.
We manually set up network settings on all devices in the home network (for networks that do not have a router/router)
Go to the Control Panel (“ Start - Control Panel") and select " Network and Sharing Center».
After that, click “ Change adapter settings». 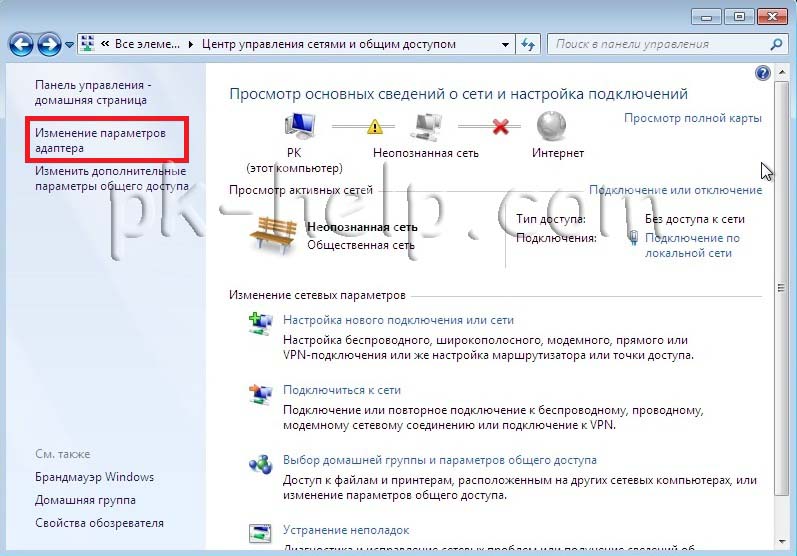
In the network connections window, select the connection we are interested in and right-click on it, select “ Properties", in the connection properties window select " Internet Protocol Version 4 (TCP/IPv4)" and press the now active button " Properties" In the Internet Protocol Version 4 (TCP/IPv4) Properties window, enter the IP address 192.168.1.1
(on other machines we write 192.168.1.2
, 192.168.1.3
etc.) The subnet mask for all computers must be 255.255.255.0
. The gateway should not match the IP address of the computer; in the gateway, enter the IP of another computer on the network (if you do not specify a gateway, you will not be able to specify the network; by default you will have it - Public, this will be discussed below). 
The first time you connect to a network, you must select a network location. This choice affects the firewall settings and security settings for the type of network you are connecting to. If your computer connects to multiple networks (for example, a home network, a network at a local coffee shop, or a network at work), choosing a network location will ensure that your computer has the right level of security. 
There are four types of network placement.
home network for work in home networks or in networks whose users and devices are known and can be trusted. Computers on your home network can belong to a homegroup. For home networks, network discovery is enabled, allowing other computers and devices connected to the network to be used and allowing other users to access the computer from the network.
Work network for working on the network of a small office or other workplace. Network discovery, which lets you use other computers and devices connected to your network and allows other users to access your computer from the network, is turned on by default, but you can't create or join a homegroup.
Public network for networks in public places (such as cafes and airports). This network location is configured to make the computer "invisible" to other users and increase its protection against malicious software from the Internet. Homegroup is not available on public networks, and network discovery is disabled. This option should also be selected if you are using a direct Internet connection without a router or a mobile broadband connection.
Domain used for domain networks, such as those used in workplaces in organizations. This type of network location is controlled by the network administrator and cannot be selected or changed.
In practice, I would recommend choosing Working network, because unlike Home Network, there is no need to enter a password to share resources. Of course, you shouldn’t choose a public network for a local network at home; I’m generally silent about the domain, since in this case you need to install and configure a domain controller; for a home network, it’s not worth it.
Checking computer and workgroup names.
It is necessary to check that all devices on the home network are part of the same workgroup and have different names. To do this, go to " Start-Control Panel-System" A similar procedure must be performed on all computers/laptops on the network.  In the Computer name, domain name and workgroup parameters field, look at the entered computer name and workgroup name.

Checking the operation of the Windows Firewall service.
The next step is to check whether the Windows Firewall service is enabled. To do this, go to " Start - Control Panel - Administration» 
In the window that opens, click " Computer management». 
Next go to " Services and applications - Services", find a service there Windows Firewall and make sure that it is enabled, if it is disabled, you need to launch it and check that the Startup type is set to " Automatically", to do this, double-click on this service and in the window that opens, look and, if necessary, correct the Startup Type. 
Checking the network operation.
The last step is to check the operation of the home network; to do this, launch the command line on one of the computers. Click " Start» in the search bar write cmd and press the " Enter». 
A command line will open, enter the command ping and the IP address of another computer on your home network, press the " Enter». 
If everything is done successfully, you should have no packet loss.
At this point, setting up your home network can be considered complete; the next step is to configure network printer or do shared folders (network folders) , this will be discussed in the following articles.
, using the MSHOME network.To activate it, you should do the following:
1 You need to go to the Start menu configuration "Control Panel".
2 Find tab "System and safety".
3 Go to the “System” section.
4 Now a window will appear in front of you, on the left side of which you need to find the section "Advanced system settings".
5 A page with several attachments will appear. We need the one called "Computer name".

The main rule is that all letters must be capitalized.
7 Save the specified parameters with the “Ok” key.
8 It is imperative to restart the computer for the new configurations to take effect.
Setting up an IP address
The next step is to set up for multiple personal devices.
- Go to the section "Control Panels" entitled "Network and Internet".
- You need to find the tab.
- Next, look at the left side of the tab and find the section "Changing adapter settings".
- Then you need to go to the item with the name of your network card and click on it. The Properties window will appear.


If your connection is made using a router and the DHCP server is enabled, then you should set the following settings in the window shown:
- IP address – in automatic mode;
- DNS Server – automatic mode;
- The main gateway is auto mode.
Although all computers are connected, each one must have its own IP address.
Set visibility for your computer
The next step is to configure visibility for within this network. We perform the following manipulations:
- We go through the start in "Control Panel".
- Then to the section "Network and Internet".
- "Network and Sharing Center".
- We turn to the left side of the page where we need the item "Change advanced sharing settings".
A window with shared configurations appears.
In each of them you need to activate the following items:
network discovery,
general access,
Now you need to change the settings for all those folders that should be shared on the local network.
However, it is not necessary to allow the value of the data recorded there to be changed. All you need to do is open access to view.
2 You need the “Properties” tab, and in it the “Sharing” section.

4 On this page, the first line contains the inscription “Share access to this folder”, and in front of it there is a special box in which you need to check a box to activate this function.
5 Scroll down to the button at the bottom of the “Permissions” page and click on it. Thus, the necessary one acquires the designated rights.

6 Activate the settings by clicking on “Ok”.
7 The next editable tab is “Security”.
8 Find the “Change” button and click on it.

An example of how to set permissions for a selected group
13 Save new data in all tabs using the “Ok” button.
14 You also need to restart your computer.
A configured local network will allow you to connect a number of gadgets into one. This is more often used to organize interaction between computers at work.
At home, this setting is also possible, but it is not necessary for everyone.
Sooner or later you will need to connect your computer to the network or connect home devices together. Firstly, this must be done in order to provide access to the World Wide Web. Secondly, when there are several computers in one apartment or house, it is very useful to combine them together. The necessary data will be accessible from any machine, and will also be available. In order to do this, you must enter the appropriate parameters. Which ones exactly - you will now find out.
Windows 7 is configured using this operating system. It makes it possible to configure an existing connection, as well as join the necessary network, which can be either home or worldwide. In Windows 7, connecting via a local network is practically no different from the same procedure in the previous Windows. The main differences are only in the interface.
I draw your attention to the fact that IPv6 has been added to the IPv4 protocol. This made it possible to significantly expand the range of used IP addresses. True, such a connection via a local network in Windows 7 is not yet used. Yes, and providers are not particularly keen on this.

So, let's start setting up. Press the usual “Start” button, which will open the main menu. Find “Control Panel” there and launch it. When the settings window opens, select the content viewing method, which is called "Category". Find the “Network and Internet” section, where you will need to select the view and network and task status tab. This will allow the computer to display the center responsible for managing your networks and sharing. It contains the necessary information about existing connections. And thanks to it, you can create your own.
At the very top of this window is a map of the available connection. In order to create a new local network connection in Windows 7, you need to select change adapter settings in the center window. After this procedure, a window will open where you will need to right-click on the connection icon with the right button of your manipulator. When you see the context menu, you should select Properties.
After you do this, the “Windows 7 local network connection” window will appear. Call the properties again, where you need to check the box next to TCP/IPv4. Then select “Properties” and fill in the fields with the values specified in the agreement with the provider or IT service. But these parameters do not need to be entered. In this case, you will receive them automatically.
After all this, confirm your settings by pressing the “Ok” button. Next we need to make sure that our connection is configured and functioning correctly. To do this, we open When they open, right-click the manipulator on the icon whose name is “Local Area Connection Windows 7” - and you go to the “Status” item.

In the window that appears, pay attention to its lower half. There will be two groups of values under the labels “Sent” and “Received”. Your connection functions normally when these values change almost constantly. If they stand still or only one of them changes, this indicates that something was done incorrectly. Go back to the very first point and double-check all your actions. Most likely, there was an error somewhere that needs to be corrected.
Now you know how to connect your device to a new network, as well as create your own.
Hello to all blog readers.
When using the Internet, the data transfer speed depends on three main factors: from degree of congestion of the network access channel belonging to your provider, depending on how busy your channel is access, and from your tariff plan.
An additional Internet connection may also be created...which disables the Internet (TCP/IPv6) or viruses that create this connection (in this case, try the program virusinfo_syscure.zip).
1.
Download and install new drivers for the network card or install native ones
drivers from disk instead of specific ones Windows.
2.
Allow in the one you use firewall (firewall) for programs in which
You download files - automatically use the necessary ports and transfer
necessary packages, otherwise your firewall can just turn it off
connection under heavy load on the network, mistaking it for an attack.
1. Run device Manager Win + R → devmgmt.msc → OK
1.1
Open menu Start
1.2
Right click on Computer and select Properties

(Control Panel\All Control Panel Items\System)
1.3 Click on the link device Manager

2. Open Network adapters
3 . your network adapter and select Properties
4. Go to the tab Power management

5. Uncheck: "Allow this device to turn off to save power."
Option 2: Disable Internet Protocol Version 6 (TCP/IPv6) and disable
disconnection in case of downtime.
1.
Open
2.
Right click on and
select Properties
3.
Uncheck and click OK.
If in addition local network you have other connection types,
then continue further:
4.
Right-click on the connection you created and select Properties
5.
Go to the tab Options
6.
In the parameter drop-down list Idle time before disconnection install
meaning - Never
7.
Go to the tab Net
8.
Uncheck Internet Protocol Version 6 (TCP/IPv6) and press OK.
9.
Also by default in operating systems Windows 7, 8, 8.1.yes and in 10
also included teredo and isatap tunnel adapters, which are used during the operation of the protocol ipv6 and besides, how reduce speed do not give anything when using the protocol ipv4.
Enter in the search bar cmd and select Run as administrator.
To disable the teredo protocol, enter:
netsh interface teredo set state disabled
To disable the isatap protocol, enter:
netsh interface isatap set state disabled
To disable the TCP/IPv6 protocol, enter:
netsh interface 6TO4 set state disabled
Option 3. Entering parameters - IP manually.
1.
Open Control Panel\Network and Internet\Network Connections
2.
Right click on LAN connection
and select Disable

3. Right click on LAN connection
and select Turn on
4. Right click on LAN connection
and select State

5. Click on the button Information or Support And write down the specified values

6. Click on the button Close, and then click the button Properties
7. Place the cursor on Internet Protocol Version 4 (TCP/IPv4)
and press the button Properties.

8. Enter the previously recorded parameter values - IP manually and click OK.
Option 4: Configure network adapter settings.
1.
Open Start → Control Panel → Device Manager
2.
Find click right click on your network
adapter and select Properties
3.
Go to the tab Additionally
4.
Set the parameter value Flow Control

To position Disabled and press OK
Option 5: Reset set values.
1. Run command line on behalf of the administrator.

In line search menu Start enter the command: cmd and press
simultaneously Ctrl + Shift + Enter.
How to paste on the command line:
Right-click on the window header and then follow the screenshot...

2. Enter the commands below one by one, pressing after entering
each, key Enter.
A.route - f

b. - netsh winsock reset
V.-ipconfig /renew "Local Area Connection""
If after performing the above steps the
network connection - check the entries in Event log:
1
. Pass Control Panel\All Control Panel Items\
Administration and open View events.
2.
On the left in the equipment tree list, open:
Event Viewer (Local) → Windows logs and check in
each of the subsections: Applications and System

whether any error related to the disconnection was described.
How to disable tracking tasks in Windows 10 Scheduler, read
Read how to close ports and block protocols
How to change dynamic IP address to bypass timeout
read on file hosting sites
You can also contact your provider's support service and check the settings. That's probably all the options - "Why does the connection to the local network or the Internet disappear" which I wanted to introduce to you.


