How to change line spacing in word. Changing the distance between paragraphs and lines in the Word text editor
The Microsoft office suite is widely used, and its DOC format has practically become the standard for formatting text documents. Unfortunately, most users end their acquaintance with this word processor by learning to change the font typeface and mastering its alignment on the page.
Meanwhile, in many organizations there are rules for working with text documents that prescribe certain options their design. They usually define the type font, used by default and the required line spacing in the document.
Change intercharacter distance, also called kerning, is required mainly to give the formatted text a more harmonious and aesthetically complete look. Its main area of application is typography, or artistic layout.
How to change and adjust line spacing
There are several ways to change line spacing in Word. ways:
The last item is called up by clicking right mouse button and allows you to manually adjust line spacing in a wide range of values.
Line spacing values
Line spacing is distance between hypothetical lines passing through the middle of letters in lines and is equal to the default font size. Standard sizes, available in Word, are 1, 1.15, 1.5, 2 and 3 values of this distance. 
Drop-down list, in the item " Paragraph", allows you to use line spacing options in the text that differ from those indicated. In addition to the standard set of single, one and a half and double, you can also find the following here:
Changing the letter spacing
Each character, in any font, is allocated a certain space, but, depending on the style, the letters can fill it in different ways. To accurately adjust the space they occupy, they use kerning. In Word, it can be specified in three different options. In addition to standard, available sparse And compacted.
Adjustment is carried out in increments of 0.1 points. This parameter can be accessed in two ways:

To give the text an aesthetically complete look, sometimes it is necessary to apply visual separation between paragraphs. Keystroke Enter, which is normally used for this operation, does not have this effect, since it simply moves the cursor to the next line. Enter edit menu can be done in two ways: 
- Using the context menu " Paragraph» called by pressing the right mouse button;
- Using the command group " Paragraph" on the " tab home» Word.
In both cases, an additional window opens in which, using the “ Interval» you can set the indentation before And after paragraph. The adjustment, regardless of the selected font typeface, is performed in a fixed increment of 6 points.
When you start typing text in Word, you may encounter a problem when the space between the lines is quite large. This nuance can greatly spoil the document, making it unaesthetic. This can often be observed by downloading a document from the Internet. In both cases, the problem is incorrect formatting. In this article we will talk about in Word: how to reduce or, conversely, increase it. We'll tell you everything in detail and give you the three easiest ways, so that everyone will find something for themselves.
First method: for all versions of Word
As mentioned above, there will be three ways to make line spacing in Word smaller or larger. They are not very different from each other, but they are not suitable for all versions of the program. Therefore, the first method presented will be universal; it will be suitable for both Word 2003 and the 2016 version.
Now we will set the default line spacing parameters. This is done so that when you create a new document, you do not change these values each time.
You need to create a new document in Word. After that, on the “Home” tab, you need to find a column called “Styles” in the toolbar (it is located in the very right corner). In this column, you need to click on the arrow icon, which is also located in the lower right corner. As soon as you do this, a small panel will appear with the ability to change the document style, but we don’t need this. In this panel, at the very bottom, there are three buttons - click the right one.
In the window that opens, you need to go to the "Default" tab. There is a column "Interval". It is there that the line spacing can be both reduced and increased. In general, use the presets in the dropdown list, enter values manually, increase, decrease until you find the value that suits you. Click OK after checking the box next to "In new documents that use this template."
Second method: only for new versions of Word
We continue to talk about interline We have already figured out how to reduce or increase it, but this is just the only way. Now let's move on to the second. It is intended only for programs 2007 and higher. It will not work in Word 2003.

You also need to open a blank Word document, only this time pay attention not to the “Styles” column, but to the “Paragraph”. Click the same icon as last time and a settings window will open. In it you will see the same column - “Interval”, with the same parameters. All you need to do is specify the line spacing in Word (you already know how to reduce or increase it).
After that, click the button located at the very bottom - “Default”. In the window that opens, select "All documents based on the Normal template." Click "OK" and get started.
Third way: one click
Now we will look at how to change line spacing in Word in one click. This method only works if you need to change the values in a separate piece of text.

So, in the "Home" tab, in the "Paragraph" section, find a button called "Spacing". By clicking it, you will see a list of all available intervals. Select the spacing you like, and it will change in the pre-selected text area. Also in the list, you can click “Other line spacing options” and the familiar “Paragraph” window will open.
If you upgraded to Word 2007 or 2010 from earlier versions, you will no doubt have noticed that the default line spacing has become larger. Today we will figure out how to adjust line spacing in Microsoft Word.
In Word 2003, the default line spacing was set to 1.0 , which some users found too dense.
Change line spacing in Word 2007 and 2010
In Word 2007 and 2010, Microsoft changed the default line spacing to 1.15 . It has now become quite satisfactory for many users because the offerings don't try to clump together. But you may want to customize it for yourself.

If you want to change the line spacing for the entire document, then on the tab Home(Home) in the section Styles(Styles) select Change Styles(Change Styles) and then Style Set(Style Set).


Here's an example of the style Manuscript(Manuscript):

For more information about dynamic preview in Word, as well as how to enable or disable it, read this lesson.
Set the default style set
You may want to set one of the default style sets for each newly created document. To make the selected style the default style, click Change Styles(Change Styles) and select Set as Default(Set as default).

We have set the default Word 2003 style, and now every time you create a new document, the default Word 2003 style with line spacing will be applied 1.0 .

Changing the line spacing of the selected part of the document
If you want to change the line spacing of a selected portion of the document, select the text you want to change. Then on the tab Home(Home) in the section Paragraph(Paragraph) press command Line and Paragraph Spacing(Spacing between lines and paragraphs).


If you select Line Spacing Options(Other line spacing options), then you will have access to even more settings. You will also be shown a small preview window so you can get an idea of what it will all look like.

If necessary, you can revert all changes made. To do this, click Change Styles > Style Set > Reset Document Quick Styles(Edit Styles > Style Sets > Reset Document Styles).

If you upgraded to Word 2007 or 2010 from earlier versions, you will likely want to change the line spacing and set it as the default for all new documents. In addition, in Microsoft Word you can change line spacing for any selected part of the text.
Because software products are continually evolving, there may be significant differences between versions of the same application. For example, the default line spacing in Word 2007 is 1.15, and there is always an extra blank line between paragraphs. In turn, in the previous Word 2003, the line spacing is automatically set to 1.0, in addition, a blank line does not appear between paragraphs.
In some cases, standard document formatting needs to be adjusted
Correcting line spacing
A user of the Microsoft Word text editor can change the line spacing of all previously typed text in just a few steps. To do this, you will need to use exclusively one of the express styles existing in the program, which has the required interval. In the case where changes to the existing indentation need to be made only in a few paragraphs, you will first have to select them and subsequently change the parameters.
You can change the line spacing in Word through the “Home” section; among other tools, the tab contains the “Styles” category, which the user will have to change in accordance with his personal preferences or needs.

In the “Set” category, the user can get acquainted with many built-in styles. To settle on the optimal option, you can use a convenient dynamic view to see how the free space changes during the transition.
In particular, “Traditional” styles, which set exclusively single indentation, allow you to significantly reduce the distance between lines. After the user chooses the appropriate option, you need to click on the style name once.
Corrections in a certain piece of text
You can help remove inappropriate spacing between paragraphs in Word by highlighting the part of the document that requires correction or formatting.
The “Paragraph” tool, located in the “Main” category, will come to the user’s aid. The user needs to select “Line spacing” and specify the parameter that is responsible for the value being changed. The user can enter one of several values that the drop-down menu offers. Selecting a value of 2.0 will change the previous line spacing to double. You can reduce the distance between lines using a single indent, which was especially popular in the very first versions of the Word text editor.

List of all possible parameters
Today, in the most popular text editor, you can use six different options for indenting from line to line in a document. In particular, the user can put in his text:
- single (the indentation from line to line depends solely on the font size used in the work);
- 1.5 lines (single line spacing increased by 1.5 times);
- double (single indent doubled);
- minimum (a small gap appears between the lines, which should only be enough to accommodate a large sign or graphic symbol, which can be printed in the appropriate font);
- exactly (fixed indentation from line to line, expressed in points). When using a 12-point font in the text, use 14-point font;
- multiplier (allows you to remove inappropriate spacing between paragraphs in Word by specifying an indentation that is numerically greater than 1). A setting of 1.15, for example, will increase the gap by 15 percent.

Before reducing the distance, the user should be aware of one feature of the text editor, which concerns the presence of large symbols and formulas in the document. The fact is that, having detected such signs, Word will independently increase the space before and after the line.
Space before and after a paragraph
When the user needs to remove spaces, the easiest way is to resort to the built-in express styles. You can get rid of unnecessary spaces both in the entire document and in part of it (a text fragment). To do this, you need to select a section for formatting and change the parameters in the properties regarding line spacing.
If the user has Word 2003 installed on his computer, then removing spaces between paragraphs is quite simple. The program does not automatically add an additional line in the middle of typed blocks of text. Almost all Word 2007 styles set double indentation from one section to another, while independently increasing the spacing that is located directly above the heading.

After the question regarding the choice of the optimal style has been resolved, you need to click once on its name.
Correcting spacing in selected paragraphs
The peculiarity of the text editor is manifested in the additional addition of an empty line after each individual block of text, and not always the necessary space above the heading.
To remove spaces, you can select a paragraph, the space before which needs to be formatted. The user must find the “Page Layout” subsection in the “Paragraph” category, where you can manually specify the required indentation before and after a separate fragment.

Conclusion
Knowledge of the basic tools of the Microsoft Word text editor allows you to quickly change the distance between lines and paragraphs and give the text an attractive appearance. After all, no matter how interesting the content of a text message is, without proper formatting it will not attract the attention of other people, much less meet certain standards.
Instructions
The vertical distance between two lines of text is called line spacing or line spacing. The default value for Microsoft Office Word documents is Single. Depending on the selected text style, a single paragraph can be used between lines of one paragraph, and a one-and-a-half or double paragraph can be used between two different paragraphs. All these parameters are configurable.
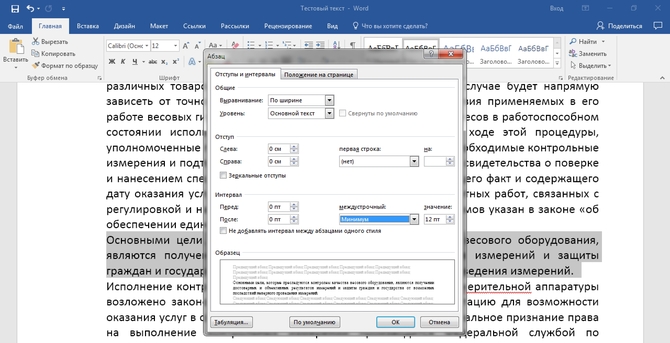
To set the desired spacing between lines in the text, you need to call the “Paragraph” dialog box. There are several ways to do this. Open the "Home" tab, select the text (or fragment of text) in which you want to change the spacing. In the Paragraph section, click on the arrow button (located in the lower right corner of the Paragraph panel). Another way: select the text and right-click on it, and also select “Paragraph” in the context menu.
In the dialog box that opens, go to the “Indents and intervals" In the “Spacing” group and the “Line Spacing” section, select the value you need using the drop-down list: single, 1.5 lines, double, exactly or multiplier. If you chose one of the last two values, enter the size of the interval in points or a numeric value for the multiplier in the field to the right. Click on the OK button so that the settings you select will be applied to the selected text (text fragment).
Different symbols are used for letter spacing. The interval can be normal, discharged or compacted. If you want to change the spacing between letters in a word, bring up the Font dialog box. You can open it from the “Home” tab from the “Font” section by clicking on the arrow button. The window also opens via the right mouse button when selecting the “Font” item from the drop-down menu.
In the window that opens, go to the “Interval” tab, in the group of the same name, set the value you need using the drop-down list and click the OK button. The interval must be set by first selecting the text. If you have not yet started typing, place the cursor at the beginning of the first line of the document, configure all the necessary parameters, and begin typing without moving the cursor one position.
Video on the topic
When working in a text editor with many documents, in addition to standard formatting, you will also need knowledge of how to make interval one and a half.
You will need
- text editor
Instructions
When setting the “multiplier” parameter in the “line spacing” list, enter in the adjacent “value” field the coefficient by which you want to multiply the height of the specified paragraph font. If desired, set other parameters for the location of the paragraph in the window. Click the "OK" button. The spaces between lines in the selection will be recalculated and as required by the user.

Interline interval in text files means the vertical distance between words. Many documents have to be saved taking into account the requirements that are also often imposed on this text formatting option. By default, it is set to single in documents.

You will need
- - computer;
- - Microsoft Office Word program.
Instructions
Open the document using Word.
Select the part of the text to which you want to apply the value change interval A. Be careful because if the text contains large characters, certain mathematical operations, etc., interval changes on its own.
On the first tab of the toolbar, click on the icon with the image of text and two arrows, one pointing up and the other down. Click on it and select the value you need from the drop-down menu. There you can add interval before or remove the distance after it.
If the value you need was not indicated in the drop-down menu, then click on the item “Other line spacing options interval ov". There you can also specify parameters such as alignment and tabulation, text level, word wrap, paragraph marking and many others.
If you need to apply a change interval and to the entire text of the document, then press the key combination Ctrl+A, and then change interval. Save your results.
If a certain value interval But you need to apply it to several unrelated passages of text, then highlight the first necessary words and phrases or paragraphs. Press and hold the Ctrl key while using the left mouse button to select the second part of the text that is subject to similar formatting. After that, without releasing the pressed key, click on the change icon interval A. Save your changes.
Please note that you can also put interval to "Multiplier" mode, then it will increase or decrease towards the end of the document. If you often use some type of line spacing setting, you can make a template to save you time repeating the formatting procedure.


