I want to create an application for android. How to Write an Android Application Using Android Studio
Elena Shramenko
CEO
"Akintsev and Partners" company
“I would like to say a few words about the mobile application designer from AppGlobal.
We recently developed our application based on the AppGlobal constructor. And every day we are revealing more and more capabilities of this tool, with which you can implement a variety of tasks.
Firstly, I realized that this tool is of great benefit to both parties: for us, as the owners of the application, and for our clients who use this application.
By solving our marketing problems, we give our clients additional benefits:
They have at their fingertips all the information on a topic that interests them, and get the opportunity to study materials that are not freely available. They can take advantage of discounts and gifts that are only active through the app. They also have the opportunity to pay for your service or delivery from the application and make a free call.
Thanks to this, we get regular customers and attract new ones.”

Ilya Basnin
AppGlobal partner
“The big disadvantage of all other services is the lack of technical support.
I have analyzed many constructors.
Most often, simple inexpensive platforms are used, the owners of which simply copy AppGlobal materials, but the designer itself remains “raw” and unfinished.
Their big disadvantage is the lack of support. And, despite the low prices, they still cannot withstand the competition.”

Arthur Budovsky
“Sales increased by 14% in the first month of using the mobile application!
I write selling texts and teach people this art. The level of trust my readers have in me has increased only because there is a mobile application. Like, if my School is in Apstore and Google Play, it means that I have a solid business, and not some kind of “scam”. People buy trainings without even downloading the app to their phone.
The AppGlobal constructor itself is a mega-tool! You can create a full-fledged application yourself, without special programming knowledge, in just a couple of hours! The only thing is that I would like to be able to make different interfaces, because all applications are similar to each other due to the buttons.
Now I post audio and video materials and information tabs in my mobile application. There is a subscription to news and integration with social networks. I use push notifications for my readers. There is feedback such as receiving messages, photos from clients.
Despite the fact that the launch of my product was delayed due to moderation, I am very pleased with the cooperation with the AppGlobal service. Problems are resolved quite quickly, consultants help to sort out all the issues.
My site now lives a mobile life. I really hope that my clients and readers will appreciate my mobile application and come back to me more than once!
Thank you AppGlobal for simple solutions to complex but important issues!”
It comes to everyone's mind - experienced designers, students or small business owners who haven't written a line of code. If you have a great idea, how can you implement it if you don't understand the difference between Java and Javascript, or Photoshop and Illustrator?
How to make a mobile application - expert opinion
- Paul Ferro is the President of 5 Nerds Software Development, a full-service design and development agency ranging from branding and design to app development from scratch.
- Andres Max, founder of Ideaware, an agency specializing in product strategy, UX/UI design and front-end optimization. Before founding the studio, Max was the lead UX designer at Mashable.
- Daniel Hindy is Chief Technology Officer at BuildFire, a mobile app building platform used by over 50,000 companies. Even if you don't know how to create mobile apps, you can still make a professional app with BuildFire's WYSIWYG editor.
The responses from these entrepreneurs make us realize that building a mobile app doesn't have to involve coding or getting your hands dirty in Adobe. With a great idea, a dash of business acumen, and a ton of effort, you can be at the helm of the next Uber. Let's take a look at their opinions.
1. Brainstorm
Paul Ferro, who, in addition to starting his own business, helps other entrepreneurs turn their ideas into reality, talks about the first step on this long path:
You have a great idea for a mobile application. This is the next viral game, or utility that everyone will use, or the next step in social expression. Either way, you know it's great and you want to get your message across to everyone. Where to begin?
First, it is very important to specify your idea. You may have the basics of your app outlined in your head, but have you thought through all the little details that separate a fantastic app from an ok one? It's important to sit down and take a few minutes to think about the entire mobile app experience.
If it's a game or something similar, you don't have to figure out each level in your head, but you do need to understand how the levels are different. Are there in-app purchases? Multiplayer game? Social media connection? As you answer all these questions, you begin to mentally put all the pieces together and overcome all the problems and pitfalls. Or, if someone is making the application for you, then they will want to know as much as possible before starting, and this will help the development process.
2. Present your idea to friends, family and colleagues for feedback.
Everyone thinks their ideas are amazing, right? How can you understand that the mobile app concept you come up with is interesting to others? Turn your “inner circle” into a cordon sanitaire that tests ideas for viability:
Now that you have a working idea, it's time to test it out and see if it's as good as you think it is. There are a ton of good apps that do pretty much the same thing, but for one reason or another, some rise to the top and become loved while others don't. Your app doesn't have to be No. 1 in the store to be popular or profitable. But he needs at least some visibility.
Share your idea with as many people as possible to get their opinion on it. Here's an expert tip: When you pitch your idea to others (friends or family), tell them that you know someone with the idea and want to invest in it. Then explain the idea itself. Your listeners will be much more honest knowing that the idea is not yours and that you could lose your money by investing in a not-so-good app. Ask – will they use it? If so, why? If they don't, then why?
Ask them to point out the shortcomings. Ask if they have seen anything similar? This approach can be much more productive for discussing an idea than simply finding out that you have a lot of friends and family who don't want to offend you.
If you have done all this several times, and your idea has not met with strong resistance, then it’s time to start! Here you have a choice. You can do it yourself or hire someone.
3. Even if you can't make a mobile app, you can make a great prototype

Andres Max reiterates the importance of testing an idea to see if it works and goes further: “I have always encouraged entrepreneurs to conduct market research. Dig deep to assess the demand for your idea, what has worked in the past and what hasn't, then make adjustments as needed.” For example, you might think you have an amazing idea for a photo app only to find out that it's already made and selling. This doesn't mean you should stop working on the idea - it's just information for you to help you figure out what you can do better.
One of the best ways to compare is, of course, to make a prototype. Max says, “Once you've refined your idea, build and test a prototype. Collect all valuable information based on it.” A prototype can be just a sketch of your design, but you can also create a fully functional prototype in a tool like Proto.io. This does not require programming or design skills.
4. Decide whether you will hire a studio or developer - or learn how to develop yourself.
The next step, Ferro says, is to figure out who will turn your prototype into a real application. You may not believe it, but you can very well create an application yourself (even without experience). Provided, of course, that it is simple enough:
“Learning how to create apps can be challenging, especially if you have no experience. But it's possible. Especially if your idea is about the uniqueness of the features - and not the technology itself. Take Flappy Bird for example. The application itself is extremely simple. But the idea was unique and exciting. Now look at Apple Passbook. The idea is relatively simple, but the technologies that allow you to store your data securely, access it to sellers, connect to your fingerprint, etc. are relatively complex.
If your app requires cutting-edge technology that uses the device in a way that no one else has used it before, then building the app yourself can be difficult. It can take years to figure out how to take full advantage of a mobile device's capabilities. If you understand that you can build the application yourself, great! But even if you don’t have development skills, there is an opportunity to develop quite quickly.”
5. Make sure you are using the right tools to create mobile apps

But how to gain this very speed? You can either walk through (there are many resources for this) or use tools that are accessible even to beginners to create your mobile application. One such tool is BuildFire, explains Daniel Hindi:
“What if you have a killer idea but don't know how to create mobile apps? This is exactly the problem we wanted to solve with our BuildFire platform. We have over 80,000 applications, created by both small companies and large corporations, all made with little or no programming knowledge. While this is great for simple applications, lack of programming skills usually limits you to the range of features the platform offers. BuildFire solves this problem and we will soon open an API for developers to add to existing BuildFire applications.
We see more and more startups and small companies connecting to our core platform with an extremely low barrier to entry. Once the app has proven its value, they ask third-party developers to create the missing pieces of the puzzle, saving a lot of time and money in the process.”
6. Make sure you hire the right people
Whether you're hiring people to finish a project started on a platform like BuildFire or building an app from scratch, it's important to find the right developer, Ferro says:
“Now, if you decide to hire someone to develop your application, then everything will be a little easier compared to if you learned to code on your own. But here, of course, the question of cost arises. Hiring an office has a number of advantages compared to developing it yourself. They have experience, they already know all the pitfalls of development, they will create an optimized and fast application, its design will not be terrible - I think there is no need to explain in detail the advantages of turning to professionals.
But you need to make sure that you hire the right professionals. First and foremost, this means finding a company that will listen to your story and fully understand it before they even start writing code. Many people want to jump right into development and start invoicing you, but this is the wrong way to go. Talk to several companies to find the one that's right for you. You should feel comfortable working with them, communicating and working through problems with them. And believe me, there will be problems!
When you find the right company, everything will work out. They will dive into your idea and untangle the loops, fill in the gaps, suggest features and functions, and provide a high level of service. The best apps happen when a great idea meets a great team who brings it to life.”
It's time to act
Ferro ends by reminding entrepreneurs that creating an app is one thing, but getting users to download it is another:
So, you have made and released the application. Don't stop there. Promote it. Talk about him. Share it on social networks - everywhere! You need to get people talking about it. There are many ways to promote your app and you should try them all. Blogs are always looking for new apps to talk about. Contact them. If your app is a utility, figure out where it can be most useful and tell people about it. Whatever you do, you should always share your app as much as possible.
And how are you doing? Have you made the app of your dreams? Tell us about it!
Without financial investments and special knowledge.
Here are the simplest instructions on how to create a basic iOS application and try it on your device. Based on it, you can go further into the topic and create really useful programs.
Note for Windows users: to create applications for iOS you need to install OS X on a virtual machine (VirtualBox, VMware). This process is by no means simple and requires separate instructions.
1. Go to the App Store and install the XCode development environment:

If you already have XCode, then you need to update it.
2. Launch xCode and select the menu item File -> New -> Project: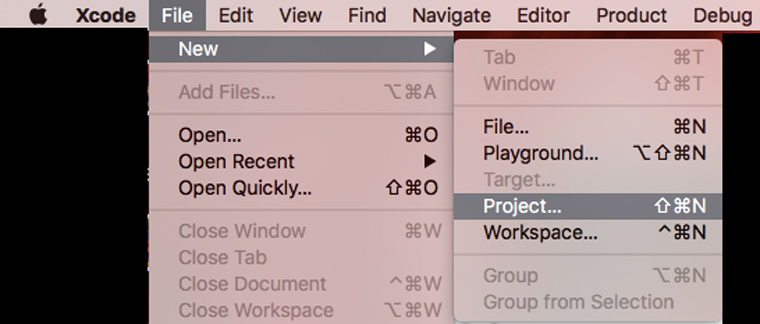
3. Select the platform and application type:

4. Provide information about the project. Please note that we have selected the "Universal" application type: 
5. Click on the button New Folder and indicate the name of the folder in which we will store the application files:

6. Uncheck the Create Git Repository checkbox and click the Create button. As a result, you should get to the start screen for working on the application: 
7. Click on the item Main.storyboard in the right menu, drag the element to the main field Label and add text to it Hello_world:

8. Now we need to make an icon for the application. We select an image and upload it to mapappicon.com:

9. We wait for the web application to finish working and indicate your email address to receive the archive with icons:
![]()
10. Return to XCode and select section in the left menu Assets.xassets:
![]()
11. Open the archive from the mail and drag icons from there to the XCode workspace:
![]()
12. Select one of the device simulators, click on the application launch button (black triangle) and turn it on on your Mac Developer Mode:

13. We try to start again. We are waiting for iOS to load on the simulator:
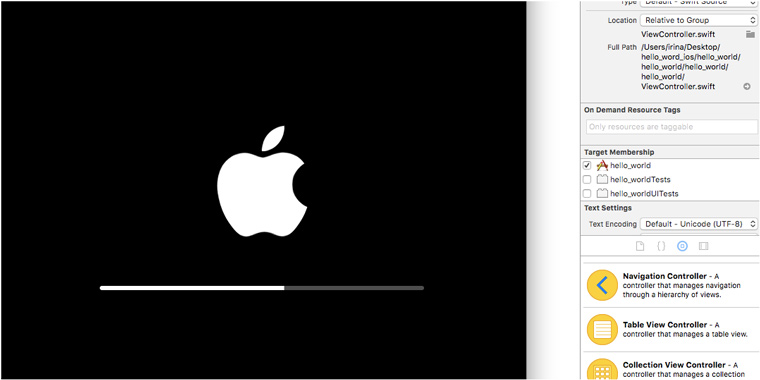
14. Make sure the application is working:

We look at the finished application on the device
Now you can see how the application works on the device. Before following the instructions, make sure that you have the latest versions of XCode and iOS.
1. Let's go to xCode -> Preferences -> Accounts and add your Apple ID:

2. Connect the iOS device to the computer:

3. Select the desired device in the list and click on the start button. We're waiting for a while.
4. If a message about security problems appears, then on the iOS device go to Settings -> Basic -> Device management and allow applications from the developer to run with your Apple ID:


5. Go to the desktop and find the new application icon:

6. Launch:

7. Disconnect the device from the computer. Now the application can be used.
What to do if you want more?
Using scientific poking and Google, you can expand the above sequence of actions and create a more functional application. But you can only use it on your own devices.
After all, Apple places very high demands on applications. The App Store Review Guidelines include 29 points and more than a hundred sub-points. In order for an application to comply with them and be accepted for publication in the store, the developer requires a large amount of technical knowledge.
If you want to create high-quality iOS applications intended for mass use,
Greetings, dear fans of the Android operating system. In today’s article I will try to cover as fully as possible a very interesting topic - a selection of tools for creating your own application (online) for gadgets based on the popular Android operating system.
With the development of mobile technologies, the market for mobile applications is also developing, including the market for mobile applications for the Android OS. If previously only an advanced programmer with thick glasses who had completed five years of university study could make an application, now this opportunity is available to anyone, completely unfamiliar with programming languages, and also without disconnecting from the Internet, i.e. online.
In the collection you will find four tools that will allow you to create an application - quickly and easily. All the proposed tools are similar to construction kits, you have to assemble your first application from various ready-made components, you can create an application in the same way as you assemble a Lego constructor.
All instruments were selected according to the following criteria:
- Ease of use. Since such a tool will be used mainly by people unfamiliar with programming and complex elements, the main emphasis in this small selection was on the convenience and ease of use of the proposed tools;
- Intuitive interface. This point and condition logically follows from the previous one. In addition to the fact that the interface of the tool for creating applications for the Android OS (Android) should be simple, it should also be intuitive;
- Possibilities. The more different things a tool “can” do, the better. Essentially, all the presented applications have the same set of tools, with minor differences and changes.
So, let’s write, let’s start making the application (the entire application can be created online), below you can familiarize yourself with the selection of software products and choose the most convenient and functional tool for yourself.
TheAppBuilder
A good tool for creating applications. Undoubtedly, the good news is that you can use this tool absolutely free. The downside is that this software product does not support the Russian language, but if you studied English at school, at least a little, then there should be no problems using TheAppBuilder. Of all the features of this software product, I would like to note the following::
- Large selection of templates for creating your Android applications. If you want to make a simple program, then from the proposed template options you can easily select the one you need;
- The ability to view detailed statistics on the application you created;
- Simple and clear publication of the application you created on Google Play.
AppsGeyser

Another good, high-quality tool that deserves close attention. As I said above, to create )) you don’t need to be able to program for Android; everything in this program is so simple that you can create an application for your project in a few minutes, simply by assembling it from the parts of the “constructor”. Below you can familiarize yourself with the capabilities of the proposed tool.:
- A large archive of templates on various topics: restaurants, pizzerias, photo studios, holidays, sports, radio, cargo transportation and many, many other templates. You just need to select the appropriate one and start editing it to suit your needs;
- Built-in tools for promoting your new application. Sometimes, to promote and promote your new application you need to spend a lot of effort and time, built-in promotion tools in the builder can make your task easier;
- The ability to connect your program to an advertising network, so you can earn money from the applications you create.
AppsMakerstore

A very simple tool for creating programs for your Android operating system. The main advantage of this application is that you can create an application for six different mobile operating systems in one go. Other advantages of this tool include the following::
- Ability to work with the designer online;
- It is possible to register a free account;
- A large archive of templates for your Android application; you can write the necessary application in two clicks.
That's all for today. I hope that you have chosen the right tool for yourself and know how to make your first application. We also write our opinion in the comments to this material.
How does the Android development process work? Let's highlight a few basics:
- In Java files, you describe program logic—what you want your application to do.
- In XML files you develop layouts - the appearance.
- Once the app is written, you need to use a build tool to compile all the files and package them together into an .apk file that can be run on Android devices and/or published to Google Play.
- All utilities and files that are used to create an Android application are combined into an integrated development environment (IDE). An IDE is a program that you will open to edit your code files and compile and run them.
- Previously, the standard IDE for Android development was Eclipse, but it has now been replaced by the more functional Android Studio, a Google product.
You will, of course, find deeper processes going on behind the scenes of the above steps. For example, advanced users will want to know the role of the Dalvik virtual machine. At the end of the article there will be links to useful resources that every Android developer should be familiar with. The first one is the official documentation from Google.
- Let's download and install Android Studio.
- Let's learn about launching and testing applications on Android devices and emulators.
- Let's create a simple Android application that displays "Hello World" on the screen of a mobile device.
At the end of the article, you can read useful recommendations from the company for novice developers.
Installing the Android Studio development environment
It's really tempting to start reading documentation and writing code to find out what the platform is capable of. And we will do it soon! However, to start working with the Android platform, you need to set up a development environment.
For those new to Android programming, it is especially important to take your time and methodically follow each step. Even if you follow the steps correctly, you may need to troubleshoot a small environment setup issue depending on your system configuration or product version. To do this, use search services. One can especially highlight the resource StackOverflow.
It's important not to let any pitfalls get in the way of your ultimate goal of learning Android programming. It is known that even professionals sometimes experience certain problems with setting up their working environment. In such cases, command line knowledge is important. If you'd like to become more familiar with this tool, there's a link to a good introductory one below.
Along with training in syntax, it is important to train yourself to have the mindset of a successful programmer, which will not accept the error message file X not found as a final verdict. This kind of thinking is easily trained by you in cases where you do not give up and look for a solution to the problem that has arisen.
Go to Android Studio developer.android.com/studio/index.html and look for a button to download the latest version for your platform.
Click on the download button and you will be asked to read the terms and conditions of use of the software product. After carefully reading (as you always do) and accepting, the download begins. This will probably take a few minutes. After this, you can install Android Studio just like any other program. The initial download page contains installation instructions for Mac and Windows.

Now that you have Android Studio installed, let's launch it! Launch Android Studio. The program will ask if you want to import your settings. Since you're starting from scratch, just select the second option and continue.

You should see a beautiful loading screen in Material Design style.

Once the download is complete, you will be taken to a welcome screen.

Even if you just downloaded Android Studio, you may not have the latest version. To avoid problems with versions in the future, click the "Check for updates now" button and, if necessary, follow all instructions to obtain the latest version. Sometimes Studio will automatically inform you that there is an update with a screen like this:

In this case, always select Update and Restart. Great! We have successfully completed the installation of the development environment.
Creating the first Android project
It's time to create the first project. Let's start with something simple. Programmers usually call the first program “Hello World”. Let's follow this tradition and then make a few small changes to make the app use your name as a greeting. At the end, you can download it to your device and show it to your friends. Android Studio has a small step-by-step tool that will help you create your project. Click "New Project" on the start screen:


Fill it out like this. Feel free to replace "example" in the package name with something else to remove the warning at the bottom of the screen. You can also set the project location by pointing to any folder on your hard drive
For drop-down SDK versions, note the Description section at the bottom of the dialog box. It explains what each setting does.
Install the minimum required SDK as shown in the screenshot. This sets the minimum version of Android required to run the application. Choosing this value for your own projects is a matter of balancing the SDK capabilities you want with the devices that will be supported.
For more information about API versions and their use, there is a special Dashboards page on the website for Android developers https://developer.android.com/about/dashboards/index.html.

After selecting the version, the starting template selection screen opens. You can create an application that already interacts with the google maps api and displays the map. In our test example, select the Empty Activity and click the “Next” button.

And now you are at the last step of the application creation process. Before you click Finish, pay attention to a few things. This is the first time you come across references to the main architectural components of any application.
- - this is the first, but not the last mention of the word Activity. In the Android context, an Activity is usually thought of as a "screen" in your application. This element is very flexible. When Android Studio creates the MainActivity class, it inherits it from the Activity class in the Android SDK. Those familiar with object-oriented programming will understand this concept, but for beginners, this basically means that your MainActivity will be a customized version of the Activity.

- Layout Name— the layout of what will be shown to the user is defined in a special form of Android XML. You will soon learn how to read and edit these files.
Click Finish. It will take some time to create and download the project. After some time, Android Studio will complete the build of your project. Of course, the project is still empty, but it has everything you need to run on an Android device or emulator.

After loading the project, you view the layout file in XML format. Before we move on to Android programming, let's talk about how we can run this application. It's time to say "Hello world!"

Running an application on an emulator
Now it's time to say a few words about the emulator. Android Studio comes with software that can emulate an Android device to run apps, browse websites, debug, and everything else on it.
This feature is provided by Android Virtual Device (AVD) Manager. If you wish, you can set up multiple emulators, set the screen size and platform version for each new emulator. This functionality is very useful because it saves developers from having to buy multiple devices to test programs.
Click on the Run button in the form of a green arrow.

You'll have to wait a while for the emulator to load and once it's ready, you'll see something like this:

Congratulations! You've made your first Android app!
And so... Why and how did it work?
To start making changes and adding interesting features, you need to gain a working knowledge of what's going on behind the scenes. Take a look at the Android Studio project section with files and folders on the left side of the screen. You may need to click the small tab on the edge (see below) if the project explorer is not currently visible.

Browse your folder structure for a few minutes and double-click on files to see their contents in the main window. If this all seems mysterious, don't worry!
Android project structure: Team
Every good team is made up of people who perform their assigned roles. Do you want to get the job done right? You need the right team. Android projects have several key elements, and each of them has a specific role to play:
Java: Professional
This is the part of your code that is responsible for the application logic. Your code will be located in the src\main\java directory in the main project folder. To learn Java, I recommend Bruce Eckel's book "The Philosophy of Java";
Resources: Artist
It's not enough to just make an Android application, it must also be stylish. Your app will never stand out if it doesn't have clear icons and images, well-designed layouts, and maybe even smooth animations.
When initialized, the folder contains the following folders:
- drawable, which stores icons. Now there is only the standard application icon.
- layout with XML files that represent screen designs.
- menu with XML files of lists of elements that will be displayed in the action panel.
- values with XML files containing sizes, colors, string constants and styles.
AndroidManifest.xml: Boss
This XML file informs your system of the application's hardware and software requirements and contains its version name and icon. The manifest also contains information about all Activities in the application. Do you need the work done by your application? Talk to your boss first.
Alteration
Navigate to res/values/strings.xml and double-click the file. When you open the file, you will see two string resources in XML.
These resources are used in different places, but it is very convenient to have all the text used in your application in one file. If you need to translate it, or if your fellow marketer asks you to remove all the unnecessary links, it's easy to make all the changes here.
Change the hello_world string that the application displays on the screen. Change the content to something more personal, such as using your own name. You'll get something like:
Click Run. The application should restart and you will see a personalized message:

We congratulate you - you have completed your first project and learned how to edit the source code. The first step in Android programming has been taken. We wish you good luck on this difficult but incredibly interesting path! If you need professional Android application development, contact Infoshell specialists.


