Where to find boot configuration data. Bootable BCD file from scratch using Bcdedit. BCD Storage Backup
The topic that I want to discuss in this article is very popular and talking about it in detail so that you understand how and what to do is not so simple. But still, I will try to describe possible ways of what to do if Windows 7 does not boot on a laptop or computer. We will also find out why this could happen?! The task ahead of us is not an easy one, namely, to correct the current situation, but there is no need to be afraid. Just follow the clear instructions and everything will be great! Some points may be suitable for other operating systems, but I will focus on Windows 7.
Dear reader, if you really want to solve the problem, then I strongly recommend reading the article in full, and then drawing some conclusions. I cannot talk about all the nuances in one paragraph.
Safe Mode and Last Known Good Configuration
This is a must try! Reboot the computer, press the F8 key continuously.
Attention! In Windows 8, entering Safe Mode is a little different, so it's best to follow the link below to find out all the details. In the list that appears, we are interested in the item called “Last Known Good Configuration (advanced).” Select and press Enter.
About how to enter safe mode on different systems:
What to do if the information above did not help you? We repeat the steps described in the previous paragraph, but select “Safe Mode”.
Next, you can make a choice: fix the problem due to which Windows 7 does not boot manually, or try to do it in semi-automatic mode. Usually I do everything manually, for example, if Windows does not boot after installing the drivers, then I delete the drivers and try to boot. I think you understand that the manual method requires more knowledge on your part, so Windows offers you another option, which I will describe below.
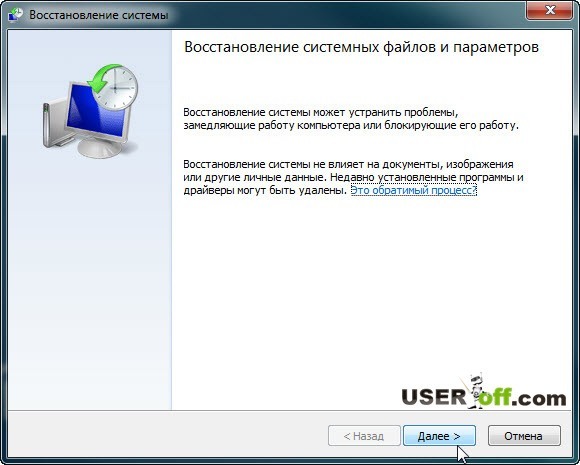
If everything loads, go to the Start menu, Control Panel, System and Security. In the “Support Center” tab, click on the inscription “Restore the computer to a previous state.” See the “Run System Restore” button? Great, then you've come to the right place.

Now click it and follow the instructions.
Next, you will need to select a restore point. In my case, I am asked to select a point on the 23rd, and now the calendar shows the 29th. Therefore, you need to click on “Search for affected programs” to find out what actions you will need to take after recovery.
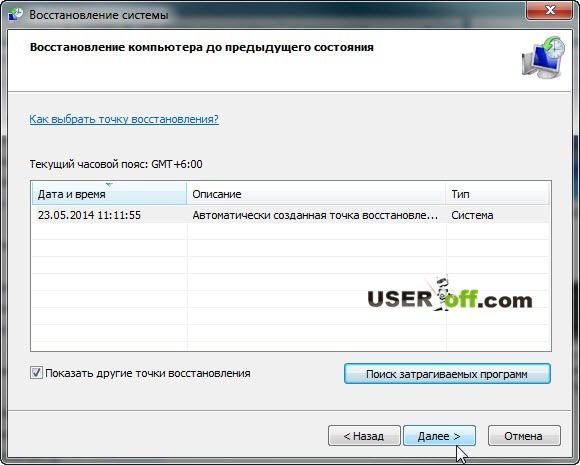

So, you have become familiar with the affected software during system recovery and can now close this window. After closing the window, click “Next”.
If you were unable to enter safe mode to restore Windows, then do not despair. Below we will look at another method.
Note: at the very beginning, when Windows 7 was just coming out, there was one strange glitch that you might have too. When you turn on the computer, the welcome screen follows and a black screen appears. As I remember, it seemed like there was still an arrow, but nothing else was visible. The cure was very simple - go into safe mode and restart the computer as usual. After this, I was able to log into my account without any additional manipulations with Windows.
You may need to reinstall Windows
This option should be considered when you have tried to revive Windows, but all attempts have produced no results.
The very first thing that comes to mind for many, and for me too, is reinstalling Windows 7. But this method, you see, is very long, and if you are a busy person, then access to the computer should be almost constant. Reinstallation is suitable for those who have a lot of free time, or do not have time to understand faster methods, or for those who will not be helped by any of the methods I have listed below for restoring the Windows operating system.
I will not dwell in detail on installing Windows, since I wrote about this on my blog:
Here are brief instructions: since you do not have access to the desktop, go to the BIOS, look for the Boot or Advanced BIOS Features tab, or search for it yourself. Then in it we find the line “1st Boot Device”, set the value to CD-ROM. What have we done? What we did is that now when the computer boots, it will boot from the disk that is installed in your CDRom, and not from the hard drive. After turning it on, when the inscription “Press any key...” appears on a black background, press any button and get into the Windows installation wizard. Then follow the instructions on the screen.
You can read more about how to boot from disk in my article: “”.
I decided to talk about the installation at the very beginning, because if you were going to reinstall Windows, then perhaps this is some kind of sign to implement it))). But as I said at the very beginning, we will now try to bring your Windows back to life without reinstalling it.
System Restore
First of all, you can use the function that is in the installation disk “System Restore”. I will give an example of the Windows 7 system, but if you have a different system, then this is not a reason to think that you cannot do on your system. The names of the buttons may differ, but the principle remains the same.
So, for this procedure we need a Windows installation disk or its image (can be downloaded on the Internet). If you are unable to download the image or do not have a disk, then write to me by email [email protected] or contact your friends who have already installed Windows themselves.
If you don’t have a working disk drive or don’t have one at all, then the article “” will help you create a bootable flash drive.
When you have a Windows distribution, insert it into the drive and restart the computer. If the BIOS is configured for installation, you will see the line:

When it appears, press any key.
If it is not there or Windows boots as usual, then you need to make manipulations in the BIOS. Namely, set loading priorities. Usually the hard drive is set in the BIOS settings, since that is where your Windows is installed.
In order for the computer to start booting from the disk that is in your drive, you need to go into the BIOS and specify CDRom as the first device to boot. I have already talked about this above, if you have not read this point, then it’s time to do so.
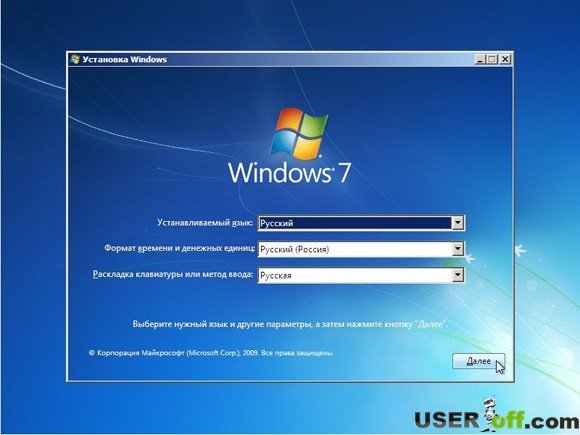
So, you pressed any key, now a window will appear where you click “Next”.
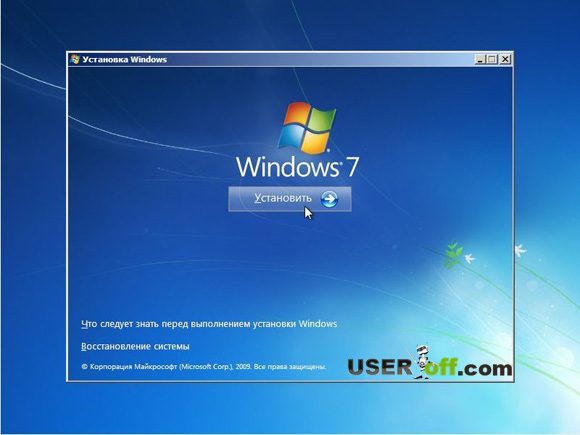
In the next window you need to click “System Restore”.
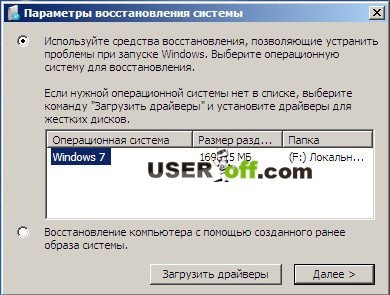
A search will be performed for installed systems. If you have one system installed, then there will be one operating system in the list. Select it and click Next.

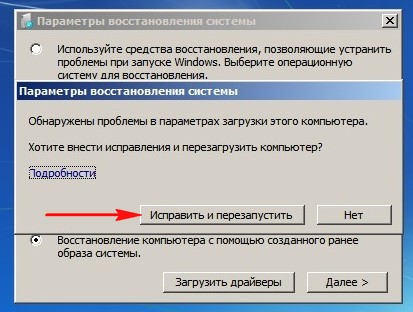
Often at this stage a message may appear in which you will be asked to restore the system. If this message is displayed on your screen, then click “Fix and restart”. After that, try to log into your account.
If the message does not appear, then in the next window you select your system and click “Next”.
After this, a window will appear where you can select system recovery methods.

– automatic problem solving.
System Restore - you can use this method, but provided that this function has been enabled.
Restoring a system image – if you have a Windows recovery image.
Command line– using certain commands you can revive Windows. This method will be discussed further.
Now click “Startup Repair”. Now you need to wait a bit for the utility to try to automatically find the problem and solve it.
System Restore via Command Line
Then enter and press Enter.

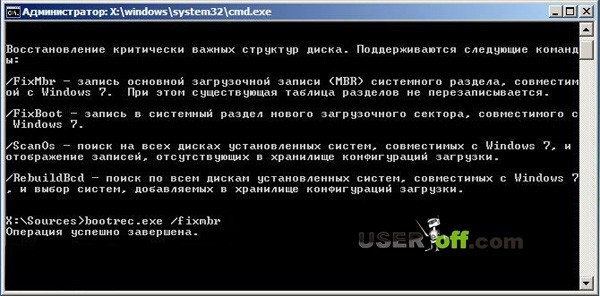
A list of commands that can be used in this utility will appear; now you need to enter: Bootrec.exe /FixMbr and press Enter.
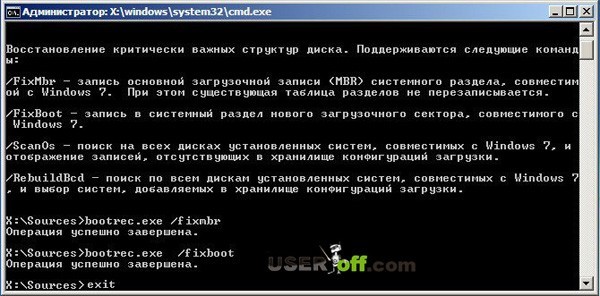
Now enter . exe / , then clicking on Enter. Next, exit the utility by typing exit and pressing Enter. Now you can try to log into your account, since the recovery work is complete.
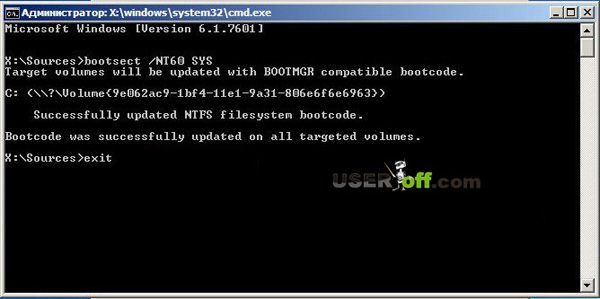
You can also try updating the boot code by entering the command bootsect /NT60 SYS. Then leave as a team Exit.
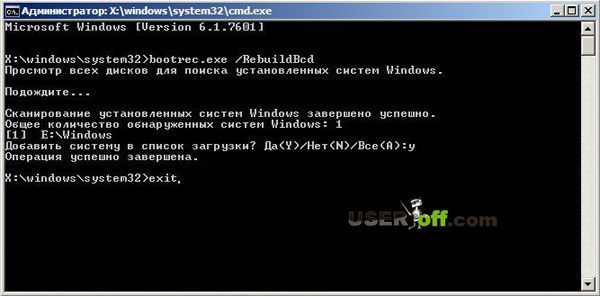
If the above commands did not help you, then go to the command line and enter Bootrec.exe /RebuildBcd. Using this command, you will scan your hard drive to find the systems installed on it.

When the scan is finished, a list of installed operating systems on your hard drive will appear. To add it to the download list, click Y And Enter. After successful completion of the operation, enter Exit and press Enter.
So, we have dealt with the command line. In principle, this should help to get your system to boot.
Inactive hard drive partition
This situation does not occur often, but it is still necessary to talk about it, otherwise the article can be said to be truncated. Let me give you an example, after which you will understand what's what.
Let's say you have several Windows operating systems installed on your computer, which are installed on different hard drives. If you assign incorrect attributes to hard drive partitions, you will have problems booting a particular version of Windows.
To check or fix this, you can use the Acronis Disk Director boot disk to change the partition attributes. So, download and burn the Acronis Disk Director boot disk and boot from it. How to do it? Insert the disc into the drive, restart the computer, and it will begin booting from the disc in the drive. But before that, check your download priorities. There should be a CDRom, just like when installing Windows. We have already talked about this in this article above.
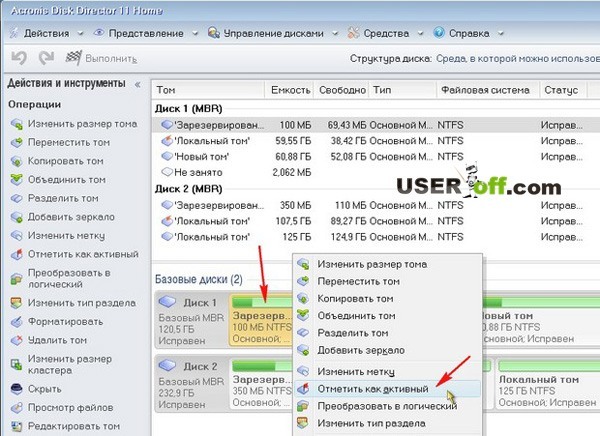
When the program loads, pay attention to the checkboxes that are on the hard drive partitions.

In the image above we see that the checkboxes are on the second partitions of the hard drive. You need to make sure that these checkboxes are on the first sections. We got to practice ;). You need to right-click on each first partition of your hard drive and select “Mark as active.”
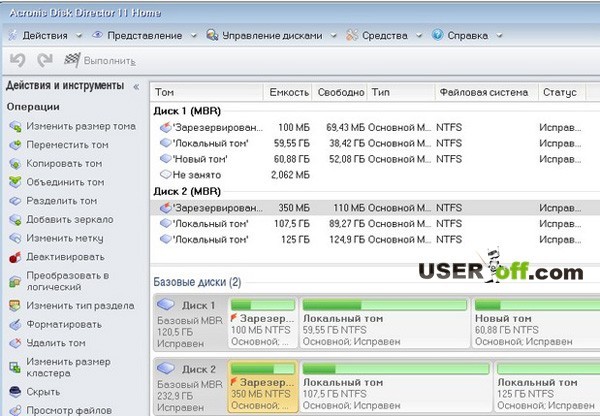
A message should appear where you click “OK”. This is what it looks like after the whole procedure:
Now all that remains is to click on the “Run” checkbox, wait for the operation to complete and restart the computer. Be sure to remove the disc from the drive.
Hardware problems, BIOS and viruses
HDD. If your system unit, or rather your hard drive, makes suspicious sounds: clicking or tapping, then there is a possibility that the hard drive needs to be replaced. To verify this, you need to open the cover of the system unit, turn on the computer and listen to the operation of the hard drive. Also check the wire connection to the hard drive. It is possible that the wires have become disconnected and the computer cannot see the hard drive.
If you suspect that the problem is with the hard drive, then you need to copy all important data to another medium. Otherwise, you may lose them completely.
BIOS. Go to the BIOS settings and put the hard drive first so that it starts booting from it. Above we looked at an example where we set up a CDROM; you do the same with a hard drive. Just don’t forget to save the changes in the BIOS by pressing the F10 key.
The second method – you won’t believe it, but it actually works! Just go into the BIOS and, without changing anything there, exit, saving the changes that in fact did not exist (by pressing the F10 button). I personally once fixed my friends’ laptop this way, and when they asked me how I did it, my answer was: “Magic and nothing more 😉.” So give it a try, maybe everything will be much easier than you think.
Viruses. Sometimes viruses prevent Windows from booting. If there are viruses on your computer, you need to scan the entire disk for viruses. Here are articles that will be useful to you: “” and “”.
Of course, if you check your hard drive for viruses, you will need to disconnect it and connect it to another computer, since in your case Windows will not load. Or you can use special boot programs with which you can scan your computer for viruses even if you cannot boot your Windows. Here are a couple of them: and.
Attention! There are cases when, after installing updates, Windows 7 stopped loading! Therefore, you may want to try uninstalling recent updates that were installed before the Windows boot problem occurred.
Important! If you see a specific error on your screen, I recommend using a search in Google or Yandex. You can enter into the search not only the error code, but also the words that are used in it. Thus, you will save your time searching for the problem and its solution.
Important! If the system unit makes squeaks when turned on, then you need to use this squeak to determine the problem. Ask how? Here's an article on this topic: "".
That's all I wanted to say. The article turned out to be long, and I sincerely hope that at least one of the methods I described helped you.
Says a lot of unnecessary things, but there is useful information for you:
Every user may sooner or later have problems starting their computer. Problems with loading your computer are not always caused by a breakdown; very often we are the cause of this, and this can be fixed very quickly and easily. In this article, we will look at the most common reasons why your computer does not start, so that you can quickly solve the problem and you do not have to call a specialist.
This can be either the simplest reason for the computer not turning on, or the most complex. Let's start with a simple one. If your computer does not turn on, the most common reason is a lack of power supply to it. This happens as a result of several factors:
- Power supply turned off
- The power cable is poorly inserted into the system unit
- The computer power cord is pulled out or not inserted properly.
- Stabilizer or UPS does not work
- The surge protector or socket does not work

Another fairly common reason why the computer does not turn on is the incorrect connection of its components in the system unit; this quite often happens when users clean the computer themselves and at the same time disconnect the wires or accidentally touch them.
The next reason is a breakdown of the power supply; this is a fairly common breakdown in computers, since on average power supplies work for 3 years, after which they often fail. If the power supply is in working condition, then there are 2 options for failure: either the motherboard has failed, or the contacts have oxidized.
Computer won't turn on, but fans work
Your computer starts but nothing happens? Check all contacts and connections of components in the system unit. Most often this happens after self-cleaning the inside of the system unit and components. Also, in some cases, resetting the Bios helps; to do this, you need to close the corresponding terminals on the motherboard and restart the computer, making the settings of the reset Bios before starting.
The computer does not turn on and beeps
If the computer turns on and beeps, it means that one of the devices is missing or connected incorrectly. By the nature of the sounds made, or more precisely by the number of long and short squeaks, you can determine what exactly the problem is. It may be necessary to remove and reinsert this component, clean the contacts, or replace it due to failure.

The computer turns on but does not boot
If the computer turns on but does not start, then this happens for three reasons, let's look at them:
- The computer does not see the hard drive on which the operating system is installed
- The system boot loader does not specify or incorrectly specifies the partition from which it needs to boot
- Problems with the operating system
The computer turns on, but there is no picture
If the computer turns on, but there is a black screen, then the problem is probably that the monitor is not connected correctly. To do this, check that the cable going to the monitor is connected correctly, both from the side of the system unit and from the side of the monitor itself. Then check the settings in the monitor itself to ensure that the correct connection type is set there: VGA, DVI or HDMI. Also check the power cable going to the monitor to ensure it is connected correctly.
The next reason why there may be no image on the monitor is a video driver failure. Try booting your computer in safe mode and reinstalling the video driver. If this does not help, try connecting the monitor to the integrated video card, removing the discrete one. If an image appears, then there is a problem with the video card (try cleaning the contacts and inserting the card well into the connector), if there is no image, then it is possible that the problem is in the monitor.

The computer turns on and immediately turns off
This situation occurs for two reasons: the cooling cooler has failed or the power button is jammed. Therefore, check the functionality of the cooler, if everything is in order with it, then disconnect the start button from the motherboard and start the computer by shorting the start terminals (be careful and do not do this if you have no experience!), if the computer starts and does not turn off, repair the button .
The BCD (Boot Configuratin Data) file is the successor to the boot.ini file starting with Windows Vista. It contains information about the operating system loaders and their options available on the computer. The BCD file is located on the active partition, in the boot folder. If it is removed, damaged or incorrectly configured, the operating system (OS) stops loading.
Editing a BCD File
At the user level, the BCD file is created and edited by the EasyBCD boot record manager. The program has an intuitive interface and a free, freely distributed license. The Russian version of EasyBCD downloads without problems from the Internet. The program is constantly updated, there is no point in posting it here.
After installing and launching EasyBCD, all that remains is to click one by one the “Add entry” and “Edit boot menu” buttons, and indicate the location of the disks of your operating systems, if there are several of them. The program will do the rest itself - create or edit a BCD file, in the best possible way. If the BCD OS is already “killed” and the system does not boot, then the portable version of EasyBCD is launched from a Live-CD with WinPE, or something like that. Regardless of where EasyBCD was launched from, it will create the correct BCD file and write it to its destination - the boot folder of the system partition (reserved by the system). The only thing you need to carefully monitor is the letter labels of the logical drives where the OS is located. Sometimes they don't match. Why? knows him... Apparently, it depends on the Windows build.
Note Sometimes, EasyBCD displays everything correctly, but the system does not boot. An alternative is to delete entries about operating systems in the BCD file and create new ones. The algorithm does not change: “Edit boot menu”, “Delete entry” button, then the “Add entry” button. All.
To restore or recreate a BCD file, boot from the Windows distribution, select the language and open the command line Shift+F10.
If we restore the BCD to RAID, then we go further in the OS installation procedure until the installer has the opportunity to transfer the RAID controller drivers. When the controller is defined and the RAID is recognized, the partitions will appear.
You can check the availability of disks and files on them by running notepad.exe and using it as a file manager via File - Open (Ctrl+O). By the way, at this stage you can copy important information from the damaged disk to a flash drive using folder navigation and the combination Ctrl+C and Ctrl+V.
Let's try to restore the BCD file automatically:
bootrec /RebuildBCD
If this does not help, then create the BCD file again using BCDEdit:
Create an empty file
add (import) it,
create an entry for the bootmgr boot manager (ntldr receiver before Windows Vista),
indicate that he will be responsible for loading
indicate the waiting time when selecting the OS
create an entry in the list of available operating systems
- bcdedit /createstore bcd
- bcdedit /import bcd
- bcdedit /create (bootmgr)
- bcdedit /set (bootmgr) device boot
- bcdedit /timeout 10
- bcdedit /create /d "Windows 2012" /application osloader
After executing the last command, the program will return a globally unique disk identifier (GUID), which we use to determine the default entry, i.e. the OS that will boot when the bootloader timeout expires.
bcdedit /default (
If we are not sure which volume our OS is on, then we look for the Windows folder by going through the drives: C:dir, D:dir, E:dir or by opening notepad.exe as described above. Typically, the system folder is called Windows and it is located on volume (disk) D. In a running OS, this volume is designated by the letter C, because The first partition, now identified as C, is usually hidden, marked as "System Reserved" and has no letter so as not to be accessible to the user.
Define the parameters of the created record
- bcdedit /set (default) device partition=d:
- bcdedit /set (default) path\windows\system32\boot\winload.exe
- bcdedit /set (default) osdevice partition=d:
- bcdedit /set (default) systemroot\Windows
- bcdedit /set (default) detecthal yes
Closing the OS list
bcdedit /displayorder (default) /addlast
That's all. Reboot the computer and boot into normal mode.
Need good advice on how to produce Windows 7 Boot Loader Recovery, if restoring the startup using the 7 installation disk did not help. I’ll briefly explain what’s going on: Windows 7 was first installed on the computer, then the second system needed Windows XP, after installation it naturally started alone, to boot two operating systems I used the EasyBCD program. Later, XP was no longer needed and I formatted the partition on which it was located from Windows 7. Now, when loading, there is nothing except a black screen. What can be done in this case? More details if possible. Sergey.
Restoring the Windows 7 bootloader
Hello friends! The most important thing is not to worry, your problem is not complicated and, in principle, the simple “Windows 7 Startup Recovery” tool described in our article should help, but! If this article does not help you, then two others should help:
These articles describe several more good ways to restore the boot of your operating system, besides them there is one more, so try it and don’t just give up.
Let me remind you that you cannot install an older operating system after a younger one; Windows 7 will under no circumstances boot after installing Windows XP on a computer, since the latter overwrites the master boot record (MBR) during installation. Therefore, you installed an additional boot manager, which is used to configure the boot of several operating systems and, in turn, has its own bootloader.
- I also want to say that file system errors are often to blame for unsuccessful loading of Windows 7; they can be corrected even if the operating system does not boot; all the details are in our other article." "
- Friends, in this article we will work with the Windows 7 recovery environment, or more precisely with the recovery environment command line. I will give you the necessary commands, but if it is difficult for you to remember them, you can. This will make your work much easier.
- The master boot record (MBR) is the first sector on the hard drive, which contains a partition table and a small bootloader program that reads from this table the data from which partition of the hard drive to boot the OS, and then the information is transferred to the partition with the installed operating system, to download it. If the master boot record contains incorrect information about the location of the system, then we will receive various errors during boot, here is one of them “BOOTMGR is missing press CTR-Alt-Del for restart” or we will see a black screen. The problem is being fixed restoring the Windows 7 bootloader.
When you uninstalled old XP along with EasyBCD, you left your computer to the mercy of fate with an incomprehensible boot record, and as a token of gratitude it gives you a black screen. To correct the situation, we will conduct boot recovery Windows 7, namely, we will overwrite the master boot record using the Bootrec.exe utility located on the recovery disk or on the Windows 7 installation disk (friends, if you have a netbook and you want to use the recovery environment located on a flash drive, then read the comments first). We will also use this utility to record a new boot sector, understandable to Windows 7.
Recovering Windows 7 bootloader automatically
We boot from a recovery disk or installation disk with Windows 7, in the initial phase of booting the computer, when prompted to boot from the disk “Press any key to boot from CD...”, press any key on the keyboard for 5 seconds, otherwise you will not boot from the disk

There is a short search for installed Windows systems and analysis of problems that prevent them from loading

Usually problems are quickly found and the recovery environment offers to fix them automatically. Click on the "Fix and restart" button, after which the computer will restart and boot Windows 7 will be restored.
If problems with loading the system continue or you are not prompted to fix the problems automatically, then in this window you need to select the operating system that you need to restore, you most likely have one and Next.

First of all, choose a productStartup recovery, it can also solve Windows 7 boot problems

Restoring the Windows 7 bootloader manually
If this remedy does not help, choose a remedy Command line

Enter the commands:
diskpart
lis vol (we display a list of hard drive partitions and see that “Volume 1” is a hidden System Reserved partition, volume 100 MB, it should contain Windows 7 boot files and it is this that needs to be made active). We also see a partition with Windows 7 installed, it has the letter D:, the volume is 60 GB.
sel vol 1 (select Volume 1)
activ (make it active)
exit (exit diskpart)
bcdboot D:\Windows (where D: the partition with Windows 7 installed), this command restores the Windows 7 boot files (bootmgr file and boot storage configuration files (BCD))!
"Download files created successfully"

Restoring the Windows 7 bootloader manually (method No. 2)
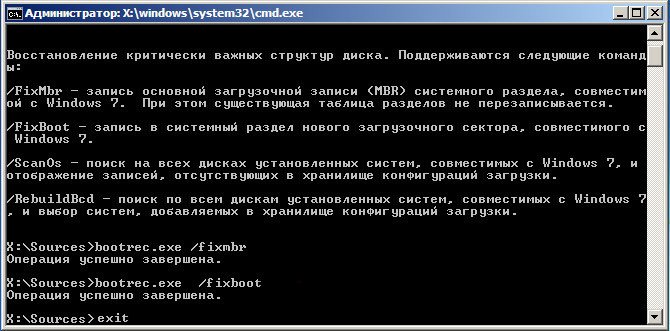
In the command line window, enter the command Bootrec and Enter

full information about the capabilities of the utility is displayed. Select the master boot record entry Bootrec.exe /FixMbr.

The operation was completed successfully. A new boot record is written to the first sector of the boot partition.
The second command, Bootrec.exe /FixBoot, writes a new boot sector.

The operation was completed successfully. Exit. Next, we try to load our Windows 7.
Friends, if the Bootrec.exe /FixMbr and Bootrec.exe /Fixboot commands do not help you, do not despair, there is another remedy.
Method No. 3
Enter the command Bootrec/ScanOs, it will scan all your hard drives and partitions for the presence of operating systems and if any are found, an appropriate warning will be issued. Then you need to enter the command Bootrec.exe /RebuildBcd, this utility will offer to add the found Windows to the boot menu, we agree and enter Y and press Enter, all the found Windows are added to the boot menu.
In my case, two operating systems were found. Everything can be seen on the screenshot.

In addition to the above method, there is another one, enter bootsect /NT60 SYS on the command line, the main boot code, it will also be updated.
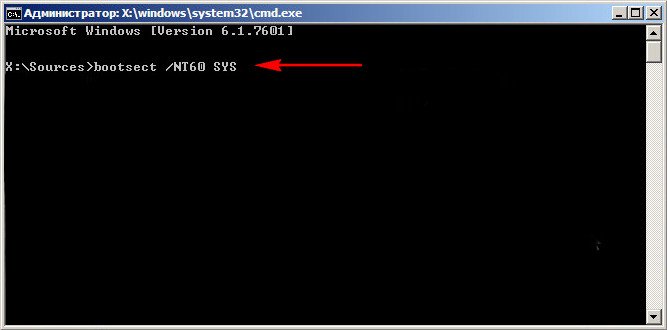
Exit
So, the error is that on both hard drives the first hidden System Reserved partitions should be marked with a red flag. On Windows 7, the volume of such a partition is 100 MB, and on Windows 8, 350 MB, these sections have the attributes: System. Active and it is on these partitions that the boot store configuration files (BCD) and the system boot manager file (bootmgr file) are located. And it turns out that these attributes are carried by other sections. Because of this, Windows 7 and Windows 8 will not boot.

Select the first hard drive 1, right-click on the first System Reserved partition and select “Mark as active”

The System Reserved volume will be marked as active. Click OK.

We do the same with Disk 2. Acronis Disk Director works in pending operation mode; for the changes to take effect, click the “Apply pending operations” button

Continue.

As you can see, after our changes, those sections that were needed became active.

We exit the program and reboot. The result of the work is positive - both operating systems are loaded one by one.


