What to do if you forgot your Administrator password? If you suddenly forgot your password... We break the password in Windows! How to remove a password in Windows 7 if you forgot
Hello.
And the old woman gets into trouble...
Many users still like to protect their computers with passwords (even if there is nothing valuable on them). There are often cases when the password is simply forgotten (and even the hint that Windows always recommends creating does not help you remember). In such cases, some users reinstall Windows (those who know how to do this) and continue working, while others ask the first to help...
In this article I want to show a simple and (most importantly) fast way to reset the administrator password in Windows 10. No special PC skills, any complex programs, etc. are required!
The method is relevant for Windows 7, 8, 10.
What do you need to start the reset?
Just one thing - the installation flash drive (or disk) from which your Windows OS was installed. If there is none, you will need to write it down (for example, on your second computer, or on the computer of a friend, neighbor, etc.).
At an important moment! If your OS is Windows 10, then you need a bootable USB flash drive with Windows 10!
In order not to describe here a voluminous guide to creating bootable media, I will provide links to my previous articles, where the most popular options are discussed. If you don’t have such an installation flash drive (disk), I recommend getting one, you will need it from time to time (and not only for resetting your password!).
Creating a bootable USB flash drive with Windows 10 -
How to create a bootable USB flash drive with Windows 7, 8 -

Burning a boot disk -
WITH throw administrator password in Windows 10 (step by step)
1) Boot from the installation flash drive (disk)
To do this, you may need to go into the BIOS and set the appropriate settings. There is nothing complicated about this; as a rule, you just need to indicate which disk to boot from (example in Fig. 1).
I will provide a couple of links to my articles if anyone has any difficulties.
Setting up BIOS to boot from a flash drive:
2) Open the system recovery partition
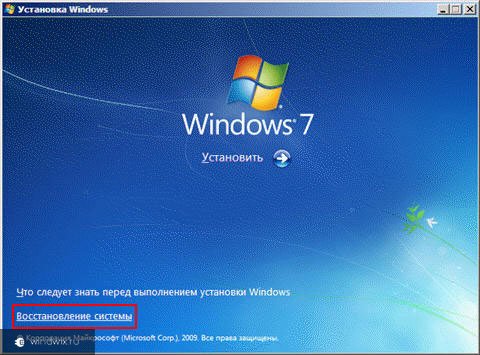
If you did everything correctly in the previous step, the Windows installation window should appear. There is no need to install anything - there is a link “ System Restore“, which is where you need to go.
4) Additional parameters
Then open the section with additional parameters.
Rice. 4. Additional options
5) Command line
After this, launch the command line.
6) Copy CMD file
The essence of what needs to be done now: copy the CMD (command line) file instead of the file that is responsible for sticky keys ( The sticky keys feature on the keyboard is useful for those people who, for some reason, cannot press several buttons at the same time. By default, to open it, you need to press the Shift key 5 times. Many users 99.9% do not need this function).
In order to do this, it is enough to enter just one command (see Fig. 7): copy D:\Windows\system32\cmd.exe D:\Windows\system32\sethc.exe /Y
Note: the drive letter “D” will be relevant if you have Windows installed on drive “C” (i.e. the most common default installation). If everything went as it should, you will see a message that “Copied files: 1”.
Rice. 7. Copy CMD file instead of sticky keys.
After this, you need to restart the computer (the installation flash drive is no longer needed, it must be removed from the USB port).
7) Creating a second administrator
The easiest way to reset your password is to create a second administrator, then log in to Windows under him - and you can do whatever you want...
After you restart your PC, Windows will ask you for a password again, you instead press the Shift key 5-6 times- a window with a command line should appear (if everything was done correctly before).
Then enter the command to create the user: net user admin2 /add (where admin2 is the account name, can be anything).
Note: after each command, “Command completed successfully” should appear. After entering these 2 commands, you need to restart the computer.
Rice. 7. Creating a second user (administrator)
After restarting the computer, in the lower left corner (in Windows 10), you will see a new user created, and you need to log in under it!
Actually, this concludes the mission to log into Windows for which the password was lost - completed successfully! Only the final touch remains, more on that below...
How to remove the password from the old administrator account
Simple enough! First you need to open Windows control panel, then go to “ Administration"(to see the link, turn on small icons in the control panel, see Fig. 9) and open the section " 
I guess that not everyone may like this method (after all, there are all sorts of programs for automatic reset. I talked about one of them in this article:). Although this method is very simple, universal and reliable, it does not require any skills - you only need to enter 3 commands...
This article is completed, good luck :)
Hello, dear blog readers. This article will talk in detail about how to reset the administrator password in the Windows 7 operating system or create a new account, without any utilities specifically designed for this. This method is very effective when for some reason you have lost or forgotten the password for an account, and this is the only account.
In fact, resetting the administrator password in the Windows 7 operating system is not such a difficult procedure if you know all the intricacies.
So, let's start with the first stage. For this we will need run a command prompt before the Windows account login screen. But first things first.
Action #1 : You need to load a disk with the Windows 7 distribution. If for some reason you don’t have this disk, it doesn’t matter, you can start the entire procedure from the recovery disk. It is also possible that you will have neither the first nor the second. But again there is a way out, you need a LiveCD with Windows PE, or if you have another operating system Windows on another local hard drive.
Action #2: A window has popped up in front of you, the so-called window for selecting language options, you need to click the “next” button, then click the “system restore” button, again click “next”, then, as shown in the picture below, click the “system restore” button.

Rice 1. System recovery options
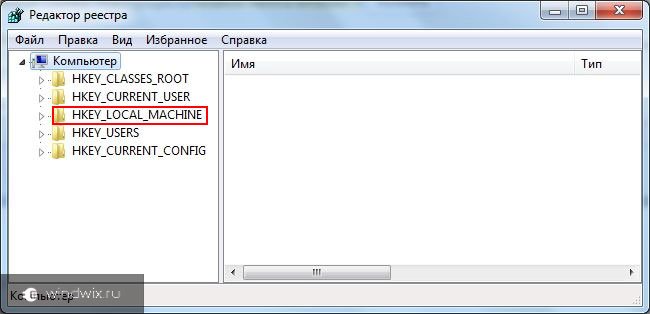
Action #3: We write the command on the command line regedit and press Enter. A Registry Editor window will open in front of you.
Action #4: In the Registry Editor window, click on the section HKEY_LOCAL_MACHINE(see picture). After this, from the “File” menu, you need to select the “Load hive” item.

Fig 2. Registry editor
Action #5: You need to go to the drive where Windows 7 is installed. By the way, if you don’t see the usual letter C there, don’t despair, this happens quite often, most likely the letter changed during this procedure. You need to open the file at:
WITH(or another name for the hard drive partition) :WindowsSystem32configSYSTEM.
We see all this in the picture below:

Fig 3. Load the bush
It also happens that in many cases the disk with the operating system is not visible, if you have this situation, then you need to load the driver in step No. 2, this will solve this problem.

Action #7: You need to go to the section.
HKEY_LOCAL_MACHINE888Setup
After this, you need to click on the following options:
- CmdLine, you need to enter cmd.exe and click on OK, as shown in the picture below.
- SetupType, you need to replace the number 0 with 2, also click on OK, as shown in the picture below:

Fig 5. Registry editor.
Action #8: You need to select a section 888 V HKEY_LOCAL_MACHINE, then from the “File” menu, click on the “Unload hive” item.
Action #9: You need to remove the installation disk, close the address bar and registry, and click the restart button in the recovery options window.
Now we have reached stage No. 2, we will denote it as “ Reset account password or create a new user, login to account”.
After clicking the restart button, you must wait for the Windows 7 operating system login window to appear. Immediately before logging in, a command prompt window will automatically pop up.
This is actually how to reset your account password.
To reset the password, you need to enter the following command, after entering it, press Enter.
net user username newpassword.
If the password you created contains spaces, you must enter them in quotes.
In the picture below, we see how user Adm7 sets the password tL942G8dWp.

Fig 6. Command line.
If suddenly, for some reason, you forgot the name of your new account, enter the net user command. All previously created accounts will appear in front of you.
This happens: when you try to log in to Windows 10, a notification appears that the password is incorrect, and the system does not allow the user to access the desktop. Let's look at how to reset a password on Windows 10 without reinstalling the operating system. You should first make sure that:
- The Caps Lock key is activated or, conversely, inactive (check the button indicator on the keyboard);
- Switch the keyboard layout to the correct one and make sure that it does not automatically switch to the system's default input language.
If you are convinced that you are entering the correct characters, but nothing helps, proceed to resetting the password.
The method is only relevant for users who work on a computer using a Microsoft account. If such an account does not exist or the password is not suitable for a local user, proceed to the next section.
1. To reset your password, follow this link: https://account.live.com/resetpassword.aspx in any browser. Enter the email address to which the account is linked.
2. Confirm your identity and indicate the code sent by email.

3. The next step is to enter a new password.

For local account starting from version 1803
In new versions, resetting a local account password has become simplified. During the installation of Windows 10, you are asked to ask security questions that allow you to restore access to the system as soon as possible.
1. After an incorrect password has been entered, the “Reset password” prompt will appear under the input field, use it.

2. You need to answer three security questions.

3. Create and enter a new password; you will also need to confirm it.

After entering a new password, you will be automatically logged in. Write down the answers to security questions where no one can see them. If this is not possible, come up with answers that you can definitely remember.
Resetting the password in older versions of Windows 10
The methods listed below are designed to reset the password in versions lower than 1803. For later editions, these solutions may not work due to constant system changes.
Using bootable media
This option is provided for local account holders. We will use the official installation image recorded on a flash drive (although the LiveCD option with the appropriate set of options is also not bad).
1. If you have a disk/flash drive, connect the media and reboot, otherwise we are looking for an opportunity to create a bootable drive with the Windows 10 distribution itself.
2. Start the system from the installation disk via the BIOS Boot Menu.
3. Specify the language and accept the terms of use of the software.
4. In the window with the “Install” icon, press the “Shift + F10” keys to open the command line window.
It happens that the last operation does not lead to anything, if this happens, click “System Restore”.

2. Select the item responsible for detecting and eliminating faults.

3. Click “Advanced options”.

4. In the menu, select the “Command Line” launch option.

5. Find out the letter identifier of the volume with the operating system.
Typically, this is the letter C:\, but due to the presence of several hundred megabyte partitions on the disk, the label in this launch mode may appear differently.
- We launch the disk utility by executing the command of the same name.
- We execute “list volume” to visualize information about the partitions.
- Based on the volume and name of the partition, we draw a conclusion about the letter label of the system volume.
- Exit the diskpart program by executing “exit”.

6. Execute the command:
Move c:\windows\system32\utilman.exe c:\windows\system32\utilman2.exe
To rename a service file that provides accessibility features on the lock screen.
7. Then enter the line:
Copy c:\windows\system32\cmd.exe c:\windows\system32\utilman.exe
Replace the utility with the command line.

8. Execute “shutdown /r” or close all windows to restart the PC.
9. On the lock screen, launch the “Accessibility” utility to bring up the command line (steps 6 and 7 were done for this), or use the Win+U combination.
10. In the command line enter “ net user Administrator /active:yes» to obtain administrator privileges in the system.

Activating an account with unlimited rights in the operating system is necessary to call the Computer Management utility and work with the registry.
11. After successful completion of operations, the “Administrator” icon will appear in the lower left corner. Click on this icon to log in to the system with the appropriate privileges, which does not require entering a password.
The first login from your newly activated account may take a little longer than usual, so be patient.
12. Using the context menu or the Win+X key combination, call up the menu of the same name and select the “Computer Management” item.

This will launch a Windows 10 snap-in designed to perform actions on the system that require special privileges (they have been obtained).
13. Expand the first branch of the vertical menu on the left.
14. Open “Users” in the “Local Users” directory.
15. Using the context menu of your account, call the command to specify a password.

16. Take note of the contents of the next information window and click “Continue”.

17. Enter a new combination of characters to protect your local account and confirm it.

This concludes the instructions on the topic: how to reset the administrator password, but it is strongly recommended to restore the system to its original form.
18. Disable the administrator account by executing “net user Administrator /active:no” on the command line (launched via Win→X).

19. We return the launch of the “Special Features” utility.
Open the system32 directory in the Windows folder and erase the utilman.exe file, then delete the two with the name utilman2.exe. If it was not possible to perform actions through Explorer (the operating system denied access), the same can be done through the command line. We launch it and execute the following commands in the same sequence:
Del C:\Windows\System32\utilman.exe move C:\Windows\System32\utilman2.exe C:\Windows\System32\utilman.exe
If unsuccessful, you must start again in recovery mode (steps 1-4).

Now you can work, and if necessary, quickly recover your lost password or gain access to another computer (only the password will have to be deleted or changed).
The same thing, but through the registry
1. Launch from the installation drive.
2. Call the Windows Recovery Environment using the combination “Shift” + F10.”
3. Execute “regedit”.
4. Go to the “HKEY_LOCAL_MACHINE” branch.
5. Call the “Load hive” command via the context menu or the “File” item.

6. Open a document called System, located along the path System32\config in the folder with the operating system.
7. Enter the Latin name of the bush and press “Enter”.

8. Go to the new HKLM branch and select Setup.
9. In the right frame, replace the key value from “ CmdLine" with the string parameter "cmd.exe".
10. Double-click on “SetupType" and enter its value as “2".
11. Reboot.
12. After loading the lock screen, a familiar command line window will appear, where you need to execute a command like: “net user user password", where instead of “user” we enter the account name, and separated by a space - the new password.
13. Execute “exit” and reboot the computer.
The advantage of the method is that all parameters are restored automatically the next time the operating system is booted.
Good day, dear readers, Denis Trishkin is in touch again.
In the latest versions of operating systems from Microsoft, for security purposes, it is possible to set a password to enter the work area. If this tool is no longer relevant, you can disable it. I will tell you how to remove the password in Windows 7 in several ways. After all, constantly entering secret characters sooner or later gets boring. This is especially irrelevant when only one person is working at the computer.
Many users store information on their computer that only they should have access to. If only one person uses the device, this is not a problem. But in the case when another may approach him, certain difficulties may arise.
Windows provides a special tool that restricts access to data by setting a personal key. For example, parents often use this tool to prevent their children from seeing content they are not supposed to see. In addition, this way you can protect yourself from changing your personal settings.
Disable password( )
There are several ways to turn off key entry. Each of them assumes that you are the owner of the account that needs to be updated. The first means that the password is known and the user has administrator rights.
It allows you to quickly deal with this problem:
That's all. Now, when the system starts, you will not be prompted to enter a secret key.
Important! However, if you change your account or go to the lock screen, you will still need to enter your password.
You can remove the annoying function using the standard menu “ User Accounts" True, in this way it will not be a shutdown, but a complete deletion. Despite this, Password will not be asked under any circumstances, even after resuming from sleep mode.
To disable the protection tool, do the following:
That's it, now the system will not ask “stupid questions” regarding security in this area.
Here you can also create a secret combination of symbols.
Interesting to know! When installing a key, experts recommend entering large and small letters in different languages and also adding numbers. The length must be at least six characters. Only in this option can at least some security be guaranteed.
Resetting the network key( )
Probably all computer users know what a network is. It is a connection between two or more devices that allows the exchange of information. The younger generation is familiar with this concept, as games can be played together through this method.
But what should you do if, after connecting the machines, a window appears to enter the network password? Moreover, if it does not exist, confirming an empty string will not lead to the desired result.
The fact is that Windows 7 provides new security tools, and therefore several conditions must be met to log in:
Use classic settings on all devices.
If all this is done, then you will not need to enter secret characters.
Resetting the administrator password( )
Sometimes situations happen when, under some circumstances, you simply forgot the password with which you can get to your desktop, and generally gain access to personal data. This often happens when a user constantly works on multiple devices. And if the passwords on them are not written down anywhere, then it is quite possible to confuse them.
There are several solutions. The first thing you can do is spend some time on selection. Alternatively, simply remove the system from your computer and install a new one. But in this case, the data that was on the system disk will be lost. And it’s not a fact that they can be restored, although methods exist.
But there is a safer way - a bypass, which I want to talk about. To do this, you will need an installation disk or USB flash drive with Windows. It is important to note that the operating system must be exactly the same. For example, if the Ultimate version is installed, then the same is true on a portable device.
So, if everything is found and prepared, you can proceed:
We insert the flash drive or disk into the computer and reboot to start from it. To do this, you need to set the appropriate settings in the BIOS.


Below we find " System Restore».
A window will appear in which we need " Command line».

increase
In it we write “ regedit" and confirm the actions.
The registry window appears. We need a branch " HKEY_LOCAL_MACHINE».

We go to the system drive (most often this is C:\). Next we go to the directory “ Windows\system32\config\" and select the file " system».
A small menu appears in which you need to enter the name of the new section. It can be anything. Let it be 3333.
On the right side, open the parameter “ CmdLine", where we enter "cmd.exe" and confirm.
After that, select “ Setup Type", where we enter " 2 ».
Now select the newly created section “ 3333 ».
Let's go to " File" And " Unload bush».

We take out the portable device, close all windows and reboot using system restore.
After the work has been done, a command line will appear while the OS is loading. Here we can change the password. To do this, enter in the line “ net user user password" We confirm the action. Example command: " net user admin 1111».
In this way we changed the password for the user " admin" on " 1111 " Now, in the window provided, we enter our treasured numbers and wait for the download.
Resetting your password via SAM file( )
There are many ways to bypass the login security system. Despite this, they all only change the information that is stored in the SAM file. It contains all the necessary data related to User-Password links.
It is worth noting that this file does not have a special extension. The fact is that it is a registry component. It can be found in the folder " Windows\system32\config", which is located on the system disk.
It is also important to note that this method is considered one of the most difficult. Nevertheless, I consider it necessary to tell it to you. To work we need a special program. At the same time, each step must be performed with extreme caution, because this can radically change the entire process.
We will use Active password changer. In addition, we will need a clean flash drive.
So, to remove the password prompt, you need to:
If everything goes as it should, no problems should arise in the future, since only the components we need are changed in the system area.
The only downside is that some relatively older motherboards may not support starting from portable memory. In this case, you can use a plastic disk.
Well, as you can see, there are several different ways to remove or change your account password. At the same time, they are absolutely simple, you don’t even need to watch the video. By strictly following the instructions, everyone will be able to gain access to the necessary information.
I hope everyone here will find an option that will help them cope with the problem. Subscribe and tell your friends about me!
Note. This method can be used in Windows 8 and later, but only if the account Not associated with a Microsoft account (in this situation there is an easier way).
Stage #1 - Setting up the command line to start before the Windows login screen
Stage No. 2 - Reset your password or create a new user and log in
After rebooting, continue to log into Windows 7 normally. Before logging in, you will see a command prompt window.
Password reset
To reset your password, enter the following command and confirm its execution with the key Enter:
Net user username new password
Important! If your username or password contains spaces, enter them in " in quotation marks " .
In the picture below for the user Adm7 password is set tL942G8dWp.

If you have forgotten your account name, enter the command net user without parameters to display all available accounts.
Create a new account
If you don't have any administrator accounts, you can easily create one. To do this, enter the commands below sequentially, pressing the key after each Enter.
For Russian(localized) Windows:
Net user username password /add net localgroup Administrators username /add net localgroup Users username /delete
For English Windows:
Net user username password /add net localgroup Administrators username /add net localgroup Users username /delete
The commands sequentially perform the following actions:
- Creating a new user.
- Adding a user to a group Administrators (Administrators).
- Removing a user from a group Users (Users).
If you want to set the password to never expire for all accounts, enter the following command at the end:
Net accounts /maxpwage:unlimited
When you finish typing, close the Command Prompt window.
Login
You now have an account with administrator rights and a new password. Simply select a user and sign in to Windows:

How it works?
To change user settings, you must have access to the Windows Control Panel or Command Prompt running with administrator rights from Windows. Since login is blocked, changes must be made before login.
To do this, at the first stage we enter the registry editor of the recovery environment and load a part of the registry (hive) of the installed Windows 7 into it. Using the parameter SetupType we indicate that before the next login to Windows, you must execute the command from the parameter CmdLine, and in CmdLine specify the command line (cmd.exe). These options are originally intended to perform administrative tasks during silent Windows installation, but we use them for our own purposes. After this, the registry hive is unloaded and the computer is sent to reboot. Then everything is simple - in the command line window that appears, we perform the necessary operations with users and log into Windows.
Enjoy using it!


