Rounded corners photoshop. How to round the corners of an image using CSS without Photoshop
In this quick tutorial, I'll show you how you can create rounded corners in Photoshop using simple masking techniques and filters.
You can adjust the corner radius to round the edge of your shape, text, etc. This is a quick and easy method that will create rounded corners. To create them you can use a layer mask.
Using a series of simple steps in Photoshop, you can create a rounded rectangle. Photoshop doesn't have a filter or any tool to make a round corner right away, but you can do it using Illustrator. It will allow you to create a rounded corner effect for almost every object. In it you need to go to the menu Effects > Stylization > Rounded Corners(Effects > Stylize > Rounded Corners).
Step 1
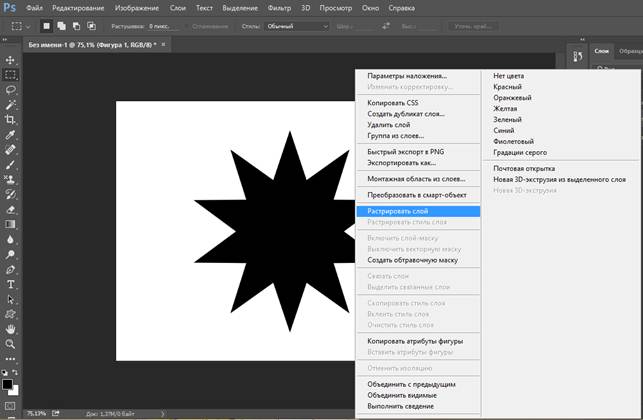
In this quick tutorial, I'll show you a simple method to create rounded corners in Photoshop using rasterized text, a shape, or an image. Let's take a vector image of a star with sharp corners (this method will also work well with right angles).

Step 2
Now you need to rasterize the layer. To do this, right-click on the star layer thumbnail in the layers palette and select from the context menu Rasterize layer(Rasterize Layer). You should do the same if you are using a text layer.

Step 3
Go to menu Filter > Blur(Filter > Blur) and select Gaussian blur(Gaussian Blur). The blur radius will depend on the size of your image and the result you would like to achieve. I'll choose a radius of 5 pixels.

Step 4
Hold down the Ctrl key and click on the layer thumbnail to activate image selection. Next we go to the menu Selection and choose Refine edge(Select > Refine Edge). You can experiment with the parameters Antialiasing(Smooth) and Shading(Feather) to select the desired effect. Contrast(Contrast) make it 100.

Step 5
Take the color of the shape, in our case it is yellow and fill the entire selection with this color. You can do this by pressing the key combination “Shift + F5”.

Step 6
Without removing the selection, you must add a layer mask by clicking on the icon that is located at the bottom of the layers palette. That's all, now the star has rounded corners.

You can use the same method to create text with rounded corners as shown in the image below. Now you can come up with your own font.
25.07.2016 27.01.2018
In this tutorial you will learn how to smooth out sharp corners of shapes in Photoshop.
First, let's create a shape. You can do this by selecting the Custom Shape Tool from the toolbar. The hotkey for calling the submenu of tools for creating vector shapes is U.
There are two ways to make this tool active:
1. While holding down the Shift key, click on the group of tools and a submenu will open to select the desired tool;
2. Long-clicking the left mouse button on a group of tools will also open a submenu.

Load all available shapes into Photoshop (click on the shape’s thumbnail in the top panel and click on the “gear” on the right to open additional settings):

From the drop-down list, select a shape with sharp corners, for example, this star with 10 corners:

When creating a figure, do not forget to hold keyShift- this will help maintain proportions.
Now you need to rasterize the figure - Right-click on the layer with the shape - Rasterize Layer.
We select the radius depending on the size of the canvas and the desired result, I chose 6 pixels.

Now we need to load the selection of the layer with the shape, to do this, hold down keyCtrlclick on the layer thumbnail with a figure on Layers panel.
When the selection is active, press the button "Refine edge" (Refine Edge):
A settings menu will open in which we need the parameter Feather leave on 0 , and the parameter Contrast increase to maximum 100%. Parameter Smooth customize it to your taste, it will help round the corners of the figure. In the case of the 10-sided star, I set it to maximum, but you may have completely different settings.
In the parameter Output to... leave the default setting - allocation.

Press the Enter key to apply the settings. Create a new layer and use Paint Bucket Tool or by going to the menu Editing-Fill fill the selection with the desired color, for example, black, as in the original figure. Turn off the visibility of the original layer with the shape and get this shape with rounded corners:

That's all. In this tutorial we learned how to round corners of shapes in Photoshop. I hope the lesson was useful to you.
Everyone has long been tired of traditional rectangular corners in website design. Rounded corners are in fashion, which are made not using images, but through styles, for which the border-radius property is used. This property can have one, two, three or four values separated by a space, which determine the radius of all corners or each individually.
In table 1 shows a different number of values and the type of block that is obtained in this case.
| Code | Description | View |
|---|---|---|
| div ( border-radius: 10px; ) | Rounding radius for all corners at once. | |
| div ( border-radius: 0 10px; ) | The first value sets the radius of the top left and bottom right corners, the second value sets the radius for the top right and bottom left. |  |
| div ( border-radius: 20px 10px 0; ) | The first value sets the radius of the upper left corner, the second - both the upper right and lower left, and the third value - the lower right. |  |
| div ( border-radius: 20px 10px 5px 0; ) | Sequentially sets the radius of the upper left, upper right, lower right and lower left corners. |  |
Example 1 shows how to create a block with rounded corners.
Example 1. Corners of a block
HTML5 CSS3 IE 9+ Cr Op Sa Fx
The result of this example is shown in Fig. 1.

Rice. 1. Block with rounded corners
An interesting effect can be obtained if you set the rounding radius to be greater than half the height and width of the element. In this case, you will get a circle. Example 2 shows how to create a round button with a picture.
Example 2: Round button
HTML5 CSS3 IE 9+ Cr Op Sa Fx
The result of this example is shown in Fig. 2.
Rice. 2. Round button
In the Opera browser, rounding to
The border-radius property can be combined with other properties, for example adding a shadow to an element. In example 3, a set of circles is made, one of which is highlighted using box-shadow . This set can be used to navigate through pages or photos.
Example 3. Glow
HTML5 CSS3 IE 9+ Cr Op Sa Fx
The result of this example is shown in Fig. 3.

Rice. 3. Glow around the circle
Using border-radius you can make not only a circle, but also an ellipse, as well as an elliptical rounding for a block. To do this, you need to write not one value, but two, separated by a slash. Writing 20px/10px means that the horizontal radius of the fillet will be 20 pixels, and the vertical radius will be 10 pixels. Example 4 shows how to create elliptical corners to add a comic-book style caption to a photo.
Example 4: Ellipses
HTML5 CSS3 IE 9+ Cr Op Sa Fx

The result of this example is shown in Fig. 4.

Rice. 4. Using elliptical corners
You can also change the appearance of the corners on images by adding the border-radius property to the img selector, as shown in Example 5.
Example 5: Images
HTML5 CSS3 IE 9+ Cr Op Sa Fx


In this section of my site I decided to place photoshop lessons, which may be useful to you when creating a website design. I think it would not be superfluous, on my part, before starting to learn Photoshop, to introduce you Photoshop hotkeys. Using Photoshop hotkeys, you will make your work easier and save time. .
My first Photoshop lesson will tell you how round the corners photo.
When creating websites, you often have to deal with the problem of how to round the corners of a picture, or how to round the corners photo. In this lesson Photoshop I'll teach you how round the corners drawing in photoshop. Also this one Photoshop lesson will allow you round the corners photos. I hope this is clear to you. After all, for Photoshop both the picture and the photograph are all the same. In my work I use Adobe Photoshop SC5, Russian version. Well, I'm not good at languages.
Today's lesson is about rounding the corners of a photo in Photoshop. Let's take a photo together with rounded corners like in my picture.
1. To implement rounding corners in Photoshop, open with Photoshop the picture (photo) we need. As an example, I took one of the photographs from my photo archive.
2. We bring the dimensions of the drawing to the parameters we need. To do this, press ALT+CTRL+I. The Image Size window opens. We set the dimensions we need. You can simply crop the image to the desired size.

3. Select the picture (CTRL+A) (a dotted line around the perimeter will appear) and copy it (CTRL+C); We copy the photo so that the original image remains unchanged after we complete the rounding corners in Photoshop. Although we can work on the original, when the rounded corners are ready, we will simply save the photo as another image.
4. Open a new window (CTRL+N), set the required image dimensions and click “OK”. Please note that I set the background to “transparent”. You can immediately set the background to the color you require;

5. Paste the copied image into a new window (CTRL+V) and create a new layer (CTRL+SHIFT+N). In This Layer, use the Rectangle Tool rounded corners"Draw a rectangle of the required size. The color of the rectangle does not matter. The tool is selected by clicking on the right mouse button. Or by simply pressing the key (U). We set the radius of curvature at our discretion (see the figure below);

If necessary, you can move the drawn shape using the arrows on the keyboard or using the mouse while holding down the left key. First, do not forget to activate “move” on the toolbar (top button). You can also resize figures. To do this, press (CTRL+T) and stretch the shape to the desired size using the mouse while holding down the left key. If you want to change the size while maintaining the proportions, you need to hold SHIFT and drag by the corner of the shape.
6. Go to the layers panel. While holding CTRL, left-click on the preview (picture) of the rectangle layer. A dotted outline of the shape appears.

7. Move on to the bottom layer. To do this, click on the right side of the image in the layers panel. In our case, layer 1. The blue highlight will go to layer 1.
8. Press CTRL+ SHIFT+I. A dotted selection will appear along the border of that part of the picture that is located outside our rectangle having rounded corners.
9. Press DEL on the keyboard. The part of the image that is outside the rectangle will be deleted.
10. Reactivate the rectangle layer. Delete it by clicking on the trash can icon.

11. Press the "M" key and left-click anywhere in the image. The selection has been removed. rounding corners in Photoshop ready. You can save the image that we received by
, in the format we need.

If such an image will be used to create a website design, save it for Web and devices (ALT+SHIFT+CTRL+S). rounded corners 12. Attention! If you have images around the edges with

There are still transparent pixels, you need to perform trimming. To do this, click “Image”, select “Trimming”, in the window that appears, set the settings as in my picture and click “Ok”. The canvas will be resized to the size of the image and any extra transparent pixels will be removed. The photoshop lesson rounded corners can be used for both oval and shaped photographs. To do this, in step 5, instead of the "rectangle with " select the "ellipse", "polygon" or "free-form" tool. Then we perform all the same actions as we did to get.
rounding corners
Webmasters everywhere use rounded corners on blocks and frames on websites. In this article I will tell you how to round the corners of pictures and photographs on a website without using third-party programs, only using CSS.
In order for the examples given in the article to be displayed correctly on your screen, you must use the latest versions of browsers, FireFox, Chrome and those based on them: Yandex.Browser, Amigo, and so on.
Rounding corners of DIV blocks
According to the CSS3 standard, so that the block DIV had rounded corners, it needs to be styled border-radius, for example like this:
Border-radius: 10px;
For clarity, let’s draw two blocks with straight and rounded corners:
Block with right angles
Block with rounded corners
Rounding corners of pictures
By analogy with the example above, you can round the corners of images on the site, for example photographs. For clarity, let's round the corners for the photo from the page
Here is the image without CSS processing
And now with rounded corners:
Border-radius: 10px;
To make it really “beautiful”, let’s add some edging from the beginning...
Border-radius: 10px; border: 5px #ccc solid;
and then the shadows:
Border-radius: 10px; border: 5px #ccc solid; box-shadow: 0 0 10px #444;
The option below (rounded corners with shadow without border) looks very similar to a mouse pad:
Border-radius: 10px; box-shadow: 0 0 10px #444;
And finally, a complete mockery of the image
Border-radius: 50%; border: 5px #cfc solid; box-shadow: 0 0 10px #444;
If you open the image in a new window, you will see that it (the image) is unchanged, and all the corners, shadows, and so on are just the result of processing CSS styles by your browser.
A small lyrical digression
Style border increases the size of the image by the amount of the border. If a value is specified border: 5px, then the final image will become wider and taller by 10 pixels. Keep this in mind, in some cases the layout of the site may not work.
A style box-shadow does not affect the size of the picture, the shadow seems to run over neighboring elements. When using it, the site layout does not suffer.
How to Round the Corners of Images in WordPress
In all the examples above, I wrote styles directly in the html code tags. For example, the last one looks like this:

This is good when you need to re-arrange one picture or photograph. What if you want to change everything? Well, you won’t climb all over your site to edit the display of each one. In most cases WordPress tag IMG defines several style classes. One by the unique name of the image file, another by size, and another by alignment. You can supplement one of them with the above parameters.
For example, for all images for which alignment is not specified, in the file style.css For your WordPress theme, enter the following:
Alignnone ( border-radius: 10px; border: 5px #cfc solid; box-shadow: 0 0 10px #444; )
Or the most stringent method for all the pictures on the site. Let's redefine the style for all tags IMG:
Img ( border-radius: 10px; border: 5px #cfc solid; box-shadow: 0 0 10px #444; )
The last option is suitable not only for WordPress, but for any CMS. And even for simple HTML pages in the case when, when displaying images, the tag IMG no style classes are assigned. But be careful. If you override the tag display options IMG you will change the appearance of ALL pictures on the site!
Instead of a conclusion
All examples in the article are conditional and are intended only to demonstrate some of the capabilities of CSS for image processing and show how simple it is.


