Yandex Disk is a reliable storage for your files. Yandex disk: logging into your disk? How to create a cloud for storing files for free on Yandex
Often people face the problem of transferring large files. You can’t put such a file on a flash drive, you can’t write it to a disk. Cloud technologies come to our aid. You've probably heard the term cloud, but didn't fully understand what it means.
The cloud is a place on the Internet where your files can be stored. Data is stored on many servers.
I recommend storing your photo and video archives not only on your computer, but also on an Internet disk. This is primarily due to safety. The computer's hard drive may fail, but photos or videos are only there. And that's it, they can't be returned anymore. Therefore, store your data in the cloud, it’s safer. You can write material to a flash drive if the flash drive’s memory allows it.
If you decide to resort to cloud technologies, you want to transfer a large file, because small ones can be sent by email or social networks. Not all people have internet speed that allows them to download movies or other files without any problem. You may also encounter the problem of slow data transfer, although the download speed may be fast. This is a typical user problem, but it is primarily related to the Internet provider. I warned you about this problem, so don’t be alarmed if the speed is low.
Why Yandex Disk?
- Makes it possible to manage files on any platform, including smartphones;
- You can share files with friends;
- Safety. No one will see your files if you did not open access;
- You can connect a network drive directly to your computer;
- Gives 10 GB. free space and increases every year by 1 gigabyte.
Upload the file to Yandex Disk
Before uploading the file, make sure that you have a Yandex account. If not, then register. This will allow you to access all site services.
How to increase disk space?
Sometimes 10 GB. It may not be enough for your needs, but you want more. There are several ways to do this:

You can also consider other sites that provide space in the cloud. They can have both advantages and disadvantages.
Overview of cloud storage and download instructions.
How to create a file storage cloud
Did you know that in 2014, every third Internet user thought about creating a cloud for storing files, and only every fourth actually used it? Now virtual storage has become widespread and virtually every user uses some kind of cloud service. And almost 87% of these users, when asked about the benefits of using the cloud, list simplicity and ease of creation among the top three.

Therefore, let's look together at the question of how to create a cloud for storing files in various services.
Step 0. Select a cloud service
As you probably already understood from the article: a virtual (cloud) service is not a specific place that has a physical address. This is a space on the Internet created by a large number of servers united under the logo of one brand (Google, Yandex or iCloud, for example).
Therefore, the first step that a user takes on the path to creating a cloud is choosing a service that will guide and coordinate you. And there is plenty to choose from. The most popular cloud storages:

- Yandex offers 10 GB of free storage. You can track occupancy thanks to the scale in the lower left corner of your account. It looks like this:

If this volume is not enough for you, you can increase it at any time to either 100 GB or 1 TB. The cost of the subscription will depend on how long you want to increase the volume: for a month (80 rubles for 100 GB or 200 rubles per month for 1 TB) or for a year (67 rubles per month for 100 GB and 167 rubles for 1 TB) .
Please note that the discount on the purchase of an annual subscription will only apply if you make a one-time payment for it!
- When creating a cloud, Mail.ru provides only 8 GB of information for free. But with the purchase of additional space, the situation is quite confusing. The service offers a separate purchase for mobile volumes (for Android and iOS) and Web space. And the terms of provision are also completely different. For example, when purchasing space for a mobile device, this volume will be added to what you already have. But in the Web space these numbers do not add up. But the same 1 TB of virtual space will cost you 699 rubles per month or 6990 rubles per year. This is 4986 rubles per year more expensive than on Yandex.Disk. But compare for yourself:


- Google.Drive.

- Each user is provided with 15 GB of free space. You can increase it to 15 or 100 GB, as well as to 1, 10, 20 or 30 GB. It will cost 139 rubles per month for 100 GB (or 1390 per year), and for 1 TB - 699 rubles per month (and 6990 per year). Prices are quite comparable with mail.

- Dropbox provides 2GB of storage free with initial sign-up. What sets this service apart from others is that you can increase the space provided for free by filling out your profile and inviting your family and friends to use it. If this volume is not enough for you, then you can purchase 1 TB or more. This purchase will cost $9.99 per month or $99 per year for a one-time purchase.
Icloud and many, many others.
Important! When choosing, keep in mind that most services offer the same functionality. But Dropbox itself lacks editorial capabilities for processing files!
How to create a cloud in Yandex?
- It’s very easy to create a cloud for storing files (photos, videos, documents) for free on Yandex. To do this, you need to register in the system if you do not yet have a mailbox there. For this:
- Open ch. yandex.ru page.

- At the top right, click the link “Create mail”.


Please fill out the form carefully.
- How to go to it:
- At the top right, find your login (email address) and click on it.
 From the drop-down menu, select "My Drive".
You will be taken to the file management tool. Here you can download, delete, open access to users. You have access to the archive, basket, history. Create new folders, copy files, you can work with office documents.
How to create a cloud in mail
- In order to create a cloud in Mail.ru, no special skills are required either. In general, the entire instructions are very similar to the manual for working in Yandex:
- Go to mail.ru.
- In the right corner, click "Registration".

- Fill out the form and receive the address.
Log in.

You will automatically be allocated storage space. You can open it by clicking on the cloud icon in the top menu.
The tools are generally similar to other services.
How to create a cloud on Google?

Once logged in, click the dotted icon to the left of the letter in the colored circle that appears in the upper right corner. This is the main menu of Google services. 
Select the triangle labeled "Disk".

An area will open in which you will see tools on the left, and the contents of your storage in the center. The functions are the same as in Yandex.

Where can I download the application?
To access your disk, it is not at all necessary to open a browser and load the storage in it. Each company has created its own mobile application that can be installed on any device.

You can download the client for any OS and any device from the pages listed below or from official markets.
Yandex - https://disk.yandex.ru/download/
Mail.ru - https://disk-o.cloud/
Google - https://www.google.com/intl/ru_us/drive/download/

If you need to create a cloud for storing files for free for Android and iPhone, also use any service. Clients can be easily downloaded from Google Play and AppStore, respectively. iCloud storage is also available for Apple devices, which can be accessed using your Apple ID. It is convenient to have an application that allows you to synchronize your iPhone or iPad with Windows devices. You can download it on the official page at https://www.icloud.com/
And remember, if you have a mailbox on one of these portals, then you have access to completely free file storage, which does not need to be created separately.
Fortunately for many users, the process of registering cloud storage has not caused difficulties for a long time. Anyone can do this, and using such services will greatly simplify your life! So try it, and if you have any questions, write to us!
Hi all! Cloud storage is a convenient tool that allows you to store your files on the Internet without taking up space on your computer, access them from any computer or other device, share them with other people, create documents online (Word, Excel, Power Point presentations), etc. .d. One of these tools is Yandex.Disk, which is available to owners of Yandex mailboxes.
By the way, earlier I already talked about something else for Mailbox users. In any case, you can use both storages at the same time, or even have several accounts (mailboxes) in each, thereby getting even more space to store your files on the Internet.
This article and video tutorial will talk about using Yandex.Disk online (via the web interface). Since, there is also an application that is installed on the computer and synchronized with the online disk. The point is that a separate Yandex.Disk folder is created on your computer, into which you can drag files on your computer and they will immediately become available in the cloud. This is especially convenient for large files, over 2 GB, which cannot be uploaded to the cloud via the web interface.
Personally, I turned off synchronization, because then all the files in the cloud take up space on the computer. And my goal is to free up this space. :) Alternatively, you can turn it on while transferring large files, and then turn it off again and empty the Y.Disk folder on the computer. Although now there is already a beta (experimental) version of the program - Yandex.Disk 2.0, which allows you not to take up space on your computer. But I haven't tested it yet.
So, what exactly are we going to look at?
1. How to start using Yandex.Disk.
2. How much space is given in the cloud for free and how to increase it.
3. Let's go through the interface (what, why and why).
4. How to upload files to Yandex.Disk and share them via a link.
5. How to create a folder, Word documents, Excel, Power Point presentation in the cloud.
6. How does sharing a folder work, how to open it to another user.
7. How to move, rename, delete files on Yandex.Disk. Group actions on files.
8. How to download and save files via a link from someone else’s cloud to yours.
Below you can watch my video tutorial on using Yandex.Disk online:
How to start using Yandex.Disk?
You can go to Disk at: disk.yandex.ru. If you already have Yandex.Mail, then you can log into your Disk by entering your email username and password at the top of the page.
If you don’t have mail on Yandex, then you need to click on the “Create Disk” button and, following the prompts, create a mailbox. By doing this, you will create an account for yourself in Yandex, and your login and password will serve to access other service tools - Disk, Direct, Metrica, etc.
In the future, you will be able to access Drive directly from your mailbox; a corresponding tab will appear at the top. Or while it is not there, you need to click on the “More” tab, select “All services” from the list and click “Yandex.Disk” there.


Storage space for your files
New Drive users are given 10 GB of space. This space can be expanded for free or for a fee. At the top right there is an inscription about how much space is on your Disk, click on it to learn how to increase space.

Free by inviting friends - 1 person gets 512 MB (something like an affiliate program). In total, in this way you can expand the Disk by another 10 GB.

Important: 512 MB will be credited to you if a person not only registers an account, but installs the Ya.Disk application.
Yandex can also give away additional space as part of promotions, etc. For example, on the mail’s birthday, that is, when a year has passed since your mailbox was registered.
In addition, additional disk space can be purchased for money:
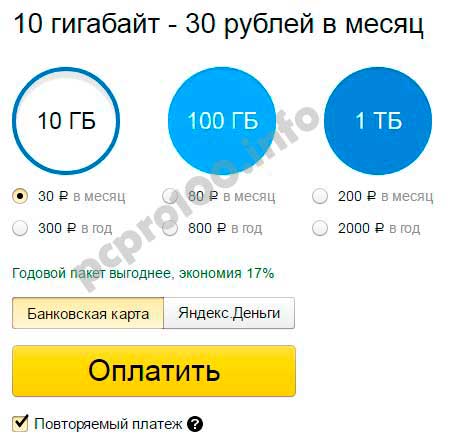
10 GB – 30 rubles per month.
+100 GB – 80 rubles per month.
+1 TB – 200 rub. per month.
Let's go through the main elements of the Yandex.Disk interface.

All your files that you have uploaded to Disk, as well as created folders and documents are displayed in the center. Just above is a panel with the latest added files, which can be hidden.
You can change the way files are displayed on Disk by clicking on the three corresponding icons - large, medium icons and list. Nearby is the “Arrange” tab, that is, place the files in the appropriate order - alphabetically, by date, by size, type, etc.
On the right is information about the occupied space on Disk and links to the application for computers and mobile devices. Above there are bell and gear icons. The first displays notifications, and with the help of the second, you can configure which notifications to display - these can be ratings and comments on your publicly accessible files, changes in shared folders, etc.
At the top there is a file upload button and a “Create” button for working with documents. We will consider them separately.
On the left is panel with sections. I’ll tell you briefly about each below.
Files- what we talked about above. All files downloaded and created on Yandex.Disk are displayed here.
Ribbon– your actions on the Disk are displayed here, as well as the actions that you performed on the Disks of other users - that is, you saved something from another Yandex.Disk, followed a link that was shared with you, information about likes, comments on these links , as well as to your links.

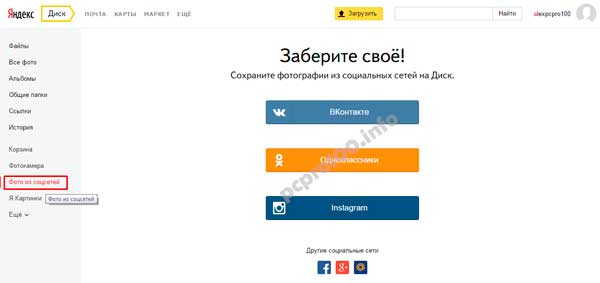
All photos– here you can upload your photos from your computer or mobile devices (by installing the application), as well as import photos from social networks.


Shared folders– this section displays folders with shared access, we’ll talk about it separately.
Story– here, as well as partly in the feed, the actions you have performed on Disk are displayed.
Basket– contains files that you deleted from Disk. Files from the Recycle Bin can be restored or permanently deleted so that they do not take up space in the cloud.

Camera– photos automatically downloaded from a computer or mobile device are saved here (with the Yandex.Disk application installed).
Ya.Pictures– here you can save images that you found through Yandex search.
Mail attachments– all those files that you attached to letters when sending.
Downloads– the folder containing files you saved from other users’ Drives.
How to upload files to Yandex.Disk and open a link to them?
Small files – documents, videos, pictures, archives with files, etc. you can upload via web interface.
You can do this by clicking on the “Download” button and selecting the file on your computer. If you need to select multiple files, hold down the Ctrl key and use the mouse to mark the ones you want to download.
Or click on the “Show dropzone” icon. This same drop zone will appear into which you can drag and drop files from your computer with your mouse.

If you have a folder with files on your computer that you want to upload entirely to Disk, then first zip it up. Since the web interface does not allow you to upload folders.
Hefty files (in particular, more than 2 GB) are downloaded by synchronizing the application installed on the computer and the cloud.

Also, recently it became possible to leave likes and comments on files via a link. It is available only to those who are authorized in their Yandex account (mail).

How to create documents in the cloud?
On your Yandex.Disk you can create folders, as well as Word, Excel documents and Power Point presentations. Click on the "Create" button and select the document type you need. I won’t show you how to work with these documents (otherwise the article will stretch for kilometers), if you used them on a computer, then the interface in the cloud is similar.

For example, you can move files into the created folders and organize them as you wish.
Shared folders
If you give another user full access to a folder, he will be able not only to view its contents, but also to add his own files to it, as well as edit the documents that you added there. In the same way as you, you will be able to edit the documents added by him. That is, this is collaboration on documents in the cloud.
To share a folder, select it with the mouse, the “Sharing” button will appear on the right. Click on it for further settings.


The invitee will receive a corresponding letter in their mailbox:

And when he follows a link from it, the shared folder will appear on his Drive, and at the top there will be a notification “Accept invitation”. When he clicks “Accept”, he will be able to work with this folder. Let me remind you that the invitation only works for Yandex.Mail owners.

And you will receive a letter stating that the invitation has been accepted.
By selecting this folder with your mouse, you will see the invited participant, and next to his email there will be a green checkmark.

You can block access to the folder at any time by clicking on the “Set up access” button and change the participant status to “No access”.
The user will receive a letter in their mailbox informing them that access to the folder has been closed.

Actions on files and folders in Yandex.Disk
For actions to become available, you need to select the file with the mouse - then the “View” button will appear on the right (you can click and view the inside directly on Disk (but if the archive is too large, it may not open). For a folder, this will be the “Open” button. Also You can open a folder or view a file/archive by double clicking on this element.

There will be three more icons nearby - download, delete to trash and an ellipsis. Clicking on the ellipsis will open several more options - copy, move and rename the file. In addition, you can move files in Drive by simply dragging them with the mouse to the desired folder or to the trash can for deletion.
As for downloading, this can be useful for editing files and archive contents that cannot be changed directly in the cloud. You downloaded, made a replacement on your computer, and then uploaded everything back to Disk with the same name. Then the open link to this material will not change, but the content will simply be replaced. Documents such as Word, Excel or PowerPoint can be edited directly in Drive.
For group actions you simply tick the required files and folders. If, for example, you need to select all the files on Disk at once, then you check the first one, then hold down the Shift key, the last one - they are all selected, and you can select the desired action.

How to download and save files via a link from someone else's cloud?
If another user shared with you a link to files from their Yandex.Disk, then you can view these files, save them to your Disk (they will be saved in the “Downloads” folder), or download them.

If the files are too large, then it is more convenient and faster to download them through downloaders, for example Download Master. True, when downloading from Disk, the bootloader has its own nuance, as described in.
So, in this article we looked at the main points of working with Yandex.Disk online. For those new to this tool, this is a good tutorial.
Thank you for your attention!
I will be glad to answer your questions in the comments.
Best regards, Victoria Karpova
Just a few years ago, PC users would have said that this is what clouds in the sky are called. But not now! Today, “cloud” technologies are making their way to the masses by leaps and bounds. What it is?
This is the name for storing files on remote servers. Today, many companies that are somehow related to the IT sector provide their users with such a service. Of course, Yandex could not stay away from such a fashionable trend today. Therefore, today we will learn about what Yandex.Disk is, why it is needed and how to use it.
general description
As you might guess, this is the name of the service for storing user data, created and supported by Yandex. The information in this case is located on the company’s servers.
All documents whose size does not exceed 10 GB can be stored indefinitely. In addition, all files are not scanned by an antivirus, and therefore downloading any content from Disk is completely safe. That's what Yandex.Disk is.
How to install it on your computer?
When the service had just appeared, new users registered exclusively by invitation. Today anyone with a computer and Internet access can do it. To start using Disk, just follow a few simple steps. Let's figure out how to install Yandex.Disk on a computer.
First, go to the official Yandex website using any browser suitable for you. If you are not registered in any of the company's services, now is the time to do so. You need to click on the button with the corresponding inscription and follow all the instructions.
After that, click on the “Login” button, enter your username and password, and you will be taken to the main working window of “Yandex.Mail”. Almost in its very title there is a link “Disk”. To get your personal 10GB of storage space, you'll need to follow three simple steps. First you have to click on the link “Install... disk on computer.” Of course, choose the version that is offered for your operating system.
 After we have learned what “Yandex.Disk” is and how to find it on the site, let’s talk directly about installing it.
Download the installation file
After downloading, the process of downloading the online installer file will start in your browser or yours. When the download is complete, right-click on it, and then select “Run as administrator” from the drop-down menu. The utility automatically starts, starting to download all the missing files from the company’s servers.
Completing the installation
After some time (depending on the speed of your connection), the installation will be completed. Attention! At the end of the installation, a window will appear in which there will be a checkbox “Install Yandex elements”. Many people are wary of this kind of “wonderful” add-on, so whether to uncheck this box or not is up to you.
Check other options according to your wishes and needs. When the installation program reports completion, simply left-click on the “Finish” button. After this, a separate dialog box will appear in which you can familiarize yourself with the capabilities of the service. Then you can click on the “Next” button.
Here's how to install Yandex.Disk. You can see that there is nothing complicated about this.

Uploading files to the server
You can find “Disk” in the system tray, in “Explorer” and in the “Start” menu, scrolling through the list of programs that are installed on your computer. How to upload your photos, videos and other files to the server? Everything is as simple as possible: copy them to the “Yandex.Disk” folder, which can be found in the left panel of “Explorer”. When a document is loading, a blue light will appear next to it. Once the process is complete, the icon will change color to blue.
In addition, the default installation involves creating the Yandex.Disk folder on the desktop. You can also copy and move files that need to be uploaded to the server. Attention! They are saved on your computer, so make sure you have enough free space. By the way, after the initial addition of new documents, you immediately receive an additional 2 GB of free space on
Making documents publicly available
Another advantage of the cloud is that you can easily make all your documents available to friends or anyone. To do this, simply right-click on the file and then select “Copy public link” from the context menu.
Smartphone application
Considering the increasing popularity of smartphones, it is not surprising that the Yandex.Disk mobile application has appeared. How to use it?
 First you need to install it on your device. To do this, you should use the AppStore, Google Play Market or Microsoft Store, depending on the model of your smartphone. Install the application, then enter your username and password. Tap on the “Login” button. If everything goes well, the program will synchronize and then display a corresponding message.
Please note: since not everyone has smartphones or tablets with a large amount of internal memory, the developers have provided the ability not to download files to the device, but only to display them.
Delete the application
How to remove Yandex.Disk? Nothing could be easier! To do this, left-click on the “Start” button, open “Control Panel”, find the “Programs and Features” item there. Click on the link, after which a list of all programs available on your computer will open.
Select “Yandex.Disk” with the left mouse button, and then click on the “Delete” button, which is located in the title of the dialog box. The utility will be uninstalled from your system. Attention! The files that you previously uploaded to the server will remain intact. If you no longer need them, delete them before uninstalling the application from its folder and wait until synchronization is complete. In addition, the same can be done through the web interface.
That's what Yandex.Disk is. Now you know how to use it.
You've probably already noticed that many information businesses post various files for download on Yandex Disk. Let's find out today what this mysterious service is and how to use it. Yandex.Disk is a new cloud data storage technology. Currently, such services are attracting more and more attention from Internet users.
After all, the question of where to store their files arises, over time, for many. These can be various documents, albums, collections of your favorite music, etc. And with the help of such services you can easily transfer information to all your acquaintances and friends.
The Yandex.Disk service makes it possible to work with files located in cloud storage at any time and anywhere.
It is worth noting that the use of Drive is available from all devices with an Internet connection. I have already made a choice in favor of a new one data storage service for several reasons:
You have access to your folders and files at work, at home, and on the go. Wherever there is an Internet connection.
Moreover, the storage of information is not limited in time and is absolutely free.
Yandex.Disk. Registration and use of the service.
I think that you already understand a little why the Yandex.Disk service is needed.
I invite you to register, so you can learn even more about the capabilities of the service and evaluate them.
To connect to the service you need to have a Yandex mailbox. If you don’t have it, then find a video on the Youtube channel (there are plenty of them there) and register on Yandex.Mail.
Click on this link REGISTRATION
 Good news - by registering using this invitation, you will receive a bonus of 1 GB of additional disk space.
A registration and login form opens. Enter your Yandex username and password. Mail and click “Login”.
If you do not have mail on Yandex, then you need create a mailbox on Yandex, enter it and follow the Disk link in the menu.

At the moment, 3G of free space is available on the Yandex disk.

How to download a file from Yandex. Disc?
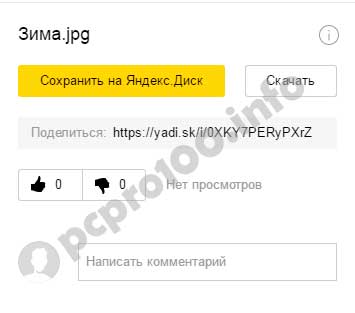
If your friend follows the link that you sent him to download the file, then he has two options:
click on the “Save file to Yandex.Disk” button (Fig. 4), after which the file will be saved to your friend’s Yandex.Disk, of course, provided that he has a Yandex account;
or click on the “Download” button (Fig. 4), after which a window will open to select a location on your computer where you can save the sent file.

Rice. 4 How to download a file from Yandex.Disk?
By the way, in Fig. 4 below you can see the inscription “No viruses detected. Verified by Dr.Web." This suggests that Yandex.Disk values its reputation and checks its files with a well-known antivirus.
This is the new file storage service offered by Yandex users. To create a Yandex disk for yourself, click here.
Create Yandex disk
Go to the Yandex Disk folder on your computer, select the desired file, and in its context menu select “Copy public link”
This link can then be sent via email or any other method.
The program does not have an independent interface, but only in the form of a context menu. From it you can open a disk folder, view the amount of free space, turn synchronization on or off, change program settings and several other small options.
Increasing Yandex Disk capacity up to 10 GB
Three simple steps will allow you to increase your disk space for storing information from the initial three gigabytes to 10! All you need to do is follow these steps:
After login to Yandex disk will be implemented, you will have access to more 3 gig disk space in Yandex disk. And in total already 6 gigs.
![]()
How to properly remove Yandex Disk?
If you need to remove Yandex Disk from your computer, you first need to disconnect it from the computer in its settings, and then delete the application in the completely familiar way. The second video shows where this setting is located.
The web interface is quite simple and allows you to perform basic file operations such as copying, moving, renaming and deleting. Interestingly, the service supports opening the main formats of office documents, and a mini-player is provided for music.
This is how any files are sent, be they documents, photos, music or something else. 

If you need to access your data from someone else's computer, on which you do not need to install the application, all functions can be performed through the web interface. To do this, you need to log into your Yandex mail and go to the Files tab

Below the tabs there are buttons with which you can perform the necessary functions.
. Click on the “Download” button and a pop-up window will appear. You can drag the file into the upload field or click the “Select files...” button and find the required file in the explorer that opens.
The principle of working with the web interface is the same as with a computer. When deleted, all files are placed in the trash, which must be emptied periodically.
Hello everybody! In this article you will learn what Yandex disk is and how to use it. And you will find information on how to use the useful Yandex.Disk service and what it is.
So, Yandex Disk is a cloud service provided by the IT company Yandex, which is known for many useful services, for example, Mail, browser, etc. It gives us the opportunity to store information using cloud technologies (more precisely, on servers owned by the company).
Previously, the service could only be used by those who received a special invitation, but at the moment it is freely accessible.
To gain access To access data stored on the disk from any device, you just need to have an Internet connection. But remember that all your devices must be synchronized.
That's all for me. I hope you now know what Yandex disk is and how to use it. If you have questions or suggestions for me, write about it in the comments, and I will definitely answer everyone. Peace and health to everyone!
With UV. Evgeny Kryzhanovsky
Yandex Disk is a convenient solution for downloading and synchronizing data. If you don’t yet know how to work with Yandex disk, then I recommend that you read this article.
Cloud storage is an excellent alternative to both a stationary hard drive and any other storage devices. Since 2010, this type of data storage has become the most widespread due to its reliability and significant volume, so it is not surprising that recently users are increasingly asking the question: “What is Yandex.Disk?” and “Should I trust him with important information?”
So, what is Yandex.Disk? Everything is very simple - this is a cloud storage that replaced the Yandex.People service. The first Yandex service was also created for storing and exchanging files, but due to the advent of cloud technologies, the project was discontinued in 2013. The fact is that interest in the capabilities of new types of archives was so high that, fearing competition, Yandex was one of the first to offer its users a modern storage facility for large volumes of information. The solution gave good results. Currently, competition in this segment is quite high, but for users of the company’s services, Yandex.Disk turned out to be “the one” - that is, a useful and convenient service. Let's find out why:
- 20 gigabytes – free. Today, each new user of the service automatically receives 10 Gigabytes after registration. But it doesn’t stop there; Yandex is not so simple: you can get additional gigabytes as a reward for inviting friends. Moreover, the inviter receives 512 megabytes, and the invitee receives 1 gigabyte additionally, subject to the installation of the Yandex.Disk desktop application. A few more gigabytes can be obtained using a Yandex.Disk certificate or by taking part in promotions that the service regularly holds together with partner companies. So, about 20 Gigabytes gradually accumulate, but if you need even more, you can purchase it. The conditions and prices are quite affordable, and the quality, stability of work and additional features are no worse than those of competitors.
- Principles of working with files and additional functions. To automatically send or change existing files, you can install the Yandex.Disk desktop program for Mac or Windows, as well as use third-party applications with the WebDAV protocol or work with files directly through a standard browser.
After installation, the program creates a separate folder, which automatically synchronizes all added information with cloud storage. For the reverse operation, that is, uploading files from Yandex.Disk to a computer or smartphone, you just need to mark them, call up the context menu and select the “Download” option.
Also, users will probably find it useful here:
- share files by generating a link for direct access to any of the uploaded files;
- receive screenshots, immediately save them in the cloud and share a link;
- send new photos and videos directly to social networks;
- establish shared access to any of your own folders in the cloud, sending invitations and setting access rights for each of the invitees;
- Synchronization. Yandex.Disk automatically synchronizes information on all available devices of one user. Therefore, if the application is installed on home and office computers, as well as a smartphone or tablet, all updates will be available on each of them.
Thus, answering the question of what Yandex.Disk is, we can say without reservation that it is a completely modern and convenient cloud, which may well become the main or auxiliary storage for any private information. If you still have any questions, I recommend reading a more detailed article at the link - how to work with Yandex disk correctly. In fact, many domestic Internet users needlessly ignore this Yandex service, preferring the Dropbox and Google Drive services. Although the product of our programmers is essentially not inferior to Western products.
Video.
In addition to this material, I suggest watching a video review of various cloud services for storing files on the Internet.
Yandex.Disk is a cloud service for storing user information on servers. It also allows you to exchange information via the Internet. The service for data transfer can synchronize various devices with each other. Yandex.Disk was released in 2012 and offered use to only select people. But now everyone can use it.
Installation
Yandex.Disk is a virtual storage that synchronizes with
computer directory. In addition, all data in this folder will be synchronized with all user devices. There is support for all devices and operating systems. When downloading information from any device, it can be processed on other gadgets or someone else's computer via the Internet.
To use this service, you must have a Yandex mailbox. Therefore, if it does not exist, you should create it. After logging in, the user is taken to the “Files” section. If the transition to the disk occurred through a referral link, then in the window there will be an underlined inscription stating that you will receive 1GB as a gift.
Initially, only 3GB is available to the user. To increase volume, you should do just a few steps. First of all, you need to click on +3GB to install the software on your computer. After this, the YandexDiskSetup.exe file will be downloaded. it needs to be launched. The installer will independently download and install Yandex.Disk. Upon completion of the installation, you will be prompted to install Yandex elements, but it is better not to clutter your computer and uncheck all the boxes. Then you need to click on “Done”.
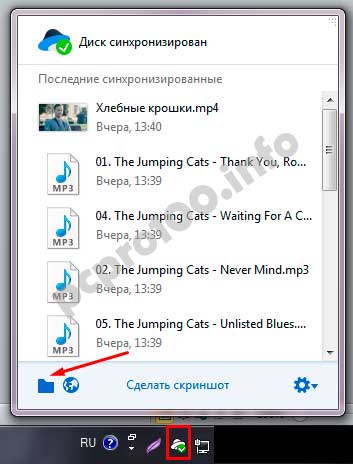
After this, you can familiarize yourself with the capabilities of the program. To do this, you should study the manual, which explains everything clearly. Then you need to register. To do this, you need to enter your email address and password. After this, the computer will begin synchronizing with Yandex.Disk, and the program icon will appear in the system tray. If there is a green flag on it, then the synchronization was completed successfully.
Before filling this folder with information, it must be moved from the system drive to another. To do this, right-click on the program icon and select “Settings”. Here you should go to the “Basic” tab and specify the future location of the Yandex.Disk directory. To do this, you need to create a folder on another drive, click on “Edit” and set the path to it.
Initially, this folder already contains some information. This is a PDF document that describes the main functions of the program. To further increase the amount of free space, you need to upload several files to the directory using the service. To do this, you need to open the folder and copy any information into it. this will bring an additional 2GB.
Using the service
Yandex.Disk allows you to publish files. To do this, you can use a program available on your computer or use the service interface. Access to information is carried out by passing a link to another user. To get this link, you need to go to the Yandex.Disk folder, select the desired file, right-click on it and in the menu that appears, click on the “Yandex.Disk: Copy public link” item.
After that, it will be in the clipboard, from where it can be sent to other users in any way.
You can also get the link in another way. To do this, you need to right-click on the Yandex.Disk icon in the system tray. In the menu, select “Sharing”, and then “Select a file and get a public link”. A window will appear in which you can open any file on your computer.
In addition, it is possible to publish folders, but this is a little more difficult to do. To do this, you need to provide access to it to a user who has a Yandex mailbox. This can be done through the program. To do this, you need to right-click on the icon and select “Sharing”, and then “Select a folder and open access”.
You can also use the Yandex.Disk website. Here you need to select a folder and click on “Open access to folder”. In the window that appears, you should enter the user’s email address or find him on a social network. Then you need to specify the access type and click on “Invite”.
If access was provided via email, then the user will receive a message with the application to go to their Yandex.Disk account. If there is none, you need to create one. These methods provide access to files and folders on Yandex.Disk.
Web interface
If you need to visit Yandex.Disk from someone else's computer on which the program is already installed, you can use the service's web interface. To do this, go to your email and go to the “Files” section. At the top of the window there will be buttons with some actions.
If you press the “Upload” button, a window will appear on the screen into which you can drag the file and place it in a special field. You can also do this using the “Select file” button and find the one you need in Explorer.
The service works on the same principle as a computer. Unneeded files are deleted into the trash, which must be emptied periodically. All other functions of the service do not require description.
In addition, the web interface allows you to view images and PDF documents, as well as listen to audio files without downloading them from the service.
In general, Yandex.Disk is an excellent service for storing everyday information. In addition, the folder size can be increased, which will make it possible to use more data away from your work computer.
Good day everyone! Today we are talking about a very convenient service that I have been using in my work for a long time - Yandex Disk. What kind of “beast” is this? - you might ask. I will talk about this in detail in the article below. If you have any questions, ask them in the comments, we will figure it out and look for answers! In the meantime, let's get acquainted with one of the most convenient file storages from the developers of the popular Russian search engine Yandex.
1. Yandex Disk: what is it
Yandex.Disk is a popular cloud storage that allows users to store various information (photos, videos, audio, texts and other files) in the so-called “cloud”, i.e. on a server on the network. Data stored on Yandex.Disk can be shared with other users, as well as accessed from various devices - other computers, tablets and smartphones. The basic version of Yandex.Disk is completely free and available to everyone. I remember that in 2012, registration was by invitation only, and I used an alternative service - Dropbox. But now I have completely switched to Yandex Disk Cloud. After all, free, and even accessible from everywhere, 10 GB is never superfluous.
2. Yandex Disk: how to use - step-by-step instructions
So, I convinced you, and you decided to install Yandex Disk on your computer. Now let’s take a closer look at how to use Yandex Cloud (also called Yandex.Disk, since it is a cloud data storage).
2.1. How to create Yandex Disk (registration in Yandex Cloud)
In order to start using Yandex.Disk, you need register and create a mailbox from Yandex(if you already have one, go straight to the second point).
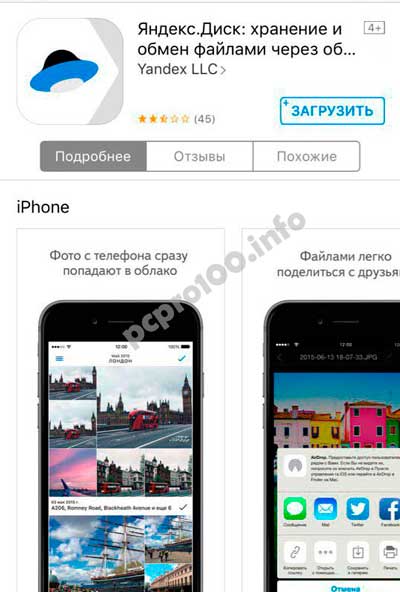
4. Installing Yandex.Disk on a smartphone. Free apps are available for iOS and Android, so you can easily download them from the App Store and Google Play. The application for iOS does not have a very high rating, there are some shortcomings, all of which can be seen in the reviews.
2.3. Yandex Disk: how much free space?
Immediately after registering and installing Yandex.Disk, you can access 10 free GB of space in the Cloud. This is quite enough for a start; it lasted me about six months. What to do if there is not enough space?
- Additional free 10 GB for inviting friends. You can get 512 MB of free cloud space for each friend you invite. Go here - https://disk.yandex.ru/invites and you will see your referral link, which you need to copy and send to your friends. After each user registers using your link, you will receive additional disk space, and the invited friend will receive an additional 1 GB.

- Additional up to 250 GB as a gift from Yandex partners. Various promotions are regularly held that will allow you to get additional gigabytes of free space. You can track current promotions on this page.
And of course, as you can expect from Yandex, additional space can be purchased. However, the pleasure does not come cheap:
If you need a lot of space in the Cloud, but don’t want to pay, you can create several mailboxes and create Yandex.Disk for each of them.
2.3. Login to Yandex Disk
Registration has been completed, the available space has been sorted out, the question arises - ?
You can view downloaded files in several ways:
1. Open the Yandex.Disk folder shortcut on the Desktop, if you did not delete it after installation.
2. Open Yandex.Disk in the My Computer folder.
3. Click on the Yandex.Disk icon in the taskbar, located in the far right corner of the screen.
4. Log in to your Yandex mail through any browser and at the top there will be a link to the Cloud:
6. Go to the Yandex main page while logged in to your email. In the upper right corner there will be a link to Yandex.Disk:

2.4. How to upload files to Yandex Disk - 7 easy ways
Let us now consider the most important point, because of which we took all these actions -. Again, there are several ways to do this:
1. Via context menu. Select the file that needs to be uploaded to the Cloud, right-click on it and select the item: “Yandex.Disk: Copy public link”:

2. Copy the file to the Yandex.Disk folder(I wrote above how to enter it). By default, this folder is synchronized automatically, so when you copy there, all files will be immediately added to your Disk.
3. Upload files via mobile app iOS or Android. I can consider this method in a separate article, if you leave such a wish in the comments.
4. Upload a file to the Cloud via browser. To do this, simply drag and drop the selected files into a browser window with Yandex.Disk open:

5. Copying other people's files. If someone shared with you a link to a file that is stored on Yandex.Disk, you can easily save it to your Cloud. To do this, you need to follow the sent link like https://yadi.sk/*** and click on the “Save to Yandex.Disk” button on the right.
They also often ask - how to upload a folder to Yandex Disk. The principle is the same as stated above in the files section. But there is one more additional benefit - the folder can be assigned to Shared access. This way, other users to whom you grant access rights will be able to view and download files in this folder, as well as upload their own files there.

How to upload a video to Yandex Disk?– is also a very popular question from Cloud users. This is due to the fact that video files are usually large, and many people worry that they simply won’t “fit” and cannot be stored there. This is not true, video files, just like photos, can be uploaded and stored on Yandex.Disk.
2.5. Yandex Disk: how to transfer files to another user

You can also remove access to the file by clicking the mouse and switching it to the OFF position.
If for some reason you need to remove Yandex.Disk from your computer, then you should do the same as with a regular application - use standard operating system tools.
Let's move on: Start -> Control Panel -> Programs and Features
In the window that appears, select Yandex.Disk (usually it is the last one in the list) and click the “Delete” button. The downloaded files will remain in your account; only the application will be deleted from your computer.


