Only the BIOS turns on. When you turn on the laptop, the BIOS opens. Faulty blocks in the computer
The situation when a user turns on a computer or laptop and sees that instead of loading the operating system, the BIOS options setup program opens does not occur very often. However, it cannot be classified as a problem that the user has no chance of encountering. This problem is unpleasant because it makes it impossible to use the computer for its intended purpose.
It should be noted that not all BIOS provide automatic entry into the BIOS when turning on a computer or laptop. In most cases, if any faults are detected, the BIOS stops the computer or laptop from booting. Automatic entry into the BIOS is intended to indicate to the user that he must fix something in the BIOS before continuing.
It follows from this that the source of the problem, as a rule, is incorrect BIOS settings. First of all, overestimated values of the frequency or voltage of the memory or processor can lead to spontaneous entry into the BIOS - if the user has been overclocking hardware components. In addition, many motherboards react by booting the BIOS to unexpected power outages, perceiving them as evidence of system instability due to overclocking.
Very often, spontaneous loading of the BIOS when you turn on your computer or laptop may indicate problems with the BIOS itself. In most cases, these problems can be caused by a faulty battery powering the CMOS memory. The problem may also occur when the hardware of a computer or laptop changes, for example, when installing a new video card.
And, finally, you should not discount such a banal reason as a faulty keyboard or even just a separate key that sticks. It is possible that a faulty keyboard constantly emits a signal that is interpreted by the BIOS as a signal from a key intended to enter the BIOS.
What needs to be done to fix the problem
If you are faced with a situation where the computer automatically loads the BIOS of your computer or laptop, then first of all you should try to restart the computer again. It is quite possible that you yourself could accidentally press the BIOS entry key when rebooting or turning on your computer or laptop. Also, the BIOS setup program may appear after a computer or laptop restart caused by an unexpected loss of power in the network.
However, if you are convinced that the cause of the problem is not a random error, then you should try other ways to fix it. First of all, you can try changing the keyboard. Then try to remember if you have made any changes to the BIOS before. If so, then the options you edited should be returned to their original values. The safest thing to do is reset the BIOS to default settings. You should also try removing recently installed cards from the computer, if any.
If this operation does not help, then you can try replacing the BIOS battery with a new one. Practice shows that in most cases changing the battery helps solve the problem. However, if the problem still persists, then we can most likely conclude that the cause of the situation is a faulty BIOS chip or motherboard.
Conclusion
The reasons for the situation when the computer spontaneously loads the BIOS instead of loading the operating system can be varied. This phenomenon can be caused by either incorrect BIOS settings or hardware failure. If the situation is not the result of a random failure, for example, caused by an external voltage surge, then in most cases the problem can be corrected by resetting the BIOS to default settings.
BIOS is a basic input and output system that stores special algorithms necessary for the proper functioning of the entire computer. The user can make certain changes to it in order to improve the performance of the PC, but if the BIOS does not start, this may indicate serious problems with the computer.
There is no universal way to solve this problem, since, depending on the cause, you need to look for a solution. For example, in some cases, in order to “revive” the BIOS, you will have to disassemble the computer and carry out some manipulations with the hardware, while in others, it will be enough to simply try to enter it using the capabilities of the operating system.
Reason 1: Problems with components
If, when you turn on the PC, the machine either does not show any signs of life at all, or only the indicators on the case are lit, but there are no sounds and/or messages on the screen, then in most cases this means that the problem lies in the components. Inspect these components:

Physical damage to important computer components occurs, but the main reason for the inability to start a PC normally is severe dust contamination of its insides. Dust can become lodged in fans and contacts, disrupting the flow of voltage from one component to another.

When disassembling the system unit or laptop case, pay attention to the amount of dust. If there is too much of it, then do “cleaning”. Large volumes can be removed with a vacuum cleaner operating at low power. If you use a vacuum cleaner while cleaning, be careful as you may accidentally damage the inside of your PC.
When the main layer of dust has been removed, arm yourself with a brush and dry wipes to remove the remaining dirt. It is possible that contamination has entered the power supply. In this case, it will have to be disassembled and cleaned from the inside. Also check the contacts and connectors for dust.
Reason 2: Compatibility issues
In rare cases, the computer and BIOS may stop working due to incompatibility of any component that is connected to the motherboard. Usually, identifying the problem object is quite simple, for example, if you recently added/changed a RAM stick, then most likely the new stick is incompatible with the rest of the PC components. In this case, try starting the computer with old RAM.
Less commonly, it happens when one of the computer components fails and is no longer supported by the system. It is quite difficult to identify the problem in this case, since the computer does not start. Various sound signals or special messages on the screen that the BIOS gives can be very helpful. For example, by looking at the error code or beep, you can find out which component is having a problem.

In the case of incompatibility of certain components on the motherboard, the computer often shows signs of life. The user can hear the operation of hard drives, coolers, and the startup of other components, but nothing appears on the screen. Most often, in addition to the startup sounds of computer components, you can hear some extraneous signals that are played by the BIOS or some important PC component, thus reporting a problem.
If there is no signal/message or they are illegible, then you will have to use this instruction to find out what the problem is:

If you completely assembled the computer (without finding a problematic element), connected all the devices to it and it began to turn on normally, then there can be two explanations for this behavior:
- Perhaps due to vibration and/or other physical impact on the PC, the contact from some important component has come out of the connector. In the actual disassembly and reassembly, you simply reconnected an important component;
- A system failure occurred due to which the computer had problems reading a component. Reconnecting each element to the motherboard again or resetting the BIOS solves this problem.
Reason 3: System failure
In this case, the OS loads without any complications, work in it also proceeds normally, but when you need to enter the BIOS, you are unable to do anything. This scenario is extremely rare, but it does happen.
The method for solving the problem that has arisen is effective only if your operating system boots normally, but you cannot enter the BIOS. Here we can also recommend trying all the login keys - F2, F3, F4, F5, F6, F7, F8, F9, F10, F11, F12, Delete, Esc. Another option is to use each of these keys in combination with Shift or fn(the latter is only relevant for laptops).
This method will only be applicable for Windows 8 and higher, since this system allows you to restart the PC and then enable the BIOS. Use this instruction to perform a reboot and then start the basic input and output system:
If you have an operating system Windows 7 or older, and also if you have not found the item "Firmware and UEFI Settings" V "Advanced options", you can use "Command line". Open it using the cmd command in the line "Run"(called by key combination Win+R).

You need to enter the following value in it:
shutdown.exe /r /o
After clicking on Enter the computer will reboot and enter the BIOS or offer boot options with entering the BIOS.

Typically, after such an entry, the basic I/O system will boot without any problems in the future if you are already using key combinations. If it is not possible to enter the BIOS again using the keys, it means that a serious failure has occurred in the settings.
Reason 4: Incorrect settings
Due to a failure in the settings, the hot keys for entering may change, so if such a failure occurs, it would be wise to reset all settings to factory settings. In most cases, everything returns to normal. This method is recommended to be used only in cases where the computer boots without problems, but you cannot enter the BIOS.

BIOS is the Basic Input/Output System, the heart of the computer, without which the normal operation of other components and software is impossible. When you turn on your computer, the BIOS starts first and only after you turn it on, the operating system starts loading.
Theoretically, since Windows boots after the BIOS, reinstalling the operating system or adding another OS should not affect the normal operation of the BIOS. However, there are often cases when an attempt to install a second operating system results in the BIOS not loading.
In this case, we can assume that the BIOS settings have gone wrong and restoring the default settings may solve the problem. To reset the settings, you need to perform the following operations.
- Disconnect the PC and monitor from the electrical network.
- Open the system unit and remove the battery from the motherboard.
- Wait a few minutes.
- Return the system battery to its place.
- Connect power to the computer and monitor.
After restarting, the BIOS will start loading “like the first time”. If the problem goes away after this, it is recommended to format the boot hard drive and reinstall the operating system. Preferably one that has previously worked without problems. It is quite possible that the added operating system was damaged in the distribution.
Connection problems
There is a high probability that the BIOS does not load due to breaks in the power supply networks or data loops. To check this option, you first need to listen to see if the cooler on the motherboard is spinning. The BIOS is part of the processor and therefore poor cooling of the motherboard leads to malfunctions.
Perhaps the contact groups of the fan have come loose, which is why it does not work. After this, carefully inspect all cable and cable connections. Check to see if dust has accumulated on the motherboard or contacts. Dust is an excellent conductor of electric current, and it also creates electrostatic fields, to which electronics are very sensitive.
- Clean the device from dust using a vacuum cleaner and a brush.
- Sequentially disconnect the contactors and clean the terminals from dirt and oxidation. You can use a school eraser to clean the contacts.
- Check that all connectors are securely attached. It is likely that vibration caused the contacts to separate, and therefore the equipment stopped working correctly.
After the maintenance, you can try to start the computer again. The screen is black again and the BIOS won't load? Then we can assume that one of the internal modules is faulty. Including the motherboard itself could fail or need to be reflashed.

You can download the new firmware for the motherboard on the manufacturer’s official website. Updating the firmware is a difficult and quite risky task. Therefore, if you don’t know exactly what and how to do, it’s better not to take risks, otherwise you could ruin your entire computer, including the hard drives. It is better to contact the service center.
Faulty blocks in the computer
None of the above helped? Then the likelihood of hardware failure increases and you can start checking the blocks.
Disconnect and remove anything from the device that is not necessary for the computer to start. Leave only the motherboard, power supply and one of the RAM sticks. The computer will not work in this state, but it is possible to check the serviceability of the motherboard itself.
A common reason for the inability to start a computer is insufficient power from the power supply. For example, you replaced the motherboard with a more advanced one, which requires more electricity. At the same time, the power supply remains the old one. Or so - additional hard drives or some other functional components were installed in the system unit. Energy consumption can increase quite significantly. Installing a more powerful power supply will solve the problem. If the issue, of course, is a lack of energy.
Often, loading the BIOS is prevented by a malfunction in the video card. If possible, you need to check the video card by replacing it with another similar one. Or install the video card in another computer. Here you need to look at the compatibility of the equipment. Otherwise, you won’t find the problem, but you may create new problems.

If the minimum configuration - motherboard, power supply, RAM socket - the system unit is working and the BIOS is loading, then the problem is in one of the removed modules. After installing and connecting the next unit, try turning on the computer again and see what happens. As soon as the BIOS stops starting again, we can assume that you have discovered a faulty unit. Now all that remains is to find a similar one and replace it.
In reality, everything often turns out to be much more complicated. For example, the computer sometimes boots and works quite normally, and then, for no apparent reason, it starts to fail. The problem can be either software or component failures.
Such periods of normal operation, alternating with the inability to load the BIOS, are typical for three types of problems.
- Presence of microcracks on the motherboard. Because of this, contact periodically disappears.
- The electrolytic capacitors on the motherboard or power supply have dried out. This malfunction mainly applies to old system units that have been in use for a long time. Sometimes faulty capacitors can be identified by characteristic swelling of the housing.
Poor contact in the connected wires. As already mentioned - the presence of dust, oxidation of contacts, insufficient pressure. If the contactors have fixing screws, they must be tightened completely. The opposite situation also happens - clamping screws that are tightened too tightly lead to deformation of the connectors and poor contact in the connection.
BIOS is the most important component of a computer, the activity of which is aimed at setting up the operation of the equipment, checking its functionality, launching the operating system, and more. One of the most unpleasant situations that a user may encounter is when the BIOS refuses to start.
Let's imagine a situation: suppose you decide to reinstall Windows on your computer, but in order to run the installation program, you need to enter the BIOS. You have made more than one attempt to enter the BIOS, and all of them were unsuccessful.
Another situation: when the computer starts, the user first sees the BIOS interface, after which the computer proceeds to load the operating system. In some cases, the user may not see any image at all, that is, neither the BIOS window nor anything else.
Reason 1: Wrong key (combination)
First of all, you should question the correct hotkey you are using to enter the BIOS. Unfortunately, you can only find out which key in your case is by experience, that is, it was not possible to enter the BIOS using one button, next time you should try another.
The process of entering the BIOS is as follows: you reboot the computer or simply turn it on and at the very first stage of turning it on, you begin to repeatedly and quickly press the BIOS hotkey.
There are a huge number of options for entering the BIOS (this is especially true for laptops), but in most cases you will find one of the following keys: F1, F2 and Del. If not a single key helps you enter the BIOS, try Googling the model of your motherboard (for a desktop PC) or laptop model on the Internet to find out how to enter the BIOS for your device.
Reason 2: Non-working or unsupported keyboard
And although in rare cases the user has the opportunity to enter the BIOS without a keyboard, in 95% of cases it is impossible to do without it.
Needless to say, a computer keyboard must be in good working order? Be sure to test the keyboard's functionality by logging into Windows or connecting it to another computer.
If everything is fine with the keyboard, then perhaps the problem is that the keyboard is not supported by the BIOS. As a rule, a similar problem is observed among users of old computers (laptops), and if you use a wired or USB keyboard, then this may well be the case.
If you have a wireless keyboard, then we will need to use a wired one to eliminate the possibility of such a problem. Especially older BIOS versions may not support the USB keyboard interface, but to check this, you will either need to connect an old keyboard with a PS/2 connector or purchase a PS/2 adapter for a USB keyboard.

Reason 3: USB port not working
The port to which the keyboard is connected must be working. Try connecting the keyboard to a different port and try entering the BIOS again.
Reason 4: Conflicting devices
One of the computer devices may have malfunctioned, resulting in a conflict, which is why you cannot enter the BIOS.Try disconnecting everything you can from the computer: drives, hard drives or solid-state drives, all USB devices connected to the motherboard, PCI cards. If there is a built-in video card, then disable the discrete one, and then try to enter the BIOS again. If the attempt is successful, connect one device to the computer at a time to find out what is conflicting. Having identified a problematic device, it is precisely this device that you will need to deal with (it is better to take it to a service center for diagnostics).
Reason 5: Computer malfunction
If, when you turn on the computer, the BIOS starts making sounds, but does not want to start, you should listen to the signals and record them. Often the BIOS uses such signals to make it clear what went wrong. There are a lot of tables on the Internet that decipher sound signals for different BIOS versions, using which you can quickly understand the cause of the problem and begin to fix it.
Reason 6: Problematic BIOS settings
As a rule, a similar cause of the problem occurs when the user makes changes to the BIOS. In this case, you should try returning the BIOS to factory settings. As a rule, in most cases you will need to look under the system unit case, where on the motherboard you can find a special switch (CMOS jumper), which is set to position 1-2. To perform a reset, just move the switch to position 3-4 for 15-30 seconds, after which you can return it to its previous position.

Reason 7: Problems with the motherboard
The most unfortunate cause of this problem is that the motherboard is practically the entire computer. If you suspect a problem with its operation, you can carry out a short diagnostic procedure.
First of all, you will need to inspect the motherboard itself: is there any oxidation, are the capacitors swollen. Any external changes indicate its malfunction, which means that all this must be eliminated. If there is oxidation, it must be carefully erased with an eraser. If the capacitors are swollen, they should be soldered with new ones.

If visually everything is fine with the motherboard, you should try the following:
- Disconnect your computer from the network, and also remove all unnecessary devices: mouse, speakers, keyboard, any additional devices and cables. As a result, only a network cable and a monitor need to be connected to the system unit.
- Reset CMOS. To do this, you should remove the battery from the motherboard for a few seconds and then install it back.
- Remove all cards from all motherboard slots, leaving only the processor and speaker connected.
- Start the computer and pay attention to the sound: if there is any sound, this tells you that the motherboard is working. If not, then everything is much sadder - she does not respond.
If you have confirmed your guess that the problem is in the operation of the motherboard, you should try to take it to a service center - it is quite possible that a specialist will be able to restore its functionality.
These are the main reasons that affect the BIOS not starting. If you have comments on the article, leave them in the comments.
Hi all.
I updated the BIOS on an ASUS laptop, I don’t remember the model, perhaps Asus x550, via Easy Flash. The update seemed to go fine. At least the process completed and the machine rebooted. After rebooting the BIOS opened. Boot devices are no longer displayed. In addition, the settings for selecting boot devices, as well as the “Create a boot option” option, have disappeared. Moreover, in SATA configurations, hard drives are displayed and therefore identified. But they are not in the Boot section, just as there is no USB drive, which was previously detected and worked. Moreover, he clearly sees the drive, because after the reboot he first starts to spin it, but does not want to boot from any device! It just opens the BIOS. That's all.
As I understand it, it’s updated, it’s updated, because it loads, it sees that there’s a new version... But it doesn’t want to load the devices. It just opens the BIOS when you turn it on. When exiting - reboot. The screws are formatted and of course he won’t boot from them, but he didn’t open the BIOS before, he just wrote “where is your boot device?”, and now neither of this nor from the boot drive. Perhaps some data was written incorrectly to CMOS, but I have no idea how to reset this data (I don’t suggest disassembly, the machine is new).
I updated the BIOS with a connected USB drive. It had boot priority.
Chipset - Intel HM76
I took the BIOS firmware from the official website.
I read the manual for such updates - everything is simple, insert a flash drive with the new BIOS, use the Easy Flash utility (which is located in the BIOS) to select the file and confirm the update.
Basically, the BIOS jambs are of a slightly different kind - a black screen.
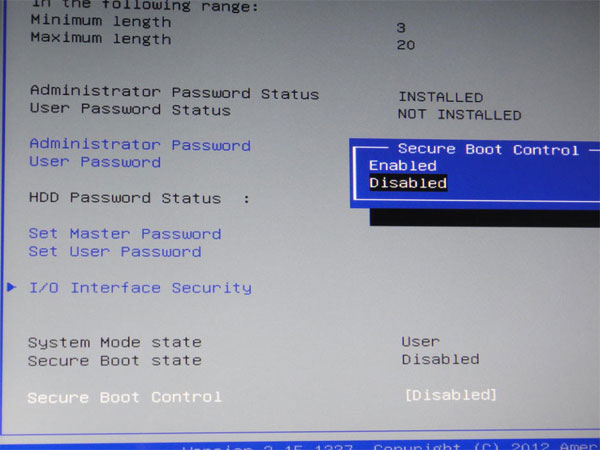
In general the solution:
go to the Boot section in the BIOS, then enable Launch CSM

then go to the Security section and disable the Secure Boot Control option.