Installing Ubuntu from a flash drive - Nothing could be easier. Installing Ubuntu Linux from a USB flash drive using Rufus
Many modern laptop models come without a CD/DVD drive. This allows you to significantly reduce the price and accommodate additional ports and connectors.
But the lack of a DVD drive makes administering the computer a little more difficult.
For example, there are sets of utilities for defragmenting files, fighting viruses, or working with hard drives and partitions, which can be downloaded as ISO files.
We also used an ISO image with the system when we looked at installing Ubuntu on a new computer in a previous article.
So, if you purchased such a brand new compact PC, then now you will have to learn how to create bootable USB drives and boot the computer from a flash drive.
Let's get started. To burn an ISO image of Ubuntu to a flash drive, we will use special software.
Create a bootable USB drive using Rufus
Rufus is a program for creating bootable USB drives. Works on any Windows systems, and supports many languages, including Russian and Ukrainian.
If you have a bootable Linux or Windows disk, you can use ISO image creation software to clone it and create a bootable USB flash drive from the resulting image.
First you need to download Rufus from the site https://rufus.akeo.ie, you can choose the portable version. Next, we’ll look at how to burn an Ubuntu image to a USB flash drive.
We launch the program, the interface is simple and clear, we have to make a few simple settings.
As you can see, our USB drive was detected automatically.
"Partition scheme" parameter - for modern computers you need to select "GPT for computers with UEFI".
For older PC models, you should leave it at "MBR for computers with BIOS or UEFI."
"Format options" - from the drop-down list, select the source type "ISO image". Click on the disk icon and select the ISO file with the Ubuntu image.
This completes the settings. We press the "Start" button and two more dialog boxes await us.
Check the box "Burn in ISO image mode" and click "OK".
Now, if you disconnect the flash drive and connect it again, the disk will have a new volume label and a characteristic icon.
Let's make sure that the computer is configured correctly and will select the USB drive when booting. The procedure may vary depending on the PC model:
- 1. Enter the BIOS by pressing the F2 key when booting the computer.
- 2. Move to the "Boot" section using the "Right Arrow" and "Left Arrow" keys.
- 3. Go down to the "Boot priority order" section.
- 4. Select the device called "USB HDD" using the up and down arrow keys.
- 5. Move the selected device to the first position in the list using the F6 and F5 keys.
- 6. Exit the BIOS, saving the changes you made.
When you restart your computer, the GNU GRUB bootloader will now launch, and you can navigate through the menu using the Up Arrow and Down Arrow keys.
Long gone are the days when Linux was just a black screen with a blinking cursor symbol. Current Linux could be like this
The appearance (or environment) of Kde. Or like this

Xfce environment. Or maybe like this?

Mate. Or like this?

Environment Cinnamon.
All the pictures look completely different, but at the same time, these are options for designing the appearance. And although in all the pictures all the names are written in English, the Russian language (with a very high-quality translation) appears after a few clicks of the mouse, which we will talk about below.
If you decide to install Linux, we recommend trying the Mint version, which is based on Ubuntu, but unlike it, has a more polished interface. Anticipating the questions, let's immediately note that to try it you don't need to immediately format your hard drive, erase all the necessary documents and find out how to access the Internet. Mint next to Windows is a fairly common occurrence, and the system developers took it into account. Everything can be done gradually, step by step. In order not to look for a blank, we will install from a flash drive. Installing Linux Mint from a flash drive is no more difficult than installing from a CD, except that instead of a 4 GB disc, we only need a 2 GB flash drive, since the distribution itself takes up ~ 1.5 GB.
Difficulty of choice
Having decided to try Linux, a user who is not accustomed to the wealth of choice will think: “What will this Linux look like for me, and which one is better?” If we choose Mint, the desktop of the main directions of development of the distribution is shown above. Everyone comes to a working environment that is convenient for themselves in the process of use. For initial testing, we recommend Cinnamon - 4 picture. One of the reasons for this choice is the flexibility of the settings, another is that Cinnamon was originally planned specifically for Mint. Finally, we can say that the appearance will be very reminiscent of Windows. Whether this is a plus or a minus is up to the user to decide. Regardless of your choice, the installation of Linux Mint will proceed the same, the differences will be revealed after the final reboot.
Having decided on the appearance, go to the official Linux Mint website and in the Download section select the architecture (32 or 64) and shell version. The no codecs version comes without additional multimedia codecs, which means you still have to install them to watch videos, listen to music, etc. The OEM version is not intended for initial training. Click on the selected architecture. In the window that opens, we get brief information about the distribution, name, architecture, shell and several mirrors for downloading. Pay attention to the data in the edition line - our shell is selected. It is also worth noting that if you want to use torrents, there is such a link, but above the list of mirrors. Click on the selected link and wait for the distribution to download.
Preparing for installation. HDD
If we don't want to lose Windows files, we will need to allocate disk space for the new system. It is recommended to allocate approximately 15 GB. If you allocate less, problems may arise during the work process. In principle, you can skip this step altogether - the installer has a good program for working with disks, but for the first time we’ll go the standard way. Let's reduce one of the disks by 15 GB. Installing Linux Mint will require less, but as we said, it's better to have a spare. This can be done with any program, even built into Windows, but we use ADD - Acronis Disk Director.
The program works with disks in a graphical interface, clearly showing the sizes and recalculating the volumes on the fly. Please note that the work is not done on the C drive.

Any other one, except the boot one, you can move as you like, making free space, before or after the data. If you make free space on drive C before the data, then next time Windows will stop loading. Having changed the section, move on to the next step
Preparing for installation. Flash drive
The official website of the distribution suggests installing Linux Mint on a flash drive using the Universal USB Installer program; let’s look at its settings. Insert the flash drive and launch the program.

In the main window of Universal USB Installer we need to configure 4 things.
Step 1 - if our Mint is not in the drop-down list, select Ubuntu.
Step 2 - specify the distribution file.
Step 3 - select the flash drive (look in “My Computer” to see which letter was assigned to it, and select it here. You don’t need to write anything else).
Step 4 - optional.
Live CD
Installing Linux Mint from a flash drive is no different from installing from a DVD, except for the speed. Therefore, after the download is complete, we will receive a Live system, which is quite functional, except that it has not yet been installed and (most likely) is in English. You can work in it, test it, usually everything works right away, just slower. In this mode, no files on the hard drive are changed or deleted, but the files you created in this system will not be saved either. The system has a full set of software - you can go online (although this works if you didn’t log out directly from Windows before), read Word files, even watch a movie. It works, but is slower. But before proceeding with the installation, be sure to configure the Internet. You will need it to install some packages. There is an icon in the tray for this. Usually depicted as two forks connected to each other. Right-click on it - change the connection and then DSL (for most modern network connection options PPPoE, PPPtP, ADSL, etc)
Installation to disk
Click on the “Install Linux Mint” icon to begin the installation. The installation will prompt you to select a language (Russian is available), ask you about connecting to the Internet, state how much it may need, and if you have a laptop, it will tell you that you need to connect it to the network. The next stage will be We will talk about it a little lower. Otherwise, installing Linux Mint is not much different from installing Windows.
Formatting partitions for Linux
At this stage we need to go into detail, since there is no general concept of partitions, letters, disks in Linux. The easiest way to think of a file system is as a tree. Root, trunk, branches. Each new section in the system will become one of the branches. The home partition will become such a branch, the D drive will become such a branch, etc.
During installation, the wizard will offer three options: “Replace Windows (remove it)”, “Install side by side (not worth the risk)” and “Another option”. This is what we need. Use the arrows to select it and press “Enter.”
The 15 GB received earlier must be divided into three parts. 8+2+5, respectively, system + swap + user files. Then, if you don’t need the middle section, you can delete it and attach the space to the user section. Double click on the free space, the window that appears is shown below. With the exception of the mount point and the size field, the remaining parameters are shown in the picture.

The type of the new partition may not be able to be changed - this does not matter. For the system in we set 8192 (this is MB), the mount point is “/”. We agree with the changes. Select the remaining free space - 2048 MB. Here we select the field where it says “EXT4”, change it to “swap partition”. No mount point is needed. Plus, select the remaining free space and repeat the steps as we did above for the system, with the exception of the mount point. Select “/home” from the list.
As a result, instead of free space, you will have 3 new partitions - “/”, “/home”, “swap”. The marking is complete. Click “Install Now”.
Booting a new system
After installing and removing the flash drive, the system will boot again. Linux Mint starts in English after installation. Let's make it Russian.
Click on the “menu” - “Control center” - “Languages” button.

In the new window, the Install/remove languages button will allow us to add Russian.

Click “Add” and in the new window select “Russuan, Russia”, then at the bottom of the window “Install”.

The window has closed, and in the previous one there is a button “Install language packs”. Click and wait until it installs.
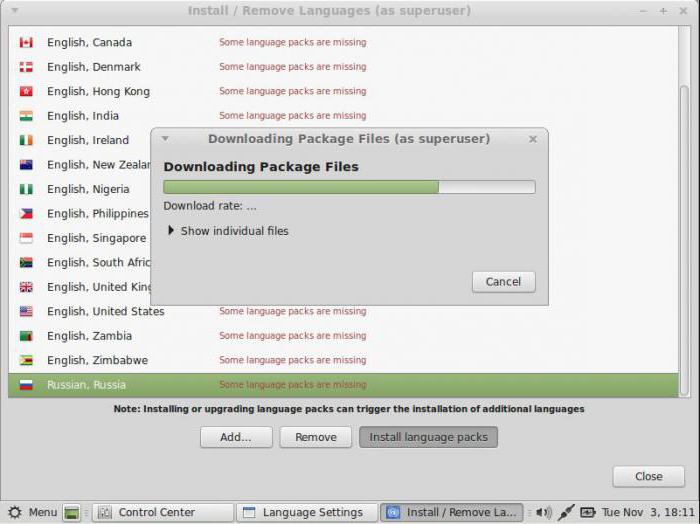
Now close all the windows one by one, making sure that “Russuan, Russia” is selected. We are overloading. If everything was done correctly, a window will appear on the screen prompting you to rename your home folders. The “menu” button is renamed in manual mode.
Further customization
The initial setup of Linux Mint after installation is widely described on the Internet. There are quite a lot of items, but here we will look at one - how to change the main menu that is unusual for us. The Cinnamon developers offer several variations of the main menu, even in Win7 form. Let's try to install it. Right-click on the bottom panel - select “add new applets” In the window that opens, do as in the figure below.

We put a checkmark to the right of the selected item, wait until it is installed and get a menu, as in Windows.
Drivers
Unlike other editions, Cinnamon almost immediately picks up all found equipment correctly. And if you are not going to play games, work with complex packages, you don’t have to bother with the issue of drivers. However, there are times when Wi-Fi, for example, is not found after installation. This is where installing Linux Mint drivers will help. We access it through the “Administration” menu. First, the system will search for possible drivers. After which a window will appear as in the screenshot below.

If there are drivers, they will appear in the list. All you have to do is select the one you need, then click “Activate” at the bottom of the window (not active on the screen). Wait for installation and reboot the system. After a reboot, the driver is usually activated without problems.
A few words in conclusion
There is a saying: “The devil is not as scary as he is painted.” The same can be said about Linux. Recently, Linux has become used by many people who previously had difficulty teaching how to use Windows. “Linuxoid”, as users of this system are called, knows one good rule - if you don’t know something, find a manual on the Internet. There are manuals for all occasions. Don't forget about this.
First, you need to understand the very concept of what is a bootable Linux flash drive? This topic is very popular; almost everything can be found on the Internet.
Option #1. Creating a bootable USB flash drive in UNetbootin
UNetbootin is a program for installing Linux without CD/DVD.
This utility allows you to install it on your computer or, otherwise, create a bootable Flash disk with special Linux/BSD distributions previously downloaded from the Internet.
Installation can be done either through Windows or Linux.
The program is installed on most Linux distributions, namely: Ubuntu, Fedora, openSUSE, CentOS, Debian, Linux Mint, Arch Linux, Mandriva, Slackware, FreeDOS, FreeBSD, NetBSD and their varieties).
- Before you start working with this utility, you need to format (clean) the USB drive; it is best to select the FAT32 file system. How to do this is shown in the illustration below:

- After cleaning the Flash media, you need to run the UNetbootin program. As already mentioned, this program allows you to burn a Live CD/DVD from the Internet, showing only the distribution and its version:

- To write a disk image of the operating system (in the example, the downloaded distribution is Debian Wheezy, you can find any other) onto a USB drive, select the “Disk Image” item, then activate the “ISO Standard”, also do not forget to indicate the path to the distribution with the extension .ISO, and also indicate the type of device and the media itself (as shown in the figure).
The characteristics have been selected, now you need to click the “OK” button, the procedure for extracting and duplicating files occurs automatically. This process will take 5-10 minutes.

- After unpacking the necessary files, the program will automatically install the bootloader and notify you when the bootable USB flash drive is ready.
If you wish, you can immediately install the Linux OS; to do this, you need to restart the computer and select in the BIOS to boot the system via a USB drive.

If installation is not required, then there is no point in restarting the computer; you should click on the “Exit” button. All! As you can see, it's not difficult at all.
Your bootable Linux flash drive is ready to go.
Option #2. Creating a bootable USB flash drive in Universal USB Installer
Unlike the first one, this program formats removable media spontaneously.
Let's look at this program in more detail.
- You need to install and run the Universal USB Installer program.
- The first step shows a list of Linux operating systems. Select the Linux that you want to use on the flash drive; if the one you need is not there, then indicate “Try Unlisted Linux ISO”.
- The second step is to go to the pre-downloaded Linux distribution on your computer; if you did not select the folder yourself, then look for it in the Downloads folder.
- The third step is to indicate our flash drive, usually an H drive, followed by the name of your device.
We check everything again and click the “Create” button.

- Next, a warning will appear telling you to close all unnecessary windows, close everything and click next.
The program will automatically format the USB drive, create the MBR boot area, change the volume label to the UUI name and install the Linux operating system image. We only need to confirm the action by clicking on the “Yes” button.

- Afterwards, the procedure for installing data on removable media is observed, as shown in the figure; literally in 5 minutes everything will be ready.

- The program completes the installation process on its own, see the figure below.

That's it, another bootable Linux flash drive has been created!
Option #3. Creating a bootable USB flash drive using the Xboot utility
In this case, the option of creating it using the Xboot utility is considered.
This program does not require installation on a computer; it can be launched immediately by first downloading it from the Internet.

The interface of this utility is quite simple.
To add images, you need to transfer the iso files (Linux OS distributions) of each image to the main part of the program window, or click on File-open, as shown in the figure.

After the path to the image has been indicated, a window will open with the question: how to perceive this image?
Since we are making a bootable flash drive for Linux, we choose Utilitu - Ubuntu, but if you are making a flash drive for Windows!! select Add using Grub4dos ISO image Emulation.
Please note that the option to add Windows is selected by default.

A huge plus of this program is that, along with the system, you can install various antiviruses on a bootable USB flash drive, such as: Dr.Web, Live CD, Kaspersky Rescue Disc.
In the future, they will help protect your computer from Trojans, viruses and other nasty things.

Utilities that come with the program
As shown in the figure above, the program offers various utilities for both Linux OS and Windows.
Xboot is not installed on your computer, so all the utilities you select will be downloaded automatically from the Internet, you will only need to confirm all actions, all steps are shown in the pictures.


To make it convenient for you to work with images, write a name for each. For example: Linux 1 WT, Linux 2 Mouse, Linux 3 Android.

Check all the steps again when everything is ready and if you are sure that you have not missed anything, then select the option to write to a USB drive (do not confuse making a bootable DVD), before use you need to clear the flash in FAT32.
If you don’t know English well, then find two buttons at the bottom of the window, when you click the Create ISO button you will make a bootable DVD, but we need to click – Create USB.
I will show how to install full-fledged Linux on a flash drive, not a live distribution, but a full-fledged OS with the ability to save changes made to it, using the example of the Linux Mint distribution.
1. Download the distribution ( http://www.linuxmint.com/download.php) and burn the OS image to DVD.
If it is not possible to burn the image to a disk, then you can burn it to a flash drive, about this in this article: How to make a USB flash drive with an installation distribution (Linux Live USB).
2. In BIOS, select boot from CD drive
3. After loading the OS, select Install Linux Mint, also insert the flash drive on which you are going to install the OS.

4. Specify the OS language, for example Russian.

5. "Check for free space and Internet connection", click "Continue"

6. In the next step, the Installer will ask you to disconnect the USB flash drive during OS installation; refuse by clicking “No”.

7. Installation type - "Other option"

8. My flash drive is detected as /dev/sdc1. Be sure to indicate "Device for installing the system bootloader:" Your flash drive, in my case it is /dev/sdc1 .

9. Then in the “List of media” double-click on the flash drive /dev/sdc1.
10. Specify the partition file system - Ext4 journaling file system.
11. Put a tick " Format partition".
12. Mount point /.
13. Click OK.

14. A message will appear that you have not specified any partition for swapping, click “Continue”.

Next, follow the standard installation instructions: name, password, regional standards... The installation process on a flash drive can take many times longer than installation on a hard drive due to its slowness; for me the process took about an hour.
If you decide to install Ubuntu, but your computer does not have a laser disk drive, do not run to your friends or to the store. Today, installing Ubuntu does not require a disk drive; you can easily create a bootable USB flash drive.
Creating a bootable USB flash drive using WinSetupFromUSB
- Download the Ubuntu image, fortunately, this OS is free, so there should be no problems at this step.
- Download the WinSetupFromUSB program. It can be found on the official Microsoft website.
- Run WinSetupFromUSB.
- On the main window, select the USB flash drive that you want to use as a boot drive. (Pre-save all important data stored on the drive, because it will be formatted while the program is running).
- Check the box next to "Auto format".
- Check the box next to "Linux ISO".
- Click on the button with three dots and tell the program the location of the Ubuntu image.
- A dialog box will appear on the screen asking you to name the Grub boot loader item. You can write any phrase, for example, “Installing ubuntu from a flash drive.” It will not affect the installation process in any way.
- Click on the “Go” button, after which the application will notify that all data on the flash drive will be deleted. Confirm your choice and wait for the process to complete.
Creating a bootable drive using Unetbootin

- As in the previous case, first download the Ubuntu OS image.
- Download the Unetbootin program from the official website. It is licensed under the GPL, so it is free to use.
- In order to install Ubuntu from a flash drive without any problems, you will have to format it before creating a bootable USB drive.
- Double-click on the "Computer" shortcut. Right-click on the USB drive icon and select "Format".
- Specifying the format "FAT32", click on the "Start" button. (Formatting will delete all data on the flash drive, copy all the necessary files in advance).
- Launch Unetbootin. In this case, the program will immediately appear in full combat readiness; there is no need to install it.
- The application is one single window in which you will have to define all the settings. In general, you will have to complete three steps to set the settings.
- First of all, specify the path where the Ubuntu image is stored.
- Then select the flash drive you want to use.
- Click "Ok" and wait for the process to complete. You may feel like the program has frozen. Even Windows, when trying to access an application, will note that the process is not responding. Be patient, Unetbootin often behaves this way when writing data.
- If you don’t have an Ubuntu disk image, you can select a distribution kit at the very top of the window, which will be downloaded by the program automatically. This installation method is only suitable for those who exchange data with the Internet at high speed.
BIOS Settings

After creating a bootable flash drive, you need to go into the BIOS and change the settings a little, otherwise installing Ubuntu from a flash drive will not be possible. To do this, restart your computer and watch the messages on the screen. Sometimes you need to press the F2 key to enter the BIOS settings, but most often manufacturers set the use of the "DEL" button. Here, go to the "Advanced" tab, and set the First Boot Device to USB. Exit the BIOS and save the changes (usually this can be done by pressing the "F10" button or selecting the appropriate item on the "Quit" tab).
Preparation

- After completing all the manipulations in the BIOS settings and booting the computer, a selection menu will appear on the screen, which will offer to either install Ubuntu from a flash drive or run a LiveCD. Choose your installation.
- After selecting, the preparation window will open. In it, the user will be asked to make sure that there is enough free space on the HDD, and in addition to connect the computer to the Internet.
- Often it will not be possible to connect to the Internet, except when using a Wi-Fi router. If you leave the installation program without the ability to connect to the global network, no errors will occur during the process, the latest updates will simply not be downloaded. They can be installed later.
- At the bottom of the window there will be an inscription “install third-party software”. Check the box next to it: third-party software here is considered to be that which is not distributed under the GPL license.
Editing HDD partitions

- The window that opens will offer several options to choose from: installing Ubuntu from a flash drive next to another operating system, installing Linux as the main OS, or partitioning your hard drive yourself.
- Whichever option you choose, the next step will load the section editor. In it, the user will have to choose how much space to allocate for Ubuntu. If the option with self-partitioning is selected, the user will be given the opportunity to completely redraw the partition table (delete existing ones, create new ones, change the size, specify the format, set the cluster size).
- After clicking the "Install" button, the program will display a warning saying that the partition table will be manipulated. They may take considerable time.
- Click "Continue".
Completing preparation and installation

- Some time will pass (the duration depends on the size of the HDD, data exchange speed, fragmentation), and a new window will appear on the screen prompting you to select a language, region, keyboard layout, and time zone.
- At the next stage, the program will ask you to enter the new user name and password. After filling out this information, click "Continue".
- Preparations are complete, installation of Ubuntu from the USB flash drive has begun. After it finishes, a message will appear on the monitor screen asking you to restart the computer.
- After rebooting, do not forget to remove the USB flash drive or return the BIOS settings to their original state.


