Installing db2. Installing IBM DB2 under Linux. Let's see what the installation and configuration process looks like using the free version as an example
which means you can put into practice the full-featured version of DB2 10.1.
If we compare the free versions of DB2 Express-C 9.7 and 10, the advantage is obvious - Now the amount of RAM used has been increased from 2 to 4 GB, which cannot but rejoice.
You can download the free and demo commercial version here - http://www-01.ibm.com/software/data/db2/linux-unix-windows/download.html (you will need an IBM ID to download, but registration is quick and free).
Let's see what the installation and configuration process looks like using the free version as an example.
Download the distribution, unpack it and run the setup.exe file, a welcome window appears.

Go to the “Install product” tab and click “Install a new copy” opposite the only offered option (in the commercial version it is possible to select the DBMS edition)

Start installation

We accept the license agreement

Leave the normal installation and continue. For 1C this will be enough.

If you want to install DB2 on only one computer, you don't need to create a response file

Specify the installation directory. If you have a separate disk array allocated for DB2 databases, you can install directly there; this will allow you to create new databases on the same disk by default, but the parameter responsible for this can always be changed.

I gave up SSH. This is an additional server administration feature that is advisable to use when managing servers over public networks over an insecure channel. This doesn't make much sense on a local network.

Create a new account to run server processes

Here we indicate the DBMS launch port. The default mail needs to be changed if several DB2s are running on the same machine, or if there is a desire to change the port to provide additional minor protection (there is a recommendation to assign non-standard ports to standard services, which can be a little confusing for a potential attacker, at least an inexperienced one ).

We wait for the installation to complete and see a success message
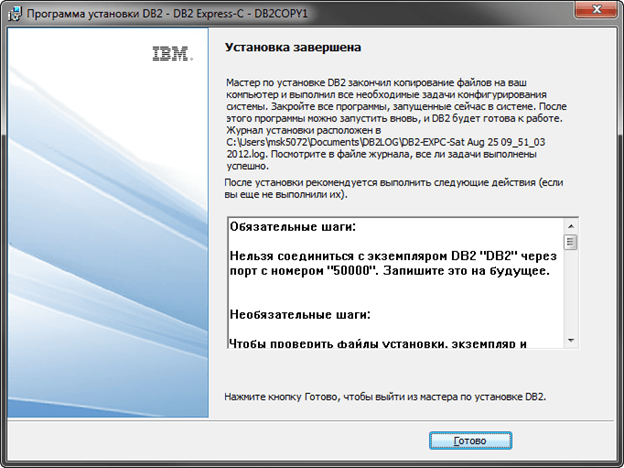
Immediately after the installation is complete, we add an important parameter that will optimize the performance of DB2 for 1C:
Open a command window

And we execute the command
db2set DB2_WORKLOAD=1C
if you just run db2set, the system will show a list of installed parameters

Then we restart the DBMS:
db2stop
db2start
We create a new information base in 1C, and you must specify db2admin, which you created during the installation process, as the user of the database server

Don’t forget to check that the semaphore file is located in the directory with the 1C application server db2loadapion, which will speed up the process of loading the database from the dt file.

That's all. All that remains is to load the dt file or configuration file into the created database and work can begin.
There is no "Control Center" in DB2 10.1, but in addition to the command line, you can install a free DB2 administration tool - IBM Data Studio.
I installed the assembly provided by IBM, posted on the website users.v8.1c.ru. But as far as I understand, it is no different from the original
At first I tried to install it manually as described in the instructions from 1C (see instructions for installing the 1C 8.1 server). To be honest, I failed. My server never started. Then on the IBM website I read about a graphical installer. The distribution contains the file ./install, run it and all requests go in graphical mode. In fact, I just agreed and that’s it... After that, everything worked. Here are the instructions from Andrey Aristarkhov, a representative of IBM in 1C, his I and was guided during installation, the only difference is that I took advantage
graphical installer:
General recommendations:
If you have any questions, take a look at the documentation, most likely you will find the answer to your question there. This is especially true if the product is new to you, or you are starting to work with a new version of the product. When problems arise, it makes sense to analyze the logs (both DB2 log files and and technological
magazine 1C), because they contain a lot of useful information: for example, error messages or the text of the query being executed.
The vast majority of problems can be resolved using logs, documentation, and searching (especially error codes). For example, by looking at the error code in the log file and searching the documentation for that code, you will find recommendations for resolving the error.
There is no need to be afraid of the command line when working with DB2. In it you can do everything the same as in the graphical interface several times faster.
Instructions for installing DB2 on Linux
All actions are performed under the root user unless otherwise stated.
The first step is to configure the Linux kernel parameters to run DB2. According to the documentation, to do this you need to edit /etc/sysctl.conf so that it contains the following lines:
- This value is for Linux 64-bit
kernel.shmmax=1073741824
# This value is for Linux 32-bit
kernel.shmmax=268435456
# And this is true for both options
kernel.msgmax=65535
kernel.msgmnb=65535
After editing the file you need to run
The changes made have taken effect.
Detailed information about the purpose of these parameters
These settings have been tested for the following versions of Linux:
Fedora Core 6x86
FedoraCore 6×86_64
RedHat 4 PPC
RedHat 4 s390x (IBM System z - mainframe)
After this, you can begin installing DB2.
Before you begin the installation, make sure you have the backwards compatibility packages for libstdc++ installed. In particular, FC6 requires packages
compat-libstdc+±33–3.2.3–61
compat-libstdc+±296–2.96–138
You can also select support for older programs when installing Linux for the “developer”; this section includes the specified packages.
Take the archive with the DB2 distribution and unpack it. For example:
tar xfz db2exc_912_1Cspecial17705_LNX_x86_64.tar.gz
cd exp/disk1
Let's launch
./db2_install
We accept the default installation directory (/opt/ibm/db2/V9.1)
Then install the product itself (write in the question line: EXP - i.e. DB2 Express)
Creating the users required for DB2 to work
useradd das
useradd db2inst
useradd db2fenc
cd /opt/ibm/db2/V9.1/instance
Create DB2 Administration Server (DAS).
./dascrt das
The server will automatically start as user das
Create a DB2 instance configured to operate on port 50000 (DB2 default port)
./db2icrt -u db2fenc -p 50000 db2inst
su - db2inst
Configuring DB2 to work with 1C
db2set DB2_WORKLOAD=1C
Starting a DB2 instance
Return to root via Ctrl-D (logout)
If you want DB2 to start automatically when the system starts, run the command:
/opt/ibm/db2/V9.1/instance/db2iauto -on db2inst
Installation and configuration 1C:Enterprise servers
First you need to
This task describes how to start the DB2 Setup wizard on Windows. You will use the DB2 Setup wizard to define your installation and install your DB2® database product on your system.
About this task
Restrictions
- You cannot have more than one instance of the DB2 Setup wizard running in any user account.
- The DB2 copy name and the instance name cannot start with a numeric value. The DB2 copy name is limited to 64 English characters consisting of the characters A-Z, a-z and 0-9.
- The DB2 copy name and the instance name must be unique among all DB2 copies.
- The use of XML features is restricted to a database that has only one database partition.
- No other DB2 database product can be installed in the same path if one of the following product is already installed:
- IBM Data Server Runtime Client
- IBM Data Server Driver Package
- DB2 Information Center
- The DB2 Setup wizard fields do not accept non-English characters.
- If you enable extended security on Windows Vista or Windows 2008, or higher, users must belong to the DB2ADMNS or DB2USERS group to run local DB2 commands and applications because of an extra security feature (User Access Control) that limits the privileges that local administrators have by default. If users do not belong to one of these groups, they will not have read access to local DB2 configuration or application data.
Before you begin
Before you start the DB2 Setup wizard:
- If you are planning on setting up a partitioned database environment, refer to "Setting up a partitioned database environment".
- Ensure that your system meets installation, memory, and disk requirements.
- If you are planning to use LDAP to register the DB2 server in Windows operating systems Active Directory, you should extend the directory schema before you install, otherwise you will need to manually register the node and catalog the databases. For more information, see the "Extending the Active Directory Schema for LDAP directory services (Windows)" topic.
- If you are planning to use the IBM® Tivoli® Monitoring for Databases: DB2 Agent, before installing your DB2 product see topic "Installing IBM Tivoli Monitoring for Databases: DB2 Agent with the DB2 installer" for details, limitations and restrictions.
- You must have a local Administrator user account with the recommended user rights to perform the installation. In DB2 database servers where LocalSystem can be used as the DAS and DB2 instance user and you are not using the database partitioning feature, a non-administrator user with elevated privileges can perform the installation.
Note: If a non-Administrator user account is going to do the product installation, then the VS2005 runtime library must be installed before attempting to install a DB2 database product. The VS2005 runtime library is needed on the operating system before the DB2 database product can be installed. The VS2005 runtime library is available from the Microsoft runtime library download website. There are two choices: choose vcredist_x86.exe for 32-bit systems or vcredist_x64.exe for 64-bit systems.
- Although not mandatory, it is recommended that you close all programs so that the installation program can update any files on the computer without requiring a reboot.
- Installing DB2 products from a virtual drive or an unmapped network drive (such as \\hostname\sharename in Windows Explorer) is not supported. Before attempting to install DB2 products, you must map the network drive to a Windows drive letter (for example, Z:).
Procedure
To start the DB2 Setup wizard:
- Log on to the system with the local Administrator account that you have defined for the DB2 installation.
- If you have the DB2 database product DVD, insert it into the drive. If enabled, the autorun feature automatically starts the DB2 Setup Launchpad . If the autorun does not work, use Windows Explorer to browse the DB2 database product DVD and double-click the setup icon to start the DB2 Setup Launchpad .
- If you downloaded the DB2 database product from Passport Advantage®, run the executable file to extract the DB2 database product installation files. Use Windows Explorer to browse the DB2 installation files and double-click on the setup icon to start the DB2 Setup Launchpad .
- From the DB2 Setup launchpad, you can view installation prerequisites and the release notes, or you can proceed directly to the installation. You may want to review the installation prerequisites and release notes for late-breaking information.
- Click Install a Product and the Install a Product window will display the products available for installation.
If you have no existing DB2 database products installed on your computer, launch the installation by clicking Install New . Proceed through the installation following the DB2 Setup wizard"s prompts.
If you have at least one existing DB2 database product installed on your computer, you can:
- Click Install New to create a new DB2 copy.
- Click Work with Existing to update an existing DB2 copy, to add function to an existing DB2 copy, upgrade an existing DB2 Version 8, Version 9.1, or Version 9.5 copy, or to install an add-on product.
- The DB2 Setup wizard will determine the system language, and launch the setup program for that language. Online help is available to guide you through the remaining steps. To invoke the online help, click Help or press F1 . You can click Cancel at any time to end the installation.
Results
Your DB2 database product will be installed, by default, in the Program_Files \IBM\sqllib directory, where Program_Files represents the location of the Program Files directory.
If you are installing on a system where this directory is already being used, the DB2 database product installation path will have _ xx added to it, where xx are digits, starting at 01 and increasing depending on how many DB2 copies you have installed.
You can also specify your own DB2 database product installation path.
What to do next
- Verify your installation.
- Perform the necessary post-installation tasks.
For information about errors encountered during installation, review the installation log file located in the My Documents\DB2LOG\ directory. The log file uses the following format: DB2-ProductAbrrev - DateTime.log, for example, DB2-ESE-Tue Apr 04 17_04_45 2008.log.
If this is a new DB2 product installation on Vista 64−bit, and you will use a 32−bit OLE DB provider, you must manually register the IBMDADB2 DLL. To register this DLL, run the following command: c:\windows\SysWOW64\regsvr32 /s c:\Program_Files\IBM\SQLLIB\bin\ibmdadb2.dll where Program_Files represents the location of the Program Files directory.
If you want your DB2 database product to have access to DB2 documentation either on your local computer or on another computer on your network, then you must install the DB2 Information Center. The DB2 Information Center contains documentation for the DB2 database system and DB2 related products. By default, DB2 information will be accessed from the web if the DB2 Information Center is not locally installed.
DB2 Express® Edition and DB2 Workgroup Server Edition memory limits If you are installing DB2 Express Edition , the maximum allowed memory for the instance is 4 GB.If you are installing DB2 Workgroup Server Edition, the maximum allowed memory for the instance is 64 GB.
The amount of memory allocated to the instance is determined by the INSTANCE_MEMORY database manager configuration parameter. Important notes when upgrading from Versions 9.1 or 9.5:
- If the memory configuration for your Version 9.1 DB2 database product exceeds the allowed limit, the DB2 database product might not start after upgrading to the current version.
- The self tuning memory manager will not increase your overall instance memory limit beyond the license limits.
The point is to unload the database using 1C, reinstall the platform and server, and load the database again. At the same time, if there were previously any slippers left in the database from updating the configurations, they will definitely disappear.
1. Cleaning. So, to begin with create a copy of the database using 1C Enterprise tools(via Configurator\Administration). Next, we disable all possible routine tasks for 1C (backup, etc.) and stop the enterprise 1C server. We completely demolish existing versions of DB2 and database files, because... In the free release, installation of an “update” is not supported, only installation from scratch. We delete the folder "C:\Program Files\1cv81\server" to clear the cache of existing databases and be able to create a database with the same name as before (so that users do not get scared).
2. Let's move on to installation. First, install the latest release of the jre package: http://www.java.com/ru/download/manual.jsp, because DB2 is tied to Java. Now we log in to Windows under a user whose name consists of no more than 8 English letters or numbers (admin), otherwise DB2 will either not be installed at all or will not be allowed into the database normally. Next, we install DB2 itself, everything is simple there, only when creating a user under which the server will be launched, do not forget about name restrictions. The rest of the settings can be defaulted. After installing the server, you need to configure it for 1C. To do this, go to Start\Programs\db2\command line tools\command window. We write the following commands in the console:
db2set DB2_WORKLOAD=1C
db2set DB2_CREATE_DB_ON_PATH=YES
db2start
Now you can update the 1C platform. I hope you can guess how to do this. The only note is that when creating a user on whose behalf the 1C server will be launched, do not forget about name restrictions and add it to the db2admns user group. Well, check whether all 1C server processes have started normally (ragent, rphost, rmngr), if some process is not there, then create it in the 1C server console with default settings.
Now we need to create an empty database for loading. If it is in the list of databases and the DB2 username/password (from which the server is launched) is old, then we simply try to log into the database in configurator mode. If something has changed, then change the settings. When you log in, an empty database will be created.
3. And finally, let’s make the database work stably. We need a DB2 control center. First, we stop the 1C server so that we can restart the database without any problems. We go into the DB2 CPU (via the icon in the system tray or through Start). We find our database in the control center, connect and click the “Request” button in the database actions group. We run the following query:
update db cfg using APPLHEAPSZ 4096 APP_CTL_HEAP_SZ 4096 STMTHEAP 16384 logprimary 64 logsecond 128 DBHEAP 32768 logfilsiz 16384 LOCKLIST automatic immediate;
UPDATE DBM CFG USING MON_HEAP_SZ 200 FCM_NUM_BUFFERS 2048 immediate;
Don't forget after each ";" press . After executing the request, restart the database (via the context menu). Now DB2 is ready to work with 1C.
We start the 1C server again, go through the configurator to our database, and load the previously saved database copy file. Here you will have to wait, because... A large database can take a very long time to load. After loading, we turn on all the scheduled tasks and, voila!, we have a new platform on a new DB2 server.


