ota technology. How to update Xiaomi firmware via OTA update
Here's a clear demonstration of why iOS still rules.
Nowadays it has become fashionable to scold iOS, saying that it is slow, Apple is no longer a cake and, in general, everything is bad in the “Apple” world, while Android furiously steers, pedals and works very quickly. There is some truth in all this, but it is only a share. In righteous anger, you shouldn’t forget about the pros of one platform and the cons of another. To support this, I'll be sharing my fun adventures with upgrading my Nexus 6, which began when I bought it two months ago and continue to this day.
Reference Googlephone, including software
Readers unfamiliar with my work can easily suspect Roman Yuryev of thoughtless fanboyism in relation to Apple and its products. Friends remember that I always tried to treat both competing platforms equally and, even if I was not burning with a wild love for Android, I perceived it adequately. Here are examples:
However, iOS has always remained the main platform due to the fact that for me personally it is simply more convenient, it is more comfortable to work in it, plus the ecosystem (iPhone + iPad + MacBook), no matter how hackneyed it may sound. Yes, I experimented, arranged for myself to move to Android, but always returned to iOS, which I described in detail earlier:
Wherein always praised the Nexus series smartphones for their long-term and high-quality software support, comparing it with that of Apple. After all, devices are promoted and supported by Google itself, promptly receiving software updates for two or even more years. A good example is the 2012 model, which my wife owns and which is still vigorous compared to Android smartphones of the same period, but from other manufacturers. It's no longer official, but it was updated to Android 5.1.1 and continues to receive . It works quite quickly and my wife is quite happy with it as a dialer + mini-tablet.
Having experimented with Android devices from third-party manufacturers, I decided to purchase a reference “Google phone” in the form of Nexus 6. I really liked him when he and .

6-inch AMOLED display (I really like this technology and size) with QHD resolution, excellent design and, of course, always the latest Android on board. I just didn’t expect that the reference “Google Phone,” the “face of Android,” so to speak, could be so unstable and sad with standard firmware update functions. And, to be honest, this is my biggest disappointment in Google and its platform. But first things first.
OTA battle “iOS vs Android”
OTA is an abbreviation for " Over-The-Air”, that is, an “over-the-air” update, when the firmware is downloaded to a smartphone via Wi-Fi or a cellular network, after which it is automatically installed, saving all user data. This feature appeared in Android a little earlier than in iOS, which is why fans of the “robot” have been trolling iPhone/iPad owners for a long time. Although in the end, Apple's OTA implementation turned out to be better.
So, just the other day, almost all Apple devices were updated with software. Came out, and... I have five Apple devices: , and - they all updated within half an hour almost simultaneously. How the process happened:
- « Settings → General → Software Update → Install iOS 9.1» for iPad and iPhone.
- « Launch the Watch app on iPhone → General → Software Update → Install watchOS 2.0.1» for Apple Watch.
- « App Store → Updates → Install OS X El Capitan 10.11.1 update» for MacBook.
- 30 minutes and all gadgets are updated automatically. At the same time, I did not take any active part in the process, but simply drank tea and relaxed my brain after a hard day of work.
An OTA update came out a little later Android 6 Marshmallow for Nexus 6. How the process happened:
- The system reported that " there is an update, click to install».
- Clicked, went to the installation menu, clicked on the “ Download" and... bummer. Instantly it showed up Failed to load”, and the button changed its name to “Download again”.

I pressed the button many times, waited for several hours (suddenly there was a rush and all that, Google servers could not stand it) - no effect. I did not perform any manipulations with the system - neither root, nor an unlocked bootloader, nor even a third-party launcher. Everything is stock, clean and tidy. How did I solve the problem? I spent an hour, or even more time, installing the update via the lanyard, using the “Terminal”, Android SDK, ADB and the “sideload” command, manipulating the smartphone itself to enter it into the desired mode (such as DFU in the iPhone). In general, it was fun and a little later I will tell you how fun it was, but the adventures began much earlier. Literally right after I printed out the brand new Nexus 6 and turned it on, which happened in Moscow at one in the morning. If it weren't for that experience that cost me four hours hard work, then I would install the update to Android 6 much longer.
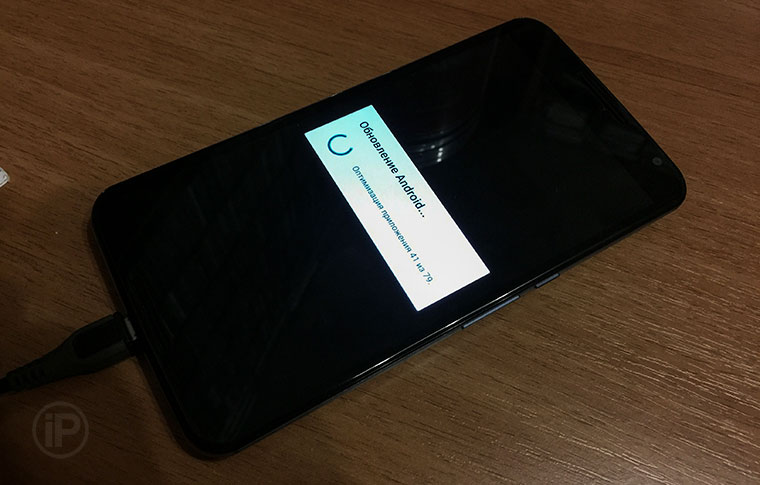
So what happened? I printed out the Nexus 6, turned it on, did some basic setup by entering my Google account. Then the operating system cheerfully told me: “ There is an update to Android 5.1, let's install it?" My soul felt good from the feeling that I had an Android smartphone in my hands with the best software support from the “Good Corporation” itself! Of course I agreed. The update was quickly downloaded from Google servers, the phone rebooted, the installation process began, everything was going well, but in the end I saw this sad picture:

I repeat, this is a brand new, clean flagship Nexus 6, on which the software downloaded by Google itself was installed. " Well, okay, suddenly there’s a small glitch. I'll reboot now and everything will work. As a last resort, I'll download the update again“, I thought and pressed the power button for a few seconds so that the device rebooted. How naive I was…
The system seemed to boot and began standard program optimization, which occurs every time after an OS update. Moreover, this process is very slow, even on flagship devices. In my case it took about 15–20 minutes. But he didn’t get to the end, on the 49th application the phone itself went into reboot and so on in a circle.
Owners of Apple smartphones also had incidents, I read about it, although I myself have not encountered any problems with OTA updating iOS devices, although I have been constantly updating them this way since the very moment the opportunity arose. What should an iPhone user do in this case? Connect your smartphone to your computer via a USB cable, launch iTunes and press one button “ Restore iPhone" After this, the required firmware will be automatically downloaded, installed, and if the person was not too lazy to make a backup copy of the data before, he will also successfully restore the address book, notes, SMS and information/settings from third-party applications.
What then does Google offer? Now I will tell you this anecdote, which has been going on for many years. After all, OTA support appeared in Android earlier than in iOS, but the Good Corporation still hasn’t figured out the emergency system.
Naive Roma went to the Google search engine with a request to restore the firmware in the Nexus, hoping that there was some simple one-button solution similar to that of Apple. Yeah, right now!
Here's a short summary of what my 3-hour adventures resulted in:
You need to download and install Android Studio
Then you will need to go to the hidden folder " Libraries", find there " Android\SDK\platform-tools" Sorry, you polluted the system with all this rubbish just for the sake of two files: adb And fastboot, which are used to manipulate the Nexus firmware.
You need to download the required stock firmware from Google Developers - there are a lot of them out there, you will have to choose carefully.After downloading, you will need to unpack it into a temporary folder, where you should also throw the files mentioned above.
To flash Nexus firmware, even with stock firmware, you need to unlock the bootloader.Firstly, load the Nexus in the “bootloader/fastboot” mode by holding down the “ buttons on the switched off device volume down + power».
Secondly, we check whether the computer sees the phone, for this in “ Terminal"go to the folder with the firmware and the files obtained above and enter the command " fastboot devices" If it shows the serial number of the connected phone, then everything is ok, you can move on and enter the command “ fastboot oem unlock", then reboot the phone with the command " fastboot reboot", and then put it back into flashing mode.
Now you can reflash the previously downloaded and unpacked stock firmware. Again through the "Terminal".And it turned out to be not as easy as I thought. You need to run the script " flash-all.sh”, who in theory will do everything himself, but he did nothing. The geniuses of Google did not add a couple of characters there before the fastboot commands, if my memory serves me correctly, these are “./”. Ok, I entered everything manually, saved the script, the flashing of the modem and something else began - in total, 5 or 6 files were uploaded in turn - but on the largest one, the operating system itself, an error was displayed. The phone was not reflashed and remained a “brick”.
I searched long and tediously for the reason, which turned out to be some incorrect version of the fastboot module. In principle, it’s my own fault, since I tried to save time and took the archive recommended in the instructions with a couple of the modules mentioned. In general, I installed Android Studio, took what seemed to be the correct files, but again there was a problem. The phone was not reflashed. And all this at 3 am. After a hard and stressful day. I didn’t want to abandon the process, because in the morning all the knowledge gained would be forgotten and I would have to put my brains back together again, and there was no time for that then. You need to do everything at once and forget.
Flashing all files one by one manually.Yes, I finally completed the process by finding another method where each firmware file is downloaded to the phone manually in a strictly defined sequence. After that, the phone came to life, it was already working on Android 5.1.1, I set everything up, installed applications and configured them too. (Normal data backup system on Android? No, I haven’t heard of it.) Everything about it still takes about 40 minutes of work. And then I discovered that instead of 64 GB the system sees 32 GB. It turned out that after flashing it was necessary to do the so-called “Wipe” - completely reset the smartphone, all caches, etc. Although this already happens during the firmware process.
Repeated Wipe.As you understand, I had to boot the phone in flashing mode, find the desired command in the service menu, reset the device, and then reinstall all my applications and configure the Nexus.
In approximately the same way, I had to install the Android 6 OTA update by downloading (it’s important not to make a mistake, since there is no “foolproof” there - if you fix something wrong, you’ll get a “brick”), installing Android Studio (since everything is superfluous I took it with pleasure after the adventures described above) and after working with the “Terminal”. Yes, it was much faster, and I didn’t have to reinstall all applications again, upload media content and configure the phone. But this operation is far from being for ordinary people.
How long, Google?
Why all this big text above? Firstly, I hope it helps some Nexus owners. Secondly, I wanted to show how BAD EVERYTHING is at Google with a seemingly basic function - restoring a phone after a failure that was caused by the company itself.
Okay, I’m an experienced user who knows how to work with Terminal, use Google search, and have repeatedly flashed smartphones on almost all current platforms. What should less experienced people do in this case? A person bought an expensive smartphone, the best from Google, with the best software support, and received a “brick” immediately after the first update. Let’s say he spent his time and took the device to a store/service/friend, they reflashed his Nexus, and then again it’s a bummer, since an important system update cannot be installed on the machine.
Against this background, friends, screams, they say, “ Apple is no longer the same», « everything is bad with the company», « iOS has gone downhill"and others look funny. Yes, I’m ready to pray to Apple for the fact that the company has been saving my time since 2008, when I transferred all my work to Mac and finally moved to the company’s ecosystem. How many branded laptops, operating systems, smartphones have been changed and I still have my workspace, content, applications, documents from those very days. I move to a new laptop using Time Machine or update OS X without any hassle at the click of a button. I change my smartphone to a new one and within half an hour, while I drink tea or coffee, I get all my applications, data and even “saves” in toys. Yes, I spent an order of magnitude more time and effort just moving between five Android smartphones than in seven years of working with two dozen Apple devices.
This article is devoted to the problem in which your Android phone or tablet does not want to be updated “over the air,” i.e. via WiFi. We will look at the main reasons and what to do in this case.
This article is suitable for phones and tablets of all Android device manufacturers: Samsung, LG, Sony, Huawei, Xiaomi, HTC, ZTE, Fly, Alcatel and others. We are not responsible for your actions.
Quite often there is a situation when Android is updated “over the air”. But not all users prefer such an OTA update, since it can be expensive when using mobile traffic and not secure. During the update, failures may occur (the update was not downloaded successfully, the battery is dead).
Let's look at how you can enable and disable Android updates over the air with or without root rights. We will also study the question of why the Android firmware is not updated via OTA.
First you need to do:
- Before updating the operating system, you should charge the gadget's battery 100%.
- Before starting the update, you need to save contacts, programs, information, etc. in a separate place. Often, after an update, all this can simply be lost.
There are the following ways to update Android to the latest version:
- Auto.
- Semi-automatic.
- Using a computer.
Why are there no updates on Android?
The most common reason why Android is not updated is that the manufacturer has stopped supporting the device and the gadget has become obsolete. Android developers are forced to work on the problem of compatibility with a large number of devices by creating additional drivers. Because of this, updates are often available only for the latest models of devices, the flagships of the series.
Other reasons for the lack of over-the-air updates include:
- Google services crash.
- Lack of memory on the device. There is simply nowhere for the update to install. In this case, a corresponding message appears.
- Hardware faults leading to failure of individual components.
- Use of unofficial software. Installing applications from dubious sources, installing custom recovery and firmware.
It is also important to understand that the new firmware is distributed gradually among users, starting from the region where the product is bound. Even if someone you know has already updated Android, this is not a reason to troubleshoot; you need to wait a little longer.
Increase
Only Nexus models in the line of different brands are updated in a timely and regular manner. Owners of other devices need to wait for information about whether the new version will support their gadgets, and when the update will be published - in a week or several months.
Automatic and manual Android updates
Often, a notification about the availability of updates appears while connected to the Internet. They can be downloaded and installed via mobile traffic or Wi-Fi. If other users have already installed new firmware, but nothing works for you, then you can request the update again:
- Open the settings.
- Go to the “About device” menu.
- Select "System Update".
- Click “Check for updates”.
If there are updates for the device, click “Download”. It is much preferable to use a Wi-Fi Internet connection. To prevent the gadget from running out of power when reinstalling it, when the battery charge is low, connect a charger to it.

Increase
If the update does not arrive, but your device model supports the new version, you need to force the update:
- Open the settings.
- Go to the "Applications" menu
- In the “All” section, open “Google Service Framework”.
- There you should erase the data and clear the cache.
- Check again for updates.

Increase
If the manufacturer supplies a proprietary control program with the device, then it can be used to receive Android updates. The screenshot below shows the Samsung Kies program. Other brands have their own software.

Increase
When connecting the gadget to Android, the program window will display a list of available updates that can be downloaded.
Using the Recovery Menu to install firmware updates
If all else fails, you can manually install the update by downloading the file from the gadget manufacturer’s website:
- Download the new official firmware to your computer. The firmware can be found on the manufacturer’s website page in the support menu for the tablet/phone model.
- We move the file with updates to the internal memory of the device or to a memory card.
- Turn on the device and go to the Recovery Menu. Often, to enter Recovery, the combination “Power button” - “Volume up” is used. If this combination does not work, you need to look at the combination for a specific model and manufacturer.
The Recovery menu is navigated using the power button and volume keys. To install the firmware, follow the steps:
- Select “Apply Update”.
- Click “... internal storage” or “Choose from sdcard” depending on the location where the update file was downloaded.
- Select the firmware file to start the installation process.

Increase
The gadget will reboot. You must ensure that there is enough charge to complete the installation. Otherwise, the system will not install correctly and will need to be reinstalled again.
Prohibiting Android updates over the air
The first method assumes that there are no root rights. The instructions are suitable for Android 5.X and higher:


Increase
The second method is relevant if you have root rights:

Allowing Android updates over the air
The first method assumes that there are no root rights. Instructions for Android 5.X and higher.
Very often you can come across such a situation as updating Android over the air, but not everyone prefers OTA updates due to the fact that it is very expensive for mobile traffic and is not very safe, since failures may occur during the update (dead battery, update was not downloaded successfully) .
If you do not want to receive these updates, then you need to disable them. You can learn how to do this from this article. You will be offered several methods to choose from by which you can easily disable or re-enable over-the-air updates if you have Root rights and if you do not have them.

Instructions for disabling over-the-air Android updates
Method number 1 (If you don’t have Root rights, hide the notification, Android 5.X and higher)
1. Pull the notification shade down;
2. Press and hold on the “Download update” notification;

3. Click on the “i” button that appears;
4. In the menu that opens, turn off all “Block all” notifications!

Method number 2 (If you have Root rights, disable)
adb shell su6. Then restart Android and your device will not receive updates.
Instructions to allow over-the-air Android updates again
Method No. 1 (If you don’t have Root rights, turn on notifications, Android 5.X and higher)
1. Go to the Android Settings menu -> Applications;

2. Find the application " Google Play Services" and go to it;
3. Enter notifications;

4. Activate notifications;

5. Reboot your Android device, after the notification the updates will be available to you again.
Method 2 (If you have Root rights, enable)
1. Enable software debugging USB to Android and connect Android to PC;
2. Then open the Adb Run program

3. Go to the Manual -> Adb menu and enter the following commands:
4. Then reboot Android and over-the-air updates will come to your device again.
Articles and Lifehacks
Periodic updates have long become an integral attribute of any operating system. Adding new functions, patching security holes, supporting new hardware components - not a single modern computer can do without this.
But mobile devices based on it have their own specifics.
A few years ago, the system was updated mainly by connecting it to a PC. It is clear that such a solution does not correspond to modern realities, so updates called OTA were introduced.
What it is
The abbreviation OTA comes from the English “Firmware Over The Air”, literally meaning “proprietary software over the air”.That is, in fact, it is a system for distributing updates from the developer to user devices through any Internet access channel supported by this gadget.
This could be Wi-Fi, 3G, LTE, theoretically even GPRS, if such a fantasy occurs to someone.
She performs a number of functions:
- Timely informing the user about available updates.
- Ensuring that the necessary data is downloaded to the device.
- Checking the possibility of installing a patch on a given OS version and smartphone or tablet model.
- Carrying out the installation process, and if necessary, maintaining the ability to rollback.
What does all this mean for the user?

The developers made sure that the number of necessary actions was kept to a minimum. Therefore, the procedure is not too different from what is usual, for example, when installing software updates for Windows.
In the settings menu of any gadget there is always an item “About phone” or “About tablet”. In addition to a variety of useful (or not so useful) information, there is a “System Update” section, where you can find a button to check for patches.
If they are available, it will be enough to click “Update” - the system will do everything else itself.
When over-the-air updates are not possible
When performing certain actions on your device, the user must understand that this may cause OTA updates to become unavailable.Otherwise, he will be unpleasantly surprised. The fact is that when installing patches, the integrity of system files, the authenticity of the OS version, and the presence/absence of some “holes” in the security of the device are checked.
OTA updates will not be installed if:
- A custom or developer version of the firmware is installed.
- The device has been rooted - superuser rights have been obtained.
- The bootloader has been unlocked.
- Any system files installed by the OS have been changed.
Is it worth installing them?

Horror myths floating around the Internet unanimously assure: this can be dangerous, the gadget may not boot at all after installing the update! It's better not to take risks!
In practice, everything is not at all so gloomy. Yes, no one is immune from problems during updates, even the wonderful iOS operating system.
But even more or less serious consequences are exceptional, and not installing patches is as “reasonable” and “prudent” as refusing to fly just because planes, you see, sometimes crash. More problems can result from unclosed “holes”.
It should also be remembered that one-time total installation of updates by manufacturers is quite rare. Initially, after testing is completed, the patch is applied to a small number of users chosen at random - about 1%.
If no complaints are received, a message about the availability of the update is sent to another 25%, then to 50%, and finally to all owners of devices of the corresponding models.
Yes, there is a chance that you will end up in the “lucky” 1% who received a faulty archive, but in any case, the manufacturer will fix the identified problem as soon as possible.
Finally
It is not only possible, but also necessary to update the system, and therefore, if there is a corresponding message, you should devote a little time to this issue.You should definitely make sure you have a stable Internet connection, because archives can be quite heavy.
And for those who for some reason lost the opportunity to install an OTA update, we can only wish that they knew what they were doing and what consequences this could lead to.
We talk about the technology for updating smartphones and tablets over the air.
As we know, all software products are subject to regular updates. Developers of operating systems and other software strive to improve, optimize and make them more functional. The Android operating system is no exception. Since its release (2008), it has received a huge number of updates. All of them related to bug fixes and functionality improvements.
Google has chosen to update its operating system exclusively via the Internet - it is called OTA or over-the-air update.
What is an OTA update?
OTA is an abbreviation for the English words “Over The Air”, which translates as “by air”. To get a new shell for Android, you do not need to connect it to your computer to install new files - just a connection to the Internet or Wi-Fi network. This is a huge plus for owners of official versions of Android, since the improvement and optimization of the operating system occurs automatically and does not require user involvement.
Pros and cons of over-the-air updates
After downloading a package of new files, the operating system will definitely ask the user when to install them - now, at night or later. It would seem like a complete convenience, but why do some users prefer to disable the ability to update? The fact is that owners of mobile devices try to save space in the system memory, and updates often take up more and more space.

But there is another danger. Software downloading during wireless updating is not scheduled, while the Android device can be connected to the Internet either through a mobile network channel or via Wi-Fi. In the second case, the process of background downloading is welcome, since the speeds are high and the cost of tariffs is low. As for the first option, receiving an update brings with it a lot of inconvenience, since there is a sudden depletion of the mobile traffic limit allocated under the tariff plan.
In this case, the speed of web surfing may drop significantly or video viewing may slow down, since the downloaded update “pulls” all the speed onto itself. In this regard, in the device settings, you can select the option “download updates only when connected to a Wi-Fi network.”

Sometimes it happens that a user heard an announcement about the release of a new version for Android and wanted to get it. But when I try to check the update through the device settings, I find that it is empty. There is a lot of information on the Internet about how to speed up the process of receiving an OTA update using standard means. For example, this is resetting data in the Google Services Framework system application or sending USSD codes with a certain combination of numbers and characters.
But it is important to understand: developer reviews indicate that such actions are unlikely to have a good effect on the stable operation of the device in the future. In most cases, the update will change something minor: the appearance of application shortcuts, improvements in energy saving and performance. Due to such minor changes, it is better to wait for the new firmware to download automatically in a timely manner rather than jeopardize the correct operation of the operating system.


